Integrating ChatGPT into .NET MAUI from Scratch

Learn how to implement ChatGPT into your .NET MAUI app in five simple steps—it’s easier than you think!
Artificial Intelligence (AI) is a powerful tool that allows us to create smarter applications, providing superior features to our users. You might think that integrating AI into your .NET MAUI apps is challenging, but this article will show you how simple it is! You will learn how to incorporate OpenAI’s ChatGPT APIs into your .NET MAUI apps from scratch. 😎
1. Generate the OpenAI API Key
⚠️ Before proceeding to the first step, you need to have an OpenAI account. If you don’t have one yet, please spend a few minutes creating one.
We need to generate an API key, which is an essential component for using OpenAI services, such as ChatGPT, DALL-E and all other AI models available through this API. To achieve this, apply the following steps:
➖ Go to the API Keys configuration, and click on Create new secret key button.
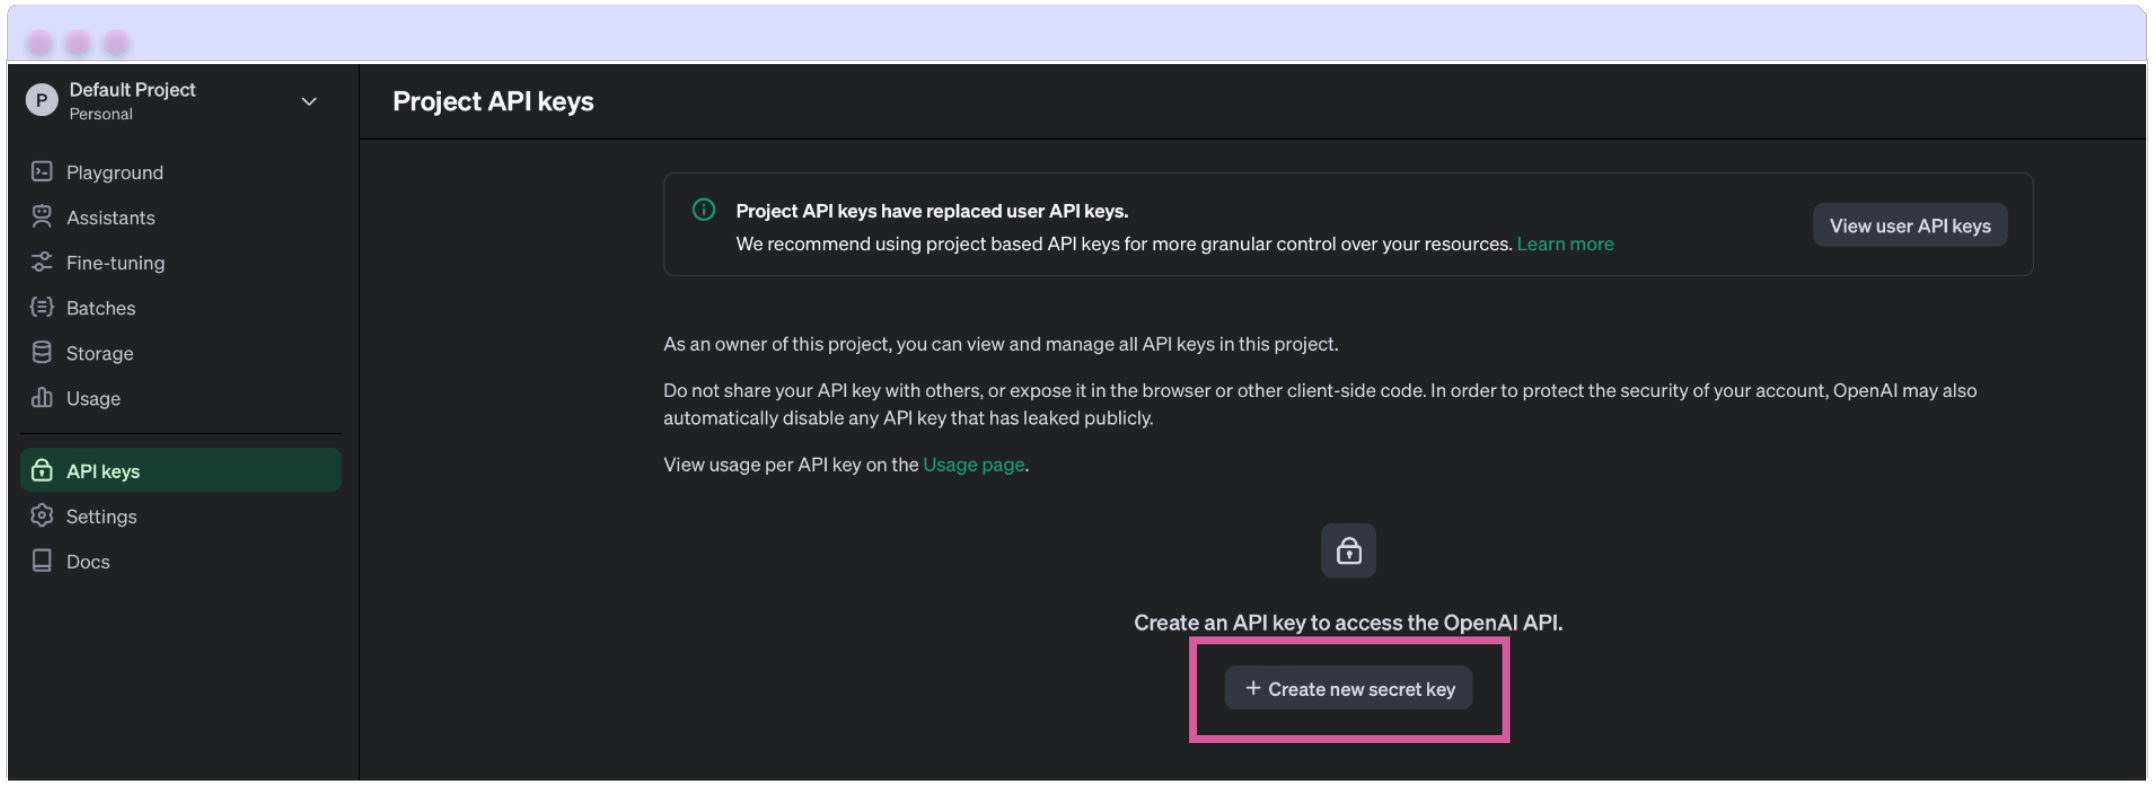
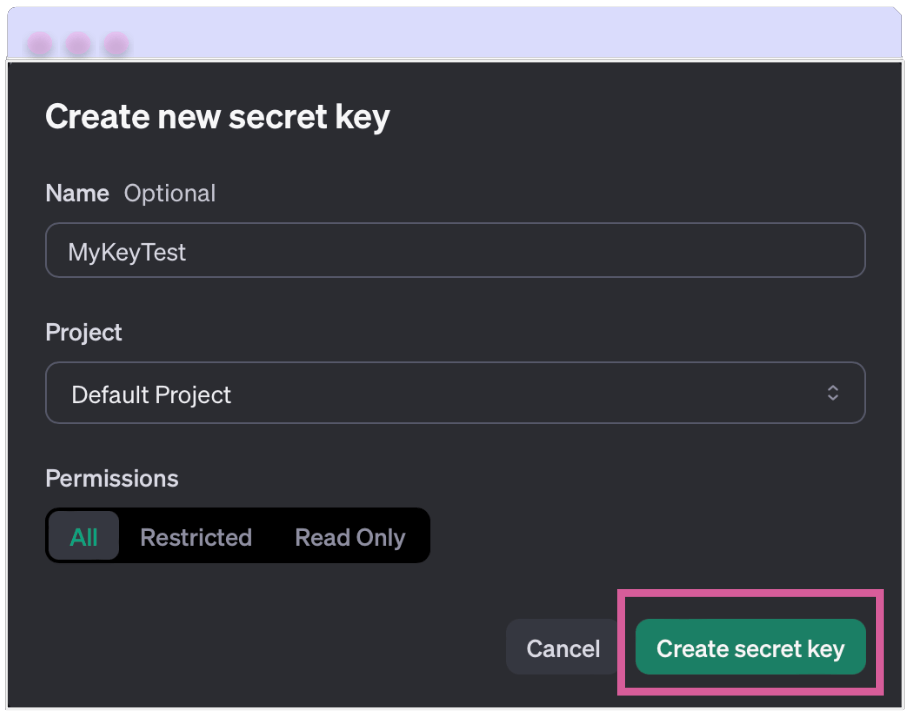
➖ To create the key, you need to fill in the following fields:
- Name: Optionally (but preferably), name your key. For this exercise, I’ve named mine MyKeyTest.
- Project: Specify the project owner of the key.
- Permissions: Set your desired permissions. In my case, I have given all permissions.
Once you’ve filled in these details, click on the Generate secret key button.
➖ A box containing your secret key will appear next. It is crucial to keep this key in a safe and accessible place. Due to security reasons, you will not be able to recover it if lost and will need to generate a new password instead.
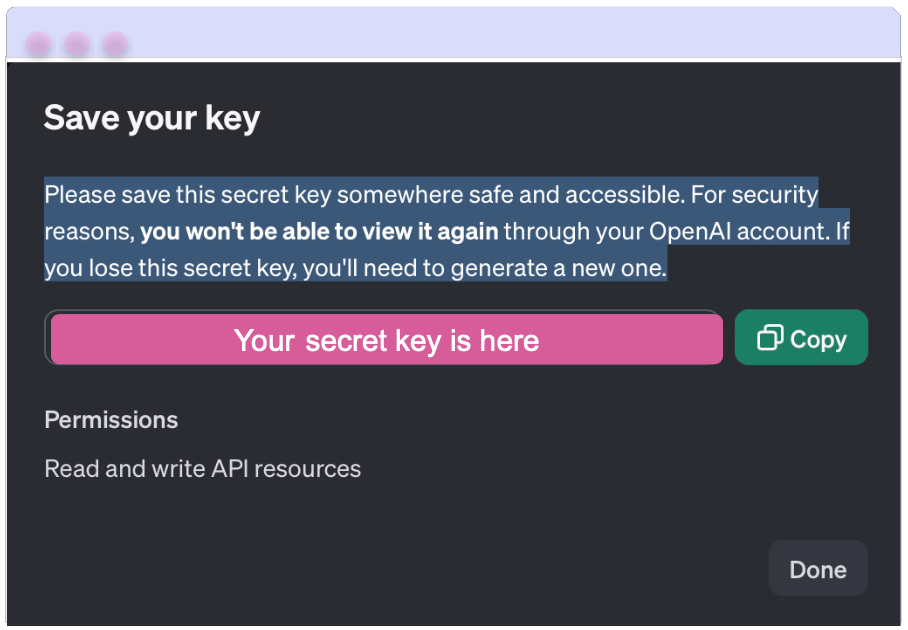
That’s it! Your API Key is now ready! 😎 Let’s move on to the next step!
2. Set the Environment Variable
You’ll need to set an environment variable containing your API key. In this example, we’ll use the OPENAI_API_KEY environment variable. Please note that this example is purely educational, and there are more secure ways to store your key. The official documentation suggests reading the article Best Practices for API Key Security.
So, let’s learn how to configure this for both Windows and Mac:
![]() On Windows – Using PowerShell:
On Windows – Using PowerShell:
- Open PowerShell and use the
setxcommand to set the environment variable. Replace<your-api-key>with the key you generated in the previous step.
setx OPENAI_API_KEY "<your-api-key>"
- This action will permanently set the
OPENAI_API_KEYenvironment variable. Be aware that you must restart PowerShell or any currently open command prompt windows for these changes to take effect.
![]() On Mac – Using the Terminal:
On Mac – Using the Terminal:
Begin by opening the terminal. We will add the variable to your shell profile file to retain the environment variable for all future terminal sessions.
Depending on your shell, the configuration file will vary:
- For bash (used in macOS Mojave (10.14) and earlier versions), use either ~/.bash_profile or ~/.bashrc.
- For zsh (default in macOS Catalina (10.15) and later versions), use ~/.zshrc.
You can add the variable by executing the following command. (Remember to replace <your-api-key> with your actual API key.)
echo 'export OPENAI_API_KEY="<your-api-key>"' >> ~/.zshrc
After completing the previous step, reload your profile to apply the changes using the following command:
source ~/.zshrc
To verify that the OPENAI_API_KEY was saved correctly, use the following command:
echo $OPENAI_API_KEY
And that’s all! Alternatively, if you’re using bash:
echo 'export OPENAI_API_KEY="<your-api-key>"' >> ~/.bash_profile
source ~/.bash_profile
3. Build the Project
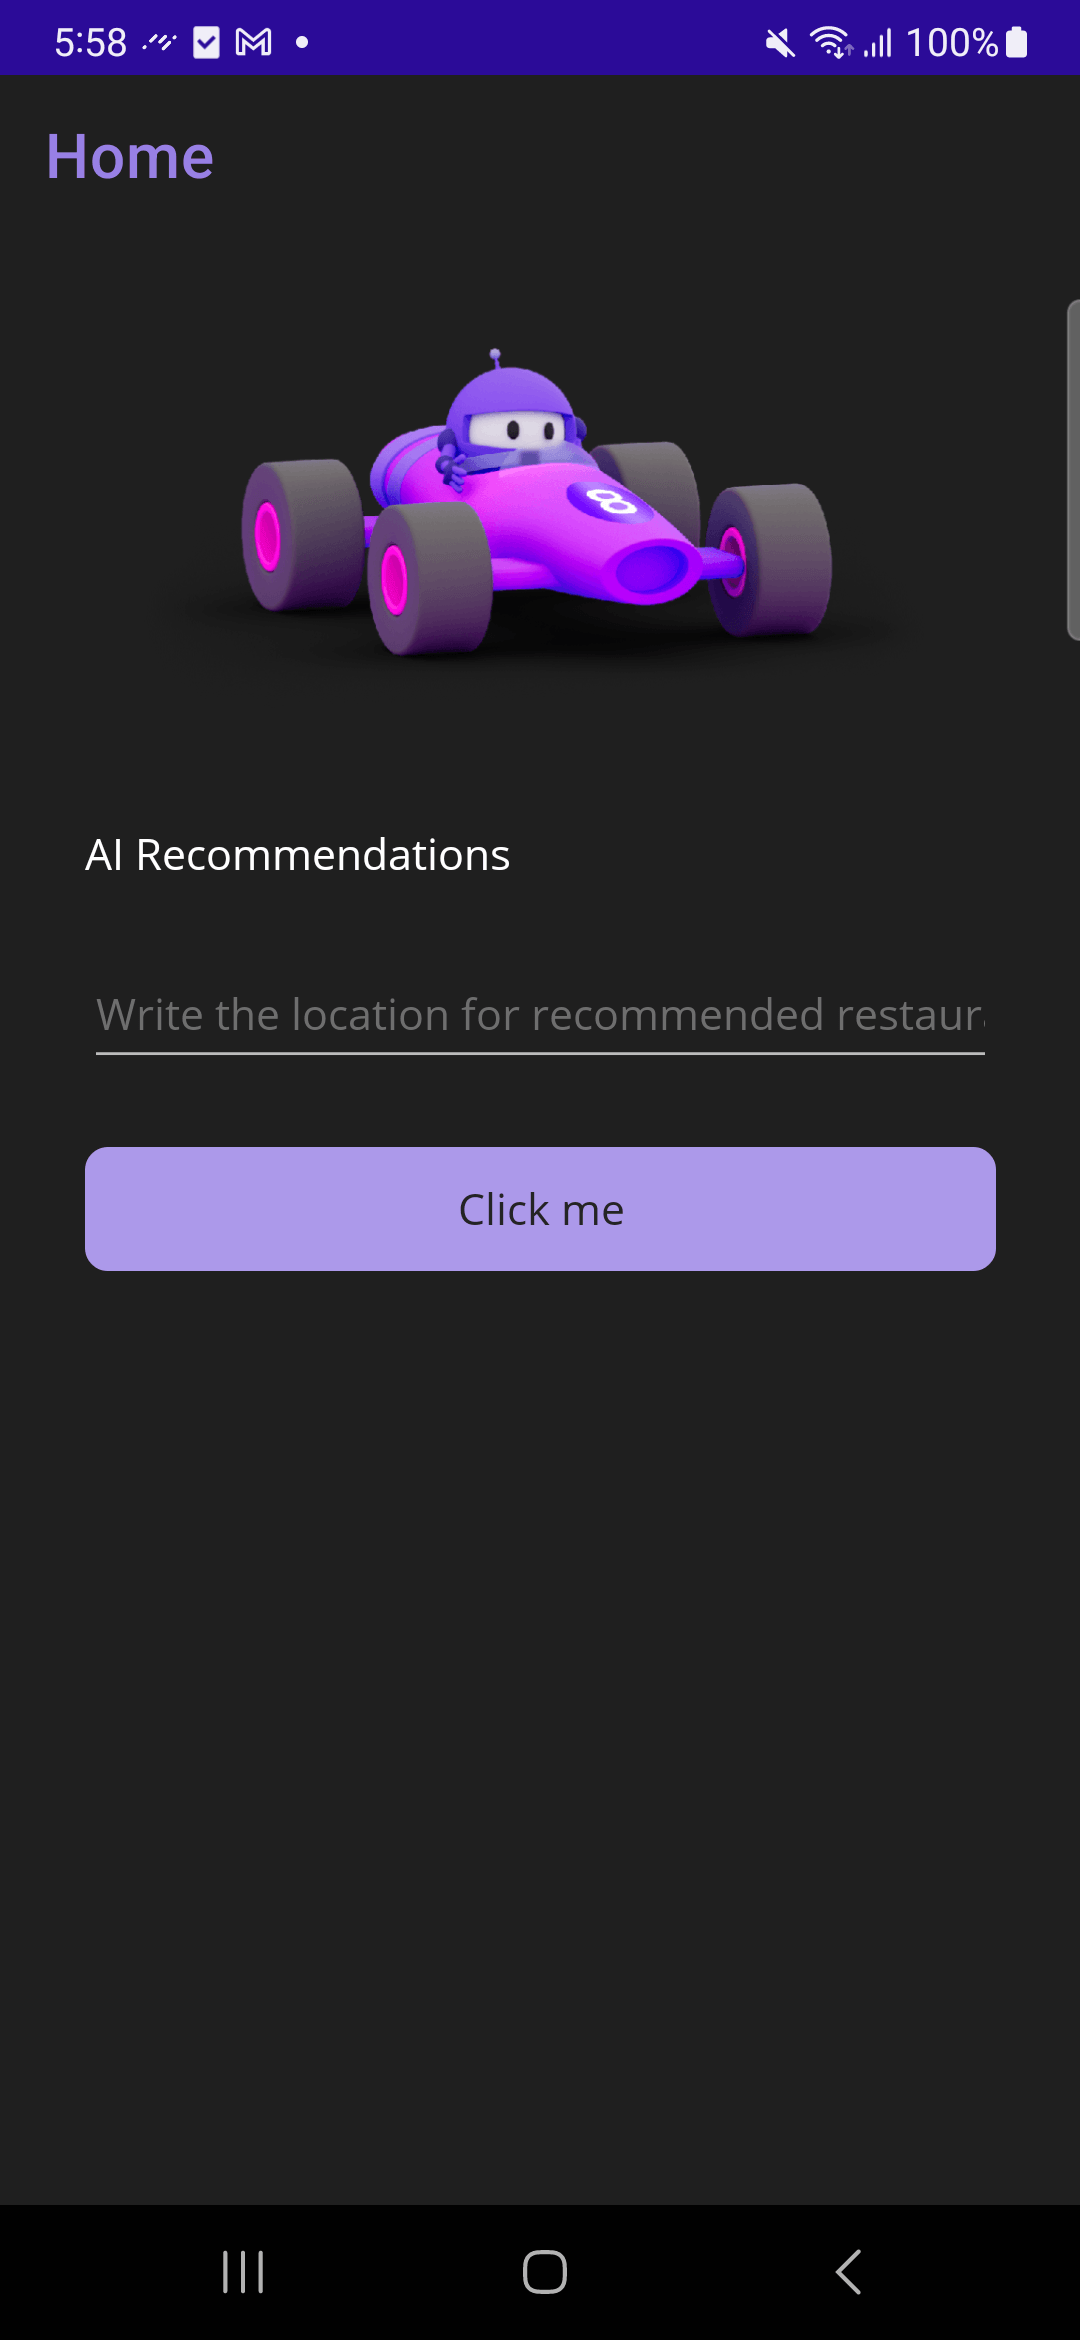
Now we are going to create a basic UI which will allow interaction with OpenAI. This example will primarily demonstrate how to get restaurant recommendations based on the location that you want.
That’s why we will create a screen named MainPage.xaml with the following elements:
- Decorative Image
- A label for the title
- An entry field to input the location for which you want a restaurant recommendation
- A button that triggers the API call through a click event
All these elements will be inside a VerticalStackLayout. Let’s see the XAML:
<VerticalStackLayout
Padding="30,0"
Spacing="25">

    <Image
    Source="dotnet_bot.png"
    HeightRequest="185"
    Aspect="AspectFit"/>
    <Label Text="AI Recommendations"/>

    <Entry x:Name="LocationEntry"
		    Placeholder="Write the location for recommended restaurants."/>

    <Button Text="Click me"
		    Clicked="OnRestaurantRecommendationClicked"/>

    <Label x:Name="lblRecomendations"/>

</VerticalStackLayout>
And, let’s create the event handlers for the button in the MainPage.xaml.cs.
private async void OnRestaurantRecommendationClicked(object sender, EventArgs e)
{

}
✍️ Note that it is marked as asynchronous because we will be making asynchronous calls to the Azure.AI.OpenAI library.
Your result should look like the following image:
4. Initialize the Azure.AI.OpenAI Library
The Azure.AI.OpenAI library provides the .NET API for making calls to the OpenAI and Azure OpenAI APIs. This library was developed by the Microsoft Azure team, and it is currently in pre-release.
To add it, open the NuGet package and search for the Azure.AI.OpenAI library. Since it is in pre-release, check the box that says “Include prereleases.”
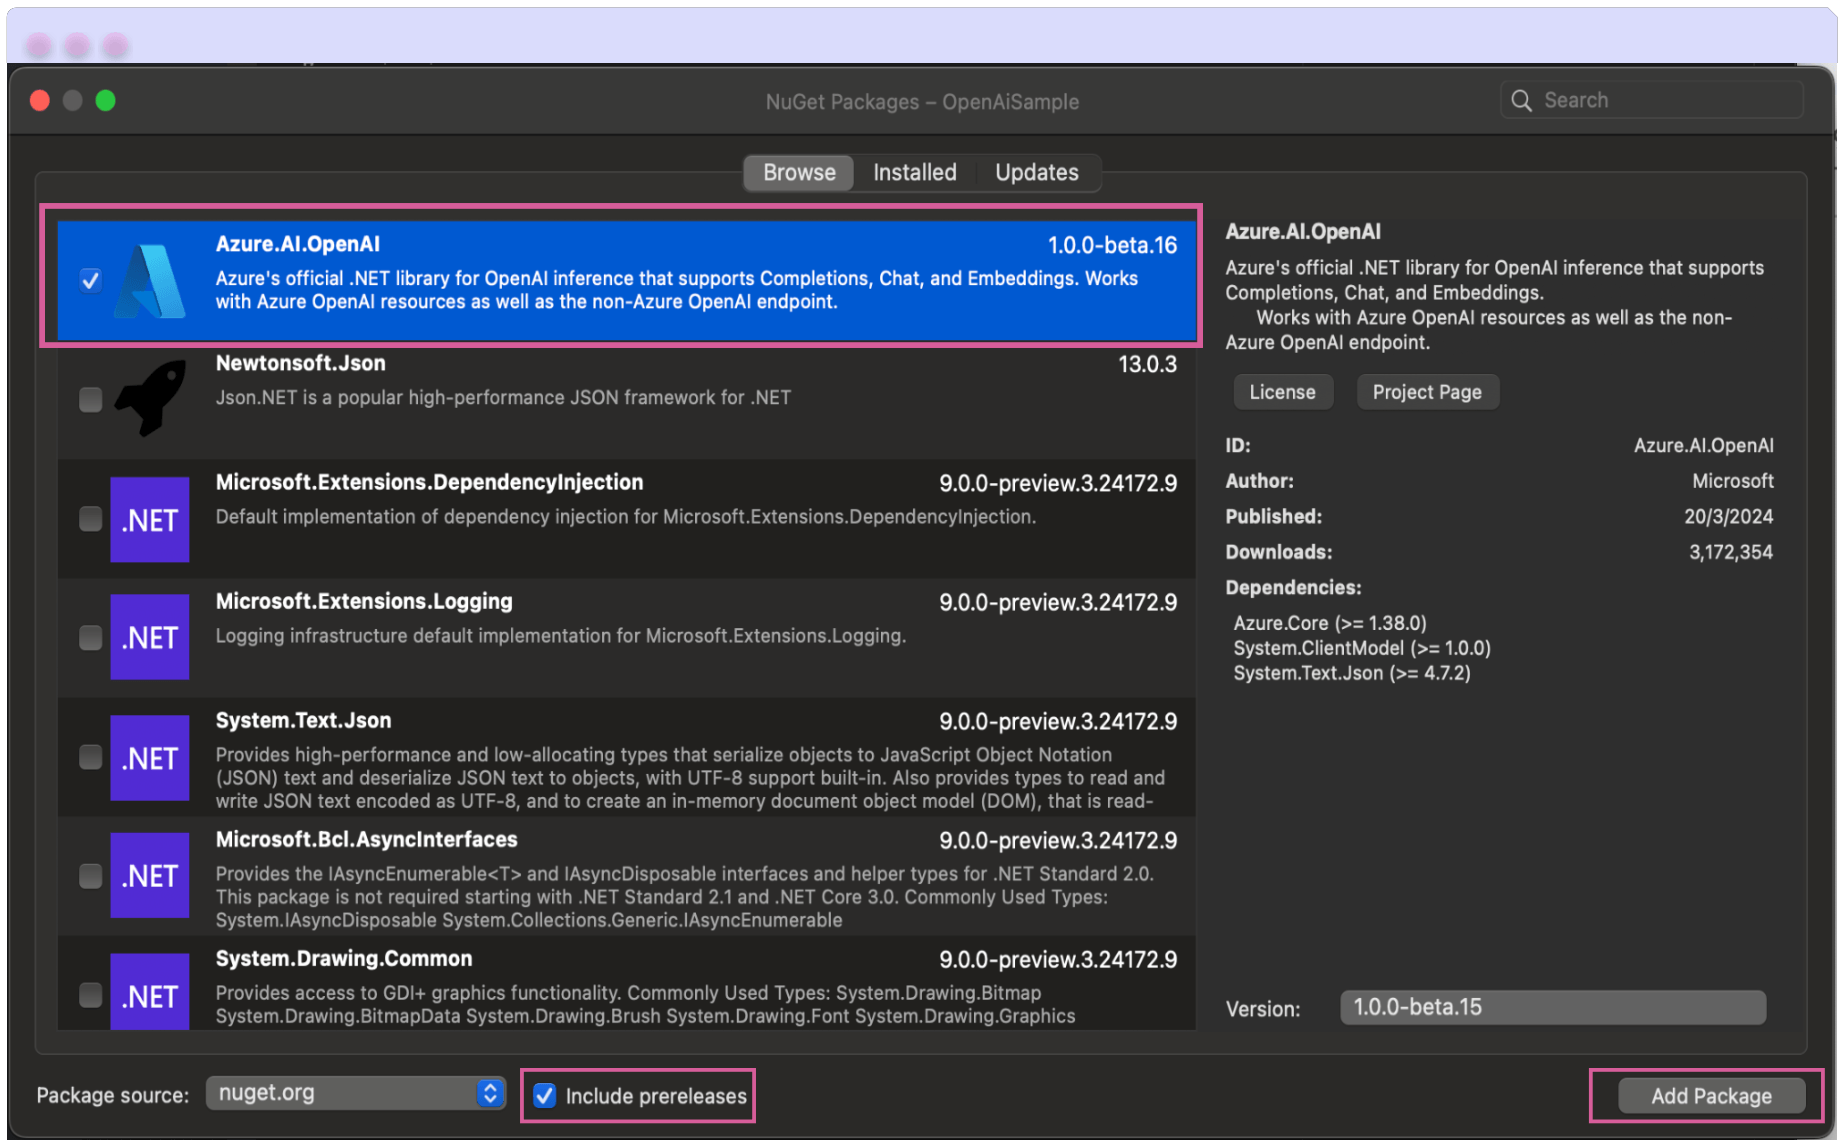
⚠️ If you choose to use PowerShell, you can execute the following command:
Install-Package Azure.AI.OpenAI -IncludePrerelease
Let’s integrate the Azure configuration in your MainPage.xaml.cs
- You need to add the following
usingstatements at the beginning of MainPage.xaml.cs file:
using Azure.AI.OpenAI;
using Azure;
- At the top of the file, include code to initialize the Azure OpenAI library with your API key.
➖ The first variable, of type OpenAIClient, is used to store an instance of the API client. This client will interact with the OpenAI service, and for this example, it’s named _chatGptClient.
private OpenAIClient _chatGptClient;
➖ Next, let’s continue with the variable that will store the key we generated earlier:
private string openAIKey = "<your-api-key-here>";
➖ For now, we’ll leave this variable as null because we’ll be using the OpenAI API for our example. However, you can add any endpoint you need, including one for the Azure OpenAI API.
private string openAIEndpoint = null;
- Time to create the loaded method.
In the same file, we’ll create the MainPage_Loaded method. This is responsible for initializing the Azure OpenAI library. After creating this method, include it in the MainPage constructor so that it will be invoked each time the page loads.
Below, I demonstrate how to create this method and integrate it into the constructor. I also show how your code should look after implementing all the previous steps.
using Azure.AI.OpenAI;
using Azure;

namespace OpenAiSample;
public partial class MainPage : ContentPage
{
    private OpenAIClient _chatGptClient;
    private string openAIKey = "<your-api-key-here>";
    private string openAIEndpoint = null;

    public MainPage()
    {
	    InitializeComponent();
	    this.Loaded += MainPage_Loaded;
    }

    private void MainPage_Loaded(object sender, EventArgs e)
    {

	    _chatGptClient = !string.IsNullOrWhiteSpace(openAIEndpoint)
		    ? new OpenAIClient(
		    new Uri(openAIEndpoint),
		    new AzureKeyCredential(openAIKey))
		    : new OpenAIClient(openAIKey);
	    }

    private async void OnRestaurantRecommendationClicked(object sender, EventArgs e)
    {


    }

}
5. Add ChatGPT API Calls
Let’s create the GetRecommendationAsync method. This will allow us to execute the recommendation logic and use it later in the button click event we created previously.
➖ The GetRecommendationAsync method should be asynchronous, return a Task and accept a string as a parameter. This string will be the text we receive for recommendations. Within this method, you’ll find different commented lines. These lines represent the necessary code, which we will break down step by step. You can identify each step through the corresponding comment.
private async Task GetRecommendationAsync(string recommendationType)
{
    // 1. Validating Entry's information
    // 2. Adding ChatCompletionsOptions
}
➖ Validating Entry’s information: Confirms that Entry contains information before making the API call. If not, it displays an alert.
if (string.IsNullOrWhiteSpace(LocationEntry.Text))
{
    await DisplayAlert("Empty location", "Please enter a location (city or postal code)", "OK");
    return;
}
➖ Adding the ChatCompletionsOptions: This is a class that customizes chat requests sent to the OpenAI API. It configures the API’s processing and response to user-provided input data, also known as prompts. It receives the following parameters:
▪️ DeploymentName: This accepts a string as a value, referring to the name of the deployment (model) you want to use.
▪️ Messages: This function accepts a collection of ChatRequestUserMessage objects. In this example, we use a specific text to precisely request restaurant recommendations based on a given location:
string Prompt = $"What is a recommended {recommendationType} near { LocationEntry.Text}";
Though we only utilize the message in this example, I encourage you to explore other data types that can be sent to provide a richer context to the API.
▪️ ChoiceCount: Accepts an Int value, representing the number of recommendations you want to receive from the API.
▪️ MaxTokens: Accepts an Int value, which represents the maximum number of tokens (words) you want the API to return in the response.
string prompt = $"What is a recommended {recommendationType} near {LocationEntry.Text}";

ChatCompletionsOptions options = new()
{
    DeploymentName = "gpt-3.5-turbo",
    Messages = { new ChatRequestUserMessage(prompt) },
    ChoiceCount = 3,
    MaxTokens = 100,
};
▪️ Lastly, we will receive the response from the API. This response will be a Response<ChatCompletions> object, and thanks to this we will be able to show the information obtained in the lblRecomendations label.
Response<ChatCompletions> response = await _chatGptClient.GetChatCompletionsAsync(options);

lblRecomendations.Text = response.Value.Choices[0].Message.Content;
If you applied all the steps, your method GetRecommendationAsync should look like the one below:
    private async Task GetRecommendationAsync(string recommendationType)
    {
	    if (string.IsNullOrWhiteSpace(LocationEntry.Text))
	    {
		    await DisplayAlert("Empty location", "Please enter a location (city or postal code)", "OK");
		    return;
	    }

    string prompt = $"What is a recommended {recommendationType} near {LocationEntry.Text}";

    ChatCompletionsOptions options = new()
    {
	    DeploymentName = "gpt-3.5-turbo",
	    Messages = { new ChatRequestUserMessage(prompt) },
	    ChoiceCount = 3,
	    MaxTokens = 100,
    };

    Response<ChatCompletions> response = await _chatGptClient.GetChatCompletionsAsync(options);
    lblRecomendations.Text = response.Value.Choices[0].Message.Content;

}
To complete our implementation, we simply need to invoke the GetRecommendationAsync method in the button click event. In this example, I have directly passed the recommendationType parameter, which enables us to seek recommendations within the restaurant category.
private async void OnRestaurantRecommendationClicked(object sender, EventArgs e)
{
    await GetRecommendationAsync("restaurant");
}
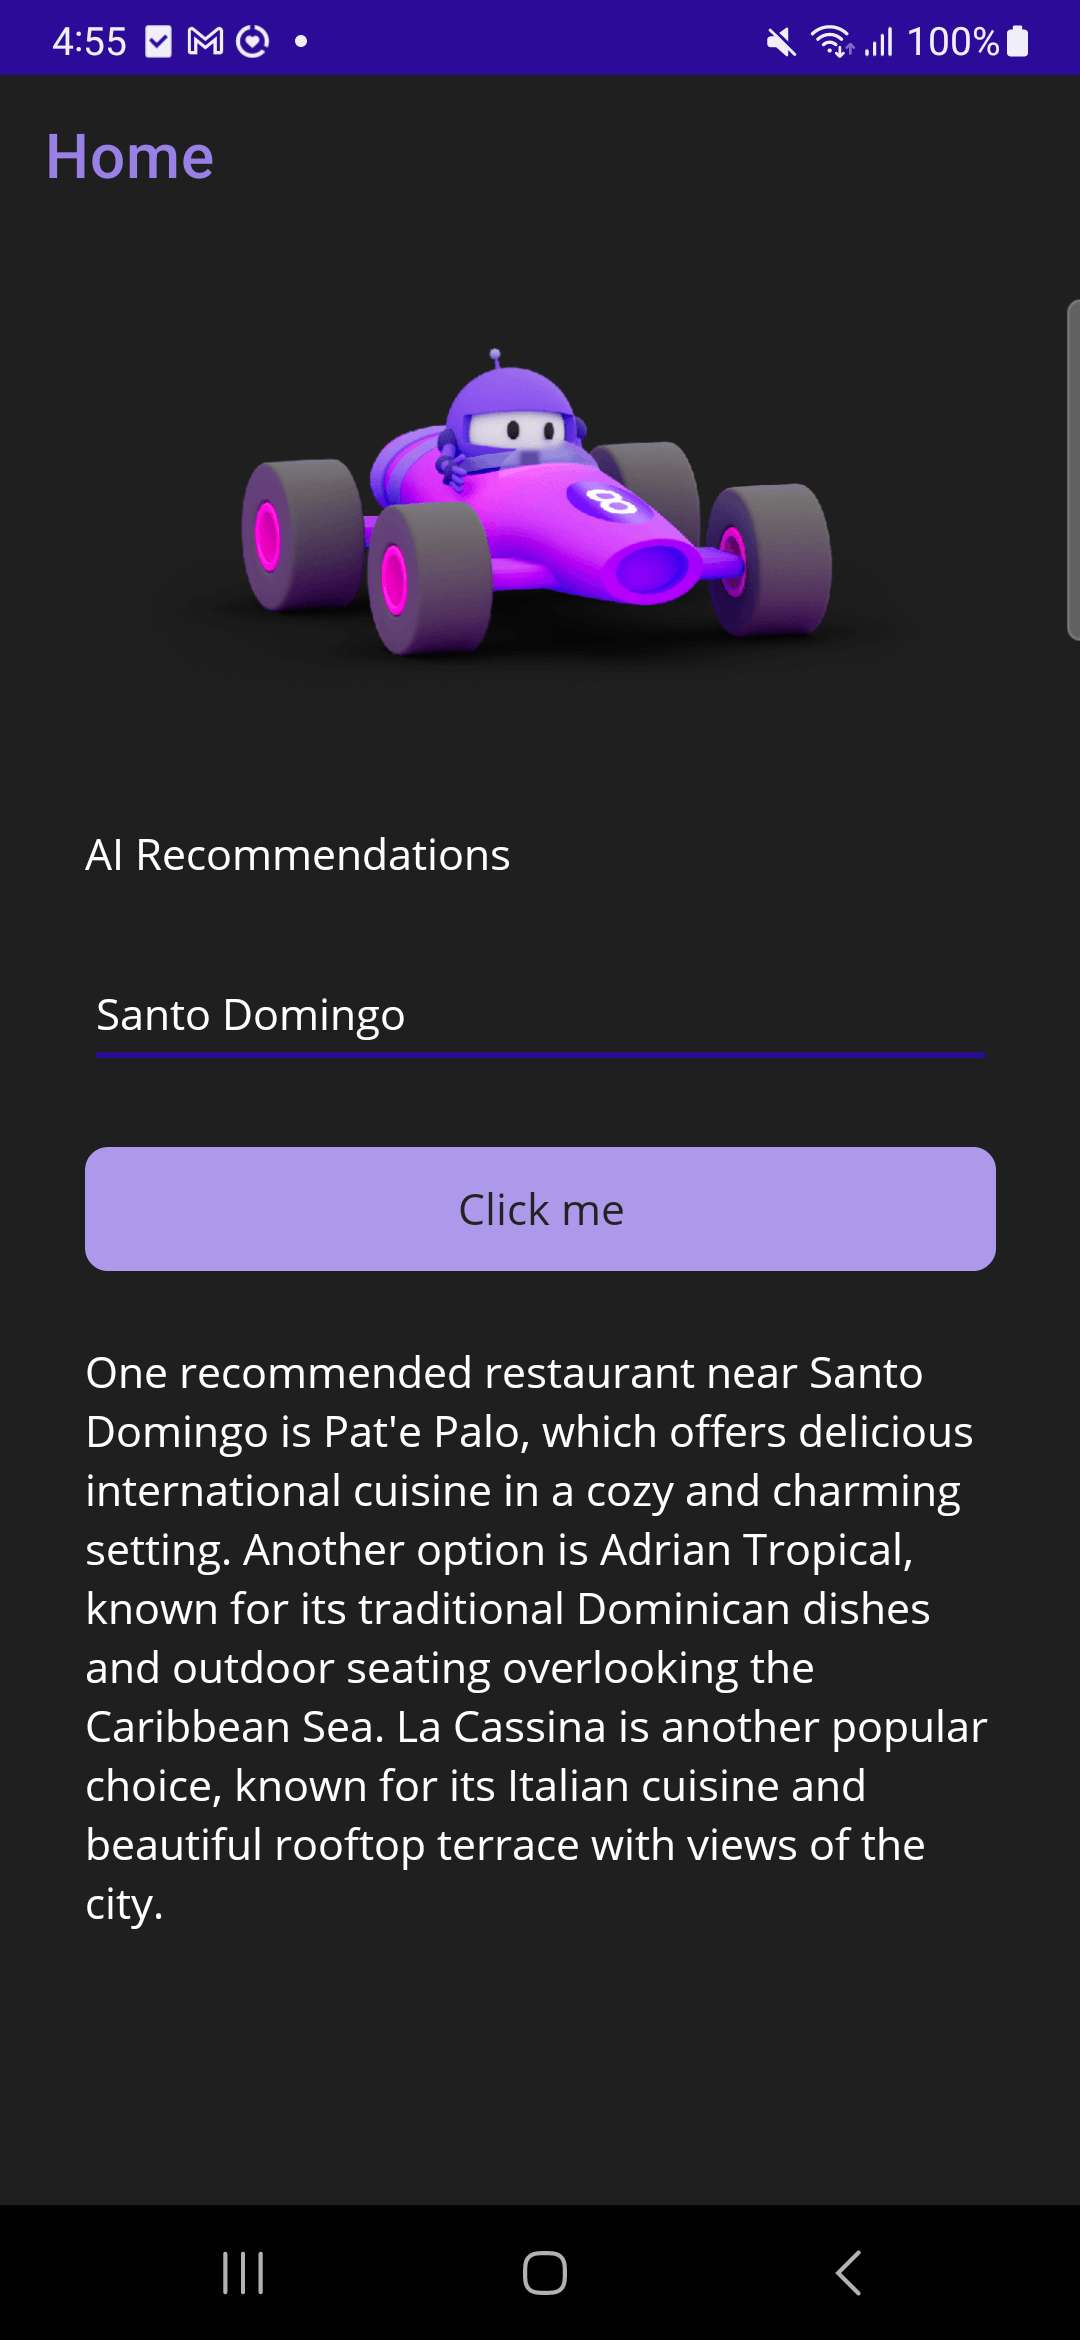
We’re ready! Below is an image of the restaurant recommendations that the AI has given me for Santo Domingo!
Conclusion
We’ve developed a straightforward app that prompts you for a location and suggests restaurants when you click the button. This is all integrated with the ChatGpt OpenAI API!
I hope this article helps you understand how to incorporate AI into your .NET MAUI apps in the future. 💚💕
See you next time! 🙋♀️
References
This article was based on the official documentation:

Leomaris Reyes
Leomaris Reyes is a Software Engineer from the Dominican Republic, with more than 5 years of experience. A Xamarin Certified Mobile Developer, she is also the founder of Stemelle, an entity that works with software developers, training and mentoring with a main goal of including women in Tech. Leomaris really loves learning new things! 💚💕 You can follow her: Twitter, LinkedIn , AskXammy and Medium.

