First Look & Overview of Web Live Preview by Telerik UI for ASP.NET AJAX

Summarize with AI:
Are you ready to find out what’s cooking on the ASP.NET Web Forms scene and how it will impact the web development in Visual Studio 2019 and beyond, and particularly the Telerik UI for ASP.NET AJAX suite?
If you are curious to learn, check out this blog post where we will take a tour in the following topics:
What Is Web Live Preview?
Web Live Preview (WLP) is a Visual Studio (VS) add-on that enables real-time mapping between your source code and the rendered HTML in the browser. When viewing your web app, you can select elements in the browser just like in DevTools and the IDE will automatically show you the code that was executed to generate the element. And vice versa: If you edit the source in VS, the web app will automatically be updated. The idea of the tool is to be accessible (a trend across the whole Microsoft portfolio) and to follow the modern web standards.
That’s not all. WLP allows you to configure the settings (properties, databinding and so on) of the ASP.NET Web Forms components. This is applicable for the Telerik UI ASP.NET AJAX controls as well, allowing you to configure them directly from your browser via the provided Action Panel (Tasks menu with control’s properties—very similar to the smart tag we are already familiar with the VS Designer). Isn’t it great and time-saving?
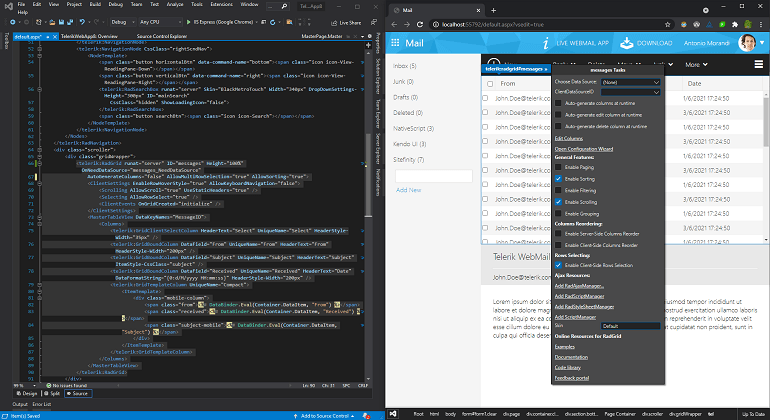
It is also worth mentioning that, unlike the VS Designer which is heavily outdated, Web Live Preview will receive full support and updates in the future versions of Visual Studio. The community is already asking and hoping to get Web Live Preview enabled for other web project types like Blazor and ASP.NET Core, where the tool is not yet available and its potential and usability will be huge.
How To Try It Out
Follow the steps below to play with the tool:
Setup (Download and Install)
You can obtain and install the WLP add-on from the Visual Studio marketplace:
- Use the web-based marketplace or the “Manage Extensions” marketplace integrated in Visual Studio -> go to Extensions -> Manage Extensions -> type “web live preview” in the Search box and hit Enter.
- Install the tool.
Tip 1: To complete the installation, you will be requested to restart Visual Studio.
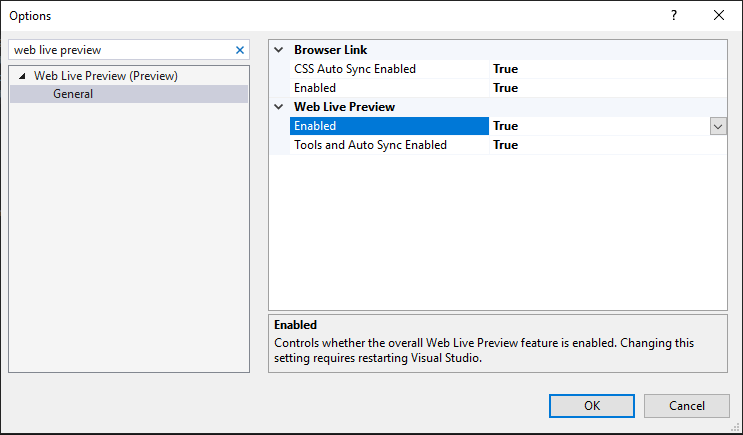
Tip 2: To ensure that the tool is installed and enabled, go to Tools -> Options -> type “web live preview” in the Search Options field -> press General -> make sure that the Enabled and Tools and Auto Sync Enabled features are turned on:
 General. Browser Link options: both CSS Auto Link Enabled and Enabled are set to true. Web Live Preview options: both Enabled and Tools and Auto Sync Enabled are set to true." title="Enable WLP from Visual Studio Options" sfref="[images|OpenAccessDataProvider]64d70f2b-e4b7-44dd-8fc6-80852569ea01">
Using the Extension
Once installed, the WLP give you a new “Edit in Browser” right-click option within the context menu of ASPX page in the Source mode as well as in the Solution Explorer:
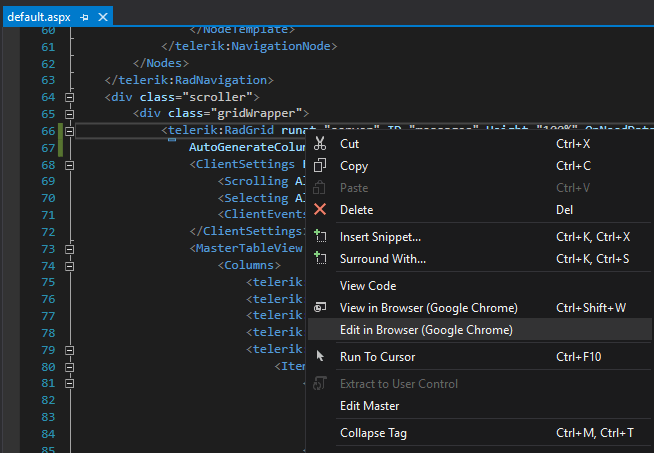
This option will load the page in a special mode within your default browser, where you can select elements and Web UI controls with the mouse and modify their properties and text:
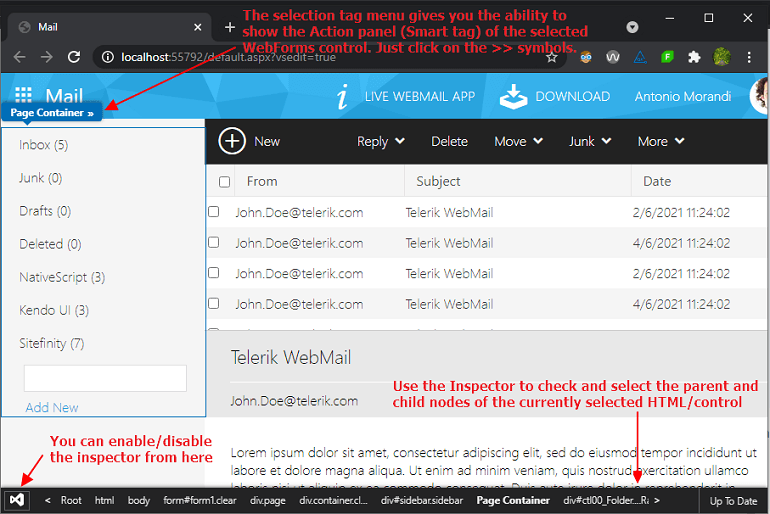 >'. Overlay text points to this tooltip and says, 'The selection tag menu gives you the ability to show the Action Panel (Smart tag) of the selected WebForms control. Just click on the >> symbols.' In the lower left, overlay text is point at the VS logo: 'You can enable/disable the inspector from here.' And lower right, pointing at div#ct100_Folder..., 'Use the Inspector to check and select the parent and child nodes of the currently selected HTML/control.'" title="Web Live Preview UI Structure" style="vertical-align: middle;" sfref="[images|OpenAccessDataProvider]a6a4d4cc-fda2-4fab-be08-95eb4785abc9">
The selection in the browser is automatically synchronized within your source code in Visual Studio. If you select a UI control in the page, for example RadGrid (more on it in the next section) or asp:DataGrid and change its properties from the WLP Action Panel, the properties will be reflected to the Source right away. The opposite is valid too—the changes in the source will be reflected in the browser too.
Integration With the Telerik ASP.NET AJAX Controls
It is a real honor for Telerik team at Progress to take part in this important and useful opportunity and be among the pioneers in introducing support for Web Live Preview for the Telerik UI for ASP.NET AJAX toolkit.
Let make a quick demo on the current level of support:
- Start a new Telerik C# Web Forms Application and choose the Outlook-inspired template as a base (a prerequisite is to have installed the Telerik AJAX VSX Extensions).
- Once you have the project created and loaded within Visual Studio, right-click over the Default.aspx page and choose the “Edit in Browser” (your default browser) option from the context menu. This will load the page along with Web Live Preview enabled in the browser.
Tip: For better visibility on machines with a single screen, you can split the screen between Visual Studio and the browser by pressing Windows key + Left (for the IDE to get left-positioned) and Windows key + Right (for the browser to go to the right). - Example 1: Insert RadTextBox and RadButton in the source page, select them in the browser on the right and change some of their core properties from the Action Panel: Text and ButtonType. Notice how the properties get applied automatically in the source:
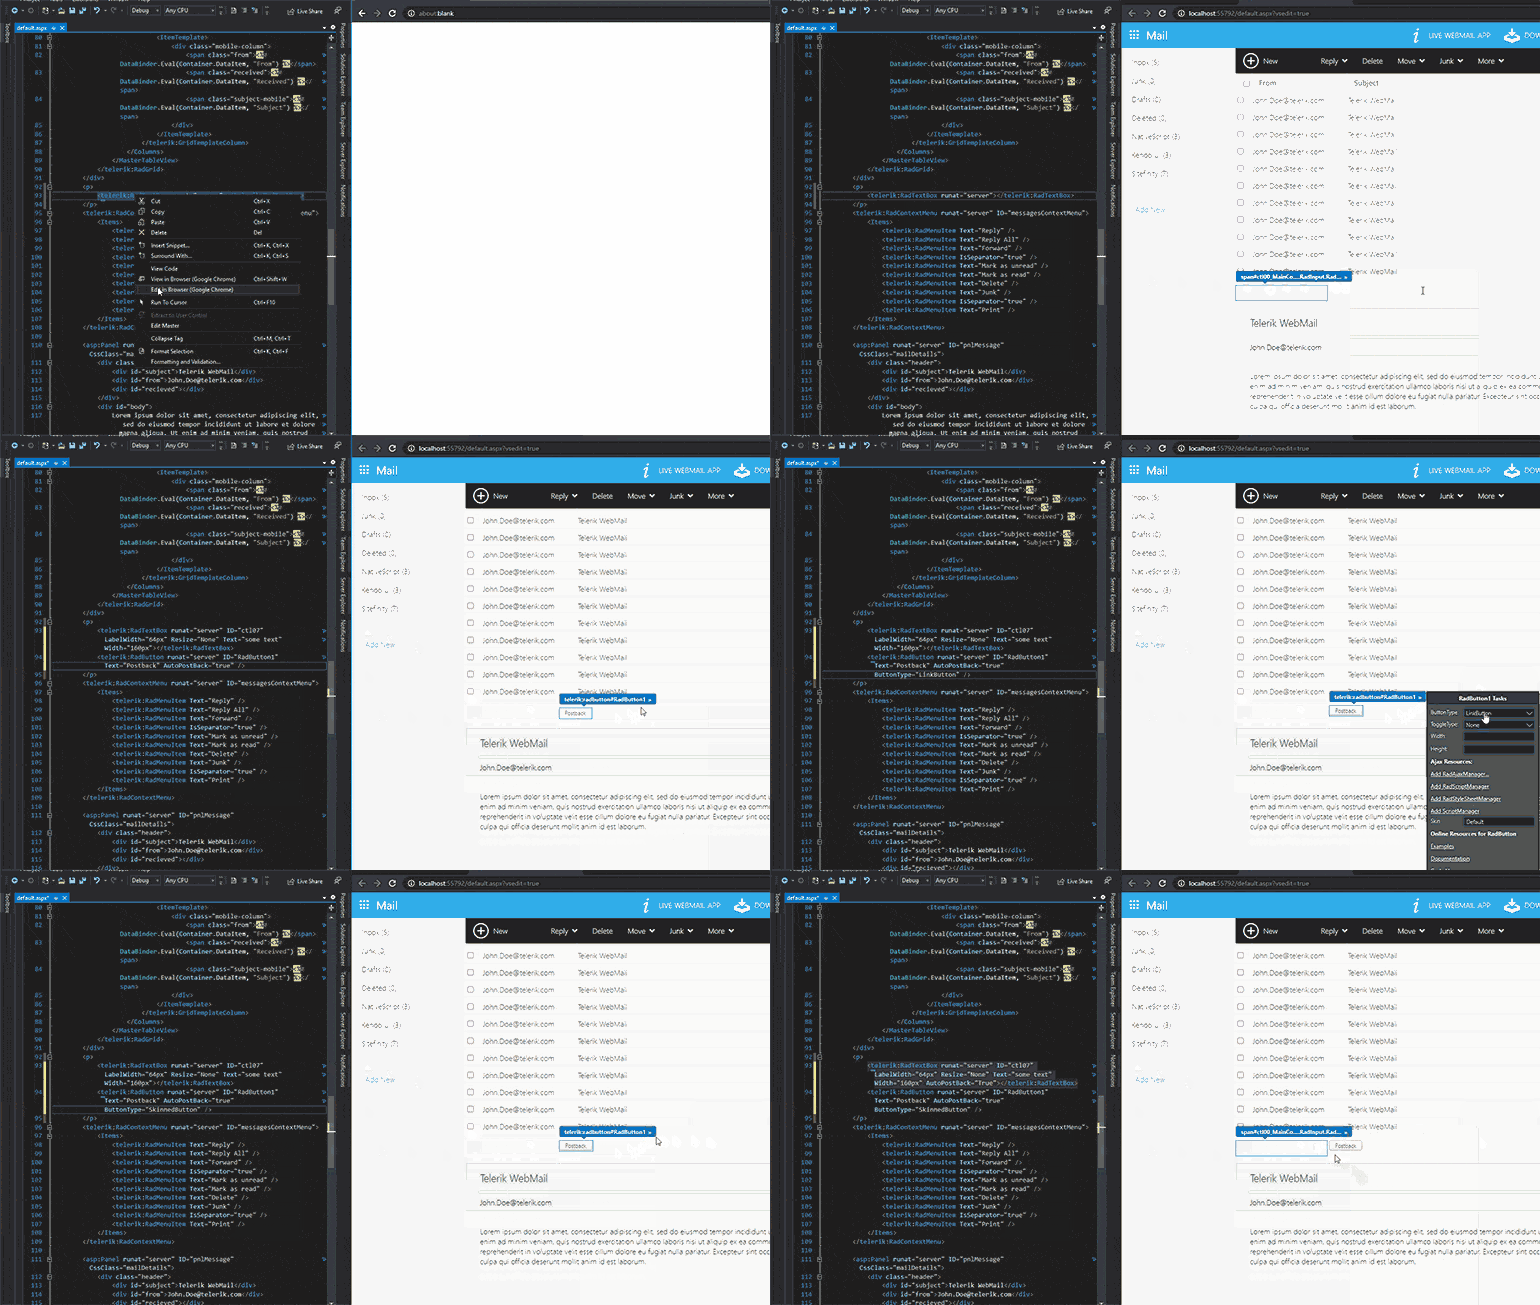
Figure 1: Web Live Preview allows you to change the properties of Telerik components through the browser.
Since it is a two-directional process, if you edit the property values in the source, they will be updated in the Action Panel too.
- Example 2: Examine and play with the WLP Action Panel of RadGrid and the other databound components. Go to the browser, select the RadGrid control and press the >> button in the tag selector to show its Action Panel. Check the available configuration settings for the web control and try to change its DataSource. You’ll see that the databound option will appear in Visual Studio for further configuration.
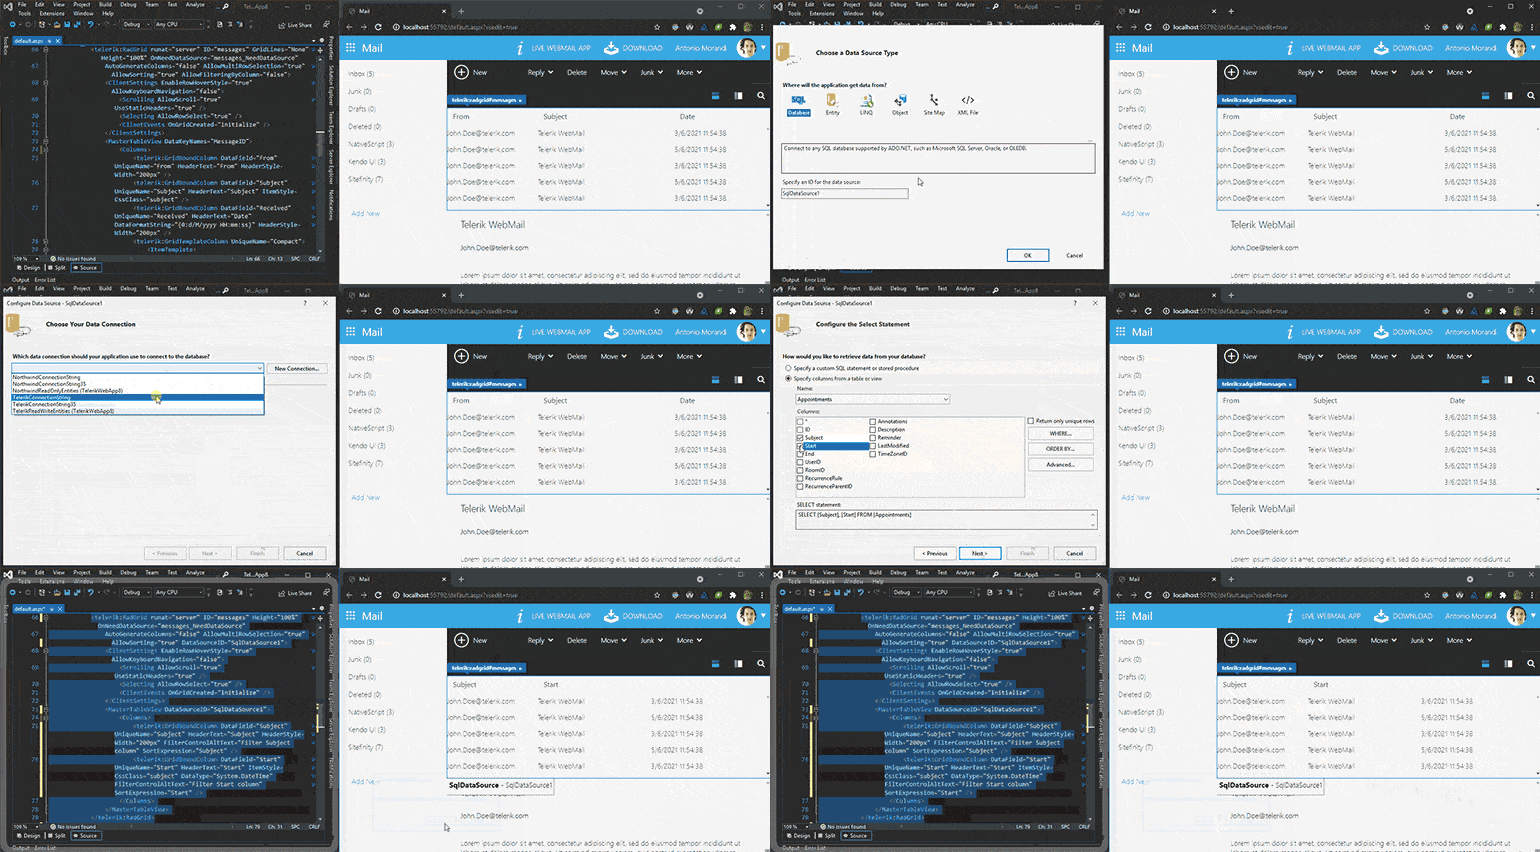
Figure 2: Bind RadGrid through the Web Live Preview Action Panel.
- Example 3: CSS Auto-Sync feature—when WLP is enabled, if you change a CSS file that is being used, updates will be pushed automatically:
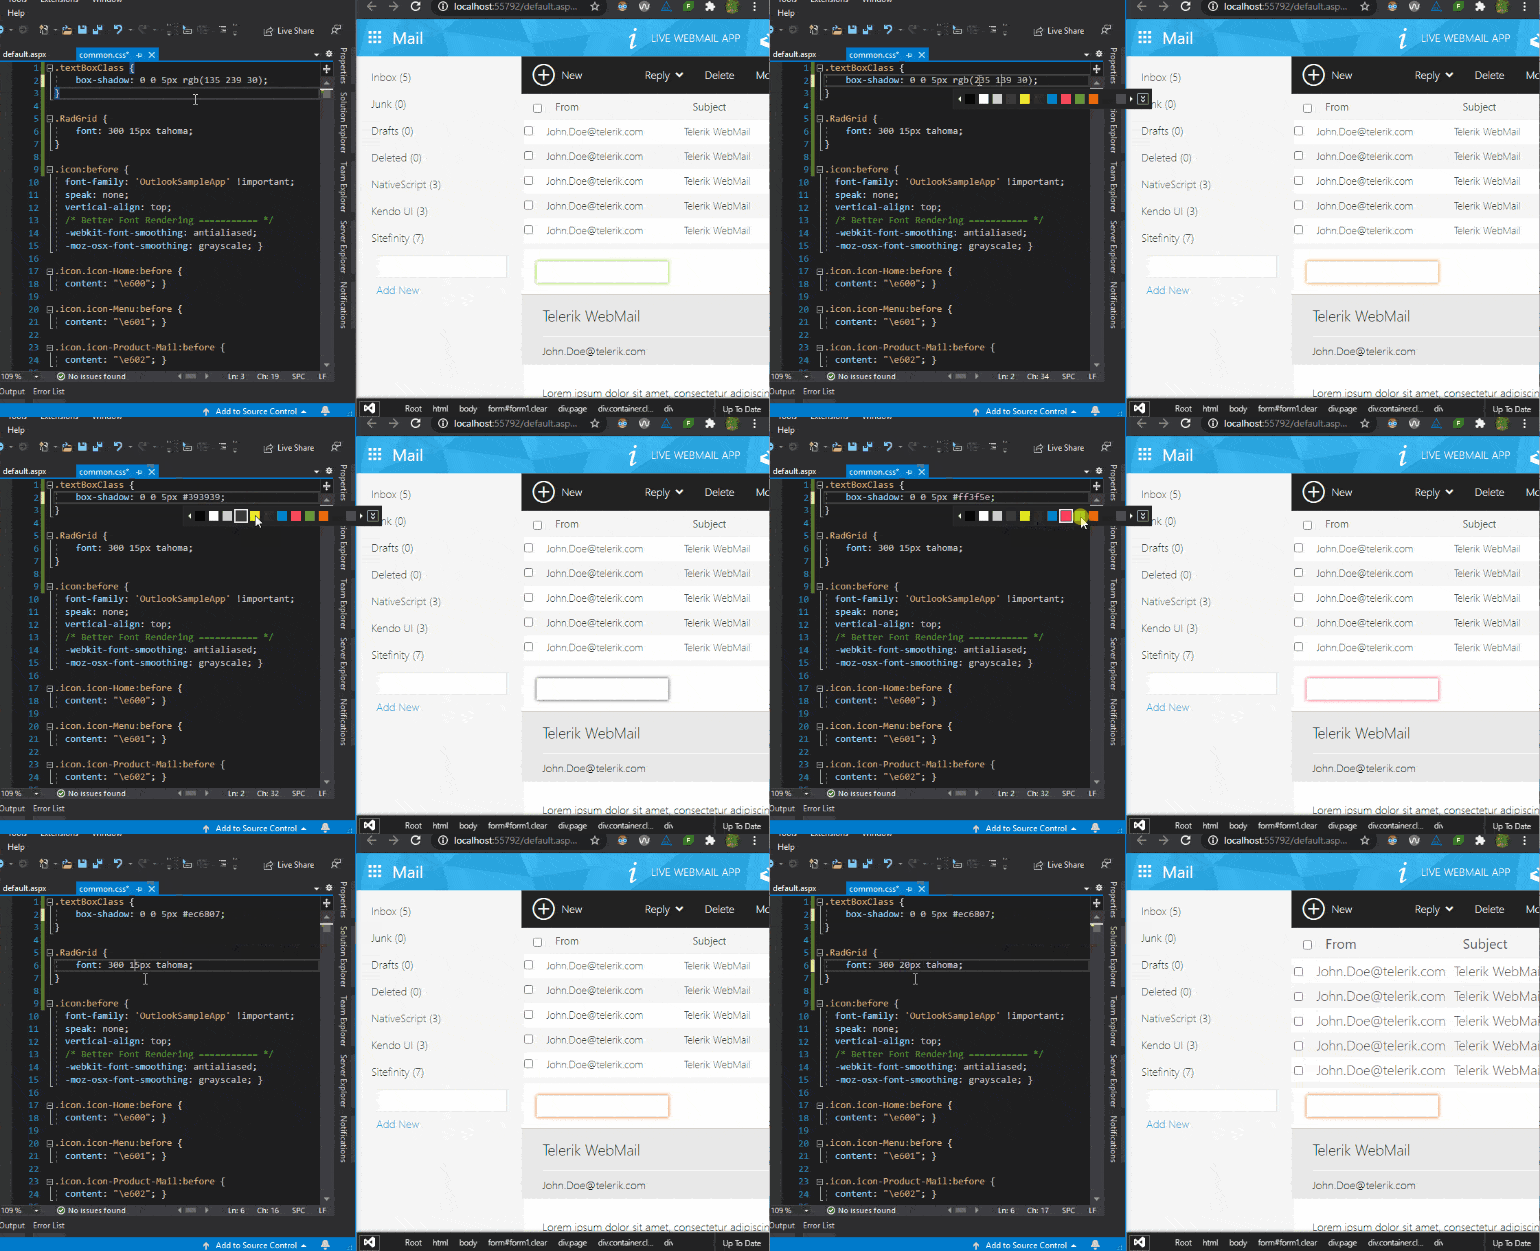
Figure 3: CSS Auto-sync in action.
- Something that I noticed during my tests was that the default behavior of the Designer to attach its default server-side handler when you double-click on a control is also supported by WLP.
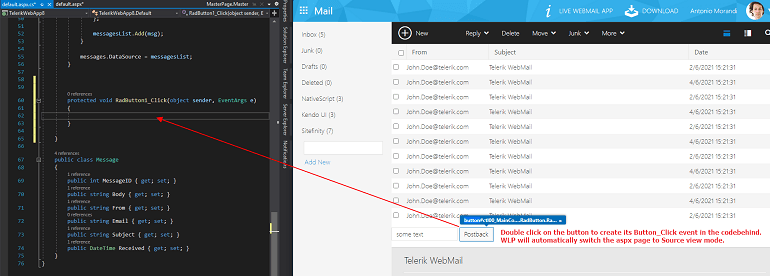
Example 4: Locate the RadButton control in the web page and double-click it. This will immediately create RadButton1_Click event and automatically show it in the codebehind page.
Tip: The double-click on containers like div, span and paragraphs makes it editable and allows you to write and edit the text inside, which gets synced with the aspx page when you blur the editable field.
Try It Out and Let Us Know What You Think
While the WLP is currently in preview stage, Microsoft is devoted to its quality, and I can confirm that many reported bugs were fixed in a relatively short time during our collaboration with them. The tool already offers a good level of support for many Telerik UI for ASP.NET AJAX controls and allows configuring their settings directly from the browser. Some of the features like the custom editor for setting the Skins are currently in development and others still are not available or don’t yet work. This, of course, is temporary and about to change in the upcoming updates of the tool.
Here is the moment to invite everybody who’d like to take part in improving Web Live Preview to let us know by opening a General Feedback ticket from your Telerik.com account. The sole prerequisite is to have an existing ASP.NET Web Forms application with up-to-date Telerik ASP.NET AJAX components you’d like to share with us for testing purposes. Of course, we will be glad to receive any feedback you may have so that we can share it with WLP team and help them out making the tool usable for every developer in the Microsoft ecosystem.
Find More on WLP
Let me give you a few more resources for WLP that you might find useful:
- Introducing “Web Live Preview” (the official Microsoft blog)
- Download, Install and Release notes of the Web Live Preview extension (VS Marketplace)
- ASP.NET Community Standup—Web Live Preview (Video Presentation)

Rumen Jekov
Rumen Jekov (@Rumen_Jekov) started his career at Telerik’s ASP.NET team in 2004 as a tech support engineer and passed through the position of a team lead to a product manager. He has answered more than 51,500 tickets helping customers to achieve their goals. Presently, he is a product owner of Telerik UI for ASP.NET AJAX and a manager of the AJAX crew at Progress. Off work, he enjoys traveling across the globe, watching movies and tech shows, reading books and listening to podcasts.
