
Firebase Authentication Using a Custom Token

Summarize with AI:
In this post, we will implement Firebase authentication in a NextJS App using a custom token.
Whenever a user authenticates successfully with the Firebase backend, a JWT (JSON Web Token) is issued to the user to manage their session. Customiszng the token creation process allows programmers to provide users with Firebase authentication using authentication providers not natively supported by the platform—for example, Instagram. It also allows them to offer unique experiences to users, both client and server, by determining who gets to see or access what, as the case may be.
From within a simple Next.js app, this post describes how to build a simple authentication system that allows a user to exchange their login details for a custom token that will be created from our server. The token will be signed with custom claims, sent to the frontend, and then used to authenticate the user. Since we will focus more on the frontend, we will also describe how to retrieve and customize our client UI based on the token’s contents to the signed-in user.
Prerequisites
To follow along with this tutorial, you will need to have the following:
- A Google account
- A basic understanding of the Next.js framework and TypeScript
- Basic knowledge of Firebase and its services
- A code editor
Project Setup
Open your terminal and run the following command to set up a Next.js application configured with TypeScript. The command below does so within a folder called custom-auth.
yarn create next-app --typescript custom-auth
Next, let us install the dependencies we will need.
yarn add firebase firebase-admin axios
From left to right, we install the client and server-side Firebase SDKs; this is then followed by Axios, which is our HTTP client. The Firebase Admin SDK will be used on our API route to create the token, while the Client SDK will use the said token to authenticate the user on the frontend. We will defer creating any files until necessary.
Setting up Firebase
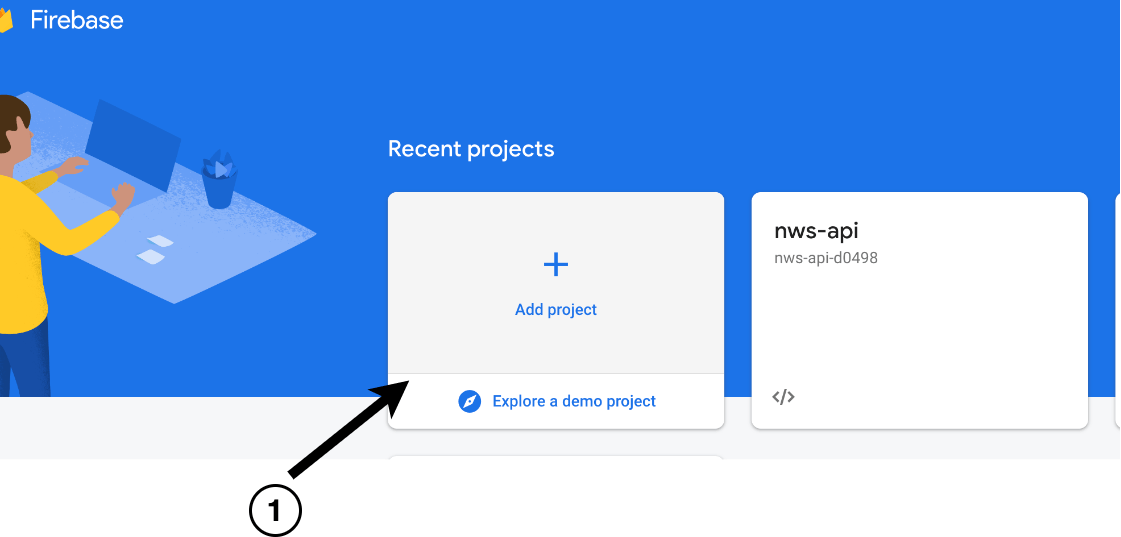
Here we will be doing four things on the Firebase console. Firstly, we will create a project via the following steps.
- In the project section, click Add Project.
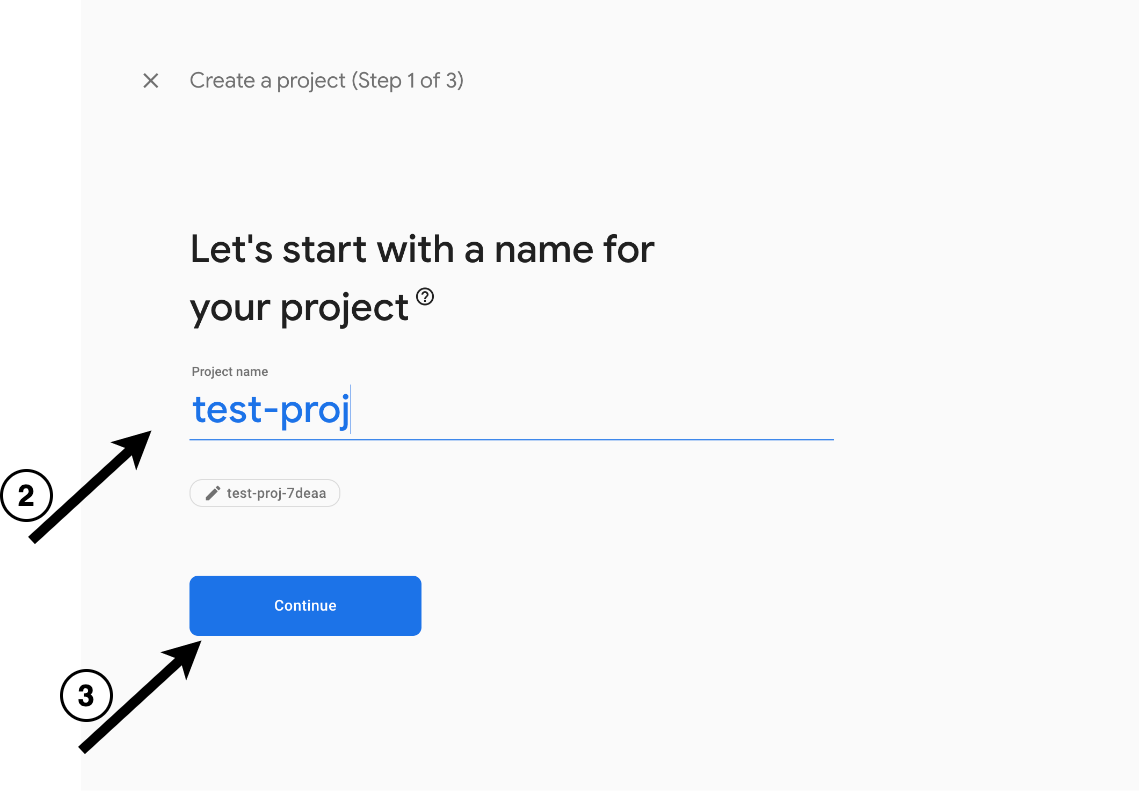
- Next, select a project name.
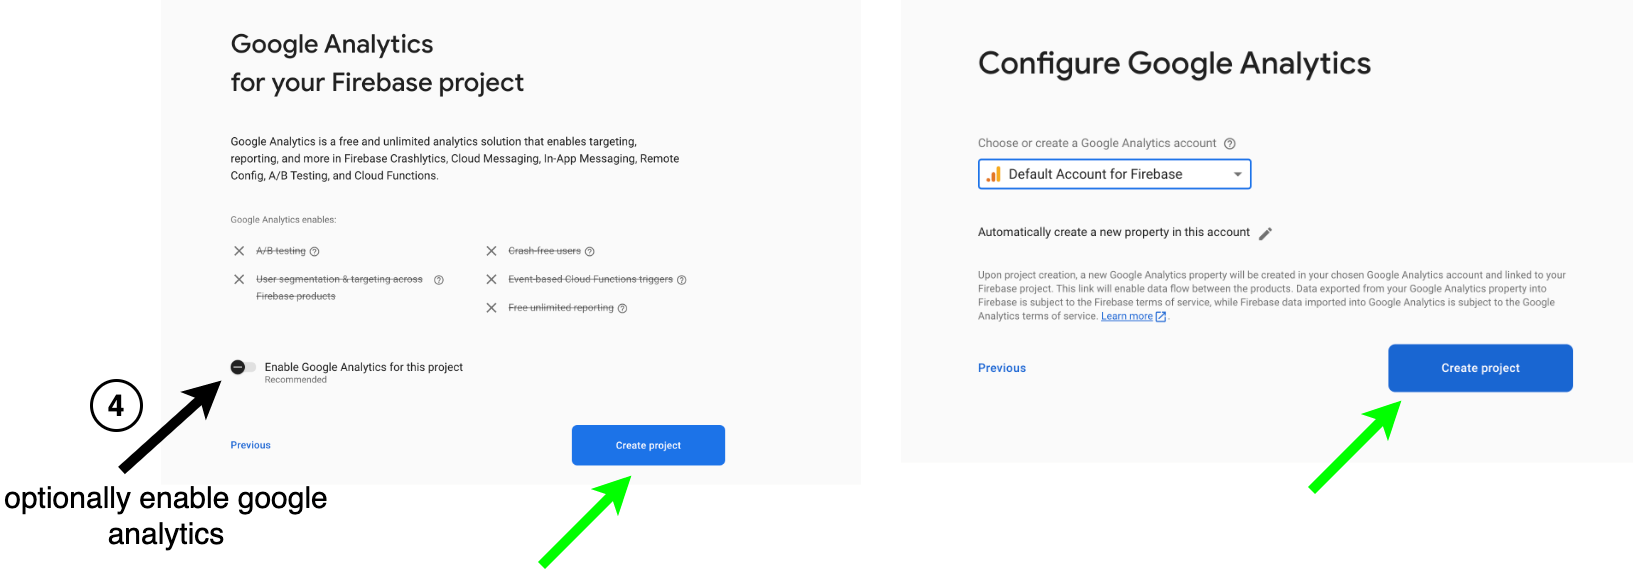
- Optionally enable Google Analytics and click Create project. You will be redirected to the project dashboard.

Client SDK Configurations
Next, we need to obtain the client SDK configurations.
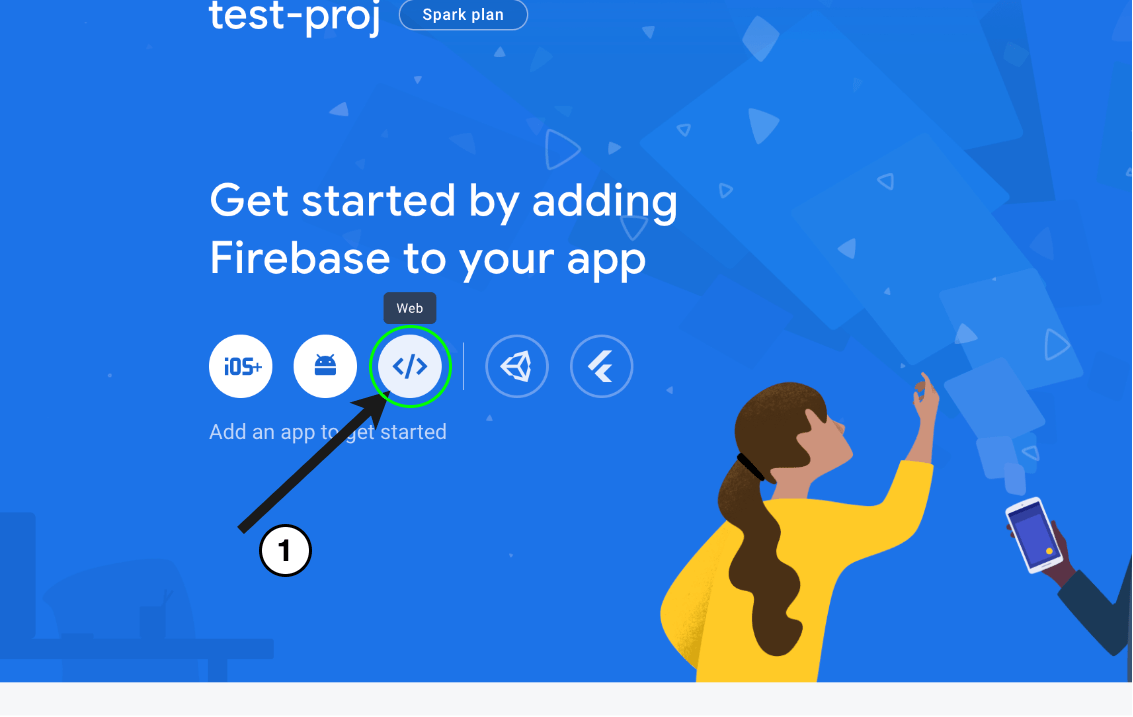
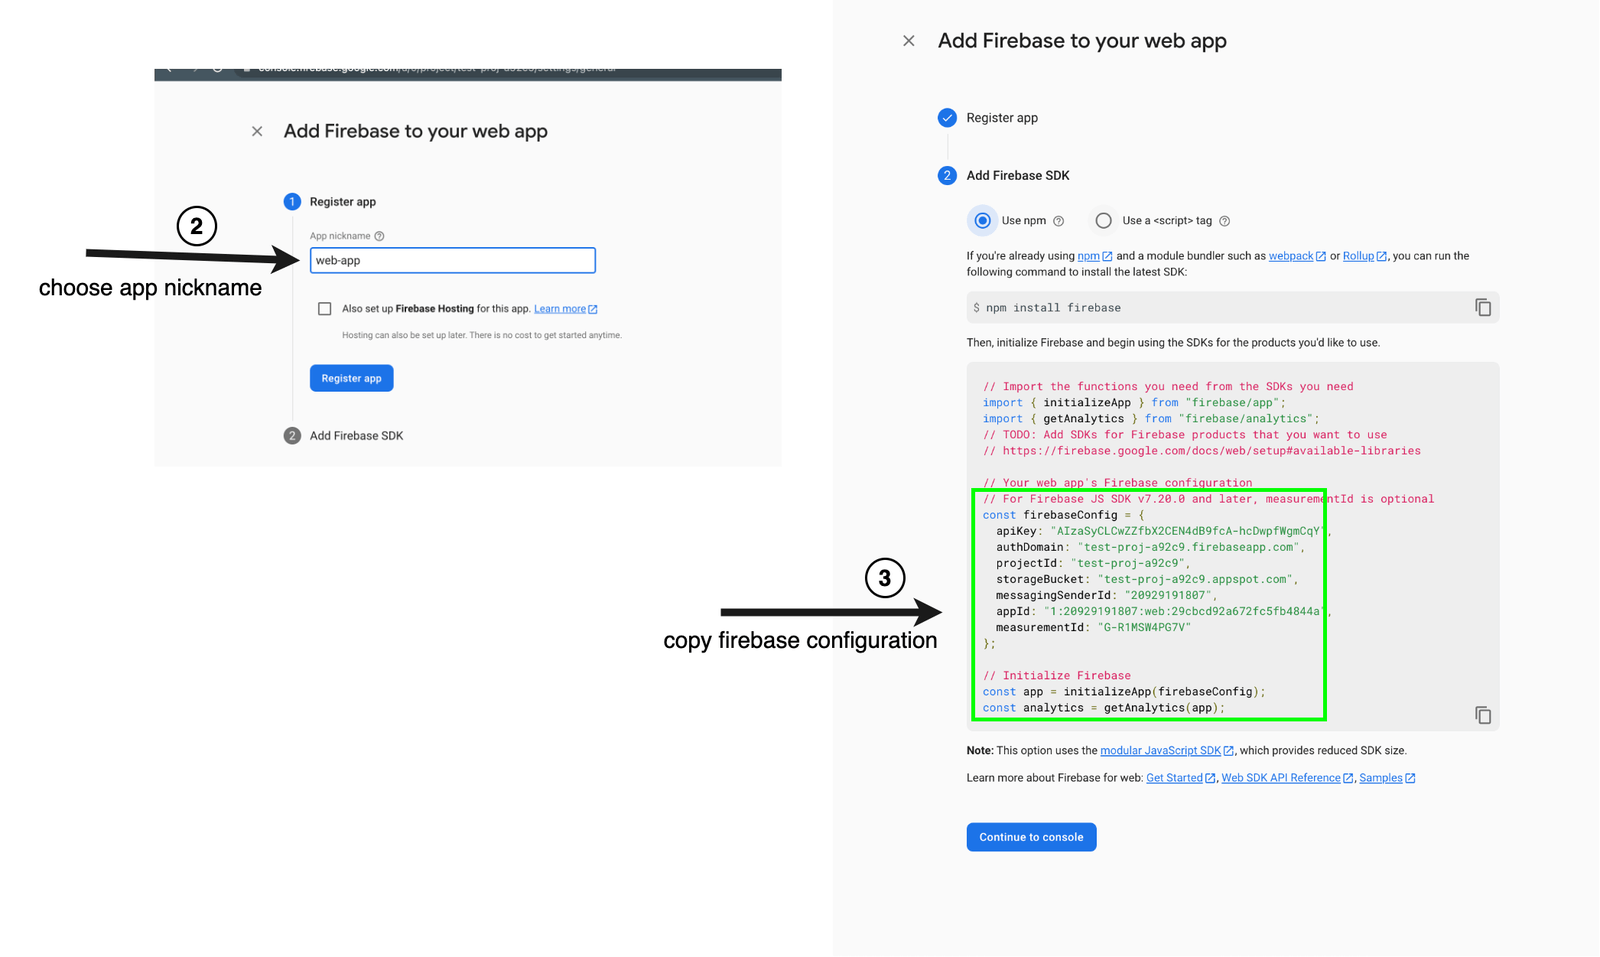
On the project dashboard, obtain your Firebase client SDK credentials by clicking the web icon (since we are integrating it into a web app).
Here you will be presented with a form to choose a nickname for your web app. We called ours “web-app.” Once this is done, you will get all the configuration you need to set up the client SDK.
Configure Server-Side SDK
We will also need to configure our server-side SDK to sign custom tokens. To do that, we need to create a service account. This account allows programmatical authentication and access to all the Firebase services used in the project from the backend (our API route).
Let’s create this account via the following steps.
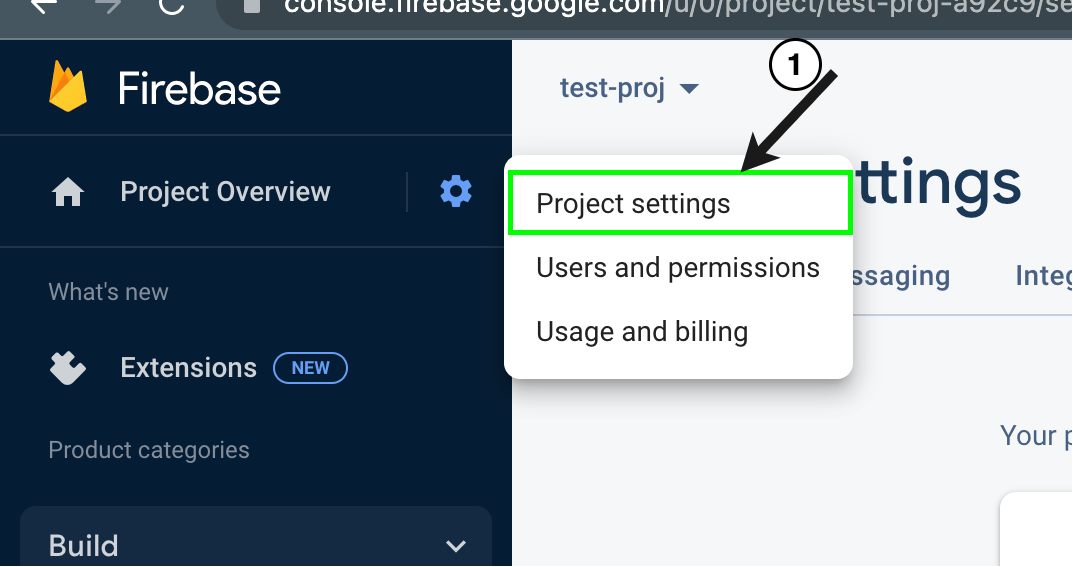
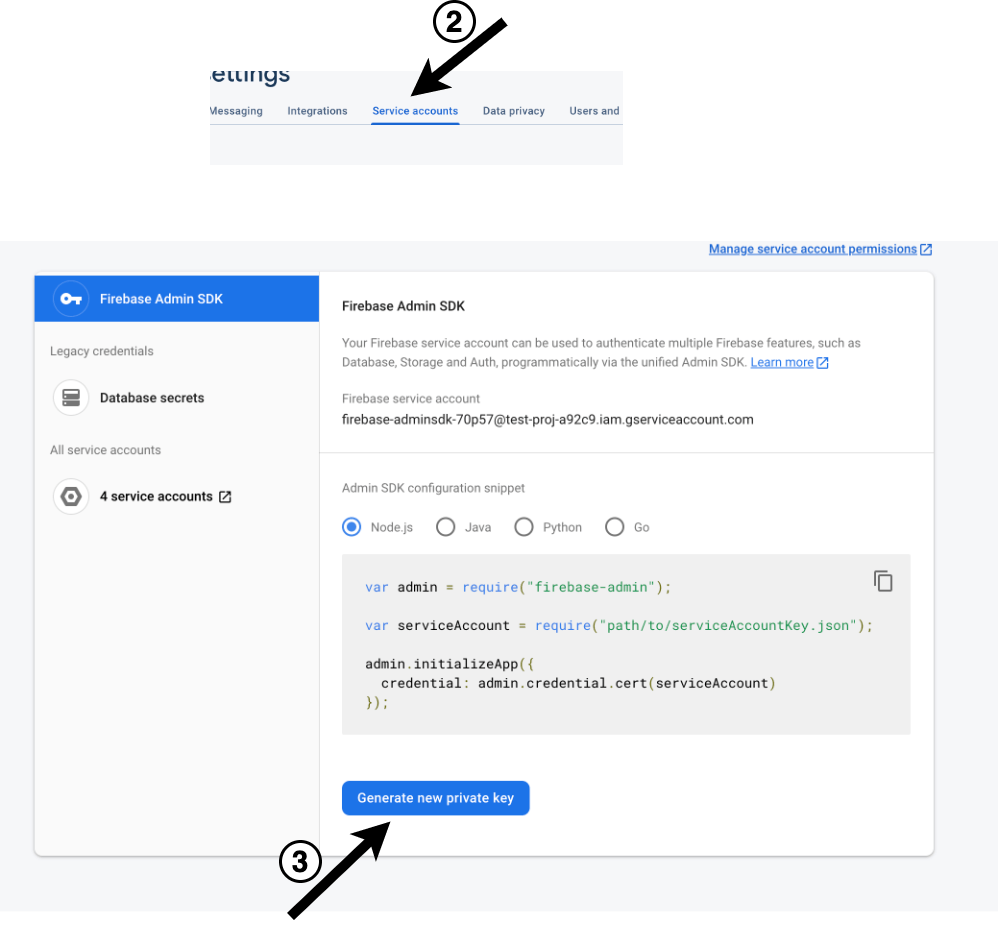
Click on the settings icon and locate service accounts in the project settings section.
Click on Generate Private Key to download the service account private key JSON file to your local machine.
Please take note of all the configuration files we have created, as we will need them later.
Next, which is a crucial step, we need to set up the only service we will need in our project—the authentication service. We can do so again via the following steps.
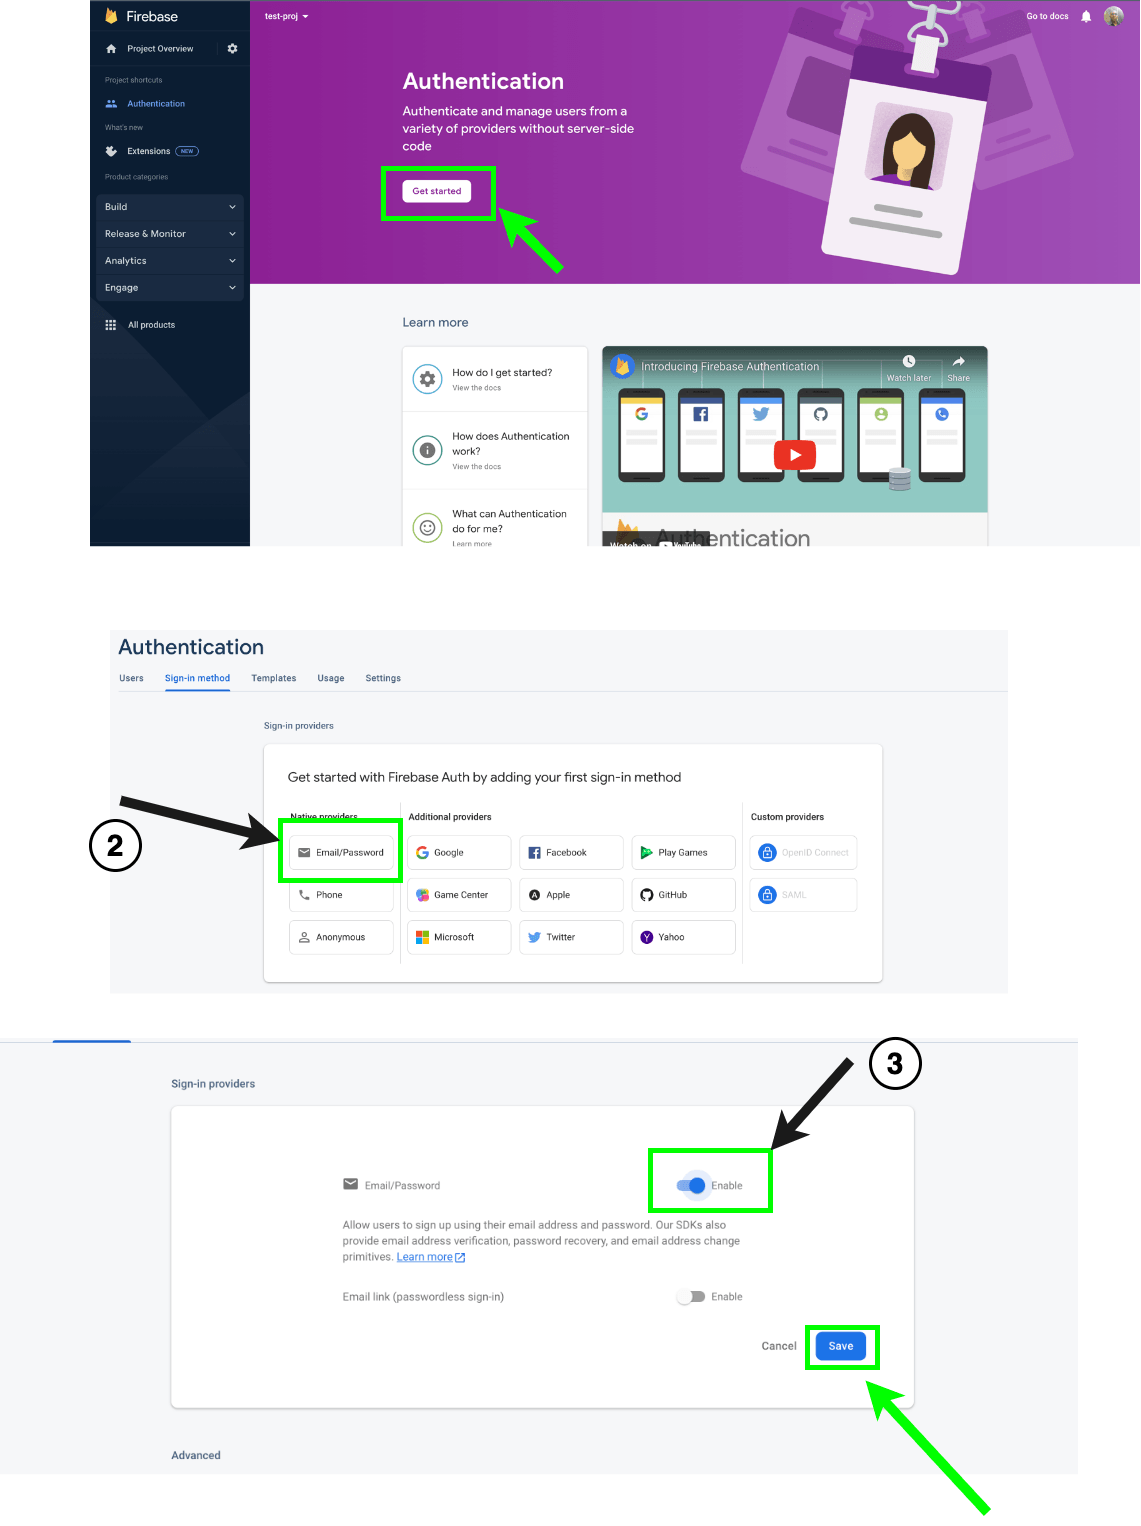
On the Sidebar, choose Authentication.

Click on “Get Started.” If this is your first time, then in the sign-in method tab, select the authentication option you want to support in your app.
Choose the email and password option, which will be sufficient for us in this guide.
Now that we have Firebase set up with all our configuration details, we will proceed to our Next.js app to build our authentication system. We will do the following:
- Set up firebase on the Server with API endpoint to create users and generate the token.
- Set up firebase on the Client and Create an Authentication provider to manage user Session.
- Create a sign-up form to interface with the authentication provider.
- Use the custom claims included in the token to illustrate simple access control on the UI.
- Implement essential route protection.
Set up Firebase on the Server with API Endpoint to Create Users and Generate the Token
Copy the service account JSON file to the root of your folder. Within the pages/api directory, create a file that represents an API route with a name of your choice. Do that by running the following command:
touch createUserAndGetToken.ts
Here we called our file name createUserAndGetToken.js. Later on, from our frontend, we will make an HTTP request to /api/createUserAndGetToken to invoke its handler function.
Update the contents of the API route to match the following:
import type { NextApiRequest, NextApiResponse } from 'next';
import { FirebaseError } from 'firebase/app';

import * as admin from 'firebase-admin';
import serviceAccount from '<PATH-TO-SERVICE-ACCOUNT-JSON-FILE>';

function getApp() {
  let app;
  try {
    app = admin.initializeApp(
      {
        credential: admin.credential.cert(serviceAccount as admin.ServiceAccount),
      },
      'my-app',
    );
  } catch (error) {
    app = admin.app('my-app');
  }
  return app;
}


export default async (req: NextApiRequest, res: NextApiResponse) => {
const auth = getApp().auth();
  type SignUpData = {
    email: string;
    password: string;
  };
  const body = req.body as SignUpData;
  const body =req.body;
  try {
    const user = await auth.createUser(body);
    const token = await auth.createCustomToken(user.uid, {
      isAdmin: true,
     //... add other custom claims as need be
    });
    res.send({ token });
  } catch (error) {
    if (error instanceof FirebaseError) res.status(400).json({ message: error.message });
  }
};
Apart from basic type declarations in this file, we start by bringing in the firebase-admin SDK, followed by our service account JSON file. Next, we define a function called getApp, which returns our Firebase app instance.
This function invokes the initializeApp method exposed by the admin SDK to set up our firebase app instance by feeding the service account details an arbitrary app name we called “my-app”.
Because the getApp function will be invoked whenever a request hits the API, we wrap the whole app initialization process in a try-catch block. That way, if the call to initializeApp fails
in a situation where my-app has been created previously, it will throw an error. The catch block simply calls the app method to get and return the existing my-app app instance.
Next, we define and expose the main handler function that will fire when the HTTP request hits this file. This function accepts the HTTP request and response streams. Internally it starts by invoking getApp to get the
Firebase instance and on it invokes the auth() method to get the authentication service.
Next, it proceeds to extract the email and password data contained in the request body, and with it, it attempts to use the auth service to create a user with the said fields by invoking its createUser method.
If the user creation process succeeds, it uses the details of the user to create and sign a token by invoking the createCustomToken method, which gets fed two parameters. The first is the newly created user’s id,
and the second is an object that holds the custom claims, i.e., the custom data we want included in in the token. Here we trivially defined an object with a single property called isAdmin which is set to true. You
can define as many fields as required provided it does not exceed the maximum size of 1000 bytes and that key names do not match any of the reserved key names specified in the Open Id Connect JWT specifications.
The token is created and signed using the RSA algorithm, and the private key used in the signing process is contained in the service account. This is why the service account file has to be protected from unauthorized parties. As is usual with Firebase auth tokens, the token has a maximum duration of one hour before it expires.
If the token creation is successful, it is then attached to the response and sent back. If an error occurs in the try block, the generated error message is sent back otherwise.
Set up Firebase on the Client and Create an Authentication Provider to Manage User Session
Again, we need to create a file to set up Firebase on the frontend and then can proceed to create that for our Authentication provider context, which will be used to wrap our entire application in our root component—the _app.tsx file.
In the root of your project, enter the following command to create both files.
touch firebase.ts AuthProvider.tsx
Update the contents of the firebase.ts file to match the following:
import { initializeApp } from 'firebase/app';
import { getAuth } from 'firebase/auth';
const firebaseConfig = {
  apiKey: 'AIzaSyAO1ztGRGtYDa8HRjdS3BRJPPVk2_EJ_Hk',
  authDomain: 'test-proj-ba46d.firebaseapp.com',
  projectId: 'test-proj-ba46d',
  storageBucket: 'test-proj-ba46d.appspot.com',
  messagingSenderId: '264900961743',
  appId: '1:264900961743:web:00935cb8d69d9664ca9eba',
  measurementId: 'G-T5EGV9HSES',
};
const app = initializeApp(firebaseConfig);
export const auth = getAuth(app)
This file simply uses the client Firebase config to create the client-side Firebase instance and stores it in a variable called app by a call to initializeApp. It then extracts and exports the auth service by invoking
the getAuth function and passing the Firebase instance.
Next, update the AuthProvider.tsx file again to match the following:
import { createContext, PropsWithChildren, useState, useContext, useEffect } from 'react';
import axios, { AxiosError } from 'axios';
import {User,onAuthStateChanged, signInWithCustomToken } from 'firebase/auth';
import { auth } from './firebase';

type authStatus = 'authenticated' | 'unauthenticated' | 'loading';
const AuthCtx = createContext<{
  signUp(email: string, password: string): void;
  status: authStatus;
  signOut(): void;
  user: User | null;
}>({
  signUp(a: string, b: string) {},
  status: 'loading',
  signOut() {},
  user: null,
});
export const useAuth = () => useContext(AuthCtx);

const AuthProvider = ({ children }: PropsWithChildren<{}>) => {
  const [status, setStatus] = useState<authStatus>('loading');

  const signUp = async (email: string, password: string) => {
    type tokenRes = {
      token: string;
    };
    try {
      setStatus('loading');
      const res = await axios.post<tokenRes>('/api/createUserAndGetToken', {
        email,
        password,
      });
      const { token } = res.data;
      await signInWithCustomToken(auth, token);
      setStatus('authenticated');
    } catch (error) {
      setStatus('unauthenticated');
      if (error instanceof AxiosError) console.log({ message: error.message });
    }
  };
  const signOut = async () => {
    await auth.signOut();
    setStatus('authenticated');
  };
  useEffect(() => {
    onAuthStateChanged(auth, (user) => {
      if (user) setStatus('authenticated');
      else setStatus('unauthenticated');
    });
  }, [status]);


  return (
    <AuthCtx.Provider
      value={{
        signUp,
        status,
        signOut,
        user: auth.currentUser,
      }}>
      {children}
    </AuthCtx.Provider>
  );
};
export default AuthProvider;
This code above focuses on creating and exposing the Authentication context. It starts by bringing in some common React hooks and types, followed by the Axios client and its error type. Next, we bring in the user type binding and two methods from the
firebase/auth module, which does the following:
onAuthStateChanged: This will be used to monitor changes in the signed-in user’s state.signInWithCustomToken: This method will be used with the token obtained from our API route to sign in the user.
We also brought in the auth service set up in the firebase.ts file we created earlier.
Next, we start by creating the Auth context using the createContext method. The auth context exposes all the properties that pages will use in the app to do the following:
- Get information about the user’s authentication status, which could either be “loading,” “authenticated” or “unauthenticated.”
- Sign up the user, i.e., the
signUp()function. - Sign out the user, i.e., the
signOut()function. - Get the signed-in user’s data via the user property.
Next, we define and export a custom hook called useAuth which returns the Auth context using the useContext hook.
The main exported AuthProvider component will serve as a wrapper to the entire app, so it accepts only the children prop. Internally, it defines and exposes the four properties specified in the Auth context type binding. From top to bottom, it firstly maintains a state that represents the authentication status, initially set to “loading.” All the other methods that follow are geared toward updating the value of the auth status.
Starting with signUp, which accepts two strings that represent the user’s email and password, and with the data, it attempts to make an HTTP request to our API route /createUserAndGetToken in to exchange it for the
custom token. If it succeeds to get the token, it is then fed to the signInWithCustomToken function to authenticate the user.
This function exchanges the custom token for a new identity and refresh tokens with the user’s data and information about how the user is authenticated, which are then attached to the auth object. It then updates the authenticated status to “authenticated.” If anything goes wrong in any of the stages above, the error is printed to the console, and the users status is set to "unauthenticated.”
Conversely, the signOut function invokes the signOut method on the auth object to clear the details of the currently authenticated user and then proceeds
to set the auth status to “unauthenticated.”
We also attach a lifecycle hook that uses the onAuthStateChanged function that fires whenever the state of the currently signed-in user changes. For example, when the user logs out or when the browser is refreshed,
onAuthStateChanged waits for the auth service to resolve with the authentication data about the user. This data is then passed as a parameter to the callback that gets passed to it. In the body of the callback, we
set the authentication status accordingly (authenticated or unauthenticated) based on the existence of the authenticated user’s data.
Open your app.tsx file and update its contents to use the AuthProvider as shown below:
import { AppPropsType, NextComponentType } from 'next/dist/next-server/lib/utils';
import AppProvider from '../AuthProvider';

type CustomAppProps = AppPropsType & {
  Component: NextComponentType // add auth type
};
const MyApp = ({ Component, pageProps }: CustomAppProps) => {
  return (
    <AppProvider>
          <Component {...pageProps} />
    </AppProvider>
  );
};
export default MyApp;
Create a Sign-up Form to Interface with the Authentication Provider
We now have most of our authentication system set up. Let’s create a simple sign-up form to interact with it. Open the pages/index.tsx file and update its contents as shown below:
import { useRouter } from 'next/router';
import { ChangeEvent, FormEvent, useEffect, useState } from 'react';
import { useAuth } from '../AuthProvider';
export default () => {
  const [email, setEmail] = useState('');
  const [password, setPassWord] = useState('');
  const router = useRouter();
  const { signUp, status } = useAuth();
  const handleSubmit = async (e: FormEvent<HTMLFormElement>) => {
    e.preventDefault();
    signUp(email, password);
  };
  const handleChange = (func: Function) => (e: ChangeEvent<HTMLInputElement>) => {
    func(e.target.value);
  };
  useEffect(() => {
    if (status === 'authenticated') router.push('/protected');
  }, [status]);
  return (
    <div>
      <form onSubmit={handleSubmit}>
        <div className='form_input'>
          <label>email</label>
          <input type='email' value={email} onChange={handleChange(setEmail)} />
        </div>
        <div className='form_input'>
          <label>password</label>
          <input type='password' value={password} onChange={handleChange(setPassWord)} />
        </div>
        <button>sign up</button>
      </form>
    </div>
  );
};
This component renders two text fields that accept the user’s email and password and a submit button, as shown in the image below:
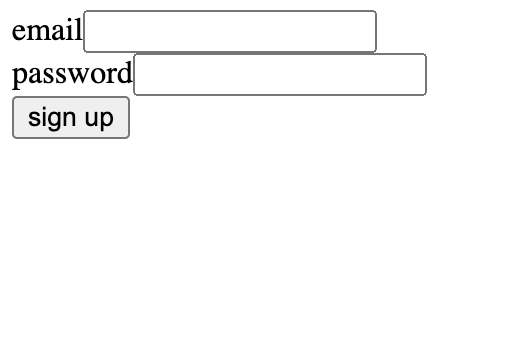
The signup button, when clicked, feeds these details to the signUp function exposed by the Auth provider. This component also has a lifecycle hook that listens for changes in the status of the authenticated user here. If the user is authenticated, the
user is redirected to a not yet defined protected route with a pathname of /protected.
Using the Custom Claims Included in the Token to Illustrate Simple Access Control on the UI
Remember, during the token creation process on our API route, we included some custom claims on the token. Our case included a trivial object that had one property, {isAdmin: true}. Again, including custom data in tokens
allow us to create a bespoke experience for users on both our server-side Firebase services and/or client-side (UI).
Server-side Firebase services, e.g., the cloud Firestore or real-time database, can use these custom claims included in the token in security rules to control access to our database—in our case, we can use our isAdmin property to control who can access a particular collection and so on. See here for more details.
For client-side usage, which we will be doing, we can customize our UI based on the claims included in the token. Let’s now proceed to create that route called “protected,” which we briefly described in the previous section. Assuming
you are in the pages folder, enter the following command to create a file called protected.tsx:
touch protected.tsx
Add the following code to the newly created file:
import { ParsedToken } from 'firebase/auth';
import { useEffect, useState } from 'react';
import { useAuth } from '../AuthProvider';
const ProtectedPage = () => {
  const [claims, setClaims] = useState<ParsedToken>({});
  const [loading, setLoading] = useState(false);
  const { user, signOut } = useAuth();
  async function getTokenData() {
    if (!user) return;
    try {
      setLoading(true);
      const val = await user.getIdTokenResult();
      setClaims(val.claims);
    } catch (error) {
      console.log(error);
    } finally {
      setLoading(false);
    }
  }
  useEffect(() => {
    getTokenData();
  }, []);
  return (
    <div>
      {!loading && claims.isAdmin && <h1>this is admin UI</h1>}
      <button onClick={signOut}>sign out</button>
    </div>
  );
};
ProtectedPage.protected = true;
export default ProtectedPage;
The ProtectedPage component is geared toward rendering a piece of UI based on the presence of the custom claims in the token (i.e., the isAdmin boolean in our case). Here, we simply rendered a traditional h1 tag with some
dummy text. This component also renders a button that allows the user to sign out using the signOut function exposed on our authentication provider.
Since the custom claims need to be fetched before they can be used and so upon mounting, the ProtectedPage component triggers the getTokendata asynchronous function. This first checks for the existence of the user, which
is gotten from the auth provider. If the user exists, it attempts to get the deserialized token by calling the getIdTokenResult() method on the user object and, if it resolves successfully, we firstly store it in a
variable called val and then extract a claims property on it and store it in the state. The val.claims object may look like so for some signed-in users:

You can see the isAdmin custom claim included in the deserialized token above.
Note: If you need to use the custom claims on many pages, you can always move the token deserialization process to the auth provider, but we are fine since we only need it on our Protected page.
Open your terminal and run this command to preview the app:
npm run dev
In the running app, we can sign in, visit the protected page, see our custom admin UI and sign out.
Implement Basic Route Protection
The authentication system is not complete without route protection to ensure that manual navigation to our protected page is not possible when the user is unauthenticated. This is what we will be doing next.
Notice that before we export the ProtectedPage component, we included a protected boolean property which we set to true:
ProtectedPage.protected = true;
Let us now head over to the _app.tsx file to use this property to complete our setup and update its contents with the following code:
import React, { ReactNode } from 'react';
import { AppPropsType, NextComponentType } from 'next/dist/next-server/lib/utils';
import AppProvider, { useAuth } from '../AuthProvider';
import { useRouter } from 'next/router';


function AuthManager({ children }: { children: ReactNode | ReactNode[] }) {
  const { status } = useAuth();
  const router = useRouter();
  if (status === 'loading') {
    return <h1>loading please wait</h1>;
  }
  if (status === 'unauthenticated') {
    router.push('/');
    return null;
  }
  return <>{children}</>;
}
type CustomAppProps = AppPropsType & {
  Component: NextComponentType & { protected?: boolean }; // add auth type
};
const MyApp = ({ Component, pageProps }: CustomAppProps) => {
  return (
    <AppProvider>
      {Component.protected ? (
        <AuthManager>
          <Component {...pageProps} />
        </AuthManager>
      ) : (
        <Component {...pageProps} />
      )}
    </AppProvider>
  );
};
export default MyApp;
The MyApp component accepts two props:
- Component: represents the current page
- pageProps: the props for that page, based on the existence of the protected boolean property on the page (Component)
For unprotected pages, we simply render the page as it is, while for protected pages, it wraps the page with a component we call AuthManager.
The AuthManager component accepts the Protected page as props internally, uses the auth provider context, extracts the authentication status, and renders different things based on it. During loading states, e.g., when the auth service is still in the process of resolving the authenticated users or signing in the user, it renders a basic loading message to the screen,
When the user is unauthenticated, it redirects the user to the homepage using the router.
If the two conditions above fail, the user is authenticated and renders the page accordingly.
Running our app now, we can sign up using a custom token, visit a protected route, and extract and use custom claims on tokens to customize the UI as expected.
Conclusion
Firebase has greatly reduced the peril required for developers to craft top-notch authenticated systems and provides and supports different authentication requirements, use cases and providers. This guide focused on using custom tokens, hence a single use case, and provides a basis for exploring other authentication mechanisms that ship with this platform in your future apps. Learn more from the docs here.

Chinedu Imoh
Chinedu is a tech enthusiast focused on full-stack JavaScript and Infrastructure engineering.
Related Posts
Comments
All articles
Topics
Web MobileMobile
Desktop
Design
Productivity
People
