Explore the New Zoneless Change Detection in Angular 18

Summarize with AI:
Learn about zoneless change detection in detail, and see how to use it in new Angular applications.
In component-based web frameworks like Angular, a component is divided into two parts: the view (HTML and CSS) the user sees and interacts with, and the data and logic that render this view. As the user interacts with the view, the data is dynamically updated. Frontend frameworks have a change-detection system so that the data and view layers are always synchronized as the user interacts with the app.
For a long time, Angular’s change-detection mechanism relied heavily on a library called Zone.js as its main notification system to tell it when to schedule change detection and refresh its views. However, this is no longer the case in Angular 18. Although still experimental, a new zoneless notification mechanism has been introduced to combat some of the challenges that Zone.js had.
In this guide, we will explore zoneless change detection in detail, and see how to use it in new Angular applications.
The Change Detection Mechanism in Angular
Here, we will summarize how change detection works in Angular applications. We’ll see how it is managed and scheduled and the idea behind zone-based and zoneless approaches.
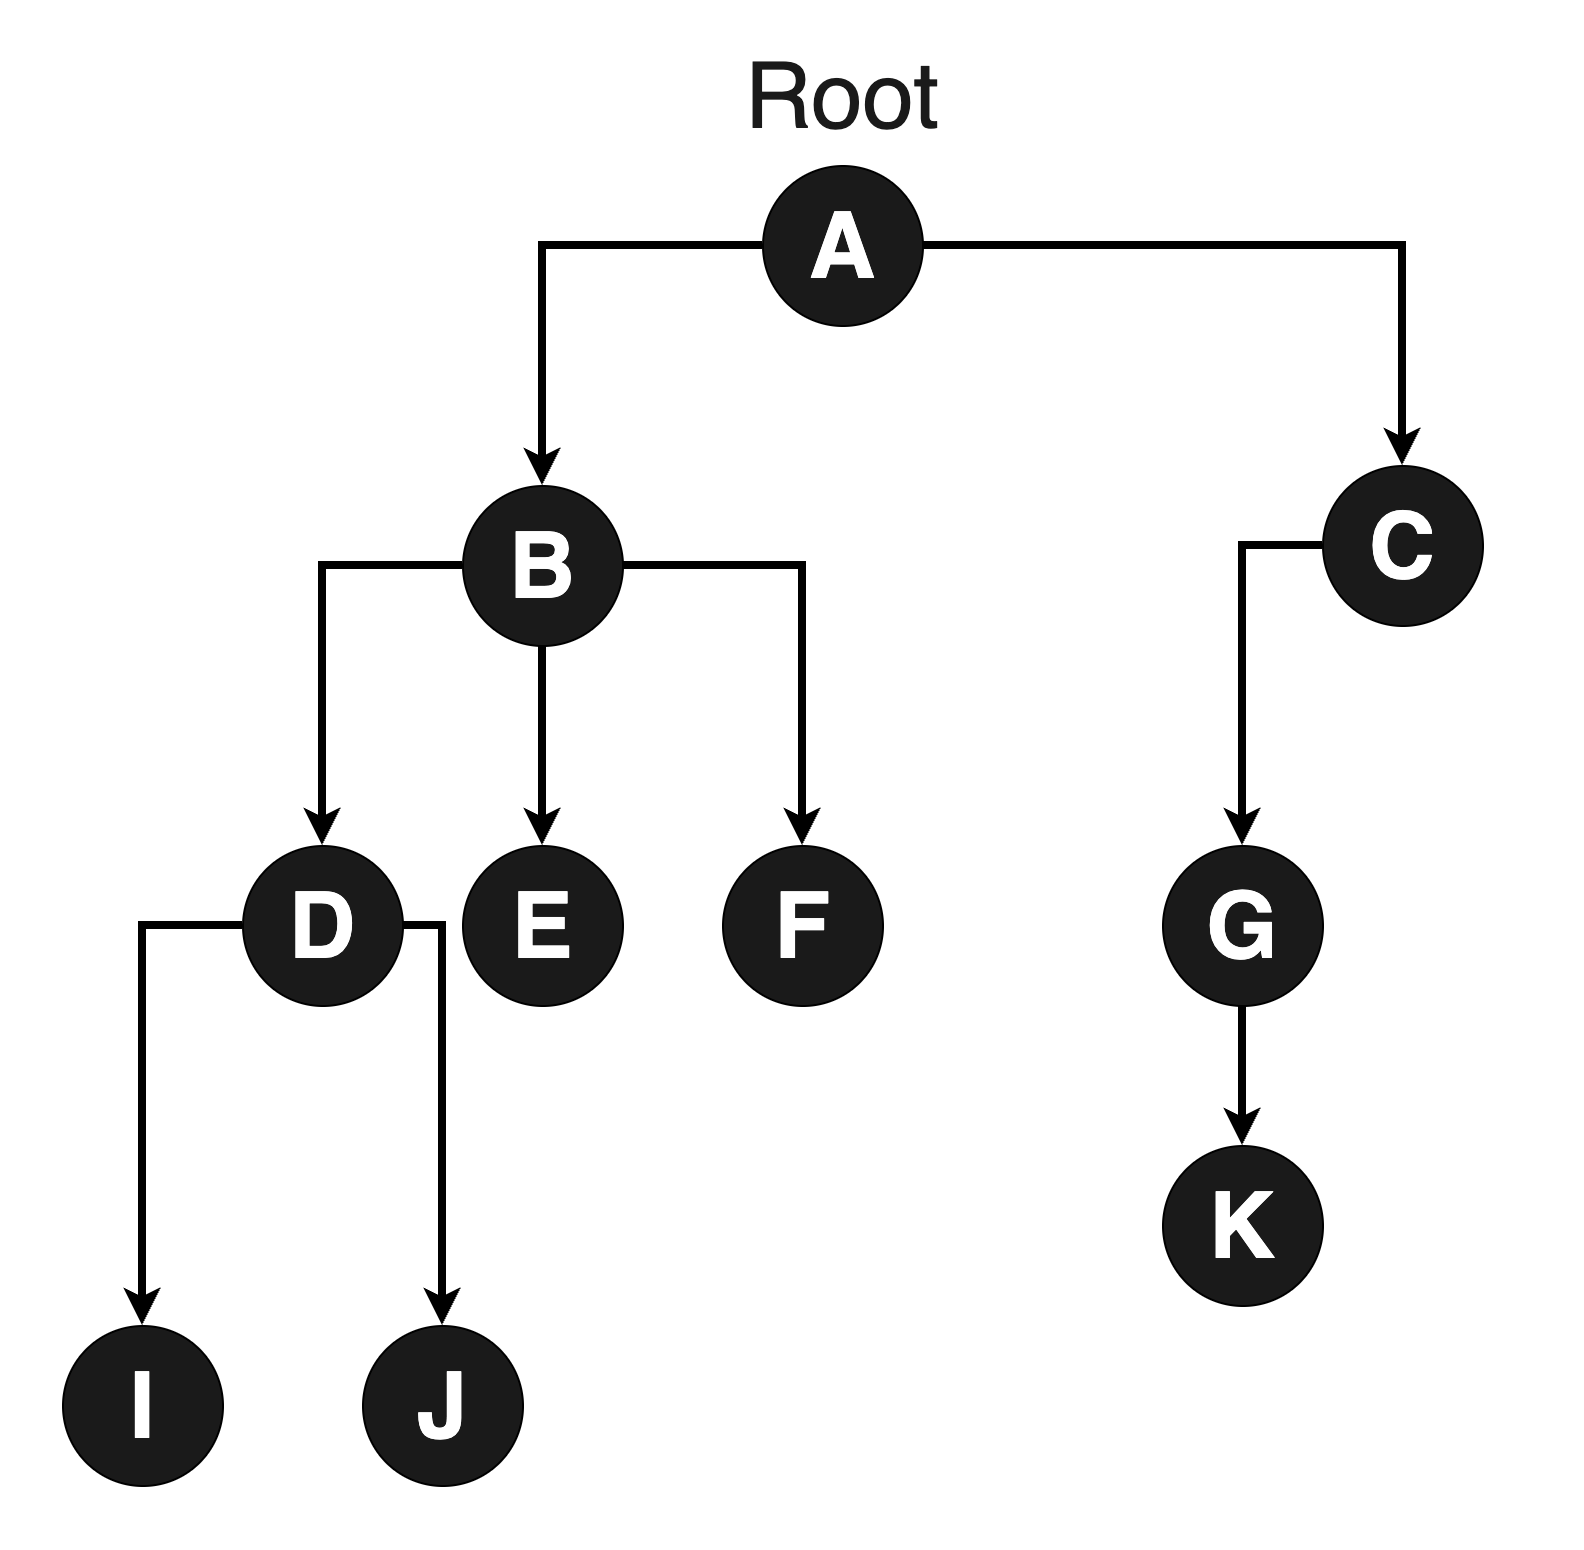
When we build an Angular application, we create a tree of nodes, with each node representing a component.

The tree representing the entire application in Angular terms is referred to as the application ref. Typically, components in the tree may manage some state using signals, instance variables and observables, and components may also render a piece of UI.
Data in components change as the user interacts with them, and this change to a component’s data may happen either synchronously (e.g., incrementing a counter) or asynchronously (e.g., a component gets some todos over the network). Irrespective of which, when a component’s data changes, it triggers a change detection process to update the UI. For example, if Component K is counter and a user clicks a button in Component K, that triggers its increment() function to change its count from 0 to 1.
To make this happen, after the increment function fires, the affected component (K) needs a way to inform the application ref that it needs to be re-rendered to reflect the latest change of the new counter value 1.
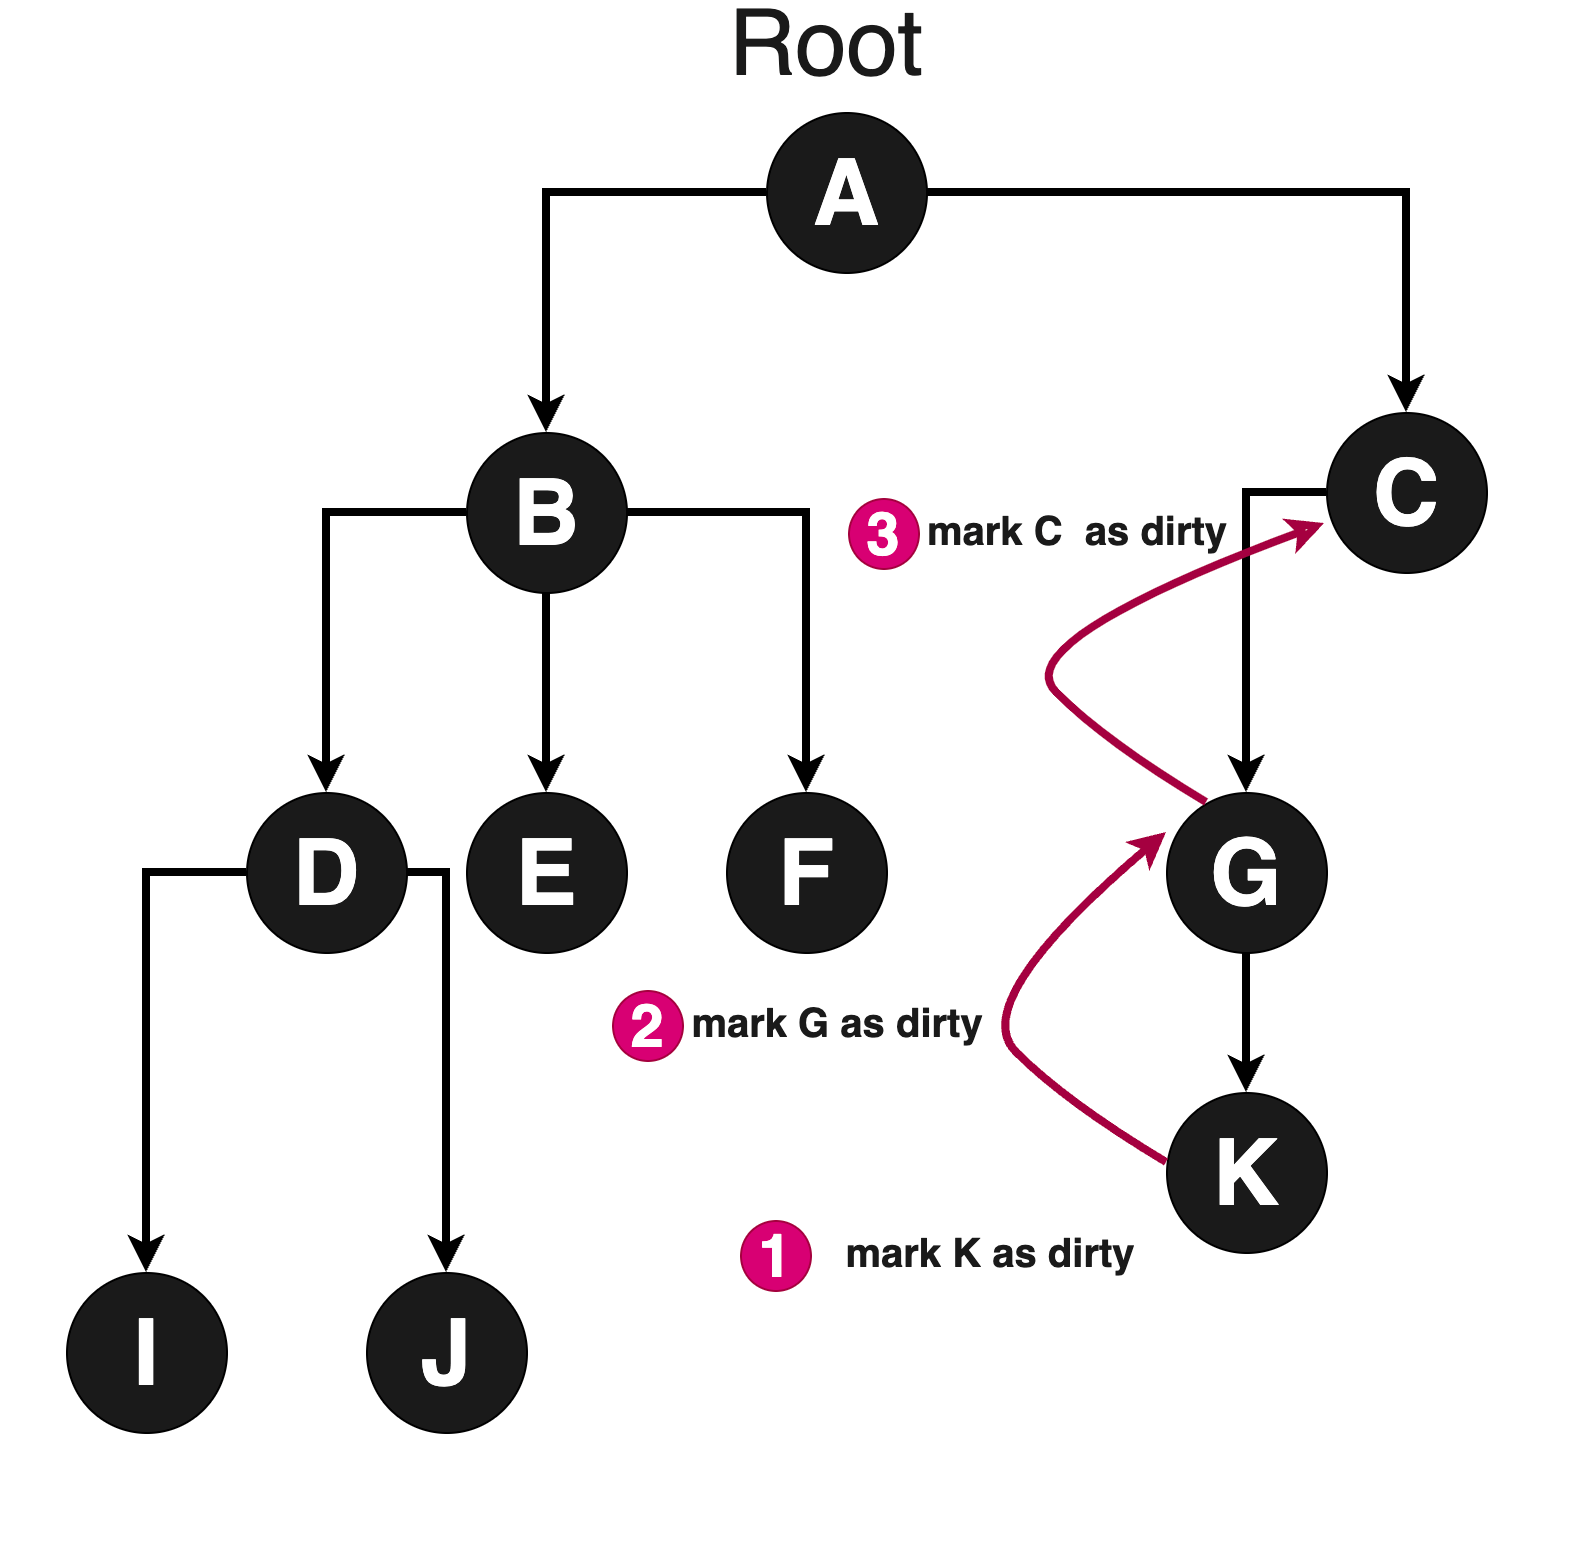
It does this by marking itself and its ancestors as dirty—in the image below, K, G and C.

Dirty marking also means a component is saying it needs to be re-rendered. The component does not mark itself but its parents because change detection in Angular applications begins from the root component. A component also has to mark its ancestors so that when the application tree is traversed to trigger change detection using the application ref’s tick() method. This component needs to be refreshed, but it can be reached during the traversal if it is deep in the application tree.
In very simplified code terms, if Component K is a counter that has an increment method that runs synchronously, we can think of something like this under the hood:
k.increment()
// once increment finishes component and ancestors. are marked for refresh
k.markAsDirty()
after marking the application tree is traversed to detect changes
Application.tick()
As you can see, a component’s method has to finish executing so that, when dirty marking and change detection are triggered, the view is updated correctly. In our example, Component K’s increment() method looks synchronous, and this is easy to reason about, but typically component methods are mostly asynchronous (use timers, promises, async-await calls).
When is the right time for change detection to be triggered? Since a component’s method has to finish executing before change detection runs, there needs to be a notification mechanism to inform the framework and run the change detection logic at the correct time so that the affected component and its views are correctly updated.
Also, for a better developer experience, change detection has to be triggered automatically so that developers only need to focus on building components and worry about its data and methods while the framework handles the rest.
The Angular team has already done all this and more for us, thanks to a pervasive library like Zone.js. Before zoneless, the Zone.js library was the first choice for handling a notification/change detection scheduling system that tells the frameworks when to run change detection.
Zone.js monkey patches many of the browser async APIs (events, timeouts, promises), so essentially, it creates an execution context that allows code to be run before and/or after browser events start or finish.
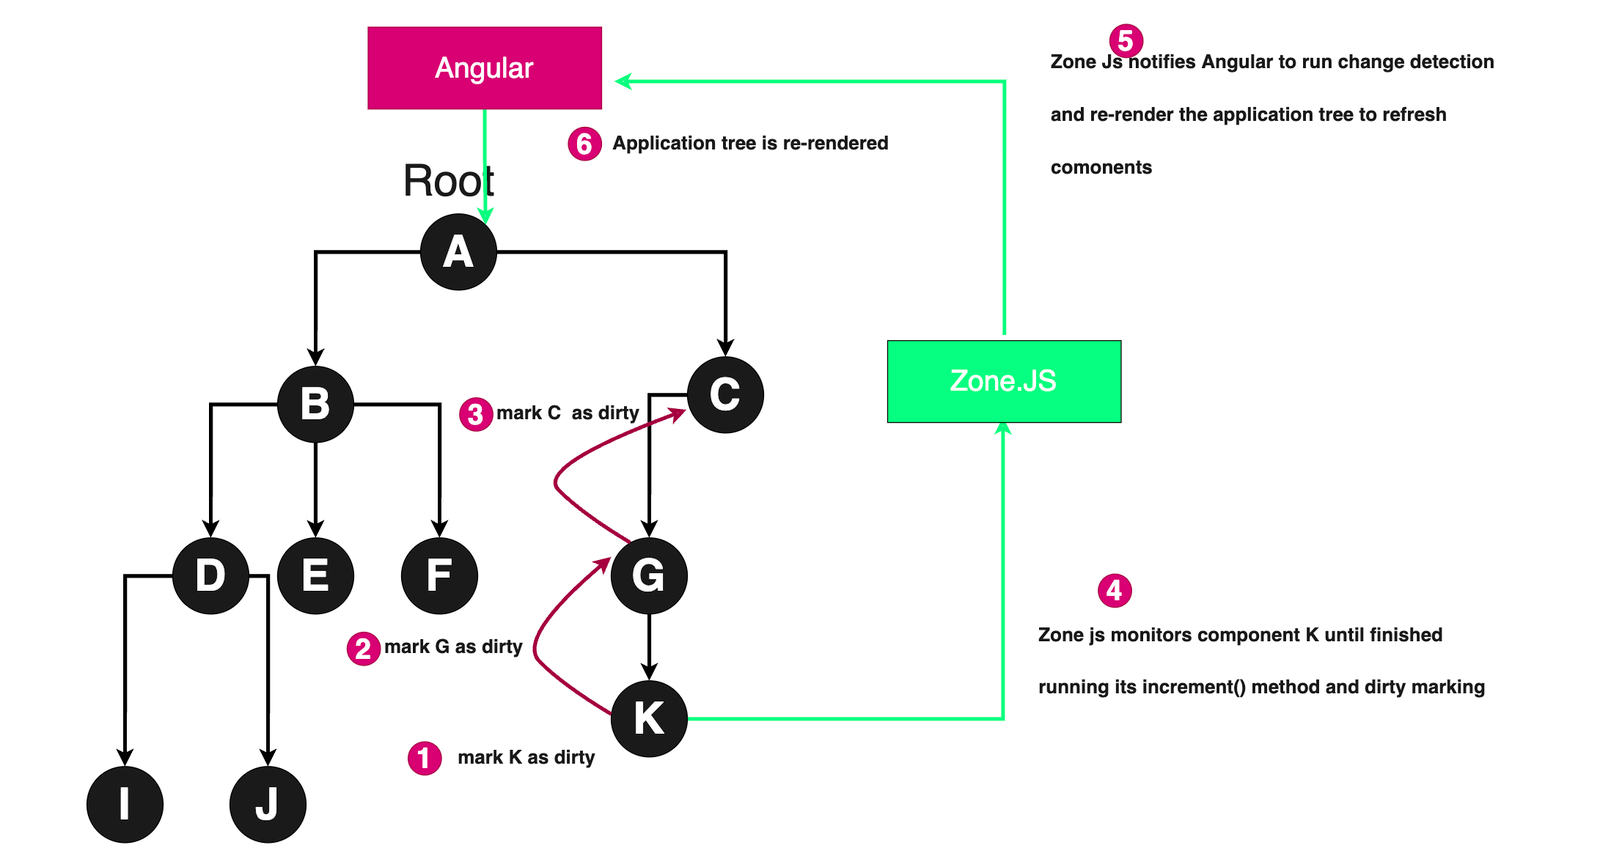
Now, it unlocks the possibility that irrespective of what a component’s method does (sync or async) and no matter how long it takes, it is possible to ensure that change detection code is scheduled at the appropriate time when it finishes. Back to our example: as shown below, after K finishes executing and does dirty marking, Zone.js notifies Angular to refresh the application tree and run the next change detection cycle to ensure that K’s view is updated correctly.

With Zone.js, the Angular framework maintains a zone for any application called the Angular Zone. By default, an Angular application runs within this zone. The NgZone class is the Angular Zone encapsulating Zone.js, which provides an interface that allows developers to write code that runs inside or outside the zone. Typically, code can be written to run outside the zone for optimization purposes. This ensures that change detection is not triggered unnecessarily and automatically, mainly when a component method is doing things that do not need to update its view.
What Is Zoneless Change Detection?
Simply put, zoneless change detection is the new change notification/scheduling mechanism that triggers change detection. It calls the tick() method on the Angular application without relying on the Zone.js library.
Why the Switch to Zoneless?
Here are some of the reasons why the Angular framework is transitioning to a zoneless architecture.
- Taking out Zone.js means Angular applications, when built, will have a smaller bundle size, which also means improved core web vitals for your application.
- This improves application performance because Zone.js is slow and triggers too many re-renders. It does not really consider what part of the state changed and how to optimize re-renders.
- Zone.js also has issues with monkey patching the browser’s async/await API, which is optimized to be a faster way to work with promises. To solve this issue, Angular CLI internally has to process all async/await usage in an Angular app back to plain promises to make it compatible with Zone.js. On the other hand, zoneless applications are fully compatible with the async/await API.
- Without Zone.js, debugging will be more straightforward because developers can track application state changes directly.
Switching to Zoneless
Let’s start by creating a simple Angular application. Run this command in your terminal:
ng new zoneless
In the prompt, select all the defaults to create a basic Angular application.
To enable zoneless change detection in our application, we need to do the following:
- First, update the
app.config.tsfile to match the following:
import {
  ApplicationConfig,
  ɵprovideZonelessChangeDetection as provideExperimentalZonelessChangeDetection,
} from "@angular/core";
import { provideRouter } from "@angular/router";
import { routes } from "./app.routes";
export const appConfig: ApplicationConfig = {
  providers: [
    provideRouter(routes),
    provideExperimentalZonelessChangeDetection(),
  ],
};
At the core, the provideExperimentalZonelessChangeDetection() exports two providers.
export function provideZonelessChangeDetection() {
  return makeEnvironmentProviders([
    {
      provide: ChangeDetectionScheduler,
      useExisting: ChangeDetectionSchedulerImpl,
    },
    { provide: NgZone, useClass: NoopNgZone },
  ]);
}
Among the two classes, ChangeDetectionSchedulerImpl has a method called notify() that calls the application’s tick() method to trigger change detection. On the other hand, the NoopNgZone class is just a placeholder that partially implements the NgZone interface. This class is included to prevent breaking changes in applications that might have been using Zone.js’s NgZone implementation. Learn more.
Remove zone.js from the options in the polyfills array in your angular.json file.
"build": {
  "options": {
//...
  "polyfills": [
    "zone.js"
  ],
  "tsConfig": "tsconfig.app.json",
  }
}
To verify that your app no longer uses zone.js, start your Angular application by running npm run start. Then, in the console located in your browser’s dev tools, enter the word Zone and hit enter. You will get an error saying this variable is not defined.

Components and Core Reactive Primitives Related to Zoneless Change Detection
As seen earlier, all change detection requests typically originate from components, and rightly so because components are the central point of all the user interactions in our app.
When building components in Angular applications, all the stateful data we maintain are stored using one of these three reactive primitives:
- Instance variables
- Signals
- Observables
Update the app.component.ts file to match the following:
@Component({
  //....
})
export class AppComponent implements OnInit, OnChanges {
  observableCount = new BehaviorSubject(0);
  signalCount = signal<number>(0);
  count = 0;
}
These are then rendered in the components view.
@Component({
  selector: 'app-root',
  standalone: true,
  imports: [CommonModule, RouterOutlet, ChildCounterComponent],
  template: `
    <h3>Instance variable counter {{ count }}</h3>

    <h3>signal counter {{ signalCount() }}</h3>

    <h3>observable counter {{ observableCount.getValue() }}</h3>

  `,
  // changeDetection: ChangeDetectionStrategy.OnPush,
})
When the user interacts with our application and modifies one or more of these reactive primitives, it is time to run some change detection. Change detection is triggered automatically for the developer but sometimes requires the developer to trigger them manually. Some of those cases are:
- The change detection strategy on the component
- How the reactive primitive is updated
In summary, change detection cycles are triggered automatically in zoneless mode for components in the following situations.
- When stateful primitives (an instance variable, signal, or observable) are modified by a function call triggered by an event, e.g., a click, mouse move, etc.
@Component({
  selector: "app-root",
  standalone: true,
  imports: [CommonModule, RouterOutlet, ChildCounterComponent],
  template: `
    <h3>Instance variable counter {{ count }}</h3>
    <button (click)="increment()">inc count</button>

    <h3>signal counter {{ signalCount() }}</h3>
    <button (click)="incrementSignal()">inc count</button>

    <h3>observable counter {{ observableCount.getValue() }}</h3>
    <button (click)="incrementObservable()">inc count</button>

    {{ detectChanges() }}
    <app-child-counter></app-child-counter>
  `,
  // changeDetection: ChangeDetectionStrategy.OnPush,
})
export class AppComponent implements OnInit, OnChanges {
  cdr = inject(ChangeDetectorRef);
  observableCount = new BehaviorSubject(0);
  signalCount = signal<number>(0);
  count = 0;

  increment() {
    this.count++;
  }
  incrementSignal() {
    this.signalCount.set(this.signalCount() + 1);
    console.log("signalCount", this.signalCount());
  }
  incrementObservable() {
    this.observableCount.next(this.observableCount.value + 1);
  }

  detectChanges() {
    console.log(" ROOT_COMPONENT detected changes", new Date().getSeconds());
  }
}
Each time the user clicks on any of the buttons that trigger either increment(), incrementSignal() or incrementObservable(), the respective primitive is updated, and change detection is executed.
We included a random detectChanges() function call in our template as a simple indicator to know that the component’s view (HTML) has been updated. Each time this function calls and prints to the console, we know that our App component’s view was recomputed.
- Any update to a signal primitive.
export class AppComponent implements OnInit {
  signalCount = signal<number>(0);
  incrementSignal() {
    this.signalCount.set(this.signalCount() + 1);
  }

  ngOnInit(): void {
    setInterval(() => {
      this.incrementSignal();
    }, 100);
  }

  detectChanges() {
    console.log(" ROOT_COMPONENT detected changes", new Date().getSeconds());
  }
}
We included a lifecycle hook for our App component where we schedule an interval to increment our signal every 100ms. When we view the running application, we see that the signal is updated accordingly, which is reflected in the view. However, if we replace the incrementSignal() call with either incrementObservable() or increment(), the view will never be updated. Simply put, change detection is always triggered wherever a signal is updated from in a component.
Updates to an observable that is subscribed to in the component’s HTML template using the async pipe. The async pipe internally marks a component dirty, which triggers a change detection cycle internally each time the observable is modified.
@Component({
  selector: "app-root",
  standalone: true,
  imports: [CommonModule, RouterOutlet],
  template: `
    //...other code

    <h3>observable counter {{ observableCount | async }}</h3>
    <button (click)="incrementObservable()">inc count</button>
    {{ detectChanges() }}
  `,
})
export class AppComponent implements OnInit, OnChanges {
  observableCount = new BehaviorSubject(0);

  incrementObservable() {
    this.observableCount.next(this.observableCount.value + 1);
  }
  ngOnInit(): void {
    setInterval(() => {
      this.incrementObservable();
    }, 100);
  }

  detectChanges() {
    console.log(" ROOT_COMPONENT detected changes", new Date().getSeconds());
  }
}
We now included the async pipe in our components view and called the incrementObservable() function in our interval. The observable is updated and reflected in the view thanks to the async pipe.
Certain situations require change detection to be triggered manually by the developer. An example is function calls that do not originate from events that update an instance variable or an observable that is not subscribed to using the async pipe.
To manually trigger change detection, the developer has to access the ChangeDetectionRef and call the MarkForCheck function manually.
@Component({
  selector: "app-root",
  standalone: true,
  imports: [CommonModule, RouterOutlet],
  template: `
    <h3>Instance variable counter {{ count }}</h3>
    <button (click)="increment()">inc count</button>

    {{ detectChanges() }}
  `,
})
export class AppComponent implements OnInit, OnChanges {
  cdr = inject(ChangeDetectorRef);
  count = 0;
  increment() {
    this.count++;
  }

  ngOnInit(): void {
    setInterval(() => {
      this.increment();
      this.cdr.markForCheck();
    }, 100);
  }

  detectChanges() {
    console.log(" ROOT_COMPONENT detected changes", new Date().getSeconds());
  }
}
Since the call to increment() originates from a lifecycle hook, change detection is not run. To run change detection, we inject the changeDetectionRef and call the markForCheck function, which dirty marks the component and its ancestors and triggers change detection.
However, for the signal primitive change detection is always triggered when its value is modified in a component. This is why components using signals are highly compatible with the zoneless change detection mechanism. This means migration of these components to zoneless can be done without any modifications to existing component code.
More Performance with onPush Components
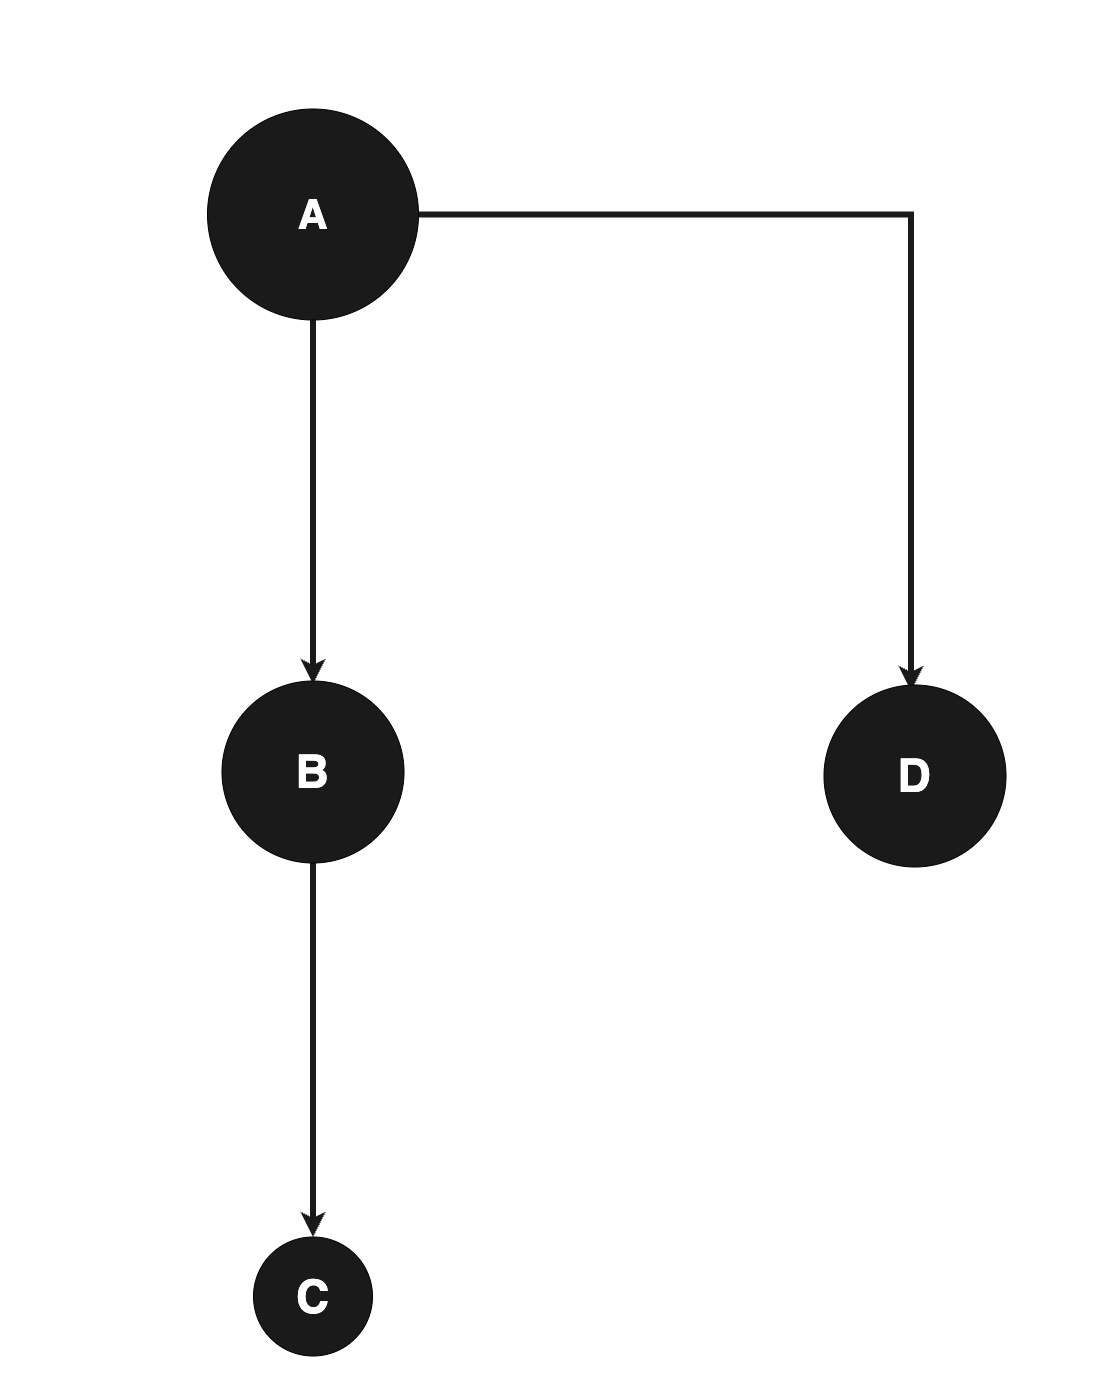
As applications scale, maintaining performance is key. When we have a large tree of components, change detection cycles may need to traverse the whole application tree, which can significantly hurt application performance. The Angular team has provided different change detection strategies for components to minimize the number of component nodes refreshed during a change detection cycle. The two main strategies are default and onPush strategy. To get the best performance in components using Zoneless change detection, it is recommended to use the onPush change detection strategy, particularly for simpler application trees like the one shown below.

When you use an OnPush change detection strategy for Components A, B, C and D, for example, if Component A changes—since it has no parents—only A will be marked as dirty and re-rendered in the subsequent change detection cycle, not its subtree (i.e., nodes B, C and D). However, if any of B, C or D receive new inputs due to A’s re-rendering, they will be re-rendered.
However, if component C changes because of dirty marking, its ancestors B and A will also be marked as dirty. Consequently, A, B and C will be re-rendered in the next change detection cycle. Component D will not be re-rendered unless it receives new inputs from its parent A due to the change detection cycle.
Conclusion
Zoneless change detection promises a lot in building highly performant and reactive Angular applications. This guide explores this new feature and provides a foundation for developers to start integrating it into their projects.

Christian Nwamba
Chris Nwamba is a Senior Developer Advocate at AWS focusing on AWS Amplify. He is also a teacher with years of experience building products and communities.

