Event Sourcing in ASP.NET Core: How to Store Changes as Events

Summarize with AI:
Learn how to implement the Event Sourcing architectural pattern in your ASP.NET Core app to record event-related system changes.
Have you ever imagined having a complete history of data in a distributed application? With Event Sourcing, each change becomes an immutable event, for full traceability in ASP.NET Core.
Event Sourcing is an architectural pattern widely used in large and medium-sized systems due to its versatility in dealing with complexities through an approach different from traditional approaches: Instead of saving the current state, it records each change in the system as an event.
In this post, we will understand how Event Sourcing works and what its advantages are compared to traditional approaches. We will also implement an ASP.NET Core application using the principles of Event Sourcing.
Understanding Event Sourcing
Event Sourcing is an architectural pattern that aims to handle changes through immutable events, storing the complete history of all changes made to a system, allowing the reconstruction of the state at any time.
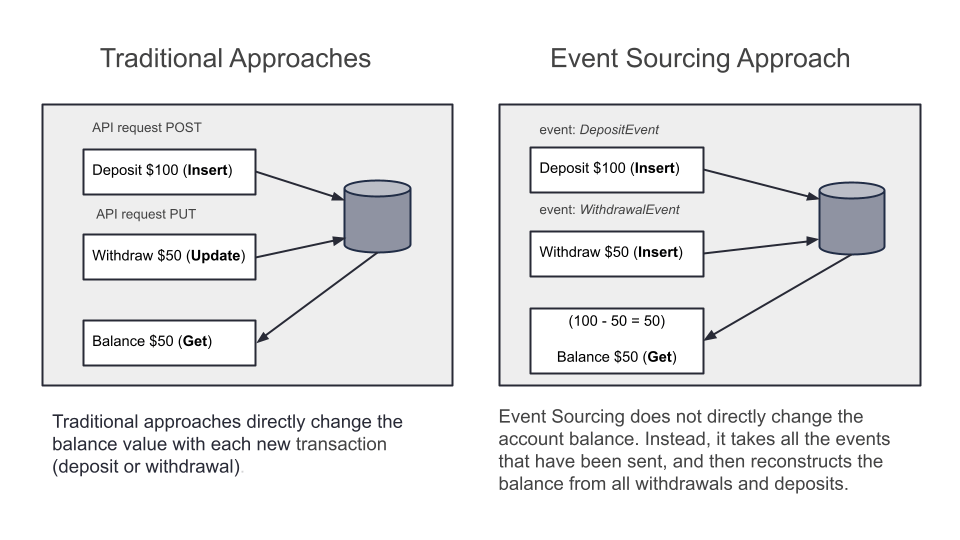
Imagine a bank account management platform. Instead of having an Account entity, which has a balance that is updated with each new transaction, in Event Sourcing, each transaction (deposit, withdrawal, transfer) is recorded as an event that does not change. Each event is recorded exactly as it was sent, so the current account balance is derived from the amounts deposited and withdrawn in previous events. This allows tracking the entire history of account movements, so all information from the first change to the last is present.
The image below demonstrates how movements in a bank account are handled using the traditional and Event Sourcing approaches.

Advantages of Using Events
The use of events brings several advantages, especially in systems that need to maintain traceability (history) and be scalable and resilient. Below are some of the main aspects that make the use of events a great choice:
Complete data history: The use of events allows you to have an immutable history of everything that happened. This facilitates audits, debugging and analysis of the behavior of the system during its life cycle.
Reproduction and reconstruction of the state: It is possible to reconstruct the current state of any entity, simply by reapplying past events.
Scalability and performance: The use of events allows the separation between writing (events) and reading (projections), allowing optimizations for each one in a specific way. In addition, systems can be designed to scale horizontally, since events are stored asynchronously.
Easy asynchronous integration: Allows the creation of decoupled microservices, where services react to events without the need for direct calls.
Resilience and fault tolerance: In case of failure, simply reprocess the events to restore the system state. In addition, there is no risk of data loss, as events are stored immutably and are always available.
Implementing Event Sourcing in ASP.NET Core
Now we will implement an ASP.NET Core application that uses the Event Sourcing pattern to send and receive deposit and withdrawal events. For this, we will use two libraries: RabbitMQ and MassTransit.
RabbitMQ is a message broker that implements the Advanced Message Queuing Protocol (AMQP). It acts as an intermediary between message producers and consumers, allowing them to communicate in a decoupled and asynchronous way.
MassTransit is a .NET library for asynchronous messaging. It simplifies integration with message brokers like RabbitMQ or Azure Service by abstracting away complex details and supporting messaging patterns like publish/subscribe, request/response and saga orchestration.
Prerequisites
Below are some prerequisites that you need to meet to reproduce the tutorial in the post.
- .NET version – You will need the latest version of .NET (.NET 9 or higher)
- Docker – Required to run the local RabbitMQ service
Creating the Application and Installing the Dependencies
To create the application, you can use the command below:
dotnet new web -o BankStream
Then, in the project root, you can use the following commands to install the NuGet packages:
dotnet add package Microsoft.EntityFrameworkCore
dotnet add package Microsoft.EntityFrameworkCore.Sqlite
dotnet add package Microsoft.EntityFrameworkCore.Design
dotnet add package MassTransit
dotnet add package MassTransit.RabbitMQ
dotnet add package MassTransit.AspNetCore
Creating the Events
Now let’s create the entities that represent the deposit and withdrawal events. They will be simple, as the focus is to demonstrate the sending and consumption of the events.
So, create a new folder called “Events” and, inside it, create the following records:
- DepositEvent
namespace BankStream.Events;

public record DepositEvent(Guid Id, string AccountId, decimal Amount);
- WithdrawalEvent
namespace BankStream.Events;

public record WithdrawalEvent(Guid Id, string AccountId, decimal Amount);
Creating the Consumers
Then, let’s create the consumers. They are responsible for receiving the events and processing the actions related to it. In this case, update the status and register it in the database.
First, let’s create the classes and enums used by the consumers. So, create a new folder called “Models” and, inside it, create the following classes:
- StatusEnum
namespace BankStream.Models;
public enum StatusEnum
{
    Pending,
    Completed,
    Failed,
    Canceled,
    Reversed,
    InProgress,
    OnHold
}
- TransactionTypeEnum
namespace BankStream.Models;

public enum TransactionTypeEnum
{
    Deposit,
    Withdrawal
}
- TransactionStatus
namespace BankStream.Models;

public class TransactionStatus
{
    public TransactionStatus()
    {
    }

    public TransactionStatus(Guid id, string accountId, StatusEnum statusEnum, decimal amount, bool isSuccess, string? errorMessage, TransactionTypeEnum type, DateTime createdAt)
    {
        Id = id;
        AccountId = accountId;
        StatusEnum = statusEnum;
        Amount = amount;
        IsSuccess = isSuccess;
        ErrorMessage = errorMessage;
        Type = type;
        CreatedAt = createdAt;
    }

    public Guid Id { get; set; }
    public string AccountId { get; set; }
    public StatusEnum StatusEnum { get; set;}
    public decimal Amount { get; set; }
    public bool IsSuccess { get; set; }
    public string? ErrorMessage { get; set; }
    public TransactionTypeEnum Type { get; set; }
    public DateTime CreatedAt { get; set; } = DateTime.UtcNow;
}
Then, create a new folder called “Data” and inside it add the class below:
using BankStream.Events;
using BankStream.Models;
using Microsoft.EntityFrameworkCore;

namespace BankStream.Data;

public class EventDbContext : DbContext
{
    public DbSet<DepositEvent> Deposits { get; set; }
    public DbSet<WithdrawalEvent> Withdrawals { get; set; }
    public DbSet<TransactionStatus> TransactionStatus { get; set; }

    public EventDbContext(DbContextOptions<EventDbContext> options)
        : base(options) { }
}
Now, let’s create the consumer classes. Create a new folder called “Consumers” and add to it the following classes:
- DepositConsumer
using BankStream.Data;
using BankStream.Events;
using BankStream.Models;
using MassTransit;

namespace BankStream.Consumers;

public class DepositConsumer : IConsumer<DepositEvent>
{
    private readonly EventDbContext _dbContext;

    public DepositConsumer(EventDbContext dbContext) => _dbContext = dbContext;

    public async Task Consume(ConsumeContext<DepositEvent> context)
    {
        var deposit = context.Message;

        try
        {
            await _dbContext.TransactionStatus.AddAsync(new TransactionStatus(
                Guid.NewGuid(),
                deposit.AccountId,
                StatusEnum.Completed,
                deposit.Amount,
                true,
                string.Empty,
                TransactionTypeEnum.Deposit,
                DateTime.Now)
            );

            await _dbContext.Deposits.AddAsync(deposit);

            await _dbContext.SaveChangesAsync();
        }
        catch (Exception ex)
        {
            await _dbContext.TransactionStatus.AddAsync(new TransactionStatus(
                Guid.NewGuid(),
                deposit.AccountId,
                StatusEnum.Failed,
                deposit.Amount,
                true,
                ex.Message,
                TransactionTypeEnum.Deposit,
                DateTime.Now)
            );
            await _dbContext.SaveChangesAsync();
            throw;
        }
    }
}
- WithdrawalConsumer
using BankStream.Data;
using BankStream.Events;
using BankStream.Models;
using MassTransit;

namespace BankStream.Consumers;

public class WithdrawalConsumer : IConsumer<WithdrawalEvent>
{
    private readonly EventDbContext _dbContext;

    public WithdrawalConsumer(EventDbContext dbContext) => _dbContext = dbContext;

    public async Task Consume(ConsumeContext<WithdrawalEvent> context)
    {
        var withdrawal = context.Message;
        try
        {
            await _dbContext.TransactionStatus.AddAsync(new TransactionStatus(
                Guid.NewGuid(),
                withdrawal.AccountId,
                StatusEnum.Completed,
                withdrawal.Amount,
                true,
                string.Empty,
                TransactionTypeEnum.Withdrawal,
                DateTime.Now)
            );

            await _dbContext.Withdrawals.AddAsync(context.Message);
            await _dbContext.SaveChangesAsync();
        }
        catch (Exception ex)
        {
            await _dbContext.TransactionStatus.AddAsync(new TransactionStatus(
                Guid.NewGuid(),
                withdrawal.AccountId,
                StatusEnum.Failed,
                withdrawal.Amount,
                false,
                ex.Message,
                TransactionTypeEnum.Withdrawal,
                DateTime.Now)
            );
            await _dbContext.SaveChangesAsync();
            throw;
        }
    }
}
Now, let’s analyze what is being done in both consumers.
The above classes DepositConsumer and WithdrawalConsumer use MassTransit to process events through the IConsumer<T> interface.
When a transaction event arrives, the Consume() method extracts the data from the received message and persists it to the database. In both classes, a new transaction status record (TransactionStatus) is created, making it possible to track the actions that occurred during processing.
After the transaction status is created, the deposit and withdrawal events are added to their database datasets (_dbContext.Deposits and _dbContext.Withdrawals). Finally, the changes are persisted in the database through the SaveChangesAsync() call.
Creating the Controller Class
In the controller class, we will add the endpoints for deposit and withdrawal that will call the events. So, create a new folder called “Controllers” and, inside it, add the following controller class:
- AccountController
using BankStream.Data;
using BankStream.Events;
using BankStream.Models;
using MassTransit;
using Microsoft.AspNetCore.Mvc;

namespace BankStream.Controllers;

[ApiController]
[Route("api/accounts")]
public class AccountController : ControllerBase
{
    private readonly IBus _bus;
    private readonly EventDbContext _dbContext;

    public AccountController(IBus bus, EventDbContext dbContext)
    {
        _bus = bus;
        _dbContext = dbContext;
    }

    [HttpPost("deposit")]
    public async Task<IActionResult> Deposit([FromBody] DepositEvent deposit)
    {
        await _dbContext.TransactionStatus.AddAsync(new TransactionStatus(
            Guid.NewGuid(),
            deposit.AccountId,
            StatusEnum.Pending,
            deposit.Amount,
            false,
            string.Empty,
            TransactionTypeEnum.Deposit,
            DateTime.Now)
        );
        await _dbContext.SaveChangesAsync();

        await _bus.Publish(deposit);
        return Accepted();
    }

    [HttpPost("withdrawal")]
    public async Task<IActionResult> Withdraw([FromBody] WithdrawalEvent withdrawal)
    {
        await _dbContext.TransactionStatus.AddAsync(new TransactionStatus(
             Guid.NewGuid(),
             withdrawal.AccountId,
             StatusEnum.Pending,
             withdrawal.Amount,
             false,
             string.Empty,
             TransactionTypeEnum.Withdrawal,
             DateTime.Now)
         );
        await _dbContext.SaveChangesAsync();

        await _bus.Publish(withdrawal);
        return Accepted();
    }

   [HttpGet("{accountId}/balance")]
    public IActionResult GetBalance(string accountId)
    {
        var deposits = _dbContext.
            Deposits.
            Where(d => d.AccountId == accountId)
            .Sum(d => d.Amount);

        var withdrawals = _dbContext
            .Withdrawals
            .Where(w => w.AccountId == accountId)
            .Sum(w => w.Amount);

        return Ok(deposits - withdrawals);
    }
}
Here, the controller uses the IBus interface, which is the MassTransit message bus used to publish events.
When a client makes an HTTP POST request to the /api/accounts/deposit endpoint, the Deposit() method receives a DepositEvent, representing the request for a deposit. Before publishing the event to the bus, a transaction status of Pending is recorded in the database, indicating that the operation has been requested but has not yet been completed. After persisting this status, the event is published with _bus.Publish(deposit), allowing asynchronous consumers such as DepositConsumer to process the transaction.
The same flow applies to the Withdraw method, which responds to the /api/accounts/withdrawal endpoint. It receives a WithdrawalEvent, records the transaction as Pending in the database, and publishes the event to the bus for later processing by the WithdrawalConsumer.
In addition to these two endpoints, there is a third one that is used to check the balance. To do this, instead of just fetching the value from the database as in traditional approaches, it uses the principle of Event Sourcing to reconstruct the current state through the transaction history. So, first, the totals of deposits and withdrawals are obtained, and the balance value is obtained by subtracting the total withdrawals from the total deposits.
Configuring the Program Class
In the Program class, we will configure the EventDbContext class to use the SQLite database. In addition, we will configure MassTransit and RabbitMQ to send and consume events.
So, open the Program class of your application and replace whatever is in it with the following code:
using BankStream.Consumers;
using BankStream.Data;
using MassTransit;
using Microsoft.EntityFrameworkCore;

var builder = WebApplication.CreateBuilder(args);

builder
    .Services
    .AddDbContext<EventDbContext>(options => options.UseSqlite("Data Source=events.db"));
builder
    .Services
    .AddMassTransit(x =>
    {
        x.AddConsumer<DepositConsumer>();
        x.AddConsumer<WithdrawalConsumer>();
        x.UsingRabbitMq(
            (context, cfg) =>
            {
                cfg.Host("rabbitmq://localhost");
                cfg.ReceiveEndpoint(
                    "event-queue",
                    e =>
                    {
                        e.SetQueueArgument("x-message-ttl", 500000);
                        e.ConfigureConsumer<DepositConsumer>(context);
                        e.ConfigureConsumer<WithdrawalConsumer>(context);
                    }
                );
            }
        );
    });

builder.Services.AddControllers();

var app = builder.Build();

app.MapControllers();

app.Run();
Let’s analyze the code above.
After configuring SQLite, MassTransit is registered, where the two consumers are configured: DepositConsumer and WithdrawalConsumer. In addition, communication with RabbitMQ is established to transport the messages, for which the connection is established with a local host (rabbitmq://localhost).
Within the RabbitMQ configuration, a receiving endpoint called event-queue is defined. This queue is configured with the SetQueueArgument() method and a special argument, x-message-ttl, which determines the time to live of the messages within the queue. This lets us remove expired messages automatically after 500,000 milliseconds (500 seconds). This is done so that the messages can be checked in the RabbitMQ dashboard. Finally, the consumers are linked to the queue, so that any deposit or withdrawal event received by RabbitMQ will be forwarded to the appropriate consumer for processing.
Running EF Migrations
To create the database and tables, run the EF Core commands:
- Command to install EF if you don’t have it yet:
dotnet tool install --global dotnet-ef
- Generate the Migration files:
dotnet ef migrations add InitialCreate
- Run the persistence:
dotnet ef database update
Setting up RabbitMQ in Docker
To run the application, you need to have RabbitMQ running locally. To do this, you can use the command below to download the RabbitMQ image and run a Docker container of it:
docker run -d --name rabbitmq -p 5672:5672 -p 15672:15672 rabbitmq:3-management
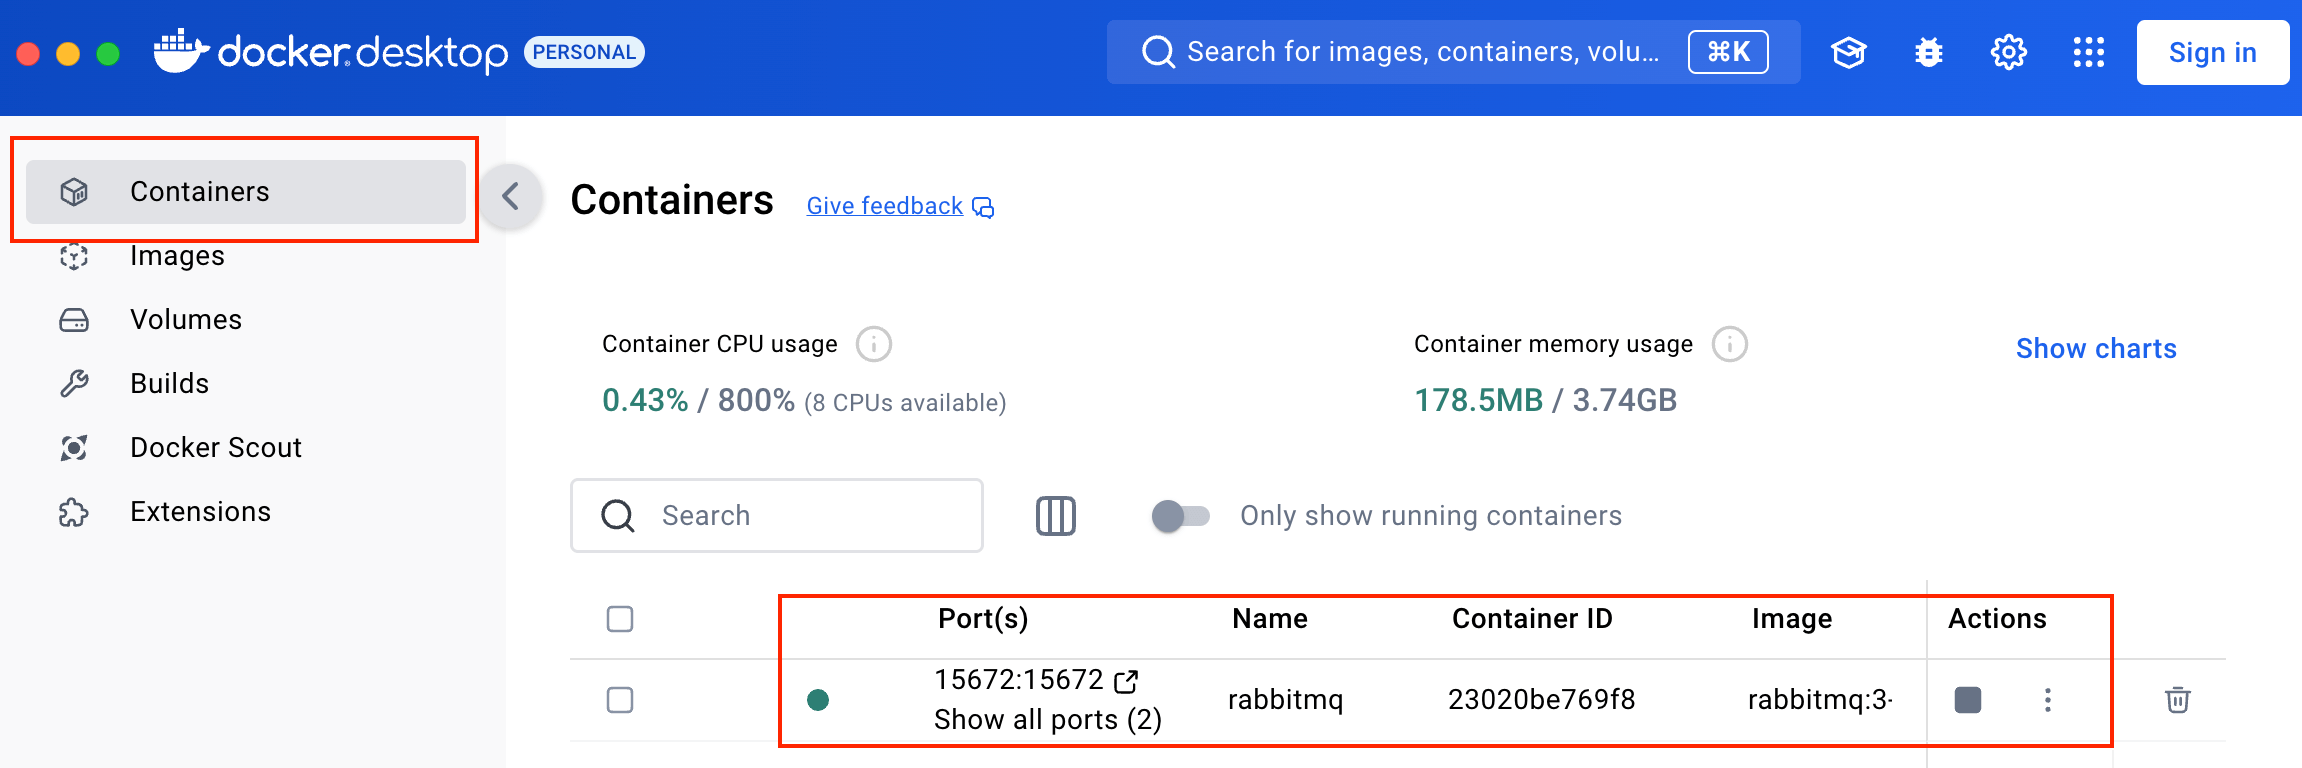
After running the command, you can check the RabbitQM container running on Docker Desktop:

Sending and Consuming Events
Now run the application and request the endpoint below. This post uses Progress Telerik Fiddler Everywhere to make the requests.
POST - http://localhost:PORT/api/accounts/deposit
{
  "id": "a1a7c1f2-3d4e-42b9-9e77-5f1e7c8b6c2f",
  "accountId": "123456789",
  "amount": 1300.90
}

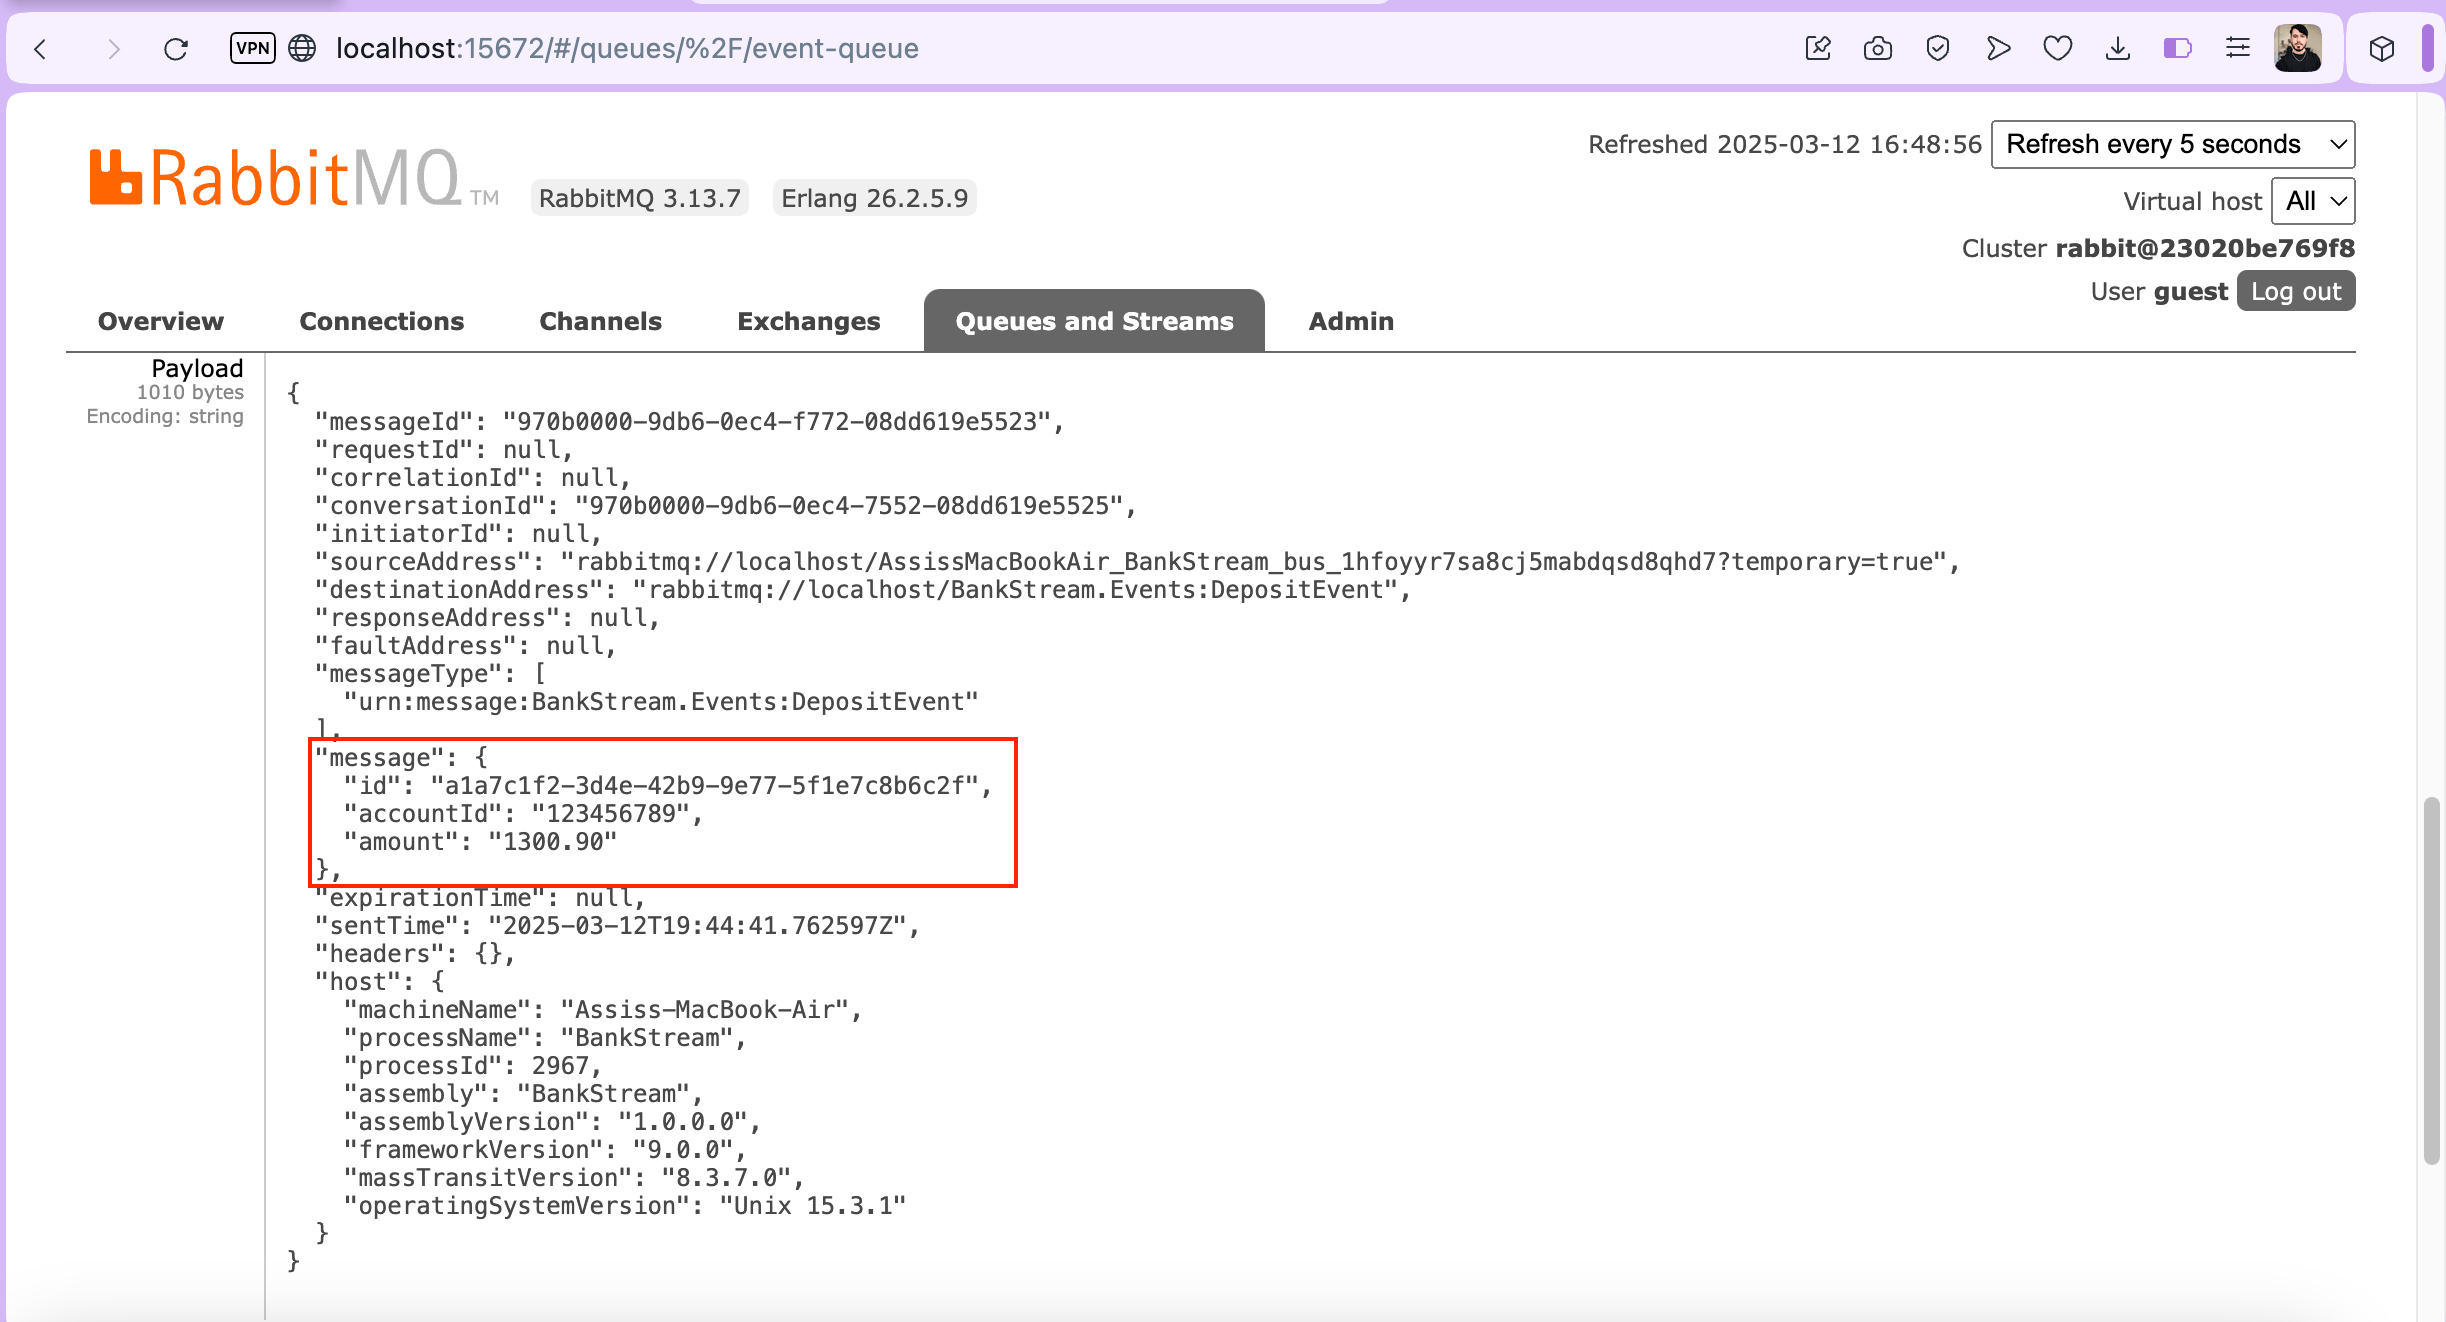
Now, access the RabbitMQ homepage at the address indicated in Docker (you can use the default username and password guest). Then click on the “Queues and Streams” menu, then on “Get messages”, and finally “Get message(s)”.
So, you can check the data sent in the message, as well as other data such as operating system, etc., as shown in the images below:


Now let’s run the withdrawal endpoint, so make a new request to the endpoint
POST - http://localhost:PORT/api/accounts/withdraw
{
"id": "fef6df04-df3f-46a7-99a7-6d9992dd3558",
"accountId": "123456789",
"amount": 200.00
}

Then, make another request to the endpoint below to retrieve the current balance:
GET - http://localhost:PORT/api/accounts/123456789/balance
If everything goes well, you will get the result below as shown in the image.

Note that the resulting value was 1100.90. This value does not exist in the database but is the result of subtracting the deposit value of 1300.90 from the withdrawal value of 200.00.
Conclusion
Whether or not to use Event Sourcing is a choice that should be made based on the needs of the project. If you need to keep a history of changes to a specific object, such as a bank account balance, for example, Event Sourcing can be a great choice. In addition, Event Sourcing has other advantages such as easy scalability, performance, decoupling, resilience and fault tolerance.
In this post, we understand how Event Sourcing differs from traditional approaches and how to implement a bank balance management system in practice, using the resources of RabbitMQ and MassTransit for sending and consuming messages.
So, I hope this post helps you understand and implement Event Sourcing using cutting-edge resources like ASP.NET Core, RabbitMQ, MassTransit and Docker.


