
Enhancing .NET MAUI App Appearance Using Lottie Animations

Summarize with AI:
In this article, we will analyze how to integrate Lottie animations into your .NET MAUI applications, allowing you to add movement and professionalism to your graphical screens.
Let’s get started!
What Is a Lottie Animation?
A Lottie animation is a type of vector-based animation, represented in JSON format, which allows it to be scalable, lightweight and easily integrated across various platforms. Since it is based on vectors and code, it is much less heavy than a GIF animation or a video.
Where Can Lottie Animations Be Found?
There are several websites that have a large collection of Lottie files. One of the most well-known is LottieFiles, which allows you to download many of these files for free. Additionally, this site has a powerful tool that allows you to create Lottie animations from scratch, with an intuitive interface.
Now let’s see how to use these animations from your own .NET MAUI apps.
Implementing Lottie Animations in .NET MAUI Projects
Using Lottie animations in .NET MAUI projects is very simple thanks to community-created projects. I recommend making sure you have searched for and downloaded a Lottie animation of interest to test with the following examples.
Preparing the Project to Play Lottie Animations
Although there are several open-source projects that allow the use of Lottie animations in .NET MAUI projects, the most popular and oldest is led by the team behind SkiaSharp. SkiaSharp is a .NET cross-platform 2D graphics API, which has a project called SkiaSharp.Extended.UI.Maui, encompassing controls usable in .NET MAUI projects. This is where we will find the SkLottieView control.
To use the SkLottieView control in your own projects, just follow these steps:
- In your project, search for and add the package
SkiaSharp.Extended.UI.Maui. - Modify the
MauiProgram.csfile by adding theUseSkiaSharp()method to the builder, like this:
public static class MauiProgram
{
    public static MauiApp CreateMauiApp()
    {
        var builder = MauiApp.CreateBuilder();
        builder
            .UseMauiApp<App>()
            .UseSkiaSharp()
            .ConfigureFonts(fonts =>
            {
                fonts.AddFont("OpenSans-Regular.ttf", "OpenSansRegular");
                fonts.AddFont("OpenSans-Semibold.ttf", "OpenSansSemibold");
            });
    ...
}
- Add the Lottie files with the
.jsonextension in the Resources\raw folder. - On the page where you will add the Lottie animation, add a reference to the control’s namespace, similar to this (you can change the name if you prefer):
xmlns:lottie="clr-namespace:SkiaSharp.Extended.UI.Controls;assembly=SkiaSharp.Extended.UI"
Running Lottie Animations in .NET MAUI Projects
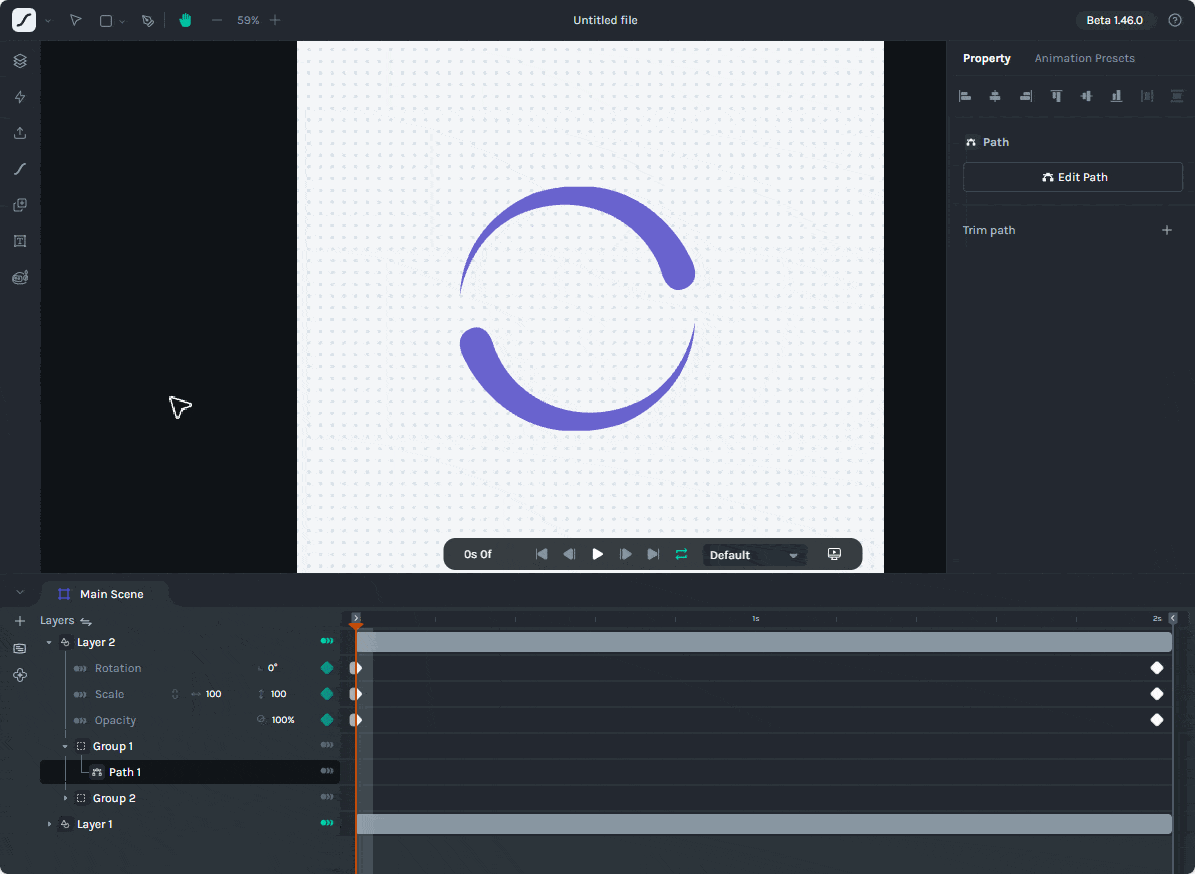
Once you have configured the project with the previous steps, it’s time to use the control. The simplest way is as follows:
<lottie:SKLottieView
    HeightRequest="400"
    RepeatCount="-1"
    Source="button.json"
    WidthRequest="400" />
From the above code, we can see the following properties:
HeightRequest: Represents the height of the animation on the page.WidthRequest: Represents the width of the animation on the page.Source: The name of the JSON file that contains the Lottie animation.RepeatCount: The number of times the animation should repeat. If it is -1, it will repeat indefinitely.
When running the application, we will see the animation being executed as shown in the following image:
In addition to the basic properties shown above, the SKLottieView control also has the following additional properties:
Duration: Allows retrieving the total duration of the animation.Progress: Gets the current progress of the animation.RepeatMode: Allows specifying how to repeat the animation, with possible values Restart and Reverse.IsAnimationEnabled: Sets whether the animation should play or not.IsComplete: Gets whether the animation has been completed.
Available Events in the SKLottieView Control
The SKLottieView control has three events that can help you know when things happen in the animation, which are as follows:
AnimationLoaded: Fired when the animation has been loaded successfully.AnimationFailed: Fired when there was an error loading the animation.AnimationCompleted: Occurs when the total number of repetitions has concluded. With a value of -1, this event is never fired.
These events are very useful if you want to perform some action immediately after the animation has finished, such as first displaying an animated company logo and then immediately transitioning to the login screen.
Practical Example: Replacing an Activity Indicator with a Lottie Animation
Let’s assume we have an AI image generator application. Such applications often take some time while generating the image, so it’s advisable to provide feedback to the user that their request is being processed. Traditionally, we could use an Activity Indicator to show that the image is being generated. The XAML code example is as follows:
<ContentPage
    x:Class="SkLottieAnimationDemo.MainPage"
    xmlns="http://schemas.microsoft.com/dotnet/2021/maui"
    xmlns:x="http://schemas.microsoft.com/winfx/2009/xaml"
    xmlns:lottie="clr-namespace:SkiaSharp.Extended.UI.Controls;assembly=SkiaSharp.Extended.UI"
    BackgroundColor="{StaticResource BackgroundColor}">

    <ContentPage.Resources>
        <ResourceDictionary>
            <Color x:Key="BackgroundColor">#121212</Color>
            <Color x:Key="PrimaryTextColor">#FFFFFF</Color>
            <Color x:Key="SecondaryTextColor">#888888</Color>
            <Color x:Key="ControlBackgroundColor">#1E1E1E</Color>
            <Color x:Key="ButtonBackgroundColor">#333333</Color>
            <Color x:Key="BorderColor">#2E2E2E</Color>
        </ResourceDictionary>
    </ContentPage.Resources>

    <Grid>
        <VerticalStackLayout Padding="20" Spacing="20">
            <Label
                FontAttributes="Bold"
                FontSize="24"
                HorizontalOptions="Center"
                Text="AI Image Generator"
                TextColor="{StaticResource PrimaryTextColor}" />
            <Entry
                x:Name="PromptEntry"
                BackgroundColor="{StaticResource ControlBackgroundColor}"
                HeightRequest="40"
                Placeholder="Enter your prompt..."
                PlaceholderColor="{StaticResource SecondaryTextColor}"
                TextColor="{StaticResource PrimaryTextColor}" />
            <Button
                x:Name="GenerateButton"
                BackgroundColor="{StaticResource ButtonBackgroundColor}"
                Clicked="GenerateButton_Clicked"
                CornerRadius="6"
                HeightRequest="45"
                Text="Generate Image"
                TextColor="{StaticResource PrimaryTextColor}" />
            <Border
                Padding="0"
                BackgroundColor="{StaticResource ControlBackgroundColor}"
                HeightRequest="400"
                Stroke="{StaticResource BorderColor}"
                StrokeShape="RoundRectangle 8">
                <Image
                    x:Name="GeneratedImage"
                    Aspect="AspectFill"
                    Source="{x:Null}" />
            </Border>
        </VerticalStackLayout>
        <Grid
            x:Name="Overlay"
            BackgroundColor="Black"
            IsVisible="False"
            Opacity=".8">
            <ActivityIndicator
                HeightRequest="35"
                IsRunning="True"
                Color="Blue" />
        </Grid>
    </Grid>
</ContentPage>
On the other hand, the C# code is as follows:
public partial class MainPage : ContentPage
{
    public MainPage()
    {
        InitializeComponent();
    }

    private async void GenerateButton_Clicked(object sender, EventArgs e)
    {
        Overlay.IsVisible = true;
        Overlay.IsEnabled = true;

        await Task.Delay(2500);

        GeneratedImage.Source = "ai.jpg";

        Overlay.IsVisible = false;
        Overlay.IsEnabled = false;
    }
}
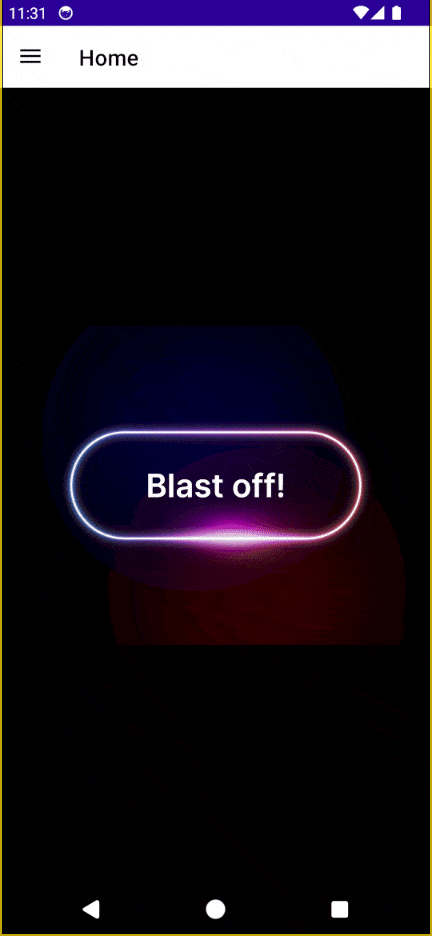
You can see that the example is simulated to avoid complicating the code too much. Now, the application running looks like this:

The application doesn’t look bad, but it could look better. In the .NET MAUI environment, we have several solutions that would allow us to display animations as popups easily, as I demonstrated in the article Discovering Multiple Ways to Create Popups in .NET MAUI. In our example, I will choose to use a .NET MAUI Popup control from Progress Telerik UI for .NET MAUI, due to its ease of use. Let’s change the Grid that contains the ActivityIndicator to the RadPopup control:
<Grid Padding="20">
    <telerik:RadPopup.Popup>
        <telerik:RadPopup
            x:Name="popup"
            OutsideBackgroundColor="#E6000000"
            Placement="Center"
            VerticalOffset="8">
            <Grid>
                <lottie:SKLottieView
                    HeightRequest="300"
                    HorizontalOptions="Center"
                    RepeatCount="-1"
                    Source="loader.json"
                    WidthRequest="300" />
            </Grid>
        </telerik:RadPopup>
    </telerik:RadPopup.Popup>
</Grid>
Similarly, let’s modify the code behind to control when the popup should appear on the screen:
private async void GenerateButton_Clicked(object sender, EventArgs e)
{
    popup.IsOpen = true;

    await Task.Delay(2500);

    GeneratedImage.Source = "ai.jpg";

    popup.IsOpen = false;
}
This way, we will have a better animation to show the user that their request is being processed:

This is how easy it is to combine a Lottie animation with a Popup.
Conclusion
Throughout this article, you have learned what Lottie animations are and how to use them to your advantage, integrating them into your .NET MAUI applications through the use of the SKLottieView control. I encourage you to explore other places where you can add interactivity to your applications using this type of animation.

Héctor Pérez
Héctor Pérez is a Microsoft MVP with more than 10 years of experience in software development. He is an independent consultant, working with business and government clients to achieve their goals. Additionally, he is an author of books and an instructor at El Camino Dev and Devs School.
Related Posts
Comments
All articles
Topics
Web MobileMobile
Desktop
Design
Productivity
People
