Embedding Beautiful Reporting into Your ASP.NET MVC Applications

Summarize with AI:
Check out our guide for embedding reports into ASP.NET MVC applications. In this step-by-step tutorial, learn how to use Telerik Report Viewer in MVC applications.
In this step-by-step tutorial, I will demonstrate how to use Telerik Report Viewer in MVC applications. This tutorial covers the following topics:
- What is Telerik Report Viewer?
- How can it be integrated with an app?
- How to implement the Report Viewer in ASP.NET MVC
- Report Viewer toolbar
- Conclusion
What is Telerik Report Viewer?
The Telerik Report Viewer is a pure HTML5/JavaScript/CSS3 jQuery-based widget that allows displaying Telerik reports in an HTML page. The layout or styling is based on pure HTML5 templates and CSS3 styles and is fully customizable. It supports mobile as well as desktop browsers. Report viewers, which are UI components, allow you to display the report document produced by the report engine in the application UI.
How Can it Be Integrated with an App?
To integrate the Telerik Report Viewer in an ASP.NET MVC application, you'll need to follow these prerequisites:
- Review the HTML5 Report Viewer requirements
- A running Telerik Reporting REST Service endpoint to use in an MVC application (find more info here)
- You must load only one version of Telerik Kendo UI styles and scripts on the page or via CDN
Grab the eBook: A Quick Guide to Expert .NET Reporting Tools
How to Implement the Report Viewer in ASP.NET MVC
The Telerik Report Viewer provides an HTML helper that can be used in ASP.NET MVC applications. The easiest way to add and configure Report Viewer would be to use the Item Templates that are registered in Visual Studio during the product installation.
The MVC Report Viewer View Item Template is a fully functional wizard that does all the heavy lifting for users:
- Adds the necessary NuGet packages and references
- Provides a sample report definition if needed
- Even creates a new instance of Reporting REST Service when requested
That workflow is described here. If you are able, that is the recommended setup.
Otherwise, follow these steps to use this helper manually in MVC:
Step 1: Create an ASP.NET MVC application using Visual Studio.
Step 2: Add the below two references of Telerik into application and set their Copy Local properties to true in Visual Studio.
- Telerik.Reporting
- Telerik.ReportViewer.Mvc
Step 3: Add the previous step's added references into the web.config file in the Views folder as below:
<pages  pageBaseType="System.Web.Mvc.WebViewPage">
    <namespaces>
        ...
        <add  namespace="Telerik.Reporting" />
        <add  namespace="Telerik.ReportViewer.Mvc" />
    </namespaces>
</pages>
Step 4: The default viewer implementation depends externally on jQuery. Create a section named scripts and add a link to jQuery in the view:
@section scripts {
<script  src="https://code.jquery.com/jquery-3.3.1.min.js"></script>
}
Step 5: The Report Viewer uses the style of the desired Kendo UI theme, so please add these below references to the Less-based CSS files in the head element of _Layout.cshtml:
<!-- The required Less-based styles -->
<link href="https://kendo.cdn.telerik.com/2020.1.114/styles/kendo.common.min.css"  rel="stylesheet"/>
<link  href="https://kendo.cdn.telerik.com/2020.1.114/styles/kendo.blueopal.min.css"  rel="stylesheet"/>
Step 6: Add references to the HTML5 report viewer's JavaScript file in the respective view, as below:
<script src="~/api/reports/resources/js/telerikReportViewer"></script>
Step 7: Add the Telerik Report Viewer helper provided for MVC applications in the respective view:
@(Html.TelerikReporting().ReportViewer()
                    .Id("reportViewer1")
                    .ServiceUrl(Url.Content("http://localhost:12345/api/reports/"))
                    .ReportSource(new UriReportSource() { Uri = "OlympicMedalsByNationalTeams.trdp" })
                    .ViewMode(ViewMode.Interactive)
                    .ScaleMode(ScaleMode.Specific)
                    .Scale(1.0)
                    .PersistSession(false)
                    .PrintMode(PrintMode.AutoSelect)
                    .EnableAccessibility(false)
                    .SearchMetadataOnDemand(false)
                    .Deferred()
)
Note - For available options for this HTML helper, please check details here.
Step 8: Render the deferred initialization statement for the Report Viewer scripts:
@(Html.TelerikReporting().DeferredScripts())
Step 9:
We have implemented the Telerik Report Viewer helper in our MVC application, and pages should look like this:
_Layout.cshtml
<!DOCTYPE html>
<html>
<head>
    <title>Demo</title>
    <meta charset="utf-8" />

    <meta name="viewport" content="width=device-width, initial-scale=1, maximum-scale=1" />
    <link href="https://kendo.cdn.telerik.com/2020.1.114/styles/kendo.common.min.css" rel="stylesheet" />
    <link href="https://kendo.cdn.telerik.com/2020.1.114/styles/kendo.blueopal.min.css" rel="stylesheet" />

    @RenderSection("styles", required: false)
    @RenderSection("scripts", required: false)
</head>
<body>
    @RenderBody()
</body>
</html>
Respective Index.cshtml view
@using Telerik.Reporting
@using Telerik.ReportViewer.Mvc
@{
    ViewBag.Title = "Home Page";
}

@section styles
{
    <style>
        body {
            margin: 5px;
            font-family: Verdana, Arial, sans-serif;
        }
        #reportViewer1 {
            position: absolute;
            left: 5px;
            right: 5px;
            top: 40px;
            bottom: 5px;
            overflow: hidden;
            clear: both;
        }
    </style>
}

@section scripts
{
    <script src="https://code.jquery.com/jquery-3.3.1.min.js"></script>
    <script src="@Url.Content("http://localhost:12345/api/reports/resources/js/telerikReportViewer/")"></script>
    @(Html.TelerikReporting().DeferredScripts())
}

@(Html.TelerikReporting().ReportViewer()
                    .Id("reportViewer1")
                    .ServiceUrl(Url.Content("http://localhost:12345/api/reports/"))
                    .ReportSource(new UriReportSource() { Uri = "OlympicMedalsByNationalTeams.trdp" })
                    .ViewMode(ViewMode.Interactive)
                    .ScaleMode(ScaleMode.Specific)
                    .Scale(1.0)
                    .PersistSession(false)
                    .PrintMode(PrintMode.AutoSelect)
                    .EnableAccessibility(false)
                    .SearchMetadataOnDemand(false)
                    .Deferred()
)
Step 10: Before running the application, please make sure the Reporting REST Service is running. Note that if the REST Service is in the same application it won’t be running until the app is started. If you're having trouble accessing the Reporting REST Service, you can check out this help article for some tips.
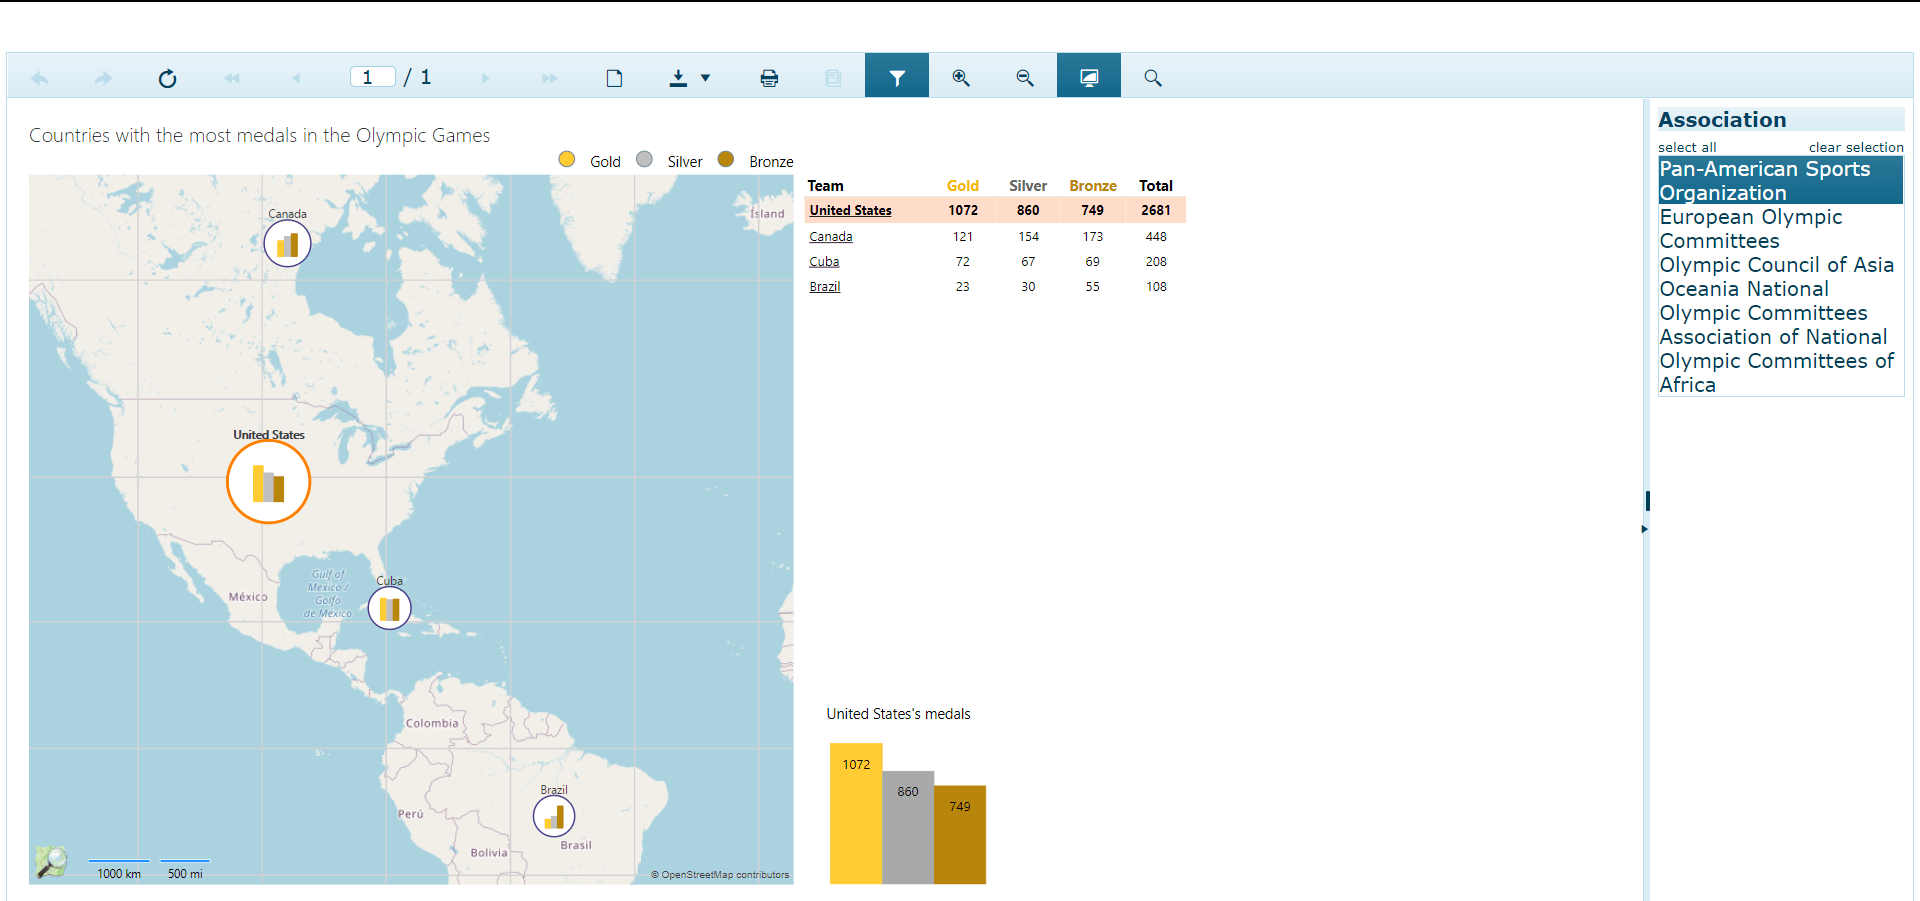
Step 11: Finally, run the application and navigate to the view with the ASP.NET MVC Report Viewer that we have just created. It will open in the browser and you can see the output like this:

The Report Viewer is divided into the main two parts. The first part on top is for toolbars, and the second part below it is used for showing the data.
Report Viewer Toolbar
Let's check what tools are available for users in the Report Viewer toolbar.
Top toolbar options:

- Forward/Backward
- Refresh report
- Page number selector
- Toggle print preview
- Download
- XLS
- CSV
- Text
- TIFF
- Web Archive
- XPS Document
- Zoom - In/Out
- Toggle - FullPage/PageWidth
- Search in report contents
- Toggles the document map area
- Print report
- Toggle filter
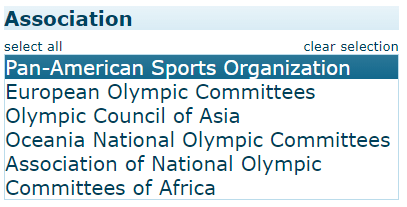
Filters - The below screenshot shows the filters that on the Report Viewer's right side. Based on these filters, data will be shown in the left side.

You can also download this example from here.
Conclusion
In this article, we discussed what the Telerik Report Viewer is, its prerequisites and how to use it working in an MVC application, and the Report Viewer toolbar for users. If you have any suggestions or queries regarding this article, please leave a comment.
Learn It, Share it.
Tried Telerik DevCraft?
You can choose Telerik Reporting and Telerik Report Server as individual products or enjoy them as part of the great Telerik DevCraft bundles.
Telerik DevCraft is the finest software developer tools collection across .NET and JavaScript technologies, which includes modern, feature-rich and professionally designed UI components for web, desktop and mobile applications, reporting and report management solutions, document processing libraries, automated testing and mocking tools from the Telerik and Kendo UI suites. DevCraft will arm you with everything you need to deliver outstanding applications in less time and with less effort. With the backing of our legendary support team, which consists of the developers who build the products, and a ton of resources and trainings you can rest assured that you have a stable partner to rely on for your everyday challenges along your software development journey.

Jeetendra Gund
Jeetendra Gund is a C# Corner MVP as well as the Chapter Leader of C# Corner Pune Chapter. He holds a master’s degree in Computer Science and has worked on several different domains. He has spent six years in grooming his knowledge about Microsoft Technologies and has been sharing his experiences on technologies such as C#.Net, MVC.Net, SQL Server, Entity Framework, AngularJS, JavaScript, HTML, and .NET Static Code Analysis. He is a regular speaker at C# Corner on Microsoft Technologies. Find him: C# Corner, LinkedIn, or Twitter.
