Deploy an Angular Application with Azure Static Web Apps

Summarize with AI:
In this post, you will learn about Microsoft’s Azure Static Web Apps and how you can use it to deploy your Angular application online, and how the changes you make afterward are built and deployed without additional input from you.
Angular
Angular, Google’s JavaScript (TypeScript) framework for building web applications, mobile or desktop, has over 67,000 stars on GitHub. It’s maintained by the Angular team at Google and a host of community members and organizations.
Before You Start
To be able to follow through in this article’s demonstration, you should have:
- A integrated development environment like VS Code
- Node version 11.0 installed on your machine
- Node Package Manager version 6.7 (usually ships with Node installation)
- Angular CLI version 9.0
-
The latest version of Angular (version 9).
// run the command in a terminal
ng version
Confirm that you are using version 9, and update to 9 if you are not.
- A GitHub account which should be currently logged in on your browser.
- An Azure Account, which you can make at this link.
Other nice-to-haves are:
- A working knowledge of the Angular framework at a beginner level.
Setting up Angular with Azure Template
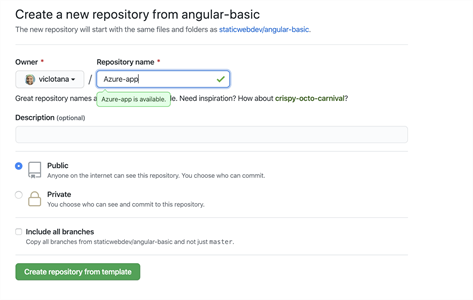
Angular is designed to be very modular and component based, which means that your whole app can be broken down in small independent components. For Azure Static Web Apps, the team provides a template to use while creating a new Angular project. So, make sure to follow the instructions at the start of this post before you continue. Now click on this link to create a repository with the Azure Angular template. The interface of the form should look like this:
Bringing It into Your Local Workflow
Now that your repository has been created, you can bring it in your workflow by cloning it into your local machine. Navigate to a folder of your choosing and use the command below:
git clone https://github.com/(Your Username)/(the repository name).git
Make sure to change the brackets to your actual credentials, and once you run the command you now have access to the repository on your machine. If you run your application in the dev server with:
ng serve
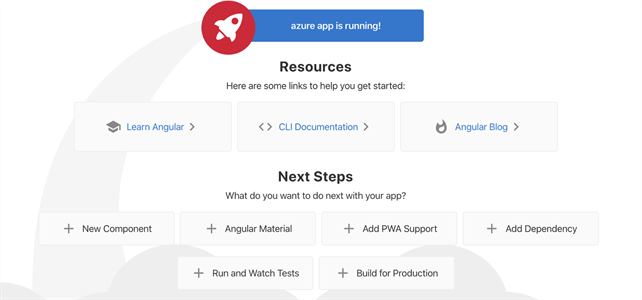
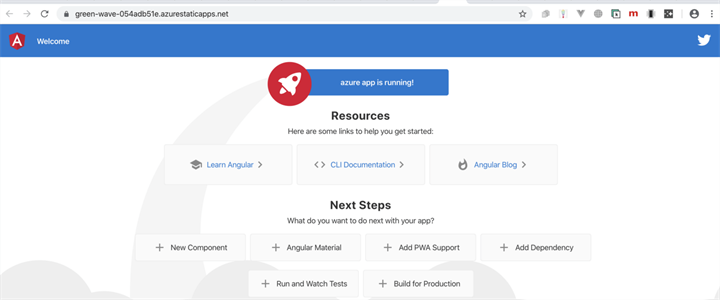
You will see that the app looks like this:
And this is the sample application we want to deploy online with the Azure Static Web App infrastructure.
What Is Azure Static Web App Infrastructure?
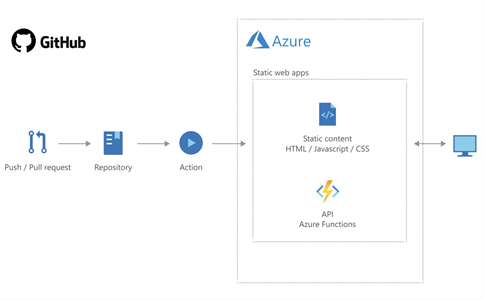
This is a modern web app service from the team at Microsoft that offers streamlined full-stack development from source code to global high availability. It accelerates your app development with a static frontend deployment and a very powerful backend service powered by serverless APIs all integrated through your GitHub workflow in the cloud, which is so amazing.
You can leverage a streamlined and unified app lifecycle management for your full-stack modern web apps, including custom domain configuration, integrated authentication and authorization and auto-provisioning of pre-production environments to validate changes before merging with a production branch. Also, Azure is one of the safest cloud hosting platforms out there. Microsoft spends over a billion dollars annually on cybersecurity research and development, is more compliant to security standards than any cloud security system available and has almost 4,000 security experts working on just privacy and security.
Now to deploy this application, let us set up the deployment using the Azure portal. If you are new to Azure portal, you can get up to 12 months of free access to Azure services by claiming the offer here.
Setting up with Azure Portal
Open the Azure portal here and click on “create a resource.” Then, search for static web apps.
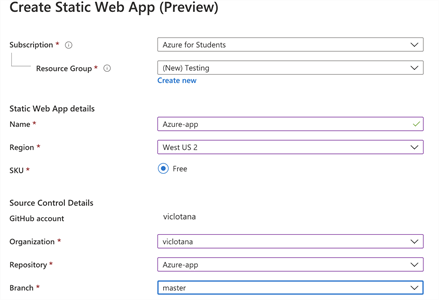
When you click “Create,” you will see a form that asks you about the resource you are about to set up. The subscription bar should have the subscription name you just used with the free 12-month plan (you can go to the section above to claim yours). In the resource group, create a new resource group, call it “Testing” and save.
In the Static Web App details section, fill it in with the repository name (Azure-app) and choose a region close to you and sign into your GitHub. When you are signed in, choose the organization and the exact project name (Azure-app), then choose the master branch. This takes you to the build page.
The Build Page
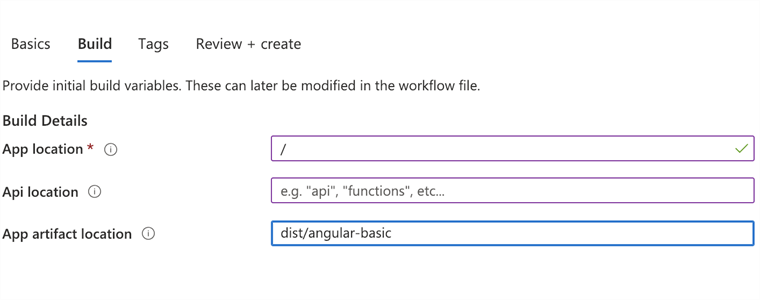
Put a forward slash in the App location box, leave the API location empty (because there is no backend for this particular test app) and then inside the artifact location, add “dist/angular-basic” to the box. Click “Review and create” and then click “Create.” You will see the deployment status and a prompt to pin the new resource. If you do, you can view it like so:
Now if you visit the custom-generated URL provided after two minutes, you will see that your Angular application is deployed publicly there. The great thing is that it all becomes automated, so for every commit you make, you can view the GitHub actions section of your project to monitor how it automatically pushes the new changes to the Azure cloud infrastructure. This is also one of the most amazing features of using the Azure cloud: You can set up your deployment process to be automated once you make a change without explicitly doing so.
What if I Have a Backend API?
In the setup stage, you can add the path for your API to your form at the API location section. However, you can also take a look at the Azure Static Web Apps documentation here.
Conclusion
This post has introduced you to building and deploying your Angular application using Azure’s cloud resource called Static Web Apps. We also saw how helpful it is to use because it integrates with GitHub actions to automate the process so you set up once and a deploy is scheduled on your behalf after every commit. We also learned how secure the Azure cloud services are compared to others in the market. Have you used any Azure cloud service before?

Nwose Lotanna Victor
Nwose Lotanna Victor is a web technology enthusiast who documents his learning process with technical articles and tutorials. He is a freelance frontend web developer based in Lagos, Nigeria. Passionate about inclusion, community-building and movies in Africa, he enjoys learning new things and traveling.

