
Angular Basics: How to Use the Event Emitter with Examples

Summarize with AI:
Learn how to use the Angular EventEmitter—a powerful tool that allows components to communicate with each other. And see practical examples with event emitters.
Welcome to our blog on using the EventEmitter in Angular. In this article, we will provide a comprehensive guide on how to use EventEmitter in Angular with examples. EventEmitter is a powerful tool that allows components to communicate with each other, and it plays a crucial role in managing communication and state within an Angular application.
We will explore the basics of EventEmitter and how it works, and then move on to practical examples that demonstrate how it can be implemented in different scenarios. Whether you are new to Angular or an experienced developer looking to improve your skills, this article will provide valuable insights and practical tips on how to use EventEmitter effectively. So, let’s dive in and learn about the EventEmitter in Angular!
What is an EventEmitter?
EventEmitter in Angular is utilized for communication between components. Custom events are emitted from a child component to its parent component through the use of EventEmitter. For instance, when a button on a child component is clicked, the child component employs an EventEmitter to inform the parent component of the button click.
You can implement it with the utilization of the @Output() decorator and the EventEmitter class. The emitted event can be listened to by the parent component through the use of the @Input() decorator. The sending of an event is done through the EventEmitter.emit() method.
Event emitter plays a vital role in managing communication and state within Angular applications. Through their use, different components are able to work together and respond to user interactions, updates to data and other events that take place within the application.
The Format for Using Event Emitter in Angular
In order to connect to a DOM event, we must enclose the DOM event name in parentheses and attach a quoted template expression to it. The use of parentheses (event name) signifies event binding. There are many predefined events such as click, key-up, input,
etc. that are available in Angular. Additionally, the @Output() decorator and an Angular event emitter must be added to the child component.
@Output() eventName = new EventEmitter<Type>();
In the parent component, we listen to child events as follows.
<child-component (eventName)="someMethod($event)"></child-component>
By using parentheses brackets, Angular is informed that an event binding is being established, which is a way of implementing one-way binding. Through emitting events, a child component can pass data to its parent, without the need for the child component to be aware of the parent’s identity.
Note: It’s essential to keep in mind that when using the output decorator and Angular event emitter in both the child and parent components, the eventName should be the same name, and it’s your choice of the custom event name. Also, someMethod is a method that gets invoked when the parent component receives an event from the child component.
Using the Angular Output Decorator to Transmit Data from Child to Parent Component
In Angular, child components can communicate with parent components using event emitters. This way, when something happens on the child component, like a button click, it can send a message to the parent component to let it know. The parent component needs to have code in place that can listen for and respond to these messages. This is known as “events” and it should flow from lower-level components like child components to higher-level components like parent components.
Additionally, event emitters can also be used to pass data from the child component to the parent component. This way, the parent component can use the data to update its own state or perform other actions.
Using the EventEmitter with Example
Pass Data From Child to Parent
Before using the event emitter, let’s first create a simple Angular project. First, use the following command in your command prompt to install Angular.
npm install -g @angular/cli
Set-ExecutionPolicy -Scope CurrentUser -ExecutionPolicy RemoteSigned
Now let’s create the new project using the following command:
ng new <name-of-the-project>
To run the application using the following command:
cd <name-of-the-project>
ng serve --open
It’s done, and your app should automatically open in the browser.
Now for this example, we will be using a shopping cart project. If you want you can use this in your own project.
So the first thing we need to do is create items so that we can add them to the cart. For that add the following code into the file:
<counter [val]="2" [name]="'Burger'"></counter>
<counter [val]="0" [name]="'Pizza'"></counter>
Now we need to create a file named counter.component.ts and notify the above component that the data has changed.
For that we need to use Output annotation along with the EventEmitter functionality. Now we have to create an output. This output can be plugged into any parent component, which has to be an event emitter. It can be any
type, but here we are using a number X because it will count the number.
To increment the number, we can use the following code. Here we emit the data.
inc() {
    this.changed.emit(this.val + 1)
  }
Now we are no longer changing the val property. Instead, the actual value of the property will change in the parent component so that the parent component will have the latest and freshest data.
Similarly, for decrement, we can use the following code but remember that the items cannot be negative.
dec() {
    this.changed.emit(this.val - 1 < 0 ? 0 : this.val - 1)
  }
Here is the complete code that you have to paste in the counter.component.ts:
import { Component, Input, Output, EventEmitter } from '@angular/core';

@Component({
  selector: 'counter',
  template: `
    <div>
      {{name}}
      <button (click)="dec()">-</button>
      {{val}}
      <button (click)="inc()">+</button>
    </div>
  `,
  styles: [`h1 { font-family: Lato; }`]
})
export class CounterComponent  {
  @Input() name: string;
  @Input() val: number;
  @Output() changed = new EventEmitter<number>()

  inc() {
    this.changed.emit(this.val + 1)
  }

  dec() {
    this.changed.emit(this.val - 1 < 0 ? 0 : this.val - 1)
  }
}
Now the parent component has to have something in order to listen to this, so let’s go back and edit the parent component template (app.component.html).
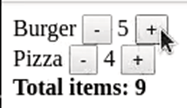
Here we are listening to the changed event and assigning them event handlers. And also we have to add the total items section.
<counter [val]="Burgers" [name]="'Burger'" (changed)="burgersChanged($event)"></counter>
<counter [val]="Pizzas" [name]="'Pizza'" (changed)="pizzasChanged($event)"></counter>

<b>
    total items: {{totalItems}}
</b>
Now let’s create these properties in our app.component.ts and also we have to create two event handlers for each item. This way, we can get the event and value back and then we can update those values in our parent component.
import { Component } from '@angular/core';

@Component({
  selector: 'my-app',
  templateUrl: './app.component.html',
  styleUrls: [ './app.component.css' ]
})
export class AppComponent  {
  burgers = 0
  pizzas = 0
  totalItems;

  constructor() {
    this.calculateTotalItems()
  }

  burgersChanged(count: number){
    this.burgers = count;
    this.calculateTotalItems()
  }

  pizzasChanged(count: number){
    this.pizzas = count;
    this.calculateTotalItems()
  }

  calculateTotalItems(){
    this.totalItems = this.burgers + this.pizzas;
  }
}
So now our child component no longer contains the event count—it’s just passing the event over to the parent and then the parent contains the actual value of any one particular item.
Final Words
In short, the Event Emitter is a handy feature in Angular that enables components to communicate with each other. By providing examples, we demonstrated how it can be employed to transfer data from a child component to a parent component or to initiate a specific action. Familiarizing yourself with the Event Emitter can enhance the performance and organization of your Angular application.

Vyom Srivastava
Vyom Srivastava is an enthusiastic full-time coder and also writes at GeekyHumans. With more than four years of experience, he has worked on many technologies like Apache Jmeter, Google Puppeteer, Selenium, etc. He also has experience in web development and has created a bunch of websites as a freelancer.
Related Posts
Comments
All articles
Topics
Web MobileMobile
Desktop
Design
Productivity
People
