
Creating a Custom AI Agent with Telerik Tools 5: Creating an Interactive UI in JavaScript

Summarize with AI:
If you’re going to give your users access to an AI-enabled backend in JavaScript, you need to give them an AI-appropriate frontend.
Right now, using Progress Telerik and Kendo UI tools you can create your own custom AI agent. (I’ve covered those tools in earlier posts, beginning with configuring a Large Language Model (LLM) in Azure or Ollama, loading content with Telerik Document Processing Library, linking your content to your LLM and summarizing/querying your content. But that backend isn’t much use without a frontend your users can interact with.
Your users have expectations around what the UI for an AI agent look like and how that UI should behave—expectations that are set by tools like OpenAI’s ChatGPT and Microsoft’s Copilot clients. Specifically, your users are looking for an interactive flow that enables them to evolve (through a set of prompts) from some initial response to a response that meets their needs. The Progress AIPrompt provides that UI as a single component.
This post is about how to create that UI with the JavaScript Kendo UI for jQuery version.
In an earlier post (Creating a Custom AI Agent with Telerik Tools 4: Crafting an Interactive Blazor UI), I walked through implementing a UI with the Blazor version of the AIPrompt component. And, in addition to the JavaScript for Kendo UI and Blazor versions of the AIPrompt, there are also versions for ASP.NET Ajax, WinForms and MAUI.
Background: The Custom Agent Backend as a Web Service
If you just want to know how to use AIPrompt (and aren’t interested in the AI-enabled backend I’ll be using), you can skip this whole section.
To implement a JavaScript frontend, I had to wrap my custom AI agent in a web service that could be called from my JavaScript code. My processor expects two parameters: the user’s prompt, of course (which I pass as a parameter to the single method that my AI agent class exposes), but also a processing option that lets the user choose between two modes: asking questions or summarizing selected content (that’s controlled through a property on the class that implements my AI agent). Fundamentally, that processing mode chooses between two Telerik AI connectors: CompleteContextQuestionProcessor or SummarizationProcessor.
I decided that, since my prompt could be a relatively wordy string, I’d pass those two parameters as a JSON document in the body of a request to my web service. So, as part of creating my web service I defined this Data Transfer Object (DTO) class to hold those two pieces of information:
public class CustomAgentRequest
{
   public string Prompt { get; set; } = string.Empty;
   public string Mode { get; set; } = string.Empty;
}
I then created a web service wrapper as an ASP.NET Core WebAPI project that instantiates my AI agent’s class and accepts my DTO class as part of an HttpPut method. (Since I was passing data in the body of the request, I had to use either a PUT or a POST request. I flipped a coin and settled on PUT.) In that HttpPut method, my service sets the processor’s mode property and calls the single method on my AI agent class, passing the prompt and returning the text generated by my selected mode.
My web service wrapper looked something like this:
public class CustomAgentAPI : ControllerBase
{
    CustomAgent? proc;

    public CustomAgentAPI()
    {
        proc = new();
    }

    [HttpPut]
    public async Task<IActionResult> Put(CustomAgentRequest req)
    {
       proc.Mode = req.Mode;
       return Ok(await proc.ProcessRequest(req.Prompt));
    }
}
I then added this JavaScript function to my frontend’s webpage that accepts a prompt and a mode option, and then uses JavaScript’s Fetch API functionality to call my web service:
const putAgentPrompt = async (requestPrompt, requestProcess) =>
{
   const resp = await fetch(
               "<URL for my Web service>",
               {
                method: "PUT",
                headers:
                {
                   "Content-Type": "application/json"
                },
                body: JSON.stringify(
                {
                   Prompt: requestPrompt,
                   Mode: requestProcess
                }
   ) });
   return await resp.text();
}
Since JavaScript’s Fetch API is asynchronous, I had to use the await keyword when calling the fetch function and mark my putAgentPrompt function as async.
My JavaScript function extracts the text property of the response object returned from my web service and then returns that to the JavaScript application that called my function.
Processing Requests
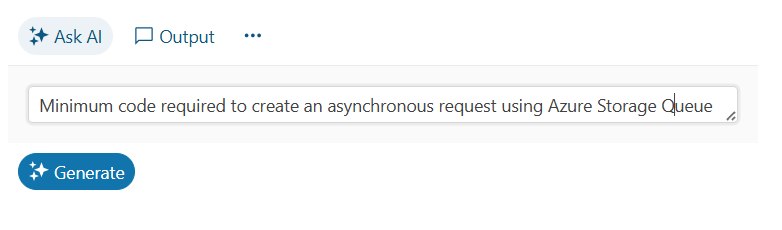
Assuming you’ve created a project with the necessary Progress Kendo UI support, the markup for using the AIPrompt component is very simple—a div element with its id attribute set to some name of your choice:
<div id="customAgent" />
To load that div element with the Progress AIPrompt component, you use jQuery to find that element and then call the Kendo UI for jQuery kendoAIPrompt extension from the found element. The resulting UI looks like this, with a textbox for the user to enter their prompt and a button to trigger sending the prompt to my backend:
To enable the UI to process your user’s prompts, you must pass the kendoAIPrompt extension a single parameter, an object literal. To process the user prompts when the user clicks the Generate button, you must set that object literal’s promptRequest property to a function that, in turn, accepts a single parameter.
That means that, initially, the code to process a user’s prompt looks something like this:
$("#customAgent").kendoAIPrompt(
      {
   promptRequest: async function(e)
   {

         }
     }
);
If you’re tempted to write the function set in the promptRequest property as an arrow function, don’t give into the temptation. Your function in the promptRequest property must accept the this reference set in the kendoAIPrompt function, which is only possible if you use a traditional JavaScript function.
The parameter passed to your promptRequest has two properties that you’re interested in:
prompt: The text the user entered in the AIPrompt’s prompt viewisRetry: Set tofalseunless the user clicks the Retry button displayed when AIPrompt shows the result of your processing in AIPrompt’s output view
Within your promptRequest function, you need to call your custom AI agent (in my case, the web service that wraps my AI agent class). I used the putAgentPrompt function from earlier in this post which returns a single text result.
After that, you need to provide the information that the AIPrompt’s output view requires and then switch to that output view. Building the output view consists of loading an object literal with four properties (all required):
id: A unique identifieroutput: The response from your backendprompt: The user’s promptisRetry: TheisRetrysetting
Once you’ve built that object, you just pass it to the kendoAIPrompt’s addPromptOutput function to have your response added to kendoAIPrompt’s output view.
Finally, to actually display the AIPrompt’s output view, you call the kendoAIPrompt’s activeView function, passing the name of the view you want (“output”, in this case).
Putting that all together, a typical version of the promptRequest function would look like this:
$("#customAgent").kendoAIPrompt(
    {
        promptRequest: async function(e)
         {
             this.addPromptOutput(
                         {
                	 id: kendo.guid(),
                output: await putAgentPrompt(e.prompt, "summarize"),
               	 prompt: e.prompt,
                	 isRetry: false
                        }
             );
             this.activeView("output");
         }
   }
);
A typical response might look like this, showing the user’s response and the output from my custom AI agent:
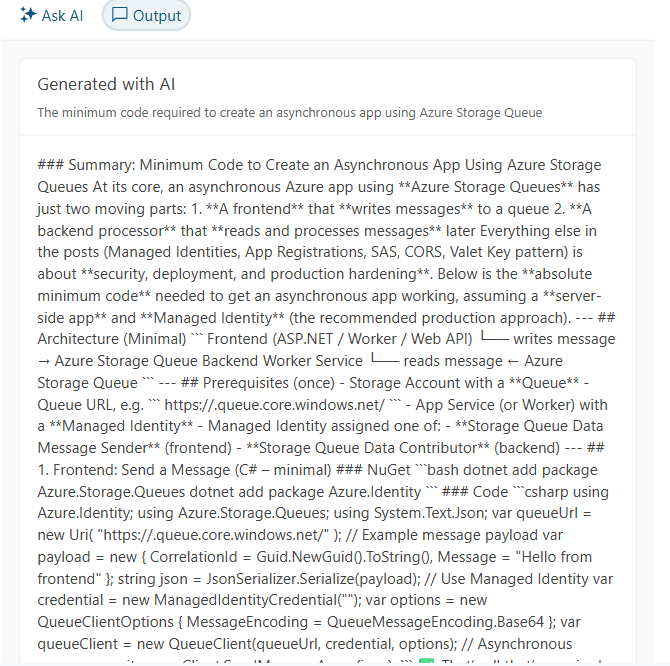
However, as you can see, the result isn’t necessarily very pretty because, as responses get more interesting, my custom agent produces output that uses Markdown for formatting. However, AIPrompt’s default output page just displays all that text “as is.”
Taking Control of the Output
You can, however, replace AIPrompt’s default output view with your own custom view and, in that custom, convert the output to HTML.
You do that by setting the outputTemplate property of the parameter passed to the kendoAIPrompt function to yet another function. That outputTemplate function will be passed a parameter that has a content property, which holds the response you put in the output property back in your promptRequest function.
To support a better display, I added the markdown-it JavaScript library to my page with this script tag and CDN URL:
<script src="https://cdnjs.cloudflare.com/ajax/libs/markdown-it/13.0.1/markdown-it.min.js"
              integrity="sha512-SYfDUYPg5xspsG6OOpXU366G8SZsdHOhqk/icdrYJ2E/WKZxPxze7d2HD3AyXpT7U22PZ5y74xRpqZ6A2bJ+kQ=="
              crossorigin="anonymous"
              referrerpolicy="no-referrer"></script>
In my custom output template, I could then use the library’s markdownit function that returns an object with a render function that converts Markdown to HTML. All I had to do was pass the content property of the parameter passed to my outputTemplate to that render function.
This means that extending the kendoAIPrompt function with a custom function that converts my output to HTML looks like this:
$("#customAgent").kendoAIPrompt(        {
            promptRequest: async function(e)
            {
                …previous code…
            },

            outputTemplate: output   => {
                    return markdownit().render(output.content);
                }
         }
);
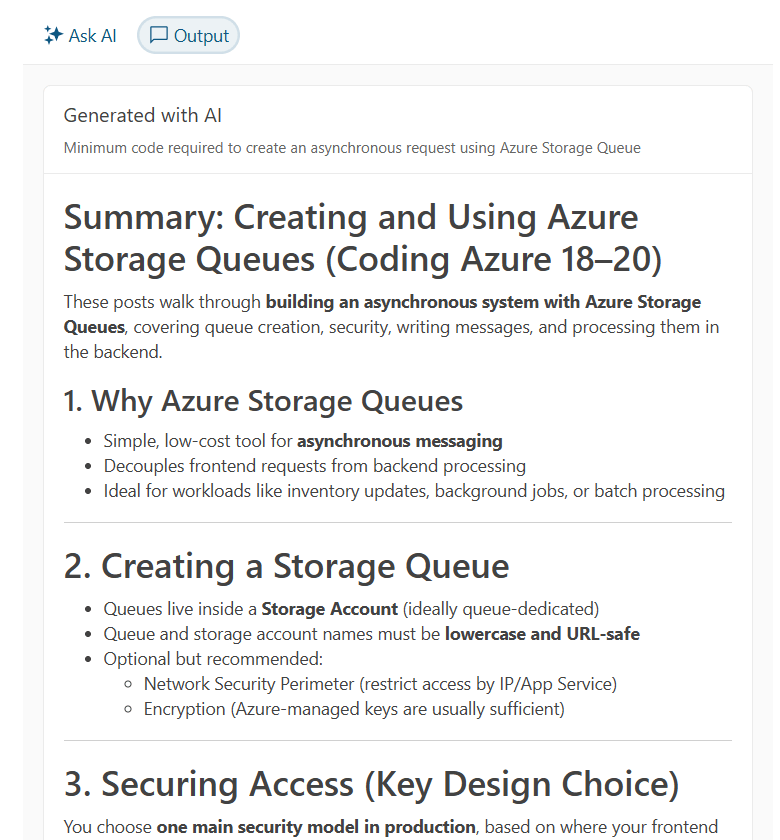
The enhanced output looks like this:
Allowing the User to Customize Their Prompts
Your agent probably supports some customization options that your users will want to take advantage of (for example, my agent supports two modes: summarizing and querying). You have two options for letting your users customize how your backend responds to your users’ prompts:
- Set options on your backend. My custom agent, for example, operates in two modes, depending on which of the Telerik AI connectors my code invokes.
- Tweak the prompts being sent to your backend in order to trigger specific behavior
In AIPrompt, I can support the user selecting my backend’s mode by having AIPrompt display a commands menu which I’ll use to let the user choose which mode (summarize or query) they want. To trigger that commands menu, I need to add a commands view to the kendoAIPrompt’s views collection and load that view with an array of the menu items to be displayed in the component’s command menu.
However, if you add a custom view to AIPrompt’s views then you have to add implementations for AIPrompt’s existing, predefined prompt view and output view. You add those default views to the views property of the parameter object passed to kendoAIPrompt, like this:
$("#customAgent").kendoAIPrompt(        {
        promptRequest: async function(e)
        {
   …existing code…
        },
        views: [
            {
               type: 'prompt',
            },
            {
               type: 'output',
            }
        ]
}
To add a command menu, you tack another view definition on to the end of your new default views, setting its type property to “commands”. In addition, you set this view’s promptCommands property to an array of objects with these properties:
id: A unique value within the arraytext: The text that will be displayed to the user in AIPrompt’s commands menuprompt: Associated text (probably text you will send to your agent backend—optional)icon: An SVG graphic (you can draw from the Progress store of icons—also, optional)
Here, I’ve set up four options for the user to select from:
views: [
    {
       type: 'prompt',
    },
    {
       type: 'output',
    },
    {
       type: 'commands',
       promptCommands: [
           { id: "Summarize", text: "Summarize", prompt: "in 100 words",
        icon: "info-circle" },
           { id: "SummarizeTerse", text: "Summarize: Terse", prompt: "in 50 words, ",
             icon: "min-width" },
           { id: "SummarizeVerbose", text: "Summarize: Verbose", prompt: "in 200 words",
        icon: "max-width" },
           { id: "Ask", text: "Ask a question",
             icon: "question-circle" },
        ]
    }
],
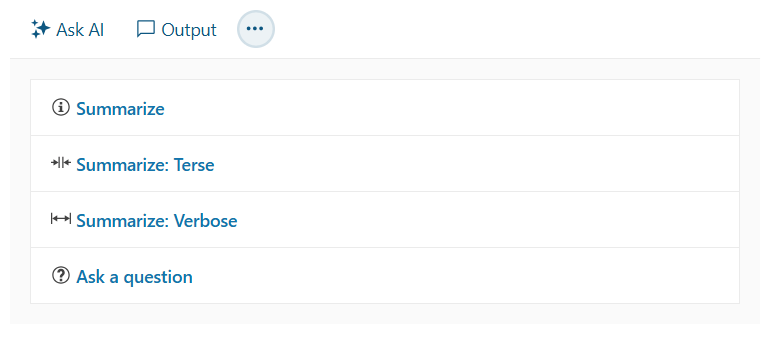
The result is that the AIPrompt gets a new overflow menu icon in its command bar, just to the right of the existing “Ask AI” and “Output” buttons. When your user clicks on the overflow menu icon, they get your list of commands:
To respond to the user clicking on one of the command menu options, you need to load a function into the commandExecute property in the object passed to the kendoAIPrompt function. That commandExecute function will be passed a parameter that has an item property holding the object from the promptCommands array that the user selected.
You can decide what to do in the commandExecute function. You could, for example, just save the user’s choice and use it later when the user clicks AIPrompt’s Generate button.
I’ll go a little further: In my commandExecute method, I’ll submit the command to my custom agent and display the results, leveraging the user’s last prompt.
To support that, in my promptRequest function, I save the user’s last prompt in a variable called, cleverly, lastPrompt. I also create a variable called mode to hold which mode (“Ask” or “Summarize”) the user wants to operate in.
My revised promptRequest function that saves the user’s prompt and uses my new mode variable looks like this:
let lastPrompt = "";
let mode = "Ask";

$("#customAgent").kendoAIPrompt(
    {
        promptRequest: async function(e)
        {
            this.addPromptOutput({
                id: kendo.guid(),
                output: await putAgentPrompt(e.prompt, mode),
                prompt: e.prompt,
                isRetry: e.isRetry
        });
        lastPrompt = e.prompt;
        …
Then, in my commandExecute function, I check which command the user picked from my commands menu. If the user selected the menu option that switches to “Ask” mode, I set my mode variable to “Ask.” If the user selected one of the summarization menu choices, I set the mode to “Summarize” and then modify the user’s last prompt to include the prompt property from the selected menu choice.
Either way, I re-submit the user’s last prompt, with the new settings, and display the result in AIPrompt’s output view:
$("#customAgent").kendoAIPrompt(
    {
        promptRequest: async function(e)
        {
           …previous code…
        },
        promptCommands: {
…command prompt menu choices…
        },
        commandExecute: async function(c)
       {
            let newPrompt = "";

            if (c.item.id.startsWith("Summarize"))
            {
                mode = "Summarize";
                newPrompt = lastPrompt + c.item.prompt;
            }
            else
            {
                mode = c.item.id;
                newPrompt = lastPrompt;
            }

            this.addPromptOutput({
                id: kendo.guid(),
                output: await putAgentPrompt(newPrompt, mode),
                prompt: lastPrompt
             });
            this.activeView("output");
        },
The result looks like this, with the result of executing the menu choice added to the output from the user’s previous requests:
Providing Sample Prompts
One last thing: It’s not unusual for an AI agent’s UI to include sample prompts to help users see what they can do with your application. Progress AIPrompt will let you do that, too, just by adding the promptSuggestions property to the object passed to kendoAIPrompt and setting it to an array of strings. This example loads three suggested prompts to AIPrompt:
$("#customAgent").kendoAIPrompt(
    {
        promptRequest: async function(e)
        {
           …previous code…
        },
        promptSuggestions:
       [
         "Summarize, targeting project leads",
        "What are the key features",
         "What are the critical steps"
     ],
     {
The result looks like this:
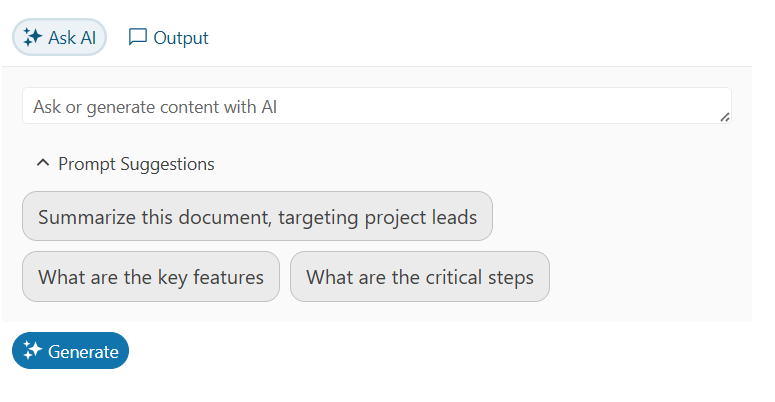
Now, when the user clicks on one of your suggested prompts, that prompt will be automatically copied into the prompt textbox where the user can modify the suggestion before clicking the Generate button. This can also simplify testing—instead of typing in a test prompt, you can just pick one of your suggestions.
Combining Telerik Document Processing Library and the library’s AI Connectors lets you create your own custom AI Agent. And the AIPrompt, in any of its implementations, lets you create a front end that enables your users take advantage of your backend (and meets your users’ expectations). You’re ready to give your users a whole new level of support.
Remember, you can get access to all of the Kendo UI and Telerik components in this series with a free 30-day trial of the Telerik DevCraft bundle.

Peter Vogel
Peter Vogel is both the author of the Coding Azure series and the instructor for Coding Azure in the Classroom. Peter’s company provides full-stack development from UX design through object modeling to database design. Peter holds multiple certifications in Azure administration, architecture, development and security and is a Microsoft Certified Trainer.
Related Posts
Comments
All articles
Topics
Web MobileMobile
Desktop
Design
Productivity
People
