
Building a Single-Page Application with Vue and Kendo UI

Summarize with AI:
A SPA is a good choice when building a website with minimal features or highlighting a smooth and responsive user experience. See how to build one, styled with Kendo UI for Vue.
Single-page applications (SPAs) have grown in popularity among web developers because they offer a much better user experience than traditional web applications. SPAs have several advantages, including faster loading times, lower costs and a better user experience. Furthermore, SPAs improve the user experience by incorporating dynamic and interactive features such as real-time updates and data fetching.
This article will cover how to build a single-page application using Vue.js and Kendo UI for Vue, a comprehensive library of professional UI components for web development, and how to build a to-do list app as a single-page application. By the end of this article, we will have a solid understanding of building a single-page application with Vue and Kendo UI.
Prerequisites
Before we begin, it is assumed you have some prior experience working with Vue.js and a little knowledge about single-page applications and consuming APIs.
Table of Contents
- Introduction to Vue.js and Kendo UI
- What is a single-page application (SPA)
- Importance of a single-page application
- Setting up a Vue.js project
- Installing and configuring our Kendo UI for Vue components
- Creating a single-page application
- Conclusion
Introduction to Vue.js and Kendo UI
Vue is a progressive, performant, open-source JavaScript framework used for building interactive UI and single-page applications. It uses the Model-View-View-Model architecture pattern. Aside from that, it has beginner-friendly documentation, a good learning curve and resources to get you started.
Kendo UI is a collection of user interface components and framework tools for developing web and mobile applications. It is built natively for your favorite JavaScript technology—jQuery, Angular, React and Vue. Each library includes various UI components, such as grids, charts and navigation elements, as well as a set of framework tools and components for creating responsive and interactive user interfaces.
Kendo UI for Vue is designed to save you time as you deliver professional, consistent, accessible Vue.js apps. Built by Vue experts, the components are crafted for reliability, scalability, customizability and ease of use.
What is a Single-Page Application (SPA)?
A single-page application (SPA) is a web application or website that loads a single webpage and dynamically renders the content as the user interacts with the app, eliminating the need for full page reloads. It improves our website’s performance and creates a dynamic user experience by loading only the information required from the user.
Importance of Single-Page Apps
A single-page application is important because it provides a smooth and responsive user experience similar to that of a native mobile app. Aside from that, it improves the performance of our application by reducing the amount of data transferred between the client and server, as well as the time required for a full page reload. Furthermore, SPAs improve search engine optimization by rendering dynamic content on the server side and providing search engines with a static HTML version of the app.
Setting up a Vue.js Project
Setting up our Vue project is easy if we have the necessary packages. To create a new Vue project, we must have the Vue CLI installed globally and the latest version of npm.
We can use Node.js or Yarn package manager to install Vue.js globally
on our system. To install the Vue CLI (Command Line Interface) globally, run the following command:
npm install -g @vue/cli
If you are using Yarn, run the following command:
yarn global add @vue/cli
This command installs the Vue CLI globally on our system, allowing us to use the vue command in our terminal to create new Vue projects whenever we want.
We have successfully installed Vue.js globally; the next step is to create our new Vue project. To do that, we will run the following command:
npm create vue@3
When we run the command above, we will be prompted with several features to select from. See the diagram below of the features we selected for our project.

After selecting, the features we need in our project, we will cd into our project name, which is “single-page,” and install the dependencies with the command below:
npm install
The final step is to run the server with the following command:
npm run dev
Installing and Configuring Our Kendo UI for Vue Components
We will install and set up the Kendo UI for Vue Layout component, as that is what we will use to display the data we fetch from our API.
Kendo UI for Vue is a commercial UI component library, and as a part of this you will need to provide a license key when you use the components in your Vue.js projects. You can snag a license key through a free trial or by owning a commercial license. For more information, you can head over to the Kendo UI for Vue Licensing page.
Install the Layout component using the following command:
npm install --save @progress/kendo-vue-layout
The following are the peer dependencies the Layout package requires us to install before the component:
npm install --save @progress/kendo-vue-intl @progress/kendo-licensing @progress/kendo-svg-icons
The next step is to import the package module into the application where we want to create the layout of our application:
import { Card } from '@progress/kendo-vue-layout';
Creating a Single-Page Application
We are going to create a simple to-do list app to illustrate what a single-page application is.
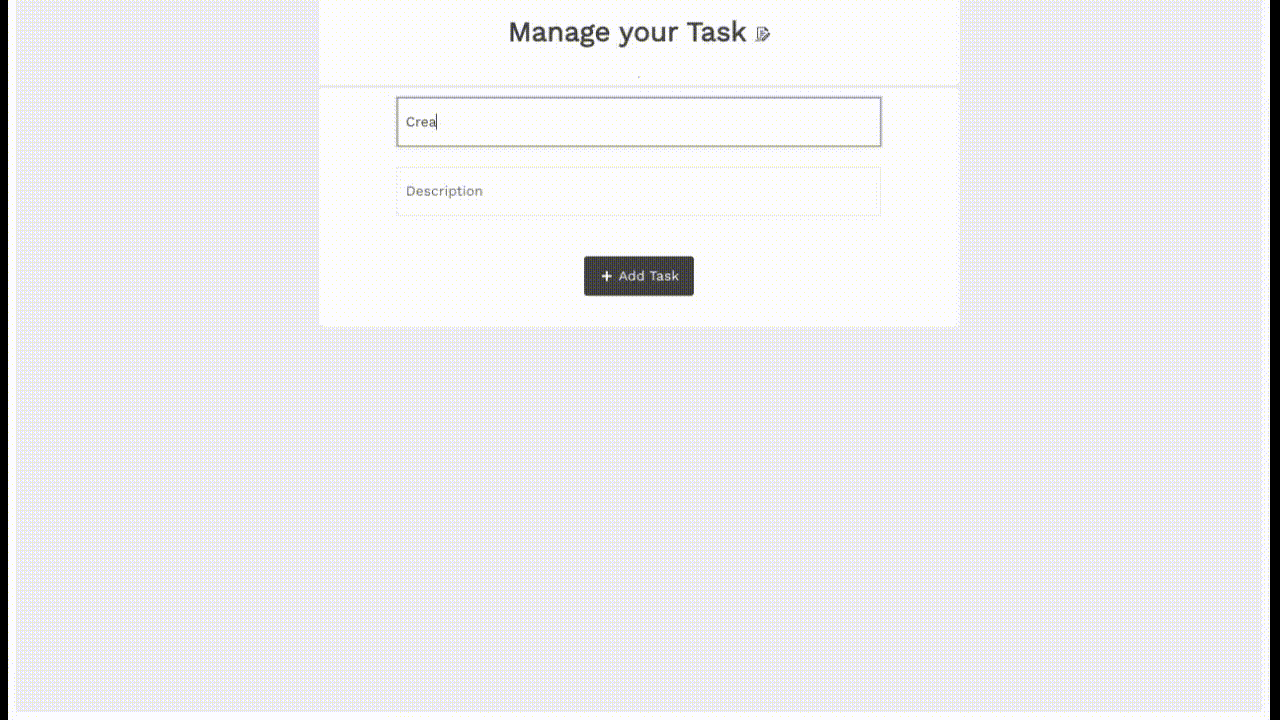
In the first step, we will create a new component called “TodoApp” that will display a list of to-do items. This component will have the structure of our application.
Next, we will create a card that displays the list of our to-do items using a v-for directive. Each item should be displayed as a list item with a checkbox to indicate whether it is completed or not:
<card class="card-section" style="width: 650px; margin: auto; ">
            <h1>Manage your Task <span class="k-icon k-i-track-changes" id="icon"></span> </h1>
            <hr />
            <div class="list">
                <li v-for="(task, index) in todoTask" :key="index" :class="{ removed: task.checked }">
                    <div class="form-box">
                        <input type="checkbox" v-model="task.checked" class="check-box" />
                        <label class="heading">
                            {{ task.text }}
                        </label>
                        <br />
                        <label class="paragraph">
                            {{ task.description }}
                        </label>
                        <div class="icon-wrapper">
                            <KButton :icon="'trash'" :fill-mode="'outline'" class="btn-func"
                                v-on:click="removeSingleTask(index)">Delete</KButton>
                        </div>
                    </div>
                </li>
            </div>
        </card>
After creating the first card, we will create a second layout that will allow us to add new to-do items to the list. The form will have an input field for the task name, description and button to submit the new item:
<card class="container-card" style="width: 650px; margin: auto">
            <div class="form-group">
                <KInput class="form-input" :style="{ width: '490px' }" v-model="newTaskList" name="task name"
                    :icon="'plus'" :fill-mode="'outline'" placeholder="Write a new task">
                </KInput>
            </div>
            <div class="form-group">
                <KInput class="form-input" :style="{ width: '490px' }" v-model="desTaskList" name="description"
                    placeholder="Description"></KInput>
            </div>
            <div class="col-xs-12 col-sm-6 example-col">
                <div class="btn-func">
                    <KButton :fill-mode="'outline'" class="btn-func">Due Date</KButton>
                    <KButton :icon="'plus'" :fill-mode="'outline'" class="btn-func" id="btn-func" @click="addNewTask">
                        Add Task</KButton>
                </div>
            </div>

        </card>
We will create a data property in the script section that returns the Todo items, new items and descriptions:
data() {
        return {
            todoTask: [],
            newTaskList: "",
            desTaskList: "",
        };
    },
Next, we create a method that will add and remove our todo items:
methods: {
        addNewTask() {
            this.todoTask.push({ text: this.newTaskList, description: this.desTaskList, checked: false });
            this.newTaskList = "";
            this.desTaskList = "";
        },
        removeSingleTask(index) {
            this.todoTask.splice(index, 1);
        },
    },
Finally, we will test the application to make sure it works as expected and that new todo items can be added and marked as complete or incomplete.
You can check out the full project on GitHub and add more functionalities like the edit function and more to your todo application.
Conclusion
A SPA is a good choice for building a website that has minimal features or requires a smooth and responsive user experience, such as a web-based application or a website with many interactions. In this guide, you learned about the concept of an SPA and how to build one.

Ezekiel Lawson
Ezekiel Lawson is a technical writer and software developer. Aside from building web tools and applications, he enjoys educating people and simplifying complicated issues for their easy understanding by sharing resources that will guide developers through technical writing.
Related Posts
Comments
All articles
Topics
Web MobileMobile
Desktop
Design
Productivity
People
