
Building a Shopping App With Kendo UI and Vue

Summarize with AI:
A shopping list app helps us track items we purchase and prioritize our spending when we go shopping. We will use Kendo UI for Vue to build our shopping application.
In this article, we will learn what Kendo UI is and how we can build fast and performant shopping applications with it using Vue.js.
Prerequisites
This article assumes you have a basic knowledge of working with Vue and familiarity with creating a Vue project, as we will not explain in detail how to create a Vue project.
Table of Contents
- Introduction to Kendo UI
- Creating Vue Project
- Setup and Installation of Kendo UI
- Fetch list items
- Create a new list item
- Delete a list item
- Conclusion
Introduction to Kendo UI
Progress Kendo UI is a JavaScript component library for building a fully interactive and highly performant website. It consists of four UI libraries—Vue, Angular, React and jQuery—each built with consistent API and theming to make you build a fast and responsive website. Kendo UI allows you to create for mobile, web and desktop users.
Kendo UI is unique for your project because it has configurable components to get started with on your web applications. Its documentation is user-friendly. Aside from that, the documentation contains many code examples and demos of the components and features you want to implement in your project.
Creating a Vue Project
In the previous section, we learned what Kendo UI is. Now, let’s see how we can implement Kendo UI for Vue in our project. The first step is to create our application.
To create a project with Vue, use the command below:
vue create shopping-app
To run the server, use the command below:
Npm run serve
Setup and Installation of Kendo UI for Vue
To set up and install our package (Kendo UI), visit Kendo UI for Vue and scroll down to the section called “All Vue Components.” Next, we will select the component we want to use for our project. In this article, we will use the card component for our application.
Kendo UI for Vue is a commercial UI component library, and as a part of this you will need to provide a license key when you use the components in your Vue.js projects. You can snag a license key through a free trial or by owning a commercial license. For more information, you can head over to the Kendo UI for Vue Licensing page.
Installation
To install the card component, use the command below:
npm install --save @progress/kendo-vue-layout @progress/kendo-vue-intl
After installing the component package, the next step is to install our CSS styles (theme) for the component we installed. To install that, we will use the command below:
npm install --save @progress/kendo-theme-default
After installing our card layout, we will install our license key. To do that, use the command below:
npm install --save @progress/kendo-licensing
Setup
We have successfully installed our packages. The next step is to set up our card layout and theme.
To do that, we will create our Vue component CardComponent.vue and import the packages in our script tag.
<script>
import {
Card,
CardHeader,
CardBody,
CardTitle,
CardFooter,
} from "@progress/kendo-vue-layout";
import '@progress/kendo-theme-default';
import { Button } from '@progress/kendo-vue-buttons';
export default {
components:{
  card: Card,
  cardHeader: CardHeader,
  cardBody: CardBody,
  cardTitle: CardTitle,
  cardFooter: CardFooter,
    'kbutton': Button
}
}
</script>
After importing all the packages we need, we will create our card.
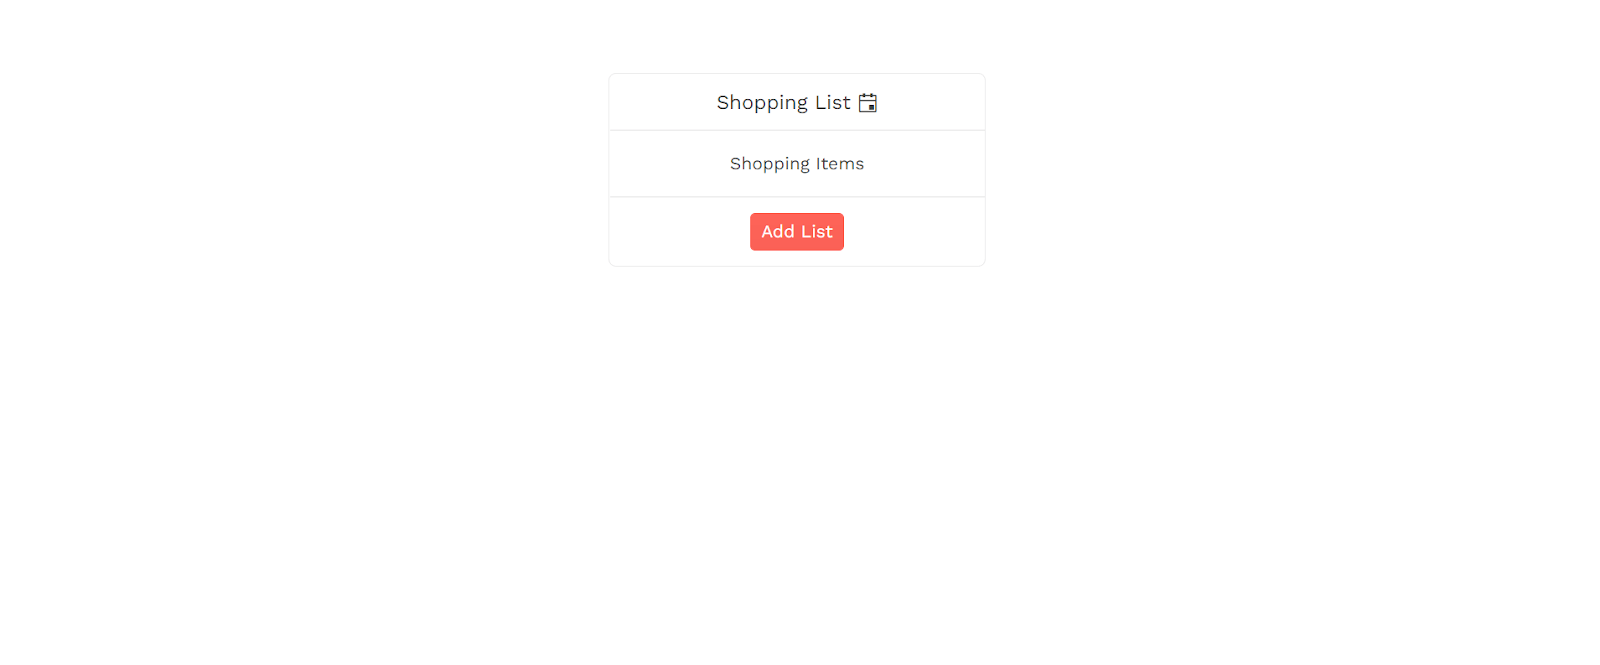
<template>
  <card
    style='width: 300px; margin: auto;'
  >
    <cardHeader>
      <cardTitle>Shopping List <span class="k-icon k-i-calendar"></span></cardTitle>
    </cardHeader>
    <cardBody>
      <p>
        Shopping Items
      </p>

    </cardBody>
    <cardFooter>

      <span>
        <kbutton :theme-color="'primary'">Add List</kbutton>
      </span>
    </cardFooter>
  </card>
</template>
Here is an example of what our application should look like:
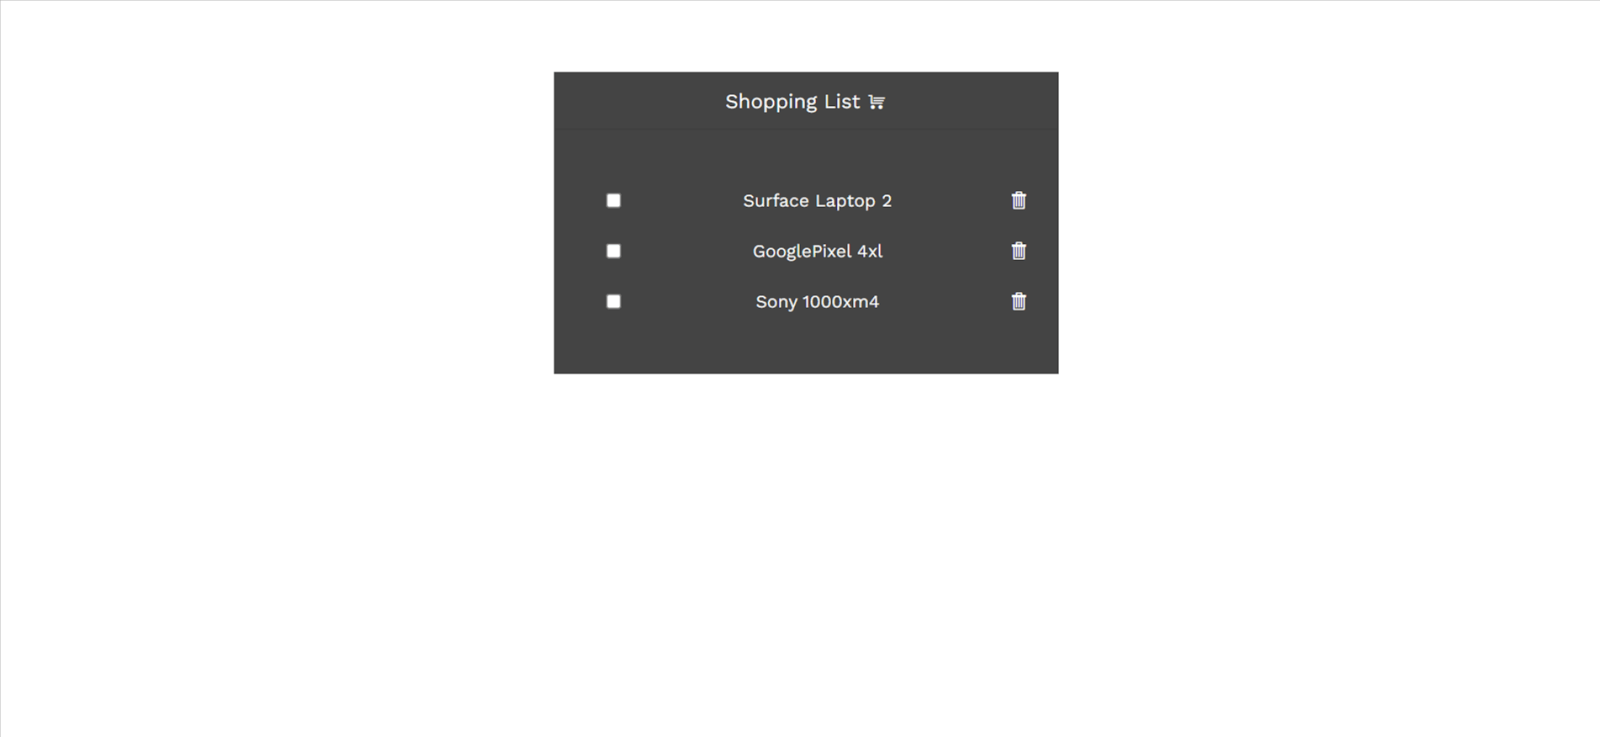
Fetch List Items
This section will fetch our items using the for loop in Vue. Let’s see an example below:
<cardBody>
      <div class="list">
        <li v-for="(list, index) in lists" :key="index">
          <div class="form-box">
            <input type="checkbox" v-model="list.checked" class="input-box" />
            <label class="label">
              {{ list.text }}
            </label>
            <span class="k-icon k-i-cart"></span>
          </div>
        </li>
      </div>
    </cardBody>
Here is an output of what our application will look like after fetching our items:
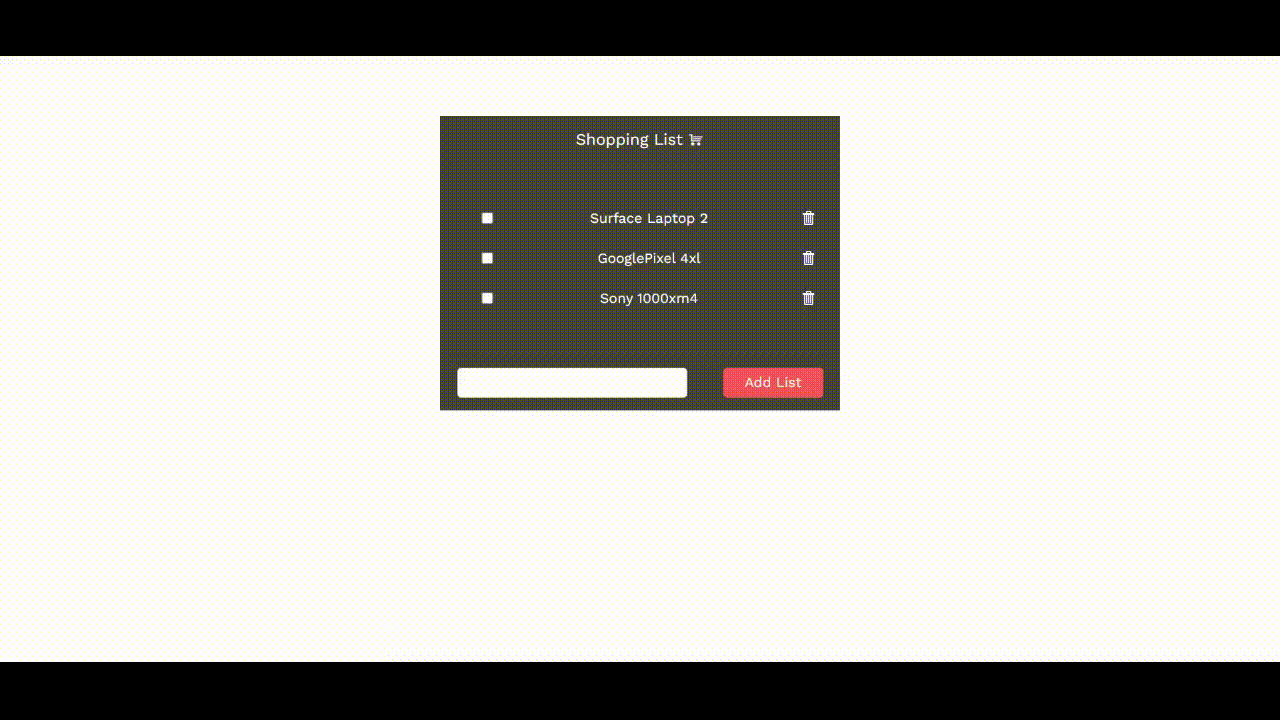
Create a New List Item
We have fetched and displayed our items; the next step is to create a new list where users can add more items to the shopping list. To do that, we will create an input and button see code below:
<cardFooter class="footer-section">
      <div class="col-xs-12 col-md-6 example-col">
        <KInput
          :style="{ width: '230px' }"
          v-model="currentList"
          v-on:keyup.enter="addList"
        ></KInput>
      </div>
      <div class="col-xs-12 col-md-6 example-col">
        <kbutton
          :theme-color="'primary'"
          :style="{ width: '100px' }"
          @click="addList"
          >Add List</kbutton
        >
      </div>
    </cardFooter>
In this example, we create data that returns an empty list:
data() {
    return {
      currentList: "",
    };
  },
The function addList pushes the new item we add to our shopping list app.
methods: {
    addList() {
      this.lists.push({ text: this.currentList, checked: false });
      this.currentList = "";
    },
  },
Delete a List Item
We have seen how to add a new item to our shopping list. The next step is to add a delete list function, which will remove a list from its index, as seen in the code below:
<span class="k-icon k-i-trash" v-on:click="removeList(index)"></span>
We will create a function called removeList, which will remove an item from the list using its index. See the code below:
removeList(index) {
      this.lists.splice(index, 1);
    },
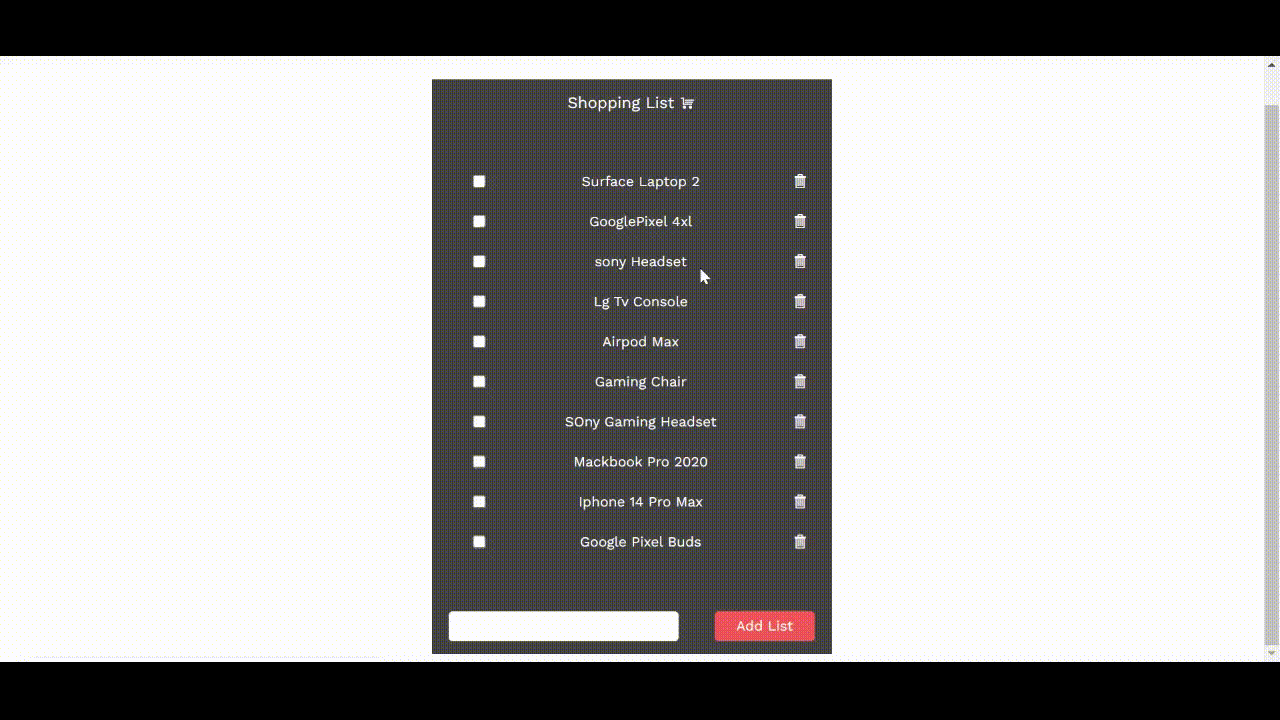
The last step is the check function, which helps us to track the item that has been bought and the item that has not been bought. Let’s see how we can create that:
<li v-for="(list, index) in lists" :key="index" :class="{ removed: list.checked }">
          <div class="form-box">
            <input type="checkbox" v-model="list.checked" class="input-box" />

          </div>
 </li>
Finally, let’s see what our application looks like with the overall functionalities.
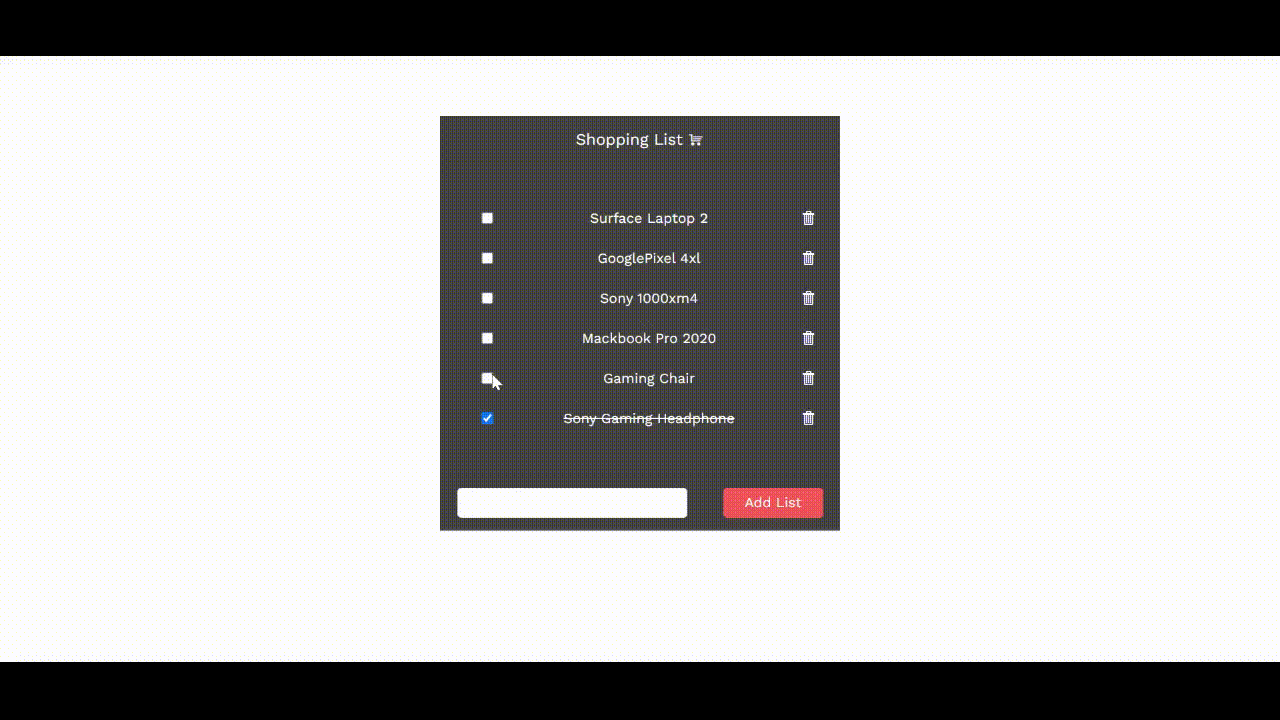
You can check out the complete code on GitHub.
Conclusion
In this article, we have learned what Kendo UI is and how we can build a shopping application with it using Vue while following a detailed step to understand better. Hopefully, this article will help you get started with Kendo UI and Vue.

Ezekiel Lawson
Ezekiel Lawson is a technical writer and software developer. Aside from building web tools and applications, he enjoys educating people and simplifying complicated issues for their easy understanding by sharing resources that will guide developers through technical writing.
Related Posts
Comments
All articles
Topics
Web MobileMobile
Desktop
Design
Productivity
People
