
Building Apps with Angular and GraphQL: From REST to GraphQL Part 1

Summarize with AI:
Learn to configure and set a GraphQL server to allow clients to request the exact data they want in an Angular app.
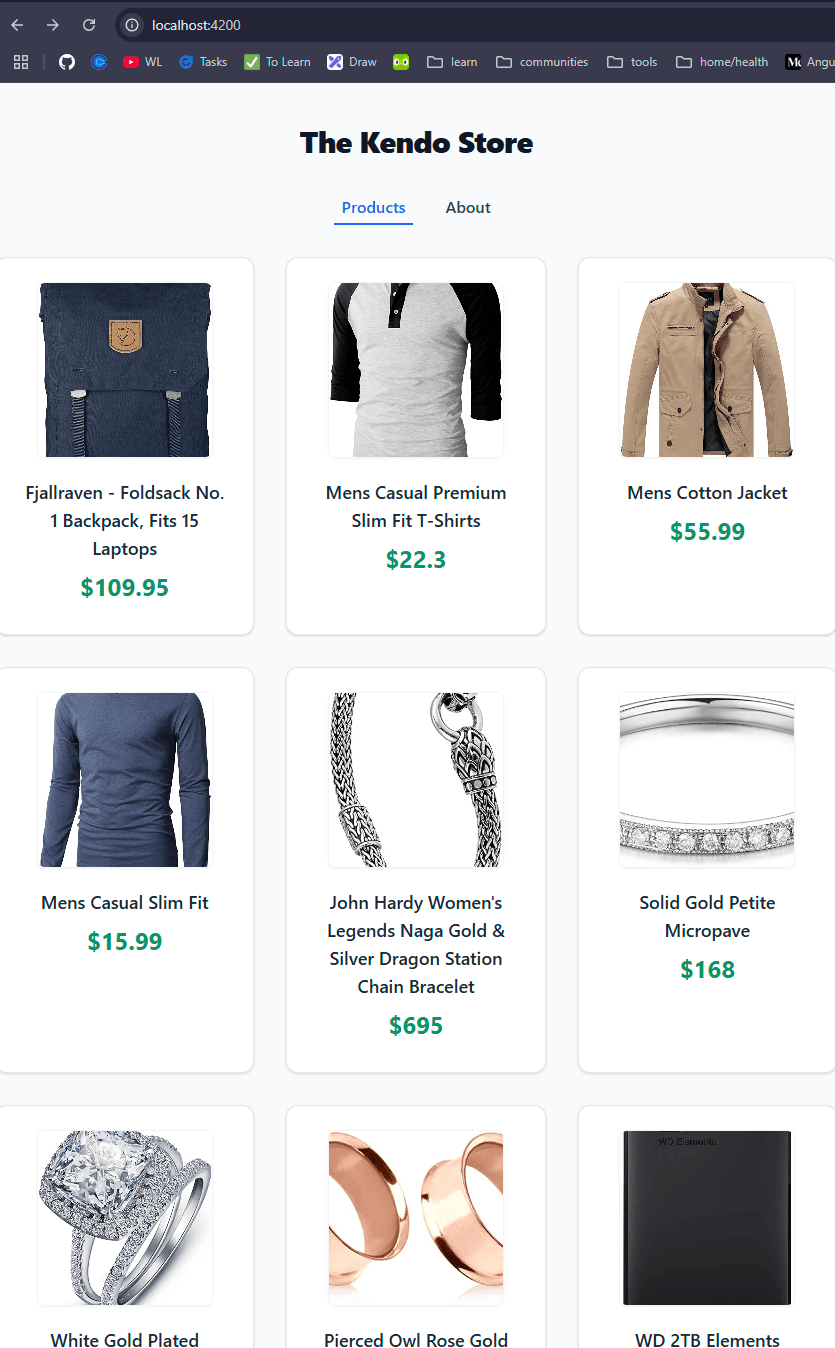
When we build Angular apps, most of the time the data in our apps is transferred using REST APIs from the server. For example, when the previous project Kendo Store shows a list of products, Angular requests the endpoint fakestore.com/products and the server returns all products.
That sounds normal, but an Angular app is just part of the business or workflow of a company or product. So the entity product may have multiple use cases, like showing a list of products, listing only image and title for the offers sections, or in mobile showing only the title and price and skipping the remaining information.
The backend developer defines the models with most use cases in our app and doesn’t care if you only want the title, image and price. The backend builds the endpoint to return the full product entity “just in case” the frontend needs it in the future.
Let’s see another case. Say we want to show a list of discounts, so the backend creates the endpoint (for example, api/discount/{id}) to return the discount by productId. But if I want to show a product with an offer, I need to make multiple requests. The backend creates one endpoint for the product and another for the discount, so what happens if I need only the discount and product title? Or the discount and image?
Last but not least, what happens if I want to create a mobile app to get the products but with other fields or information? Should the backend create an endpoint for the frontend and mobile?
If we want to optimize, reduce the noise in the traffic and make our frontend flexible to only request the data that is actually needed, or to serve mobile, this is a real-world pain point. That moment is when GraphQL comes to help us!
GraphQL is a query language for APIs that lets you request exactly the data you want—nothing more, nothing less.
It works like a single endpoint to handle all queries and mutations (which I will explain later). GraphQL provides strong typing, so the API describes what data it can return and what operations are available, making it more efficient, preventing over-fetching and reducing network requests.
All these features solve most of the problems when we want to build our apps, reducing the amount of requests, and allowing the client to take control about what they need, when. The best way to learn is by doing, so we’re going to see how GraphQL helps us to improve our existing application Kendo Store. Let’s do it!
Set Up Project
First, clone our existing project, Kendo Store, by running the command git clone https://github.com/danywalls/graphql-and-angular.git. It clones the project in the specific branch.
Next, move into the graphql-and-angular/ directory and run npm i to install all dependencies.
dany@dany:~/lab$ git clonehttps://github.com/danywalls/graphql-and-angular.git
Cloning into 'graphql-and-angular'...
remote: Enumerating objects: 176, done.
remote: Counting objects: 100% (176/176), done.
remote: Compressing objects: 100% (111/111), done.
remote: Total 176 (delta 95), reused 113 (delta 59), pack-reused 0 (from 0)
Receiving objects: 100% (176/176), 276.55 KiB | 2.51 MiB/s, done.
Resolving deltas: 100% (95/95), done.
dany@dany:~/lab$ cd graphql-and-angular/
dany@dany:~/lab/graphql-and-angular$ npm i
We are ready, so let’s see our existing project by running ng serve in the terminal.
ng serve
Initial chunk files | Names         | Raw size
main.js             | main          | 24.20 kB |
styles.css          | styles        | 96 bytes |
polyfills.js        | polyfills     | 95 bytes |

                    | Initial total | 24.39 kB

Application bundle generation complete. [1.242 seconds]

Watch mode enabled. Watching for file changes...
NOTE: Raw file sizes do not reflect development server per-request transformations.
  ➜  Local:   http://localhost:4200/
  ➜  press h + enter to show help
Perfect. Our app is running, so it’s time to see what is happening in our app. First, open your browser and navigate to http://localhost:4000.
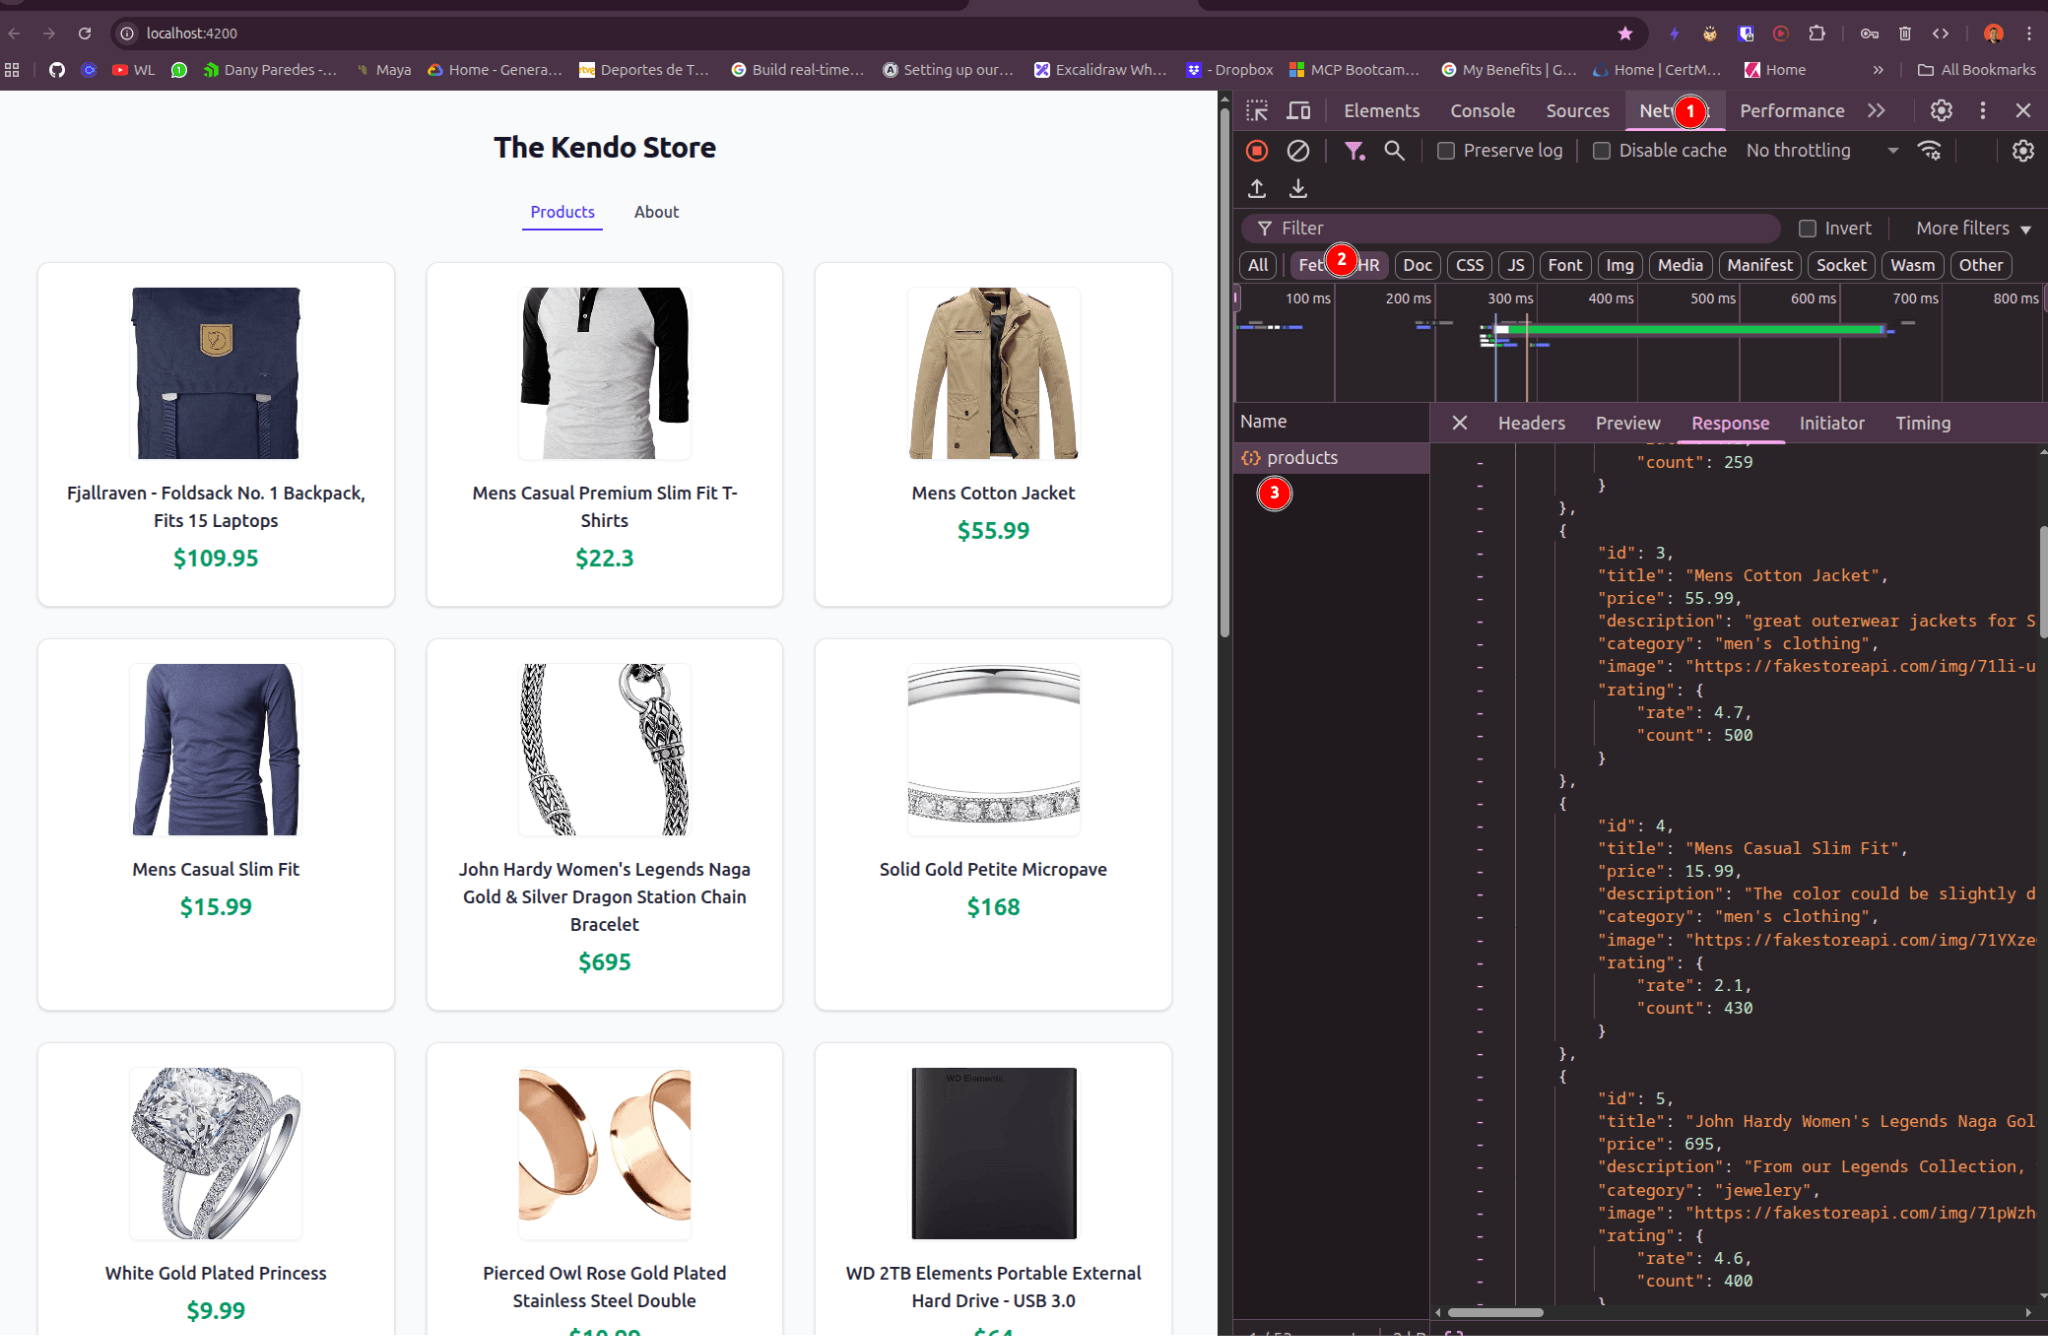
Go to http:localhost:4200 and press F12 (or ⌘ ⌥ i for Mac) to use DevTools. Click on the “Network” (1) tab, check the “Fetch” (2) filter, and reload the page to see our request to fakestoreapi.
Then click on the products response (3). It comes with an array of products and includes all properties related to a product. But it looks like too much information, more than we really need.
This is when you start to think about changing the backend so it only shows three fields. But what happens if we want to create a new page displaying products with offers, only showing the image?
The UI changes frequently, so the backend makes changes every time or creates new endpoints? That is not a scalable solution, so before requesting changes to the backend, let’s focus on our app and see what we really need.
What Data Do We Need?
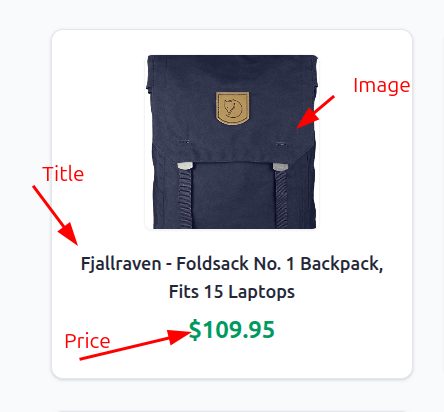
If we take a look into our Kendo Store, it shows a list of products in a grid list of card items, and each card item shows a list of product details.
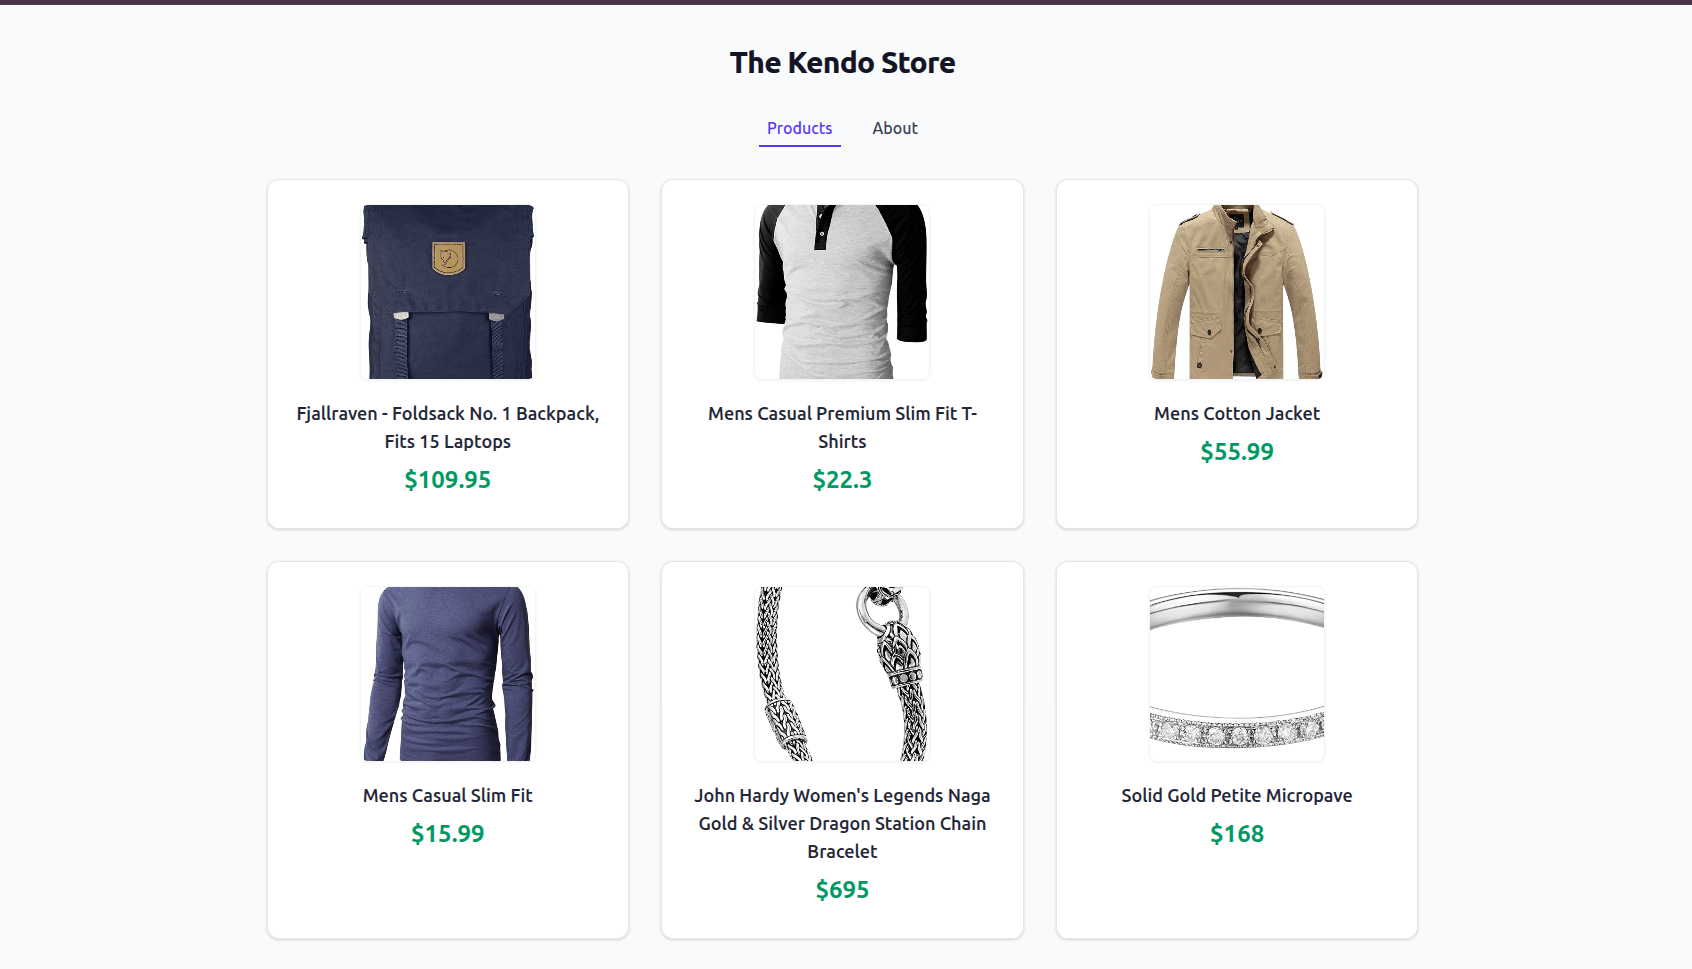
If we take a second to see what information we really need to show this page, the data is the same for each card, so the details our page needs are the Image, ProductTitle, Price and (hidden) productId.
Now, if you compare that with a single item from the products response:
{
        "id": 4,
        "title": "Mens Casual Slim Fit",
        "price": 15.99,
        "description": "The color could be slightly different between on the screen and in practice. / Please note that body builds vary by person, therefore, detailed size information should be reviewed below on the product description.",
        "category": "men's clothing",
        "image": "https://fakestoreapi.com/img/71YXzeOuslL._AC_UY879_t.png",
        "rating": {
            "rate": 2.1,
            "count": 430
        }
    },
The backend returns rating, category and description fields that I don’t use. This creates noise and also more network traffic for the user and our servers.
The data for our store should be simple: an object or collection of objects with only title, price, image and id.
We can think of our application as a graph—a network of connected objects. Sometimes these have relations between them or other elements, like navigation, that come from the backend. The response of our backend is like our data graph or application graph—this is a common way in GraphQL to talk about the data for an application.
The application graph provides a set of nodes. GraphQL helps us to represent our app data as a collection of nodes and edges for our app, to make relations or not between them. And to define our graph structure, we use a schema!
What Is a GraphQL Schema?
A schema is a contract, so GraphQL schema is a contract between our server and the client. It defines what our GraphQL API can do, how the client (app or mobile) requests or interacts with the data, working like a layer between server and client, giving us flexibility for consumers and reducing complexity in the backend.
But how can we define our contract ? Don’t worry, we’ll go step by step. To define our schema, we’ll use schema definition language (SDL). The schema is the core of our contract, its work a collection of objects with types and properties (or fields), defined into a TypeScript file or a .graphl extension.
Keep reading because we’re going to build our schema and server!
The fields in a schema have a type, like string or Int. But also, for example, we can have the type Player with a field of type Stat with statistics of the player’s performance. For example:
export type Stat {
	points: Int!
	rebounds: Int!
	steals: Int!
}

export type Player = {
  id: Int!
  name: String!
  position: String
  stats: [Stat]
}
Also, the SDL allows us to add extra definitions for our entities, using """ triple quotes at the begin of each type:
"""
The nba player with his stats
"""
export type Player = {
  id: Int!
  name: String!
  position: String
  "Player stats with points, rebounds and steals only"
  stats: [Stat]
}
Now that we have an overview of a GraphQL schema, let’s build our first schema using GraphQL and TypeScript!
Get deep about schema and types.
Build the Schema
In our app directory, create a new directory server; it will contain everything related to our GraphQL server. After creating the directory, navigate to the server with the terminal and run npm init -y and install @apollo/server, graphql and graphql-tag packages.
🧐 Be sure you are located in the
serverdirectory.
npm install @apollo/server graphql and graphql-tag

added 77 packages, and audited 1284 packages in 8s

190 packages are looking for funding
  run `npm fund` for details

2 low severity vulnerabilities
Next, create a src directory and, within it, create the schema.ts file. To create our schema, import gql from graphql-tag. It works like a tagged template literal, for wrapping GraphQL strings such as the schema definition and GraphQL strings into a format that Apollo libraries can understand to perform operations over schemas, and it also enables syntax highlighting.
Let’s create our type definitions typeDefs by setting the value from gql. In the template, we write our types Product and Rating as in the previous example.
import gql from "graphql-tag";

export const typeDefs = gql`
type Product {
  id: ID!
  title: String!
  price: Float!
  description: String
  category: String
  image: String
  rating: Rating
}


type Rating {
  rate: Float
  count: Int
}
}`;
Excellent, our Product is now fully represented in our schema, but hold on a second! How can we get these types with our data?
We need to find a way to tell the GraphQL server what to retrieve. Instead of getting data from multiple endpoints, like a REST API does, GraphQL provides a special type: Query!
Type Query
We create types like objects and the query type is also like an object whose fields work as endpoints for us, allowing us to get data from GraphQL.
To create our query, we take the same approach as gql, adding another type Query with the fields for each type of query for our data.
Let’s allow apps to query products by creating a type Query and adding the field products. It returns a non-nullable list of products products: [Product!]!. The code looks quite similar to the types:
type Query {
 products:[ Product!]!
}
The final version of our schema in schema.ts looks like:
import gql from 'graphql-tag';

export const typeDefs = gql`
 type Product {
   id: ID!
   title: String!
   price: Float!
   description: String
   category: String
   image: String
   rating: Rating
 }

 type Rating {
   rate: Float
   count: Int
 }

 type Query {
   products:[ Product!]!
 }
`;
Perfect, we have our schema ready. It’s time to build our GraphQL Server!
Build GraphQL Server
We want to create a GraphQL server using @apollo/server package (installed before). It provides a set of functions to create and configure our GraphQL Server with TypeScript, with just a few lines of code, ready for development and production.
The GraphQL server will help us handle GraphQL queries, return a populated schema’s fields and validate them over our schema.
Before we start, because we’re using TypeScript, create a tsconfig file by running npx tsc --init in the server directory.
Navigate to the server/src , create the index.ts file and import two functions: ApolloServer from @apollo/server package and startStandaloneServer from @apollo/server/standalone:
import { ApolloServer } from "@apollo/server";
import { startStandaloneServer } from "@apollo/server/standalone";
Next, we create the startApolloServer function. Inside it, create an instance of ApolloServer and set our typeDefinitions from the schema.ts.
The server is configured. To start it, call the function startStandaloneServer, passing the server as parameter. Add a console.log to see that everything is working and remember to call the startApolloServer function to initialize the server.
import { ApolloServer } from "@apollo/server";
import { startStandaloneServer } from "@apollo/server/standalone";
import { typeDefs } from "./schema";


async function startApolloServer() {
  const server = new ApolloServer({ typeDefs });
  const { url } = await startStandaloneServer(server);
  console.log(`
    🚀  Server is running!
    📭  Query at ${url}
  `);
}
startApolloServer();
Next we need to run the server using a npm script. Open the package.json in the server directory and add a new script “start”. Using npx and ts-node package, execute the index.ts. your package.json must look like this:
{
  "name": "server",
  "version": "1.0.0",
  "description": "",

  "scripts": {
    "start": "npx ts-node src/index.ts"
  },
  "keywords": [],
  "author": "",
  "license": "ISC"
}
In the terminal run npm run startand you should see something like:
npm run start

> server@1.0.0 start
> npx ts-node src/index.ts


    🚀  Server is running at http://localhost:4000/
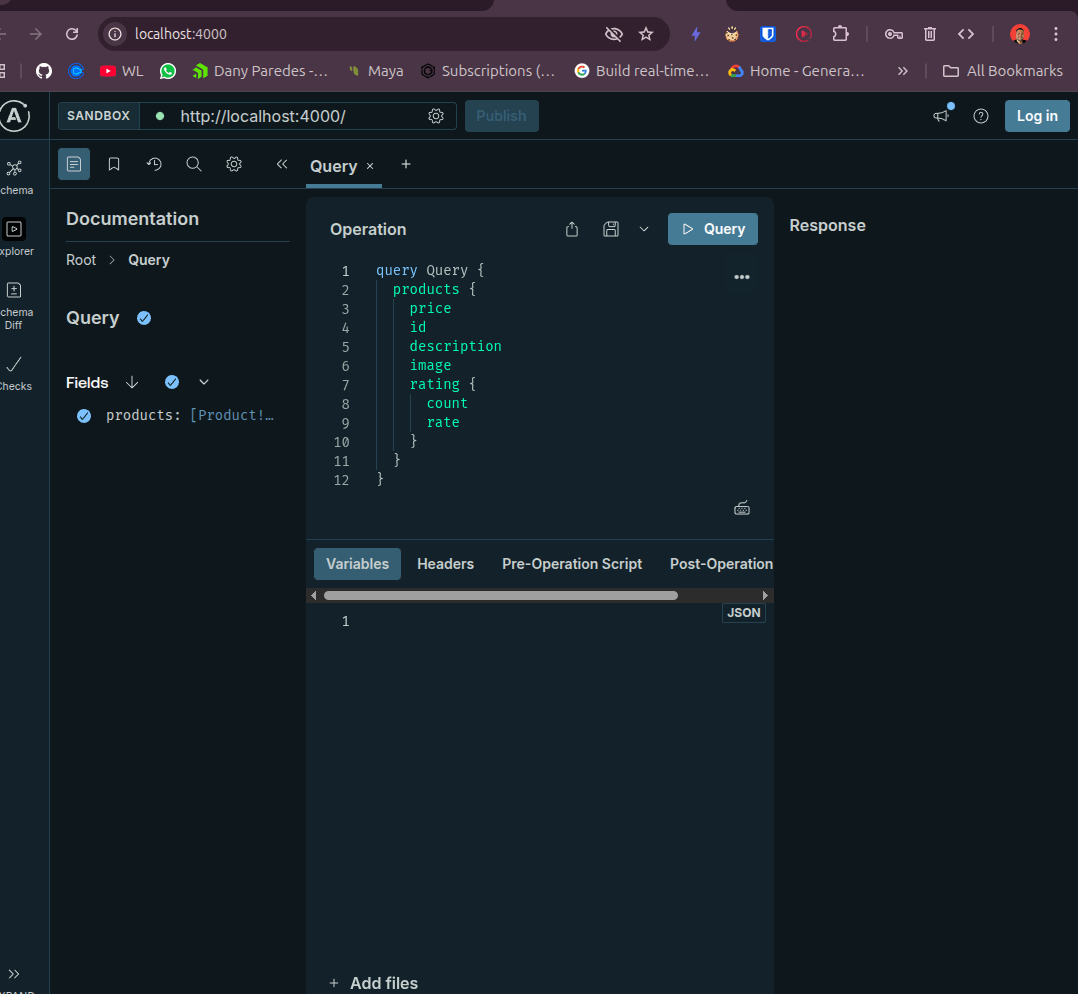
Open the server in the browser in port 4000 (http://localhost:4000) and tada!! We found the Apollo Explorer. The Apollo Explorer helps us to interact with our schema and execute multiple queries over it.
The documentation area shows the query and fields to get data. The example query comes with all fields to get the data. We can write an example query and pick fields for our query like id, image, price, title or use the example and hit the “Query” button and see the results.
🙁 PUSH!! It shows an error! But if we read the error message, “Cannot return null for non-nullable field Query.products.”
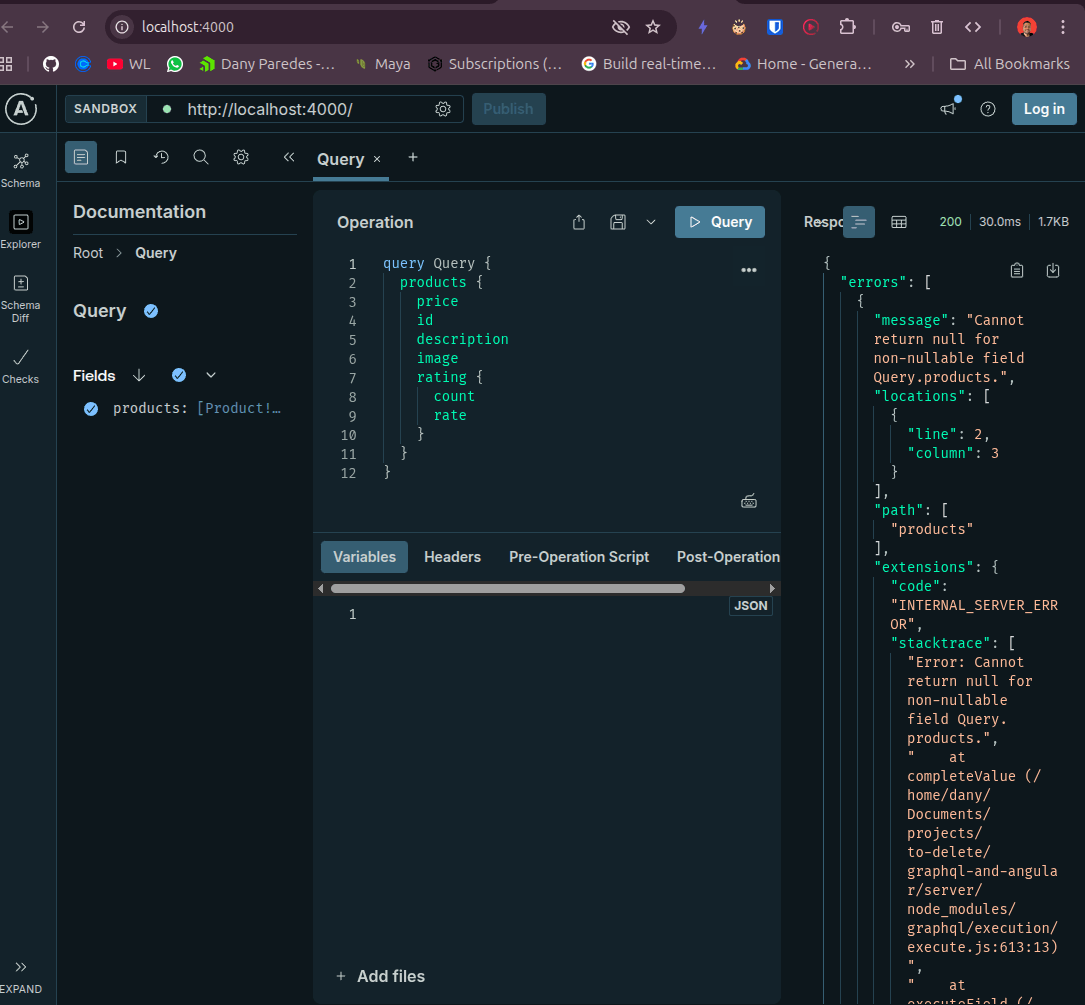
That means we need to return some data because our GraphQL is not connected to any datasource. To make it fun, we can set up mock data to keep our team working with the UI without take care about the source of data.
Learn more about Apollo Explorer.
Fake and Mock
GraphQL is ready with a set of tools to allow us mock our contract or schema with the clients. To mock our data, we need to use @graphql-tools/mock and @graphql-tools/schema packages. These packages will provide functions to configure our server when we start to change our schema with example mocks, by calling two functions: addMocksToSchema and makeExecutableSchema.
First, install the packages @graphql-tools/mock and @graphql-tools/schema. In the terminal run the following command:
npm install @graphql-tools/mock @graphql-tools/schema

added 11 packages, and audited 12 packages in 3s

found 0 vulnerabilities
Perfect, now it’s time to make some changes in our server. Instead of using our default schema, we’ll use the schema property to change how we initialize the Apollo Server. Create a new file schema-mocks.ts file; at the top import addMocksToSchema and makeExecutableSchema functions and typeDefs.
import {typeDefs} from "./schema";
import {makeExecutableSchema} from "@graphql-tools/schema";
import {addMocksToSchema} from "@graphql-tools/mock";
Next, we make a new schema using makeExecutableSchema, passing as parameter typeDefs from schema.ts.
import {typeDefs} from "./schema";
import {makeExecutableSchema} from "@graphql-tools/schema";
import {addMocksToSchema} from "@graphql-tools/mock";

const schema = makeExecutableSchema({typeDefs});
Define a new file mocks object with the example of Product based on our type definitions for our clients when requesting data.
const mocks = {
  Product: () => ({
    id: `1`,
    title: 'Mock Product',
    price: 15.2,
    description: 'This is a mocked product description.',
    category: 'Electronics',
    image: 'https://via.placeholder.com/150',
    rating: {
      rate: 5,
      count: 3,
    },
  }),
};
To provide the server to the mocks, use the new schema with the result of addMocksToSchema function.
export const schemaWithMocks = addMocksToSchema({schema, mocks});
The final version looks like:
import {typeDefs} from "./schema";
import {makeExecutableSchema} from "@graphql-tools/schema";
import {addMocksToSchema} from "@graphql-tools/mock";

const schema = makeExecutableSchema({typeDefs});

const mocks = {
 Product: () => ({
   id: `1`,
   title: 'Mock Product',
   price: 15.2,
   description: 'This is a mocked product description.',
   category: 'Electronics',
   image: 'https://via.placeholder.com/150',
   rating: {
     rate: 5,
     count: 3,
   },
 }),
};

export const schemaWithMocks = addMocksToSchema({schema, mocks});
Finally, we’re going to perform a small change in the ApolloServer, passing the schemaWithMocks function. Open index.ts, import the schemaWithMocks function and set it to the schema property.
import {ApolloServer} from "@apollo/server";
import {startStandaloneServer} from "@apollo/server/standalone";
import {schemaWithMocks} from "./schema-mock";


async function startApolloServer() {
  const server = new ApolloServer({
    schema: schemaWithMocks
  });
  const {url} = await startStandaloneServer(server);
  console.log(`
    🚀  Server is running at ${url}
  `);
}

startApolloServer();
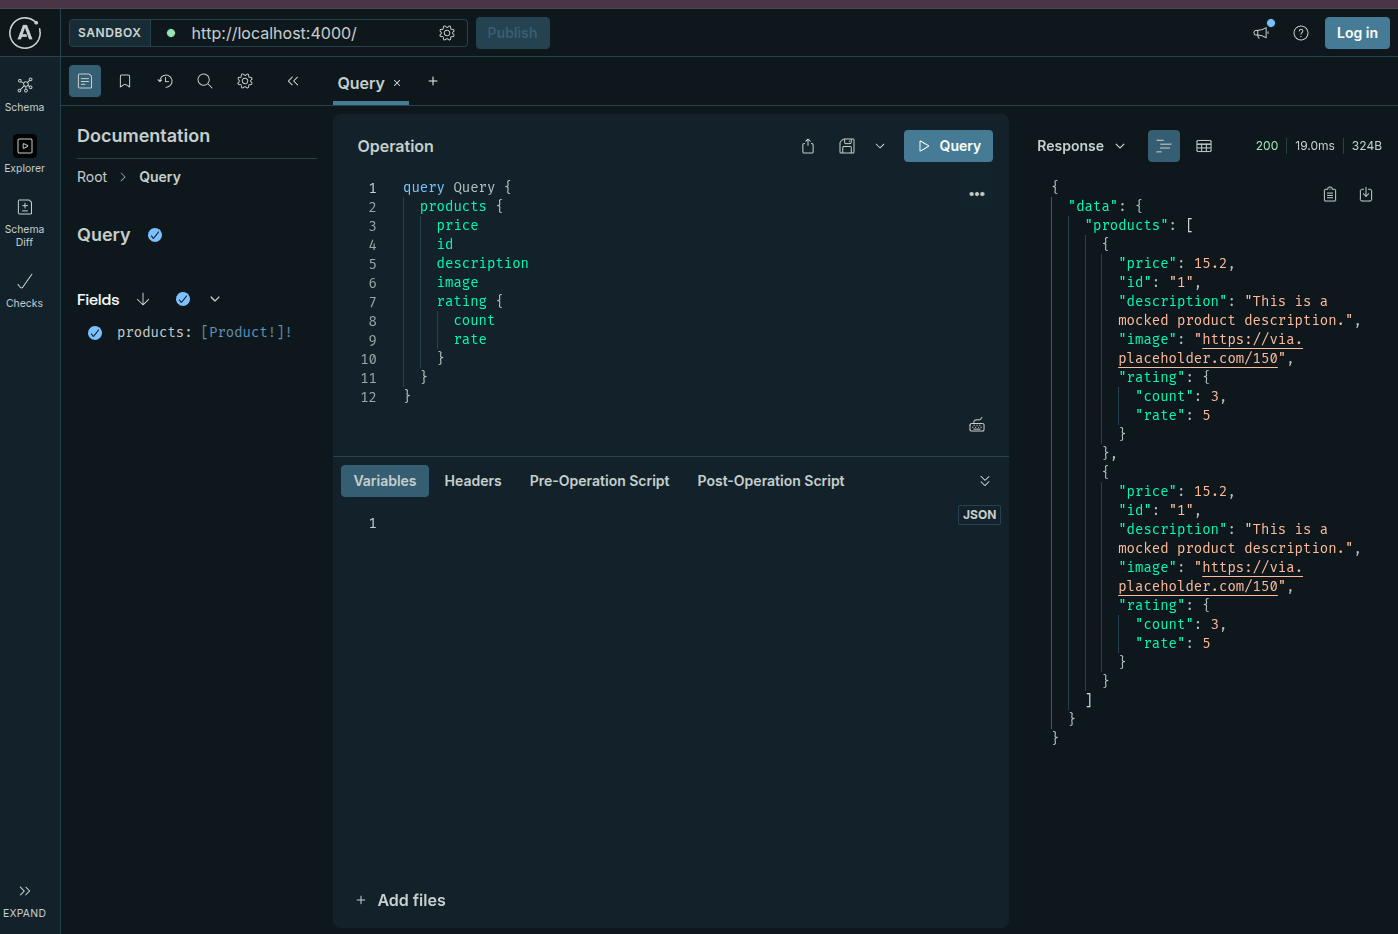
Save changes and reload our server. It is ready to query with mock data, so now we are fully free to write custom queries, like selecting multiple fields or a single one for our queries.
Recap
We learned the pain points when we build a data-driven app, how easy it is to configure and set up our own GraphQL server using Apollo client and the advantages for querying data and defining types and queries.
We saw when and why to use GraphQL, which allows clients to request exactly the data they want to from the server. And, on top of that, we learned about how to configure mock queries to play with GraphQL explorer.
In the next chapter, we’re going to learn how to integrate Apollo Client with Angular and how to query only required fields in our components!

Dany Paredes
Dany Paredes is a Google Developer Expert on Angular and Progress Champion. He loves sharing content and writing articles about Angular, TypeScript and testing on his blog and on Twitter (@danywalls).
Related Posts
Comments
All articles
Topics
Web MobileMobile
Desktop
Design
Productivity
People
