
Build Fast Angular Apps with SSG

Summarize with AI:
Learn how to improve performance of your CSR Angular project by moving to SSR and prerendering (SSG) in Angular 20.
Nowadays, when we build applications in Angular, we need to think about more than just code. Our product needs to be fast, and if it is a digital product, being discoverable by search engines is key to achieving a good rank in Google’s results.
But, when we build our apps, do we take all of this into consideration?? By default, Angular creates a SPA with CSR instead of SSR or SSG. Do you consider Lighthouse score metrics like FCP, LCP or CLS? 😵 Hold on a second! What do all these terms mean? Why are they important?
Don’t worry! Today, let’s begin a journey of exploring all these terms and why they are important to us, and how Angular helps us to solve most of these cases. As always, we are going to learn this with a real existing project, moving from a slow and low score to a fast and great score.
But why not learn to create a new one from zero? In a new greenfield, it’s always perfect, but I want to share the real-world experience of moving an existing project built with Angular’s default options.
Let’s get started!
Set Up Project
First, clone our existing project, Kendo Store, but instead of starting with the master branch, we start from the starting point branch store-angular-20-2-1. Run the command git clone --branch store-angular-20-2-1 --single-branch https://gitlab.com/kendo-ui/kendo-angular-ssg.git. It clones the project in the specific branch.
Next, move into the kendo-angular-ssg directory. To be sure we are working in the same state, run the git branch command—it must show the start-point-20 branch and run npm i to install all dependencies.
dany@dany:~/lab$ git clone --branch start-point-20 --single-branch https://gitlab.com/kendo-ui/kendo-angular-ssg.git
Cloning into 'kendo-angular-ssg'...
remote: Enumerating objects: 176, done.
remote: Counting objects: 100% (176/176), done.
remote: Compressing objects: 100% (111/111), done.
remote: Total 176 (delta 95), reused 113 (delta 59), pack-reused 0 (from 0)
Receiving objects: 100% (176/176), 276.55 KiB | 2.51 MiB/s, done.
Resolving deltas: 100% (95/95), done.
dany@dany:~/lab$ cd kendo-angular-ssg/
dany@dany:~/lab/kendo-angular-ssg$ npm i
We are ready, so let’s see our existing project by running ng serve in the terminal.
dany@dany:~/lab/kendo-angular-ssg$ ng serve
Initial chunk files | Names         | Raw size
main.js             | main          | 24.14 kB |
styles.css          | styles        | 96 bytes |
polyfills.js        | polyfills     | 95 bytes |

                    | Initial total | 24.33 kB

Application bundle generation complete. [1.457 seconds]

Watch mode enabled. Watching for file changes...
NOTE: Raw file sizes do not reflect development server per-request transformations.
  ➜  Local:   http://localhost:4200/
  ➜  press h + enter to show help

Perfect! Our first impression looks like a nice app that works and also has two pages of navigation. But let’s go deeper about the real status of this project.
CSR: Client-Side Rendering
By default, Angular uses client-side rendering (CSR). That means the client or browser takes the responsibility to build the entire app, so the server will send the minimal amount of HTML and include the JavaScript code (bundle) and our browser will generate the interface (DOM elements) dynamically.
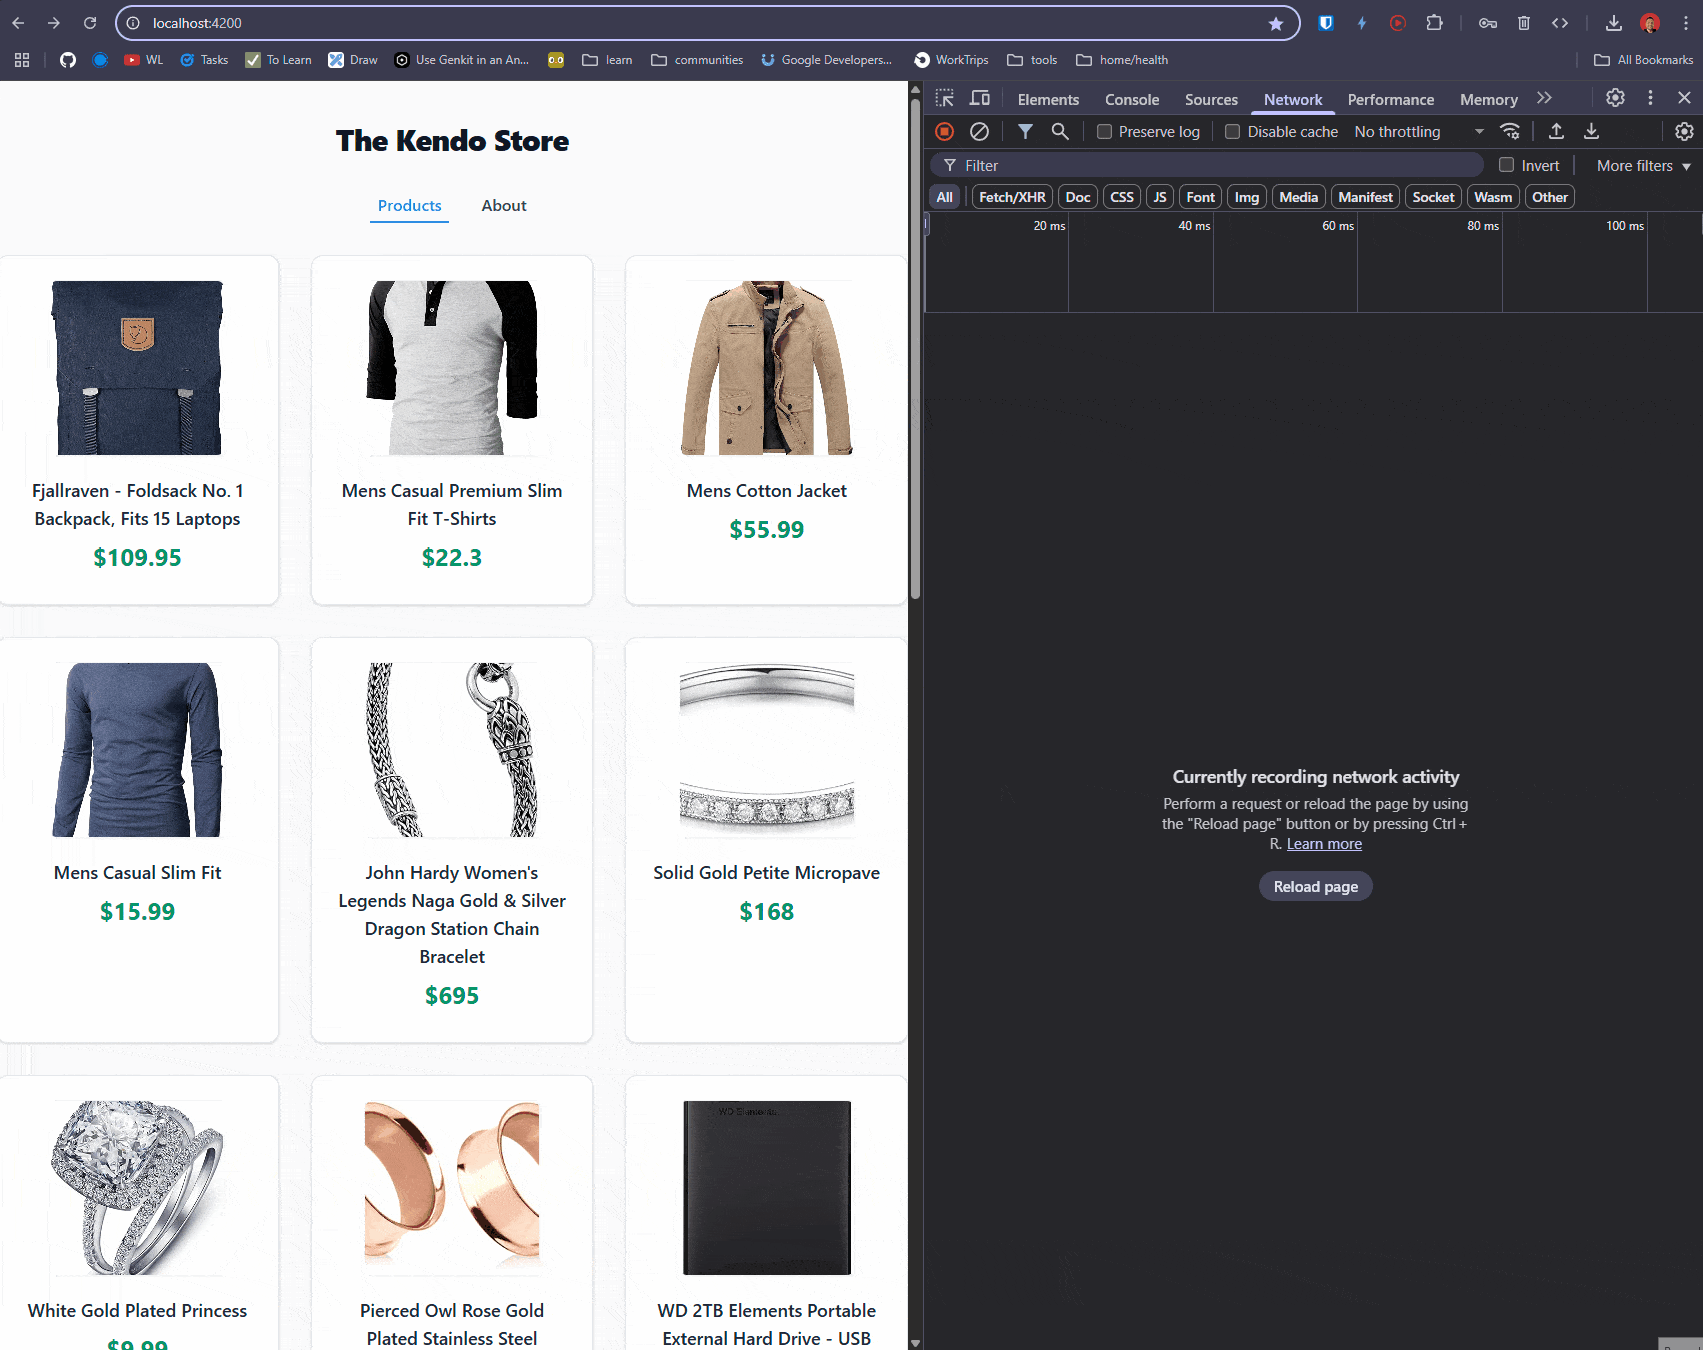
For example, let’s see our project built using CSR in Angular. Go to http:localhost:4200 and press F12 (or ⌘ ⌥ i for Mac)to use DevTools. In the Network tab, clear the logs and reload the page. Then click on the localhost file and open the Preview tab. You’ll see that the server only sends back a very simple HTML file with the <app-root> component.
Learn more about Network Activity in Chrome DevTools.
What happens when the Google crawler tries to read the information about our store? It doesn’t get any products. :( So that means for Google our page isn’t providing any products.
When we use CSR, it builds the application in the browser, but after loading and building the DOM, it works faster because we have all elements in the client and don’t need any new requests to the server to navigate the application. But the hidden price to pay is the SEO impact.
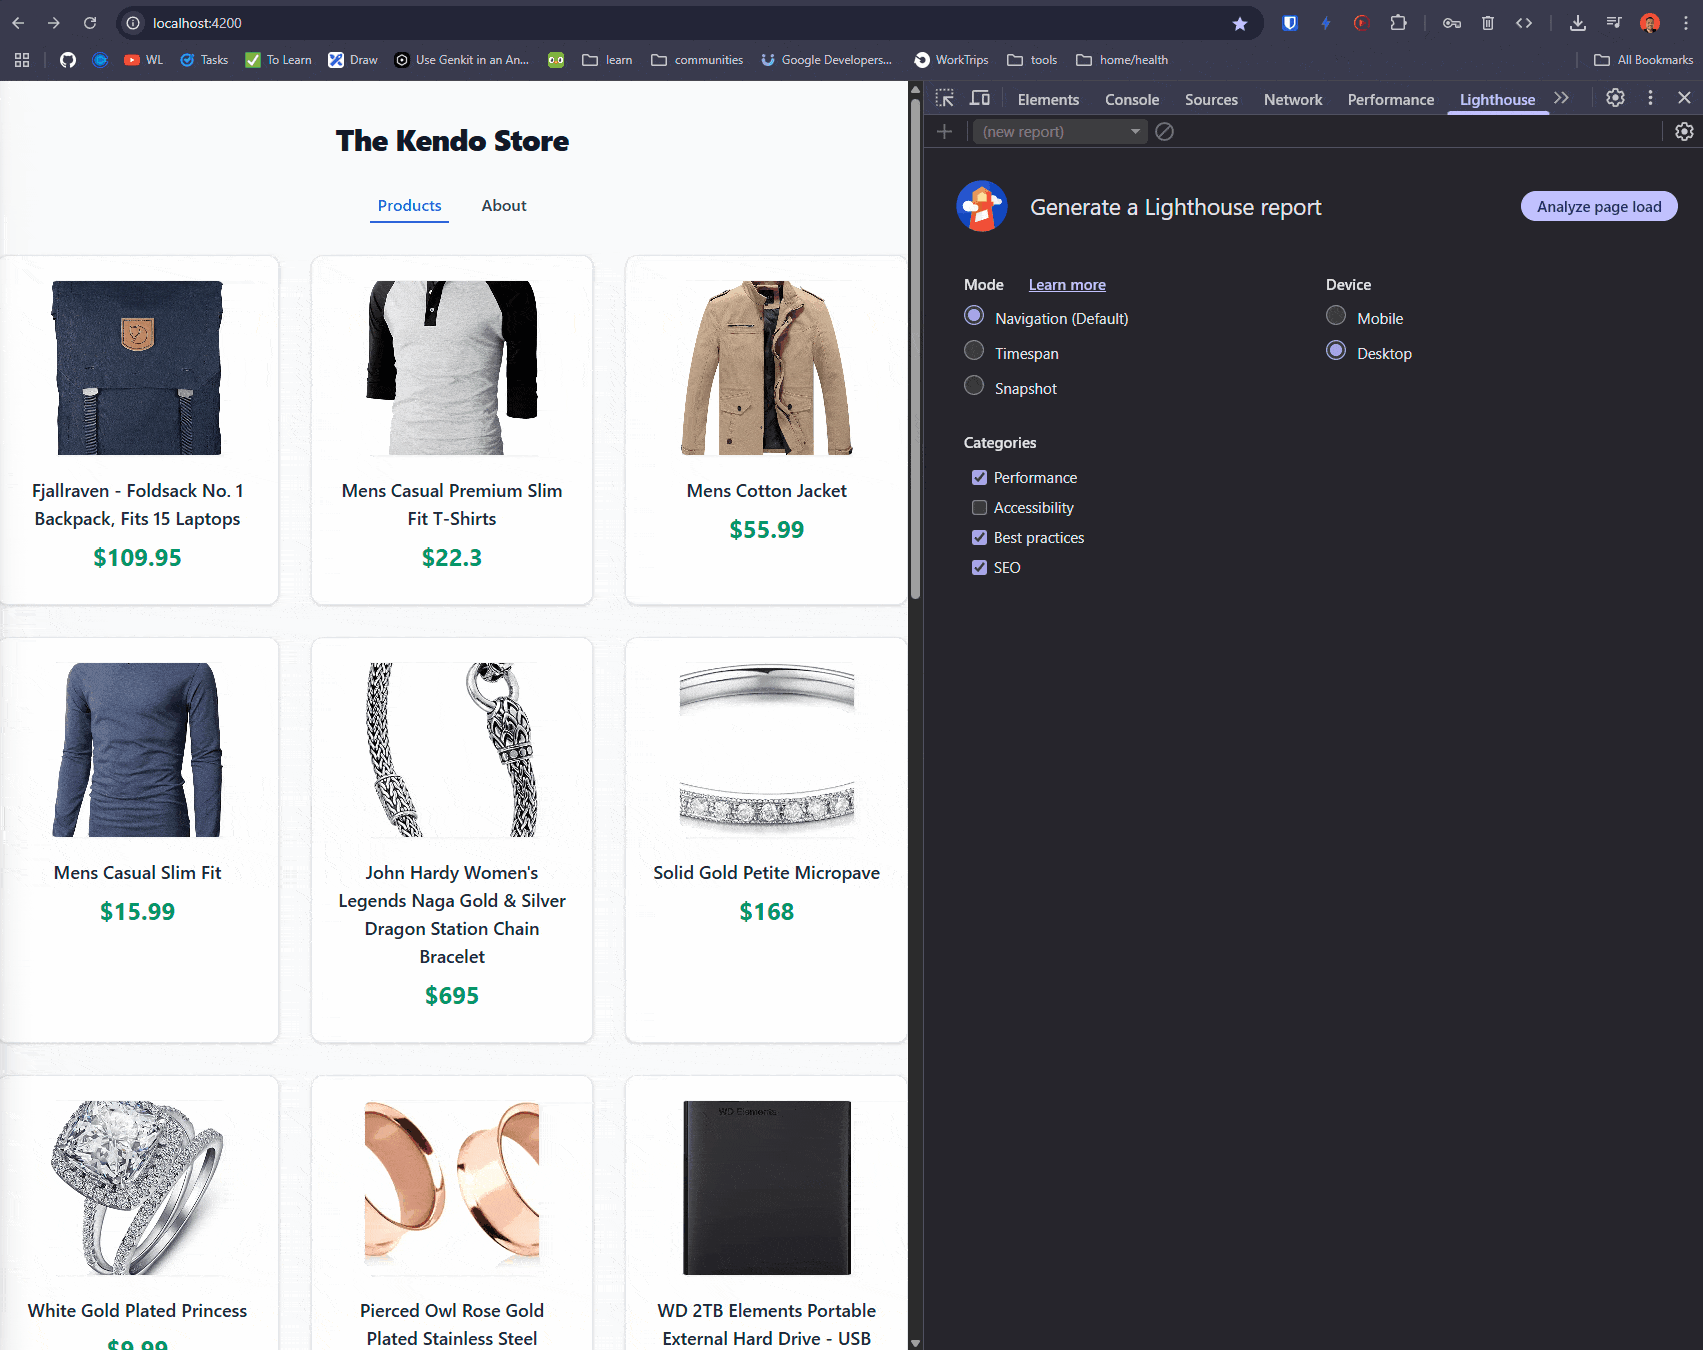
Let’s see how our app performs with Lighthouse, which helps us to improve the quality of our apps by auditing for performance, accessibility, SEO and more.
Open the browser again, and click the Lighthouse tab. Select desktop and the categories for best practices, SEO and performance and click “Analyze page load.” 🤞
Oops. Looks like the performance is not good enough. 🙁 No worries! We’re going to improve it by combining it with the power of Angular. Let’s do it!
SSR and SSG: Server-Side Rendering and Static Site Generation
After understanding CSR, let’s learn about other ways Angular provides to build and serve our apps. One of them is server-side rendering (SSR) and prerendering or static site generation (SSG).
SSR improves the speed because instead of the client needing to build the HTML, it loads on the server on-demand. But what does that mean? Well, for each request, the server will build our app HTML and return it to the client.
It’s good because the crawlers can read the information and speed up the performance, and the server gets the fresh data and returns it to the client. But the impact is the cost to the server. What happens if we have 1,000 users? It makes our server build the HTML 1,000 times, increasing costs, which is not nice for the budget. ? Yep.
Sometimes our content is more static and doesn’t change much, like a blog or maybe our store. We don’t change the price every hour or every day.
In that case we can use prerendering, or SSG.
When we use SSG, Angular builds the full page in the build process, so instead of building the app every time a user requests the page, the page is already ready, making faster page loads. Prerendering creates HTML documents at build time, and the server directly responds to requests with the static HTML document without any additional work.
Keep in mind that prerendering requires that all information necessary to render a page is available at build time. So it is perfect for pages that are the same for all users of your application.
Moving to SSR with Prerendering
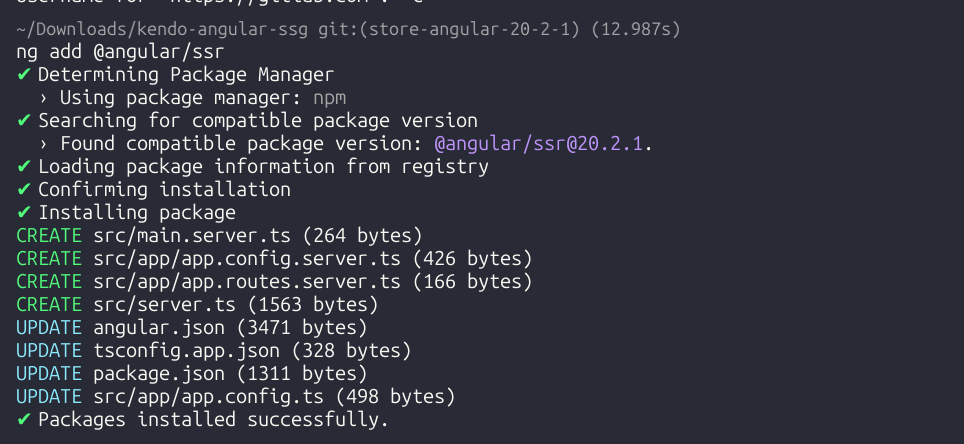
We’re going to transform our existing project from CSR to SSR with prerendering. The Angular team created an amazing schematic for us in @angular/ssr. It takes the responsibility to install, create files and change required files.
Open the terminal and run ng add @angular/ssrcommand:
Note: You can build a new project from zero running
ng new --ssrcommand.
After that, it made changes in tsconfig.json, app.config and package.json
The ng add @angular/ssr schematic command automatically added main.server.ts and server.ts to tsconfig.app.json, since SSR uses Node with Express to add the node types.
{
 "extends": "./tsconfig.json",
  "compilerOptions": {
    "outDir": "./out-tsc/app",
    "types": [
      "node"
    ]
  },
  "files": [
    "src/main.ts",
    "src/server.ts",
    "src/main.server.ts"
  ],
  "include": [
    "src/**/*.d.ts"
  ]
}
The ng add @angular/ssr schematics also automatically imported the provideClientHydration and withEventReplay functions into the app.config file.
import { ApplicationConfig } from '@angular/core';
import {provideRouter, withComponentInputBinding} from '@angular/router';

import { routes } from './app.routes';
import { provideHttpClient } from '@angular/common/http';
import { provideClientHydration, withEventReplay } from '@angular/platform-browser';

export const appConfig: ApplicationConfig = {
  providers: [
    provideRouter(routes, withComponentInputBinding()),
  provideHttpClient(), provideClientHydration(withEventReplay())
  ]
};
In Angular.json, the schematic also changed the use prerender property to true, so server.ts, combined with the power of Express Node.js, uses AngularNodeAppEngine to provide our Angular app from the server.
"prefix": "app",
	"architect": {
        "build": {
          "builder": "@angular-devkit/build-angular:application",
          "options": {
            "outputPath": "dist/kendo-store",
            "index": "src/index.html",
            "browser": "src/main.ts",
            "polyfills": [
              "zone.js"
            ],
            "tsConfig": "tsconfig.app.json",
            "inlineStyleLanguage": "scss",
            "assets": [
              "src/favicon.ico",
              "src/assets"
            ],
            "styles": [
              "src/styles.scss"
            ],
            "scripts": [],
            "server": "src/main.server.ts",
            "outputMode": "server",
            "ssr": {
              "entry": "src/server.ts"
            }
          },
It also creates the app.config.server ts, to combine the serverRendering() and combine the appConfig with serverConfig.
import { mergeApplicationConfig, ApplicationConfig } from '@angular/core';
import { provideServerRendering, withRoutes } from '@angular/ssr';
import { appConfig } from './app.config';
import { serverRoutes } from './app.routes.server';

const serverConfig: ApplicationConfig = {
  providers: [
    provideServerRendering(withRoutes(serverRoutes))
  ]
};

export const config = mergeApplicationConfig(appConfig, serverConfig);
We have all the changes, so let’s build our app (and cross our fingers)! 🤞
Build SSR and Prerender
Before starting, if you are using a version Angular 20.0.2 or lower, you might encounter the following error after running the build command ng build. This issue has been fixed in the latest version issue.
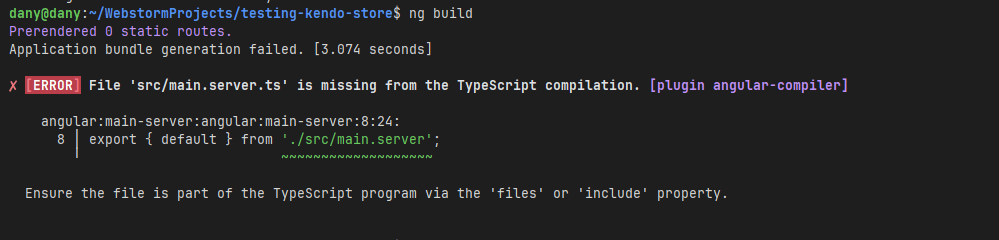
You can fix this by importing the main.server.ts into the tsconfig.app.json.
/* To learn more about this file see: https://angular.io/config/tsconfig. */
{
  "extends": "./tsconfig.json",
  "compilerOptions": {
    "outDir": "./out-tsc/app",
    "types": [
      "node"
    ]
  },
  "files": [
    "src/main.ts",
    "src/server.ts",
    "src/main.server.ts"
  ],
  "include": [
    "src/**/*.d.ts"
  ]
}
If you are using latest version of Angular or make the previous changes, run the ng build command again in the terminal.
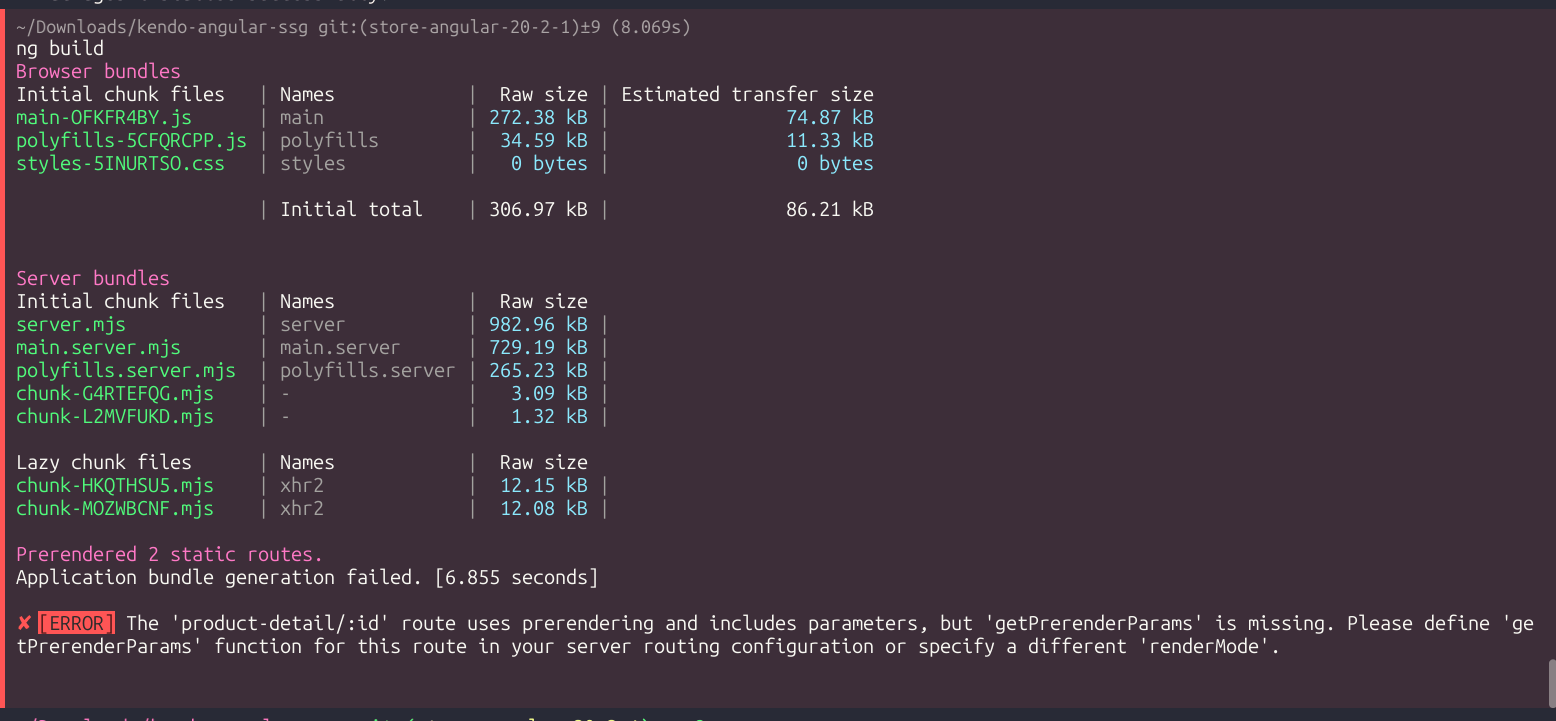
Oops. It built the project but showed an error! The route product-detail/:id needs its information, so did you remember: Prerendering requires that all information necessary to render a page is available at build-time.
We need to provide this. It’s time to write a bit of code!
The Router with Parameters
Open the app.routes.server.ts file. It is responsible for handling which pages to prerender. In our case, we need to specify the path 'product-detail/:id' and indicate that it needs the id parameter by providing the getPrerenderParams function.
Register the route 'product-detail/:id', set the renderMode to RenderMode.Prerender, and set the getPrerenderParams function as a parameter. Within this function, we call the service to retrieve all product IDs.
{
 path: 'product-detail/:id',
 renderMode: RenderMode.Prerender,
 async getPrerenderParams() {
   const productService  = inject(ProductsService);
   const productIds =  toSignal(productService.products$,{ initialValue: []} );
   return productIds().map(product => ({
     id: product.id
   }));
 }
}
The final code looks like:
import { RenderMode, ServerRoute } from '@angular/ssr';
import {ProductsService} from "./services/products.service";
import {inject} from "@angular/core";
import {toSignal} from "@angular/core/rxjs-interop";

export const serverRoutes: ServerRoute[] = [
  {
    path: '**',
    renderMode: RenderMode.Prerender
  },
  {
    path: 'product-detail/:id',
    renderMode: RenderMode.Prerender,
    async getPrerenderParams() {
      const productService  = inject(ProductsService);
      const productIds =  toSignal(productService.products$,{ initialValue: []} );
      return productIds().map(product => ({
        id: product.id
      }));
    }
  }
];
Perfect, save the changes! And build the app by running ng build:
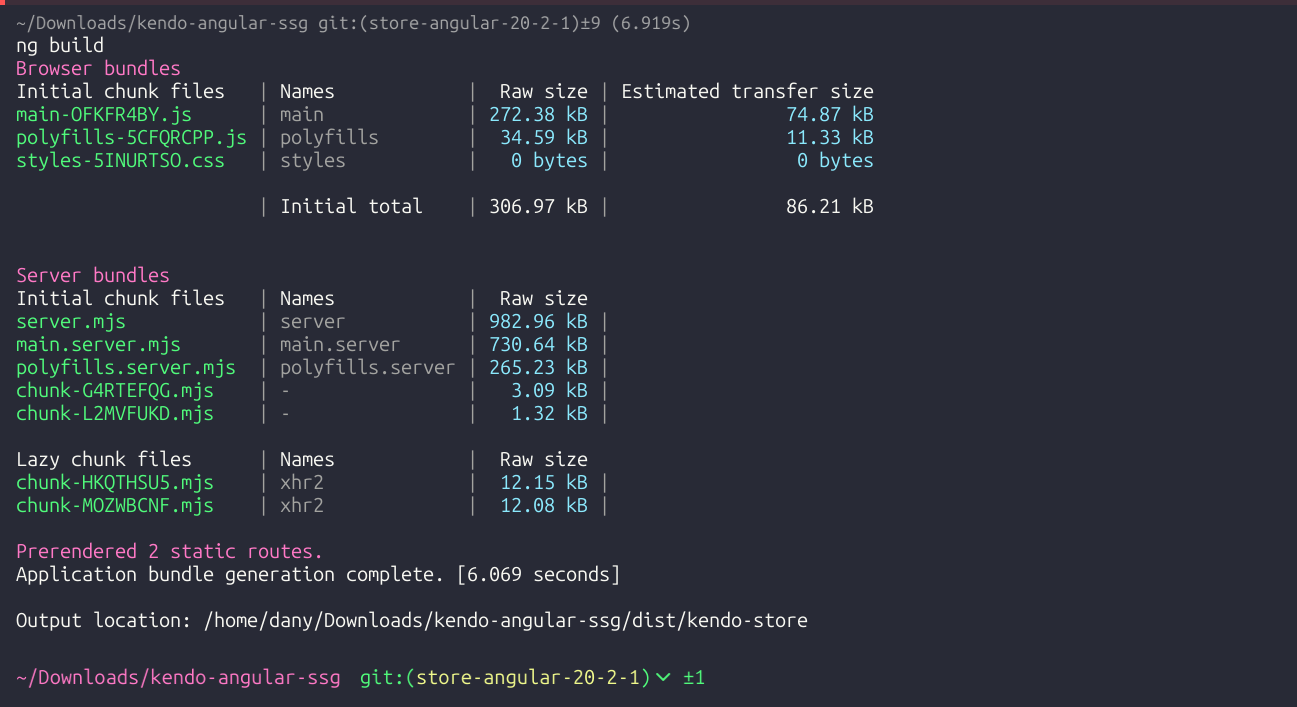
Because the schematic created a new npm script to run the SSR version of our app, it’s time to run the app and see the results by running npm run serve:ssr:kendo-store in the terminal. This serves the app on another port, 4000.
Read more about getPrerenderParams.
Open the browser and navigate to http://localhost:4000. Our app is working!! Yeah! But let’s see the performance, open the DevTools, click in lighthouse tab and hit the analyze page load button.
Maybe in the first reload get lower than 80, because Angular didn’t build and cache the files, try again (also its depends your machine, connection and extensions). But run the test again, and tada!!
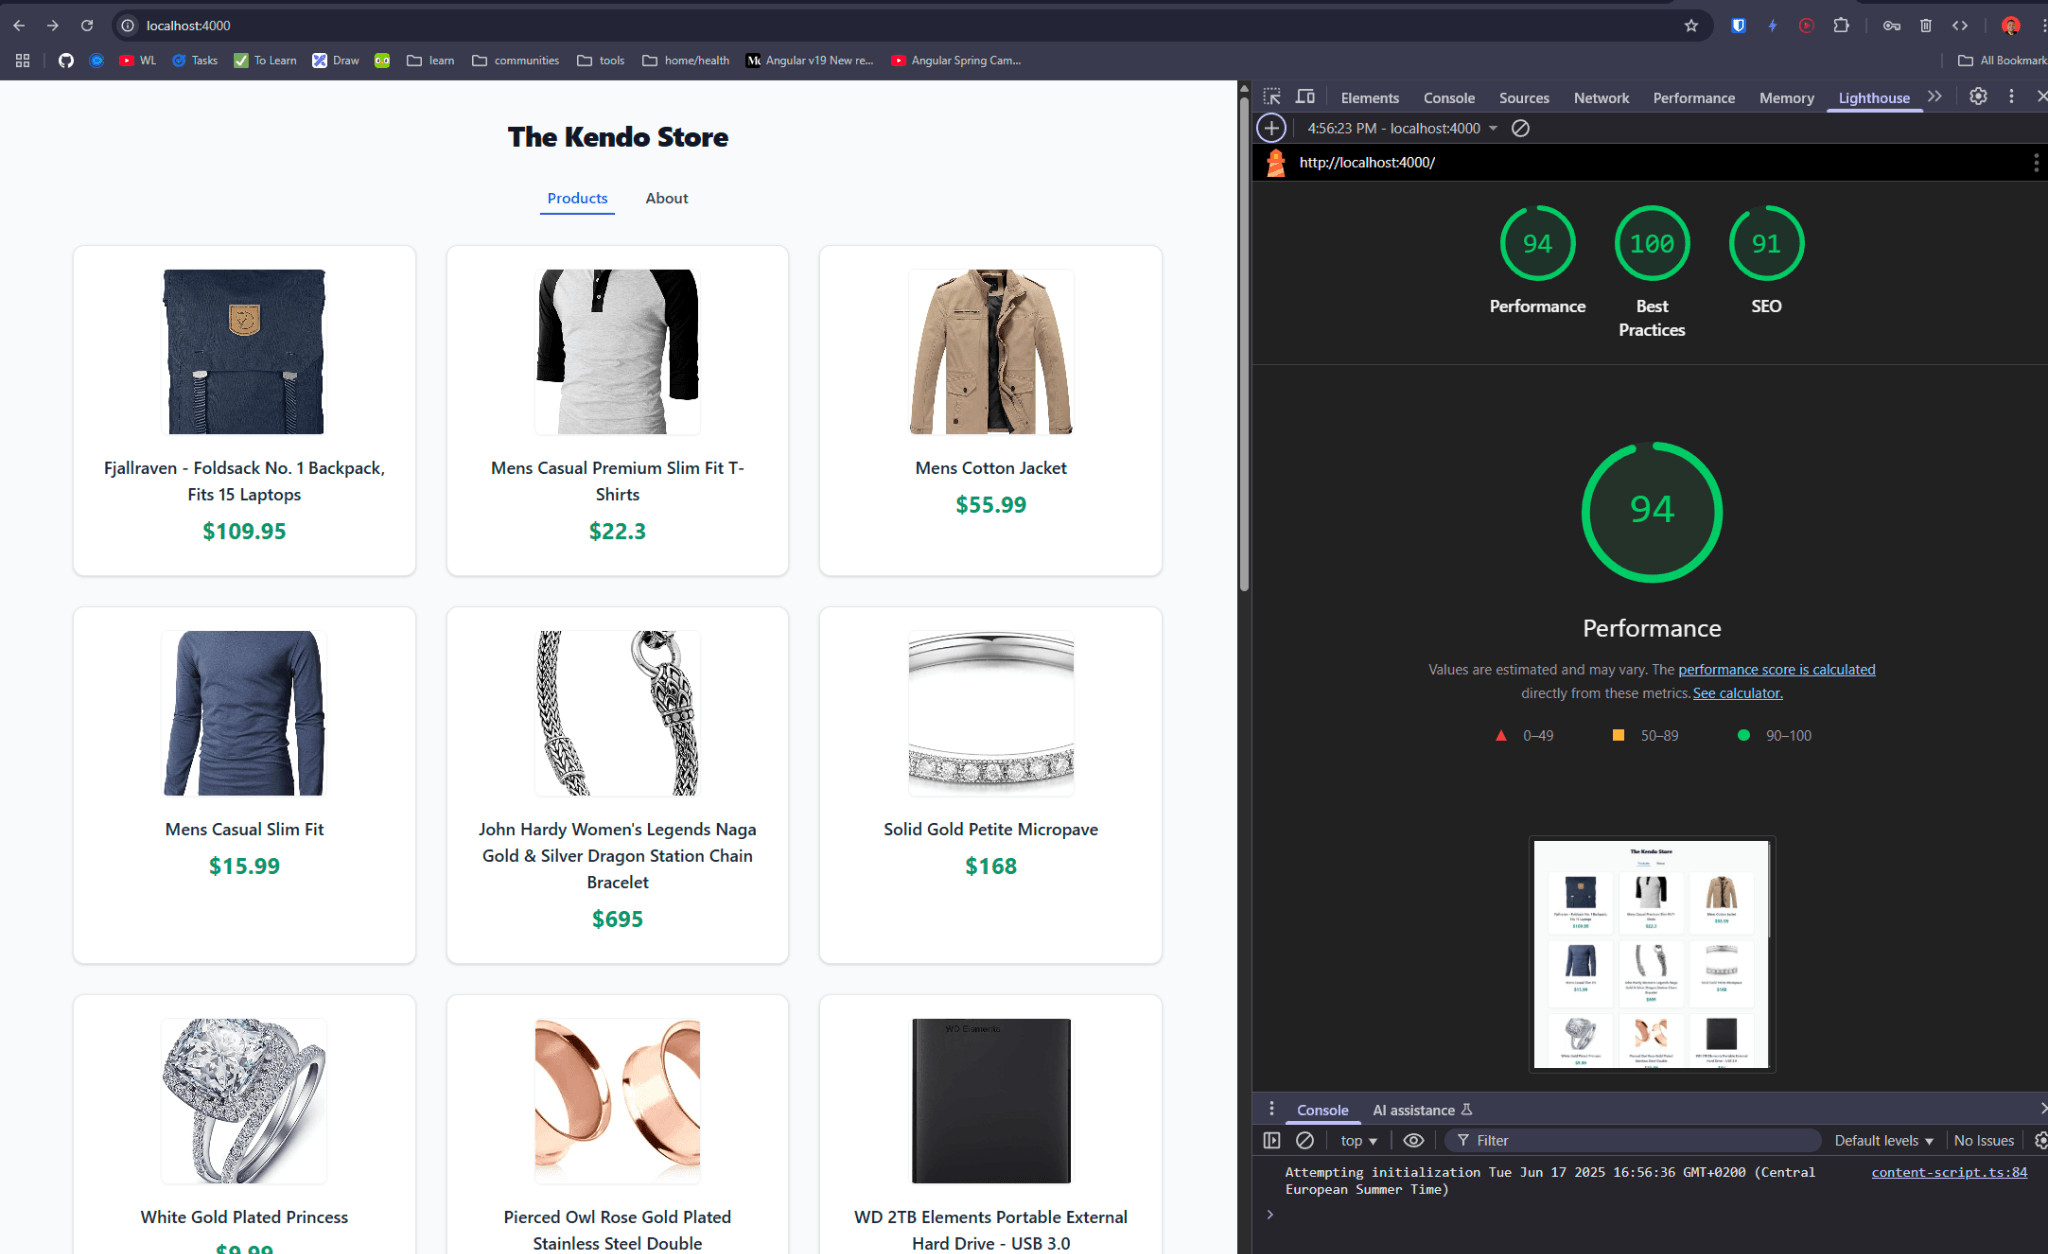
We got 😍!!! 94!!! Great!!! From 74 to 94, we increased the speed by 20%! Only by adding prerendering to our app!!! Yeah!!!
Hmm, but could this be even better?
Using Angular Power with NgOptimizedImage
We want to be faster, and Angular gives us the NgOptimizedImage directive to improve images. Let’s add it to the product and details pages.
Open products.component.ts and import the NgOptimizedImage directive in the imports section.
import {Component, inject} from '@angular/core';
import {ProductsService} from "../../services/products.service";
import {AsyncPipe, NgOptimizedImage} from "@angular/common";
import {RouterLink} from "@angular/router";

@Component({
  selector: 'app-products',
  imports: [AsyncPipe, RouterLink, NgOptimizedImage],
  templateUrl: './products.component.html',
  styleUrl: './products.component.scss'
})
export class ProductsComponent {
  public products$ = inject(ProductsService).products$;
}
Open the template products.component.html and update the image with the ngSrc directive; it requires width and height.
<img
 [ngSrc]="product.image"
 width="164"
 height="164"
 [alt]="product.title"
 class="rounded-lg object-contain h-64 w-64 shadow"
/>
The final version of products.component.html looks like:
@if (products$ | async; as products) {
 <div class="grid grid-cols-1 sm:grid-cols-2 md:grid-cols-3 gap-8">
   @for(product of products; track product) {
     <div [routerLink]="['product-detail', product.id]" class="bg-white border border-gray-200 rounded-xl shadow hover:shadow-xl transition-shadow p-6 flex flex-col items-center">
       <img
         [ngSrc]="product.image"
         width="164"
         height="164"
         [alt]="product.title"
         class="rounded-lg object-contain h-64 w-64 shadow"
       />
       <h3 class="text-lg font-semibold mb-2 text-gray-800 text-center line-clamp-2">{{product.title}}</h3>
       <span class="text-green-600 font-bold text-2xl mb-2">${{product.price}}</span>
     </div>
   }
 </div>
}
Repeat the same steps in the products-details.component, importing the NgOptimizedImage.
import {Component, inject, input} from '@angular/core';
import {ProductsService} from "../../services/products.service";
import {toObservable} from "@angular/core/rxjs-interop";
import {switchMap} from "rxjs";
import {AsyncPipe, NgOptimizedImage} from "@angular/common";

@Component({
  selector: 'app-product-details',
  imports: [
    AsyncPipe,
    NgOptimizedImage
  ],
  templateUrl: './product-details.component.html',
  styleUrl: './product-details.component.scss',
  standalone: true,
})
export class ProductDetailsComponent {

  #productService = inject(ProductsService);
  id = input.required<string>();
  product$ = toObservable(this.id).pipe(
    switchMap(productId => this.#productService.productById(productId))
  )
}
Update the product-details.component.html, using ngSrc directive and adding width and height.
<img
 [ngSrc]="product.image"
 width="64"
 height="64"
 [alt]="product.title"
 class="rounded-lg object-contain h-64 w-64 shadow"
/>
The final version of product-details.component.html looks like:
<div class="min-h-screen bg-gray-50 font-sans flex items-start justify-center py-12 px-4">
 @if(product$ |async; as product){
   <div class="bg-white rounded-2xl shadow-lg max-w-3xl w-full flex flex-col md:flex-row overflow-hidden">
     <!-- Product Image -->
     <div class="md:w-1/2 flex items-center justify-center bg-gray-100 p-8">
       <img
         [ngSrc]="product.image"
         width="64"
         height="64"
         [alt]="product.title"
         class="rounded-lg object-contain h-64 w-64 shadow"
       />

     </div>
     <!-- Product Details -->
     <div class="md:w-1/2 p-8 flex flex-col justify-center">
       <h1 class="text-2xl md:text-3xl font-bold text-gray-900 mb-4">{{ product.title }}</h1>
       <span class="text-green-600 font-extrabold text-2xl mb-4 block">${{ product.price }}</span>
       <p class="text-gray-700 mb-6">
         {{ product.description || 'No description available.' }}
       </p>
       <button
         class="bg-blue-600 hover:bg-blue-700 text-white font-semibold py-3 px-6 rounded-lg shadow transition-colors w-full md:w-auto"
       >
         Add to Cart
       </button>
     </div>
   </div>
 }
</div>
Save the changes and run Lighthouse. Tada! 🎉 We get 97% on the homepage and 99% on the details pages!
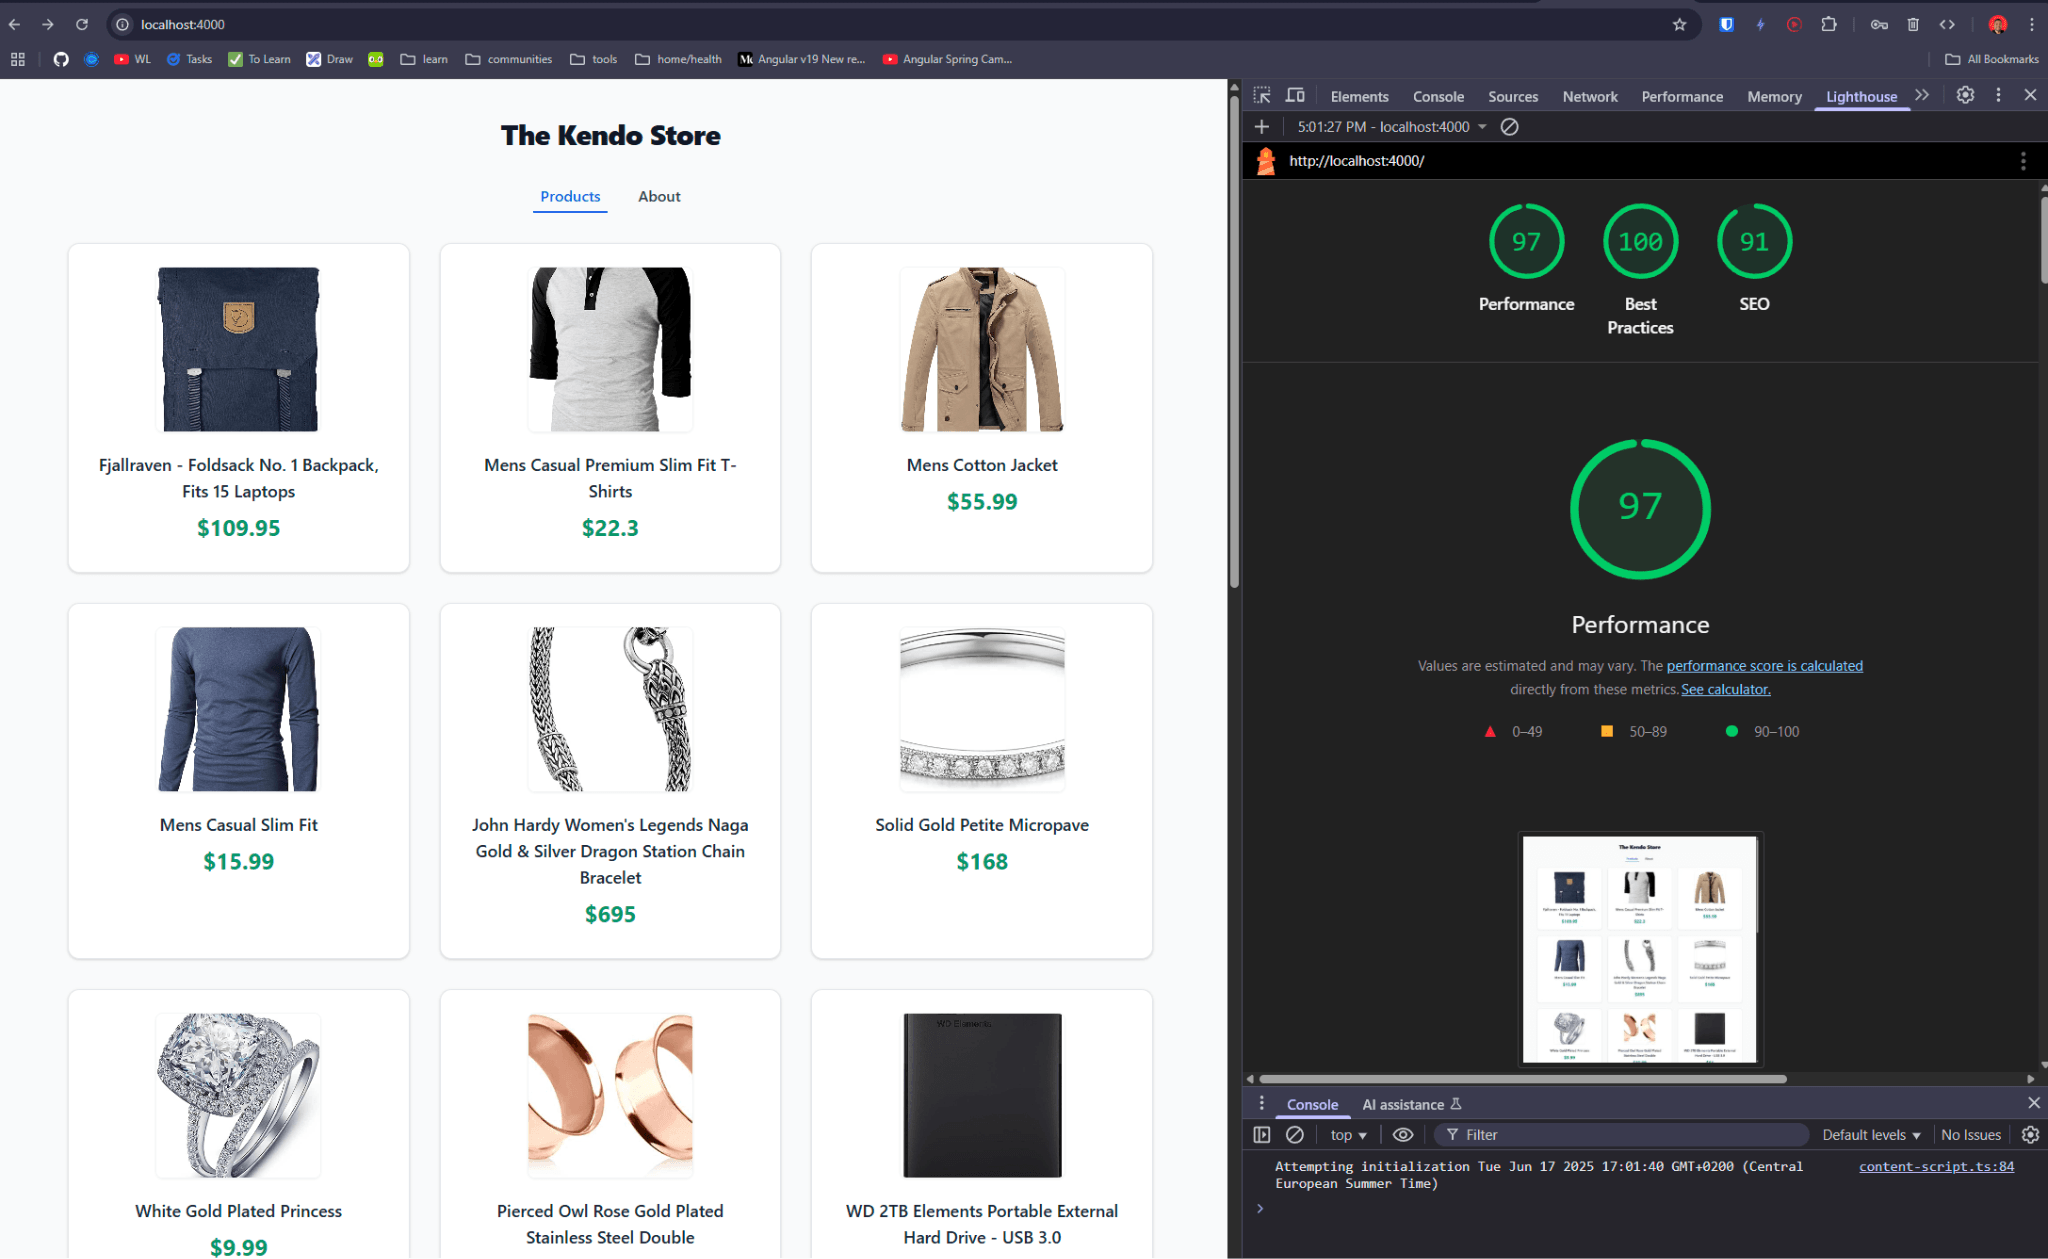
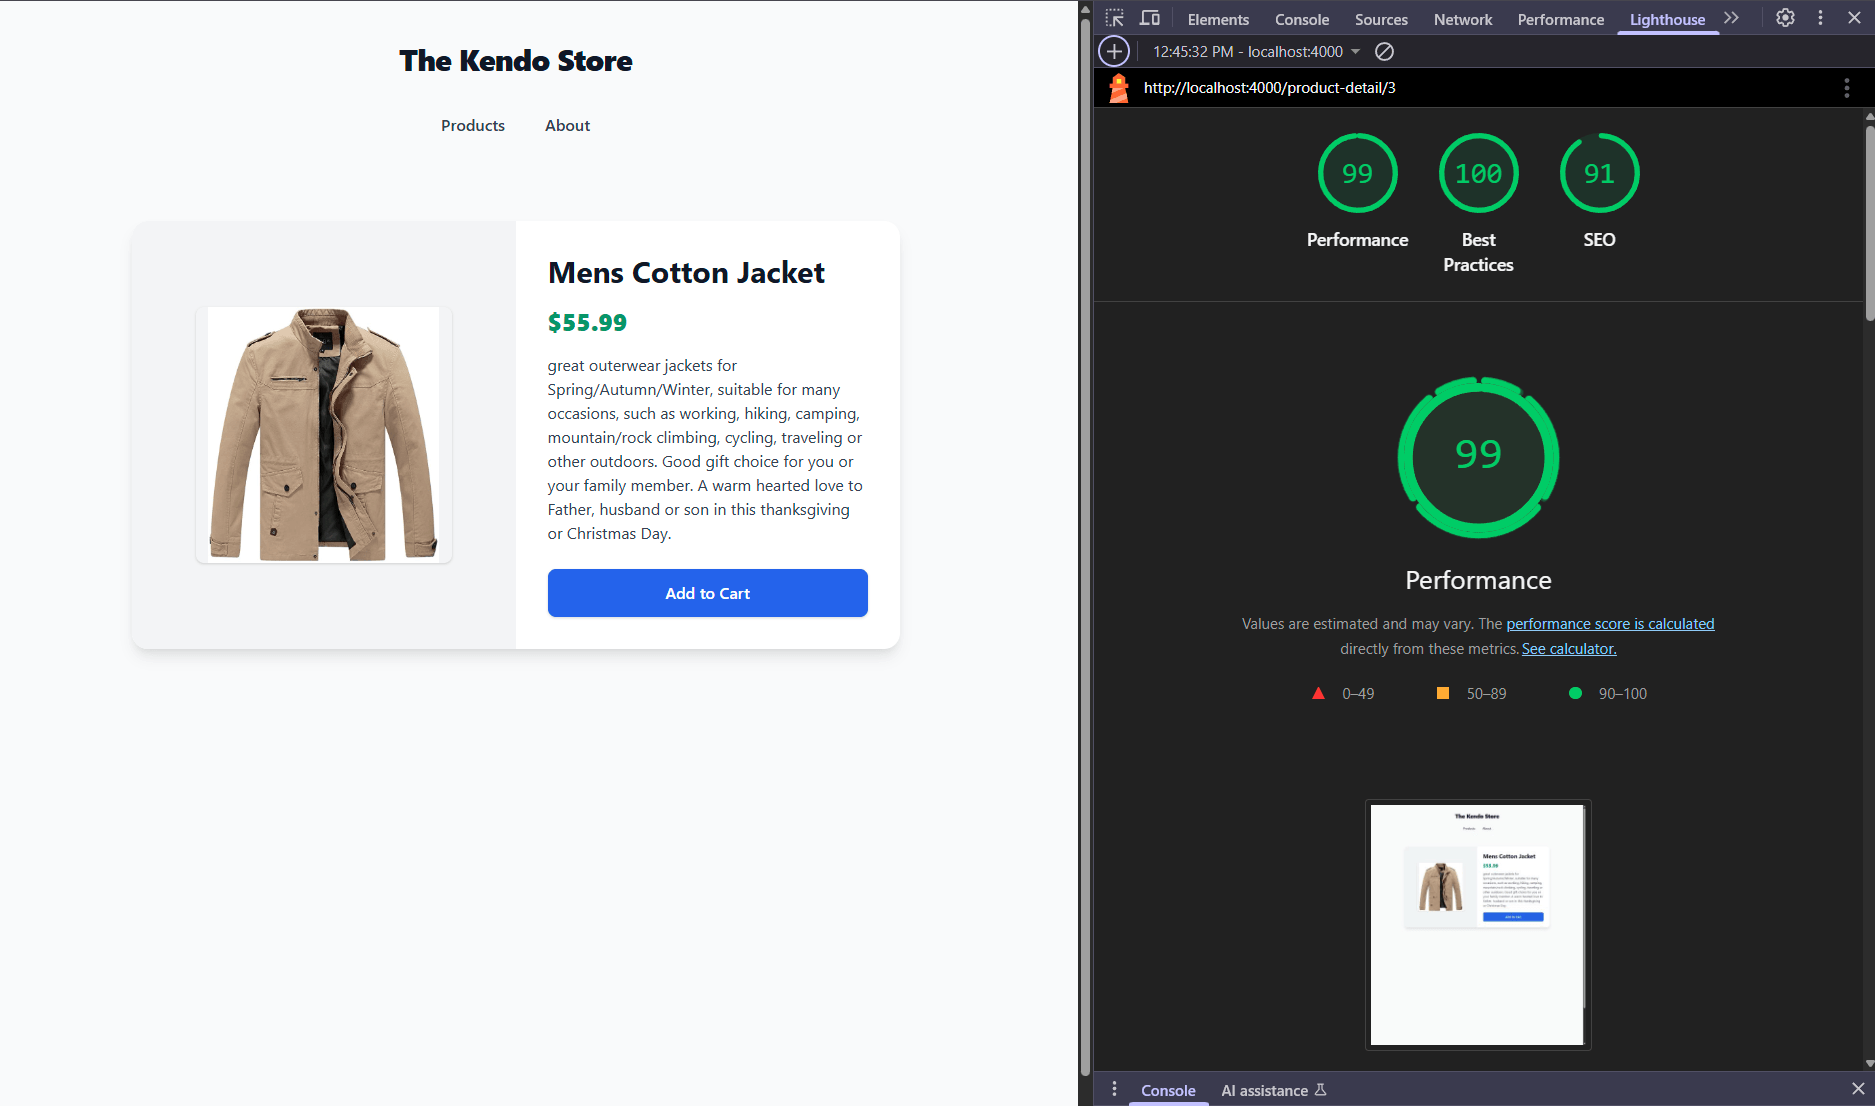
That’s amazing! We got extra points on the score by combining SSR with the NgOptimizedImage directive and got a better result!
Learn more tricks with NgOptimize Directive.
Recap
This was a great journey, moving from a slow website with a low score that impacted performance to using client-side rendering (CSR), and then moving to SSR combined with prerendering (SSG), making our website fast. Finally, we made it even faster by combining it with the NgOptimizedImage directive to improve images, get data from an API and send data between routes.
I hope this article helps you improve the performance and speed of existing projects or start playing with SSR and prerendering in Angular 20! 👍🏼
We built this project with the Kendo UI for Angular component library from Progress, which made it a snap to bring together. The UI library comes with a free 30-day trial, so give it a try:

Dany Paredes
Dany Paredes is a Google Developer Expert on Angular and Progress Champion. He loves sharing content and writing articles about Angular, TypeScript and testing on his blog and on Twitter (@danywalls).
Related Posts
Comments
All articles
Topics
Web MobileMobile
Desktop
Design
Productivity
People
