Beyond the Basics: Exploring Simple Navigation in .NET MAUI

Summarize with AI:
.NET MAUI offers multiple options for implementing navigation. Let’s look at NavigationPage, push and pop, modals and more.
To facilitate a particular user flow, applications are typically composed of multiple interrelated pages. Navigation between these pages is crucial for an optimal user experience.
In this article, I will guide you on how to make your .NET MAUI applications easily navigable. There are two primary methods to accomplish this: using the Shell or using simple navigation with the NavigationPage. Our focus will be on the NavigationPage.
What is App Navigation?
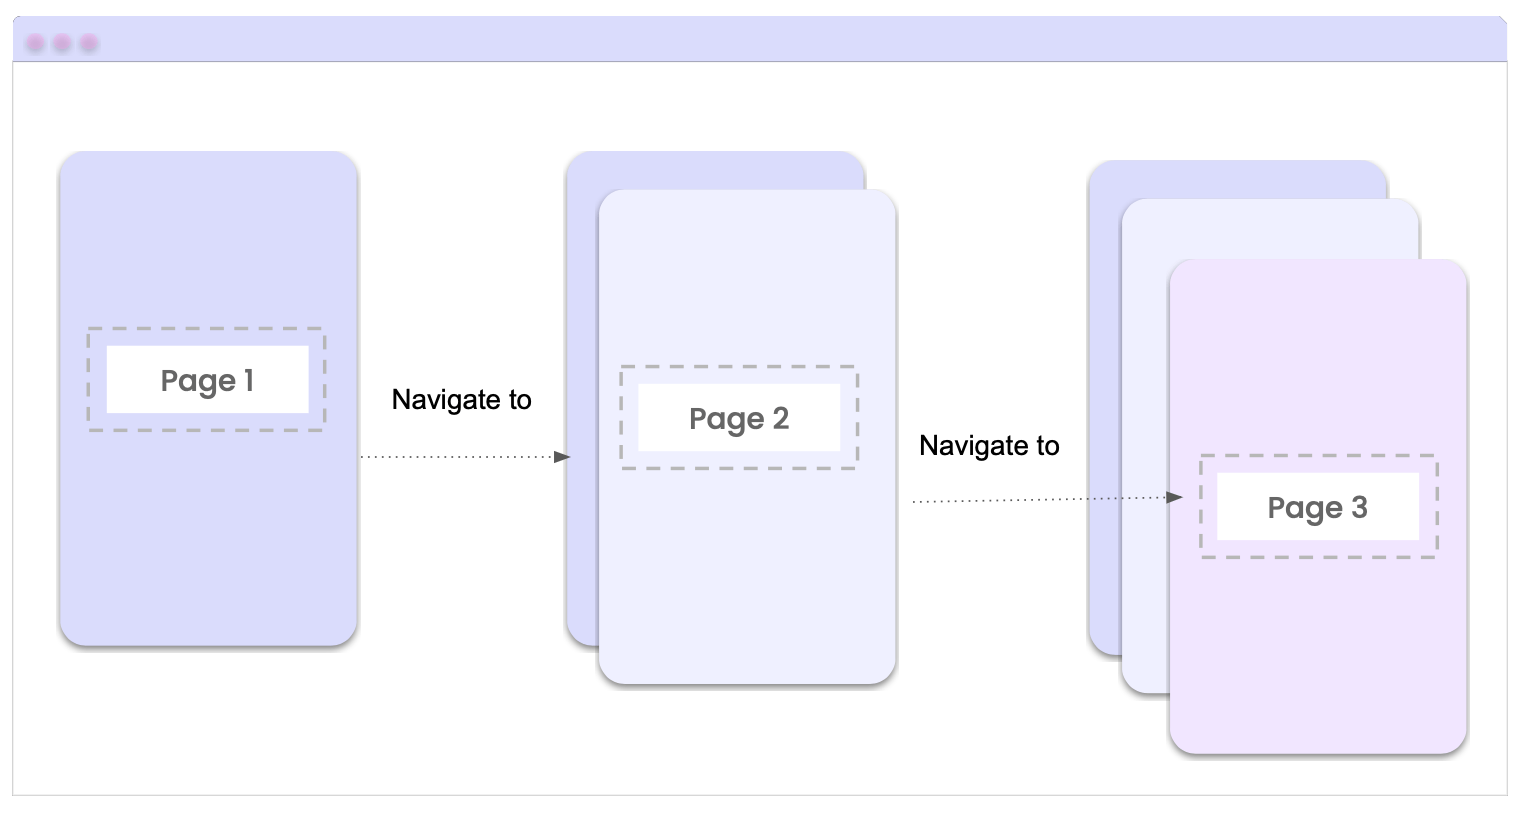
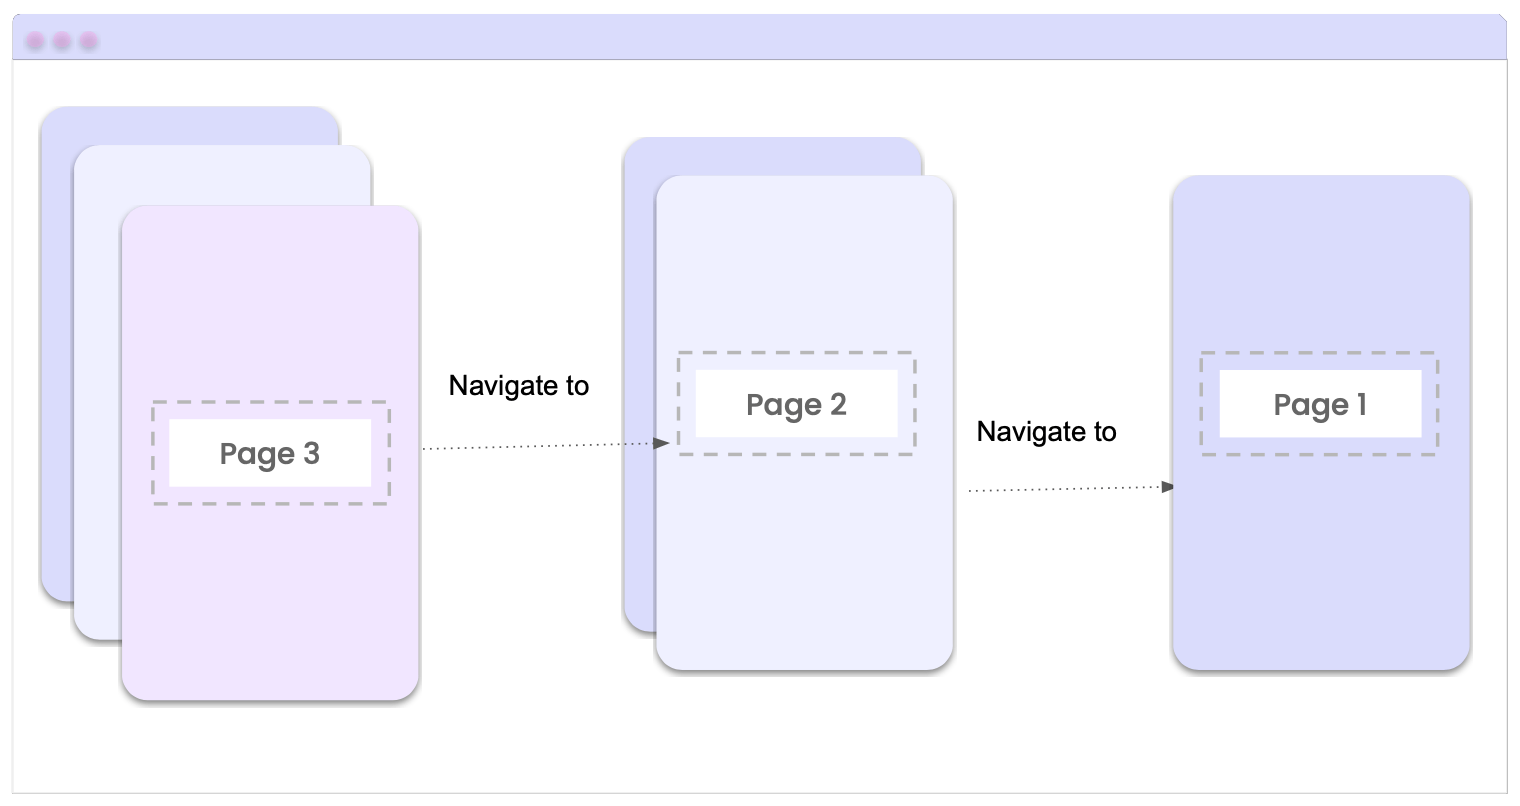
Navigation enables users to move between pages within an application. Think of a stack of papers on a desk, where each paper represents a page in the application. You can add more papers (i.e., pages) to the top of the stack and remove them from the top when you’re finished with them. This is known as hierarchical navigation—last in, first out (LIFO). The NavigationPage class in .NET MAUI provides a simple way to do it!
Navigation Options
Navigation involves two types of movement: Push and Pop. In the following sections, I will explain their meanings with graphic illustrations.
🔹Push: When you navigate to a new page, it is added to the navigation stack. This process is called a push. The following image illustrates how this internal process is carried out.
🔹Pop: When you want to go back to the previous page in your application, it eliminates the active page and returns to the previous one. This is called “Pop.”
Preparing the Environment to Navigate
Now that you know the navigation types, let’s build an example. Apply the following steps:
Step 1: Adding the Root Page
The first step is to choose the page that will serve as the starting point in your navigation stack (the root page). Go to the MainPage property in the App.xaml.cs file, and insert a NavigationPage object that specifies the root page of your application. Your code should resemble the following snippet:
public partial class App : Application
{
    public App()
    {
	    InitializeComponent();
	    MainPage = new NavigationPage(new MainPage());
    }
}
Step 2: Pushing a Page
To proceed to the next page using a push, I have included a button in MainPage.xaml and created a second page named SamplePage1.xaml to which I will navigate.
To perform the push, let’s use the PushAsync method of the Navigation property. This returns an awaitable Task that indicates when the push operation is complete. It accepts the
following parameters:
- Page: The page we want to navigate to. It receives a Page as value. Mandatory.
- Animated: Indicates if the navigation transition will be slightly animated. It receives a Bool as value. Its default value is false.
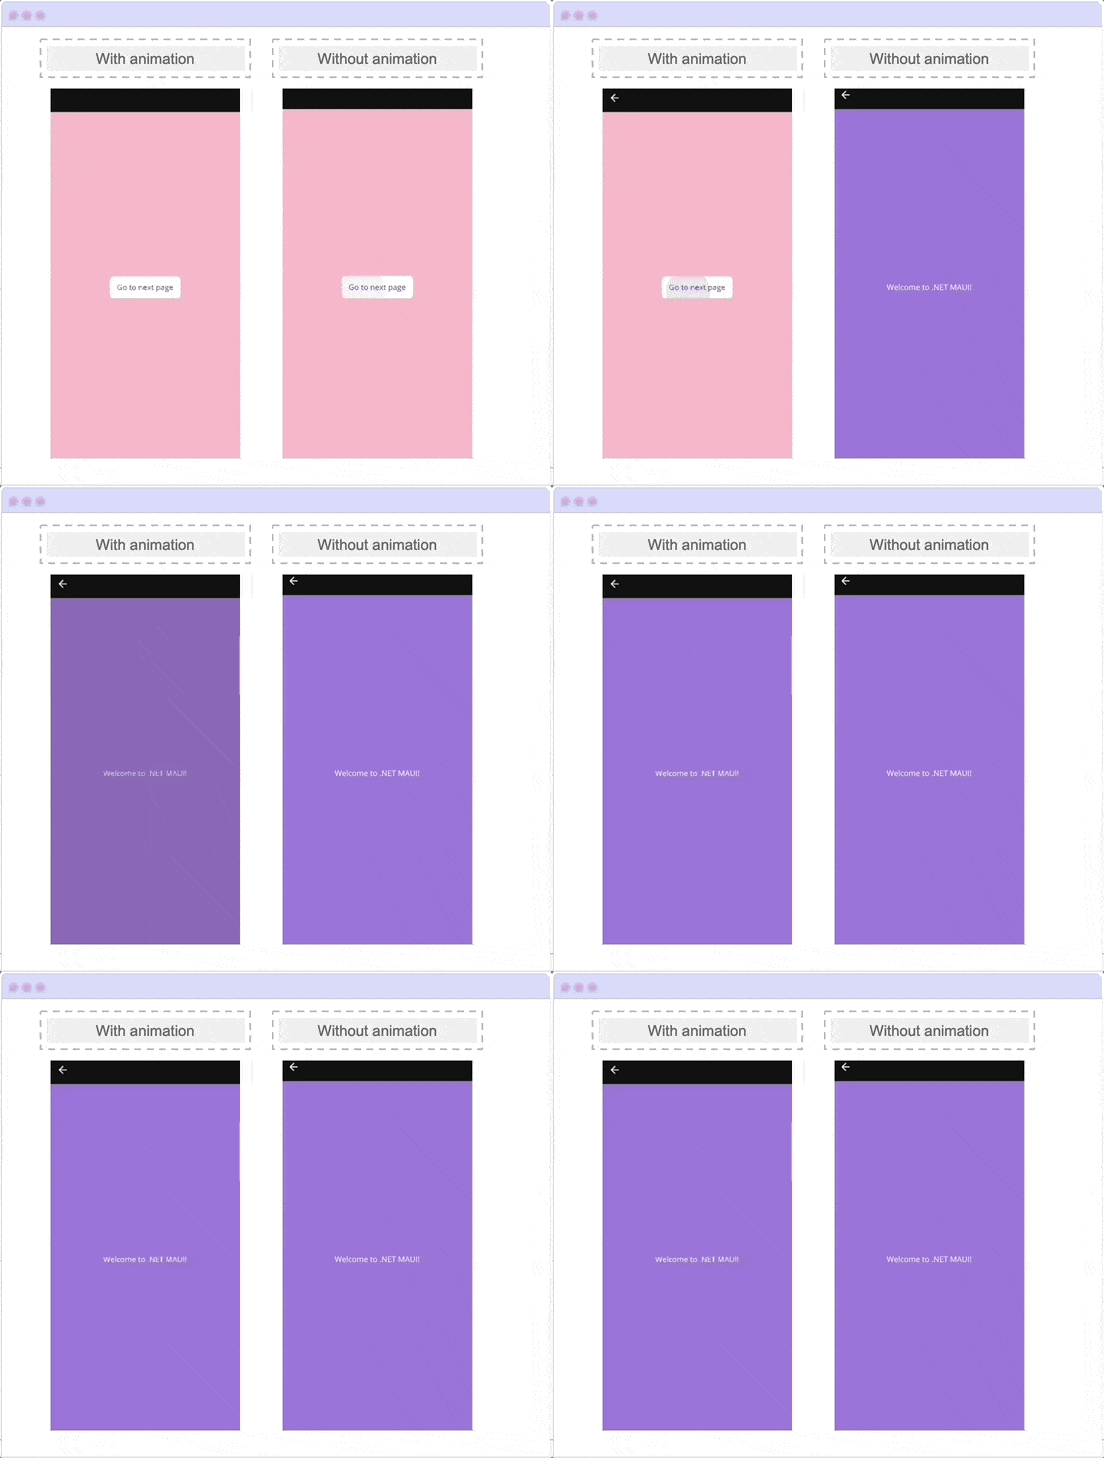
Let’s see how to do it in code:
async void NextPageNavigation(System.Object sender, System.EventArgs e)
{
    await Navigation.PushAsync(new SamplePage1(), true);
}
Step 3: Popping a Page
You already know how to navigate to a next page. Now you will learn how to return to the previous page of the stack. There are two options to go back:
- Pressing the back button from the navigation bar.
- Alternatively, you can use the
PopAsyncmethod from the Navigation property. This method is responsible for displaying the previous page of the navigation stack and removing the active page.
The PopAsync method accepts the following parameter:
- Animated: Indicates if the navigation transition will be slightly animated. It receives a Bool as value. Its default value is false. Not mandatory.
Let’s see how to do it in code:
async void BackToPage (object sender, EventArgs e)
{
    await Navigation.PopAsync();
}
Let’s see a demo of what navigation looks like:
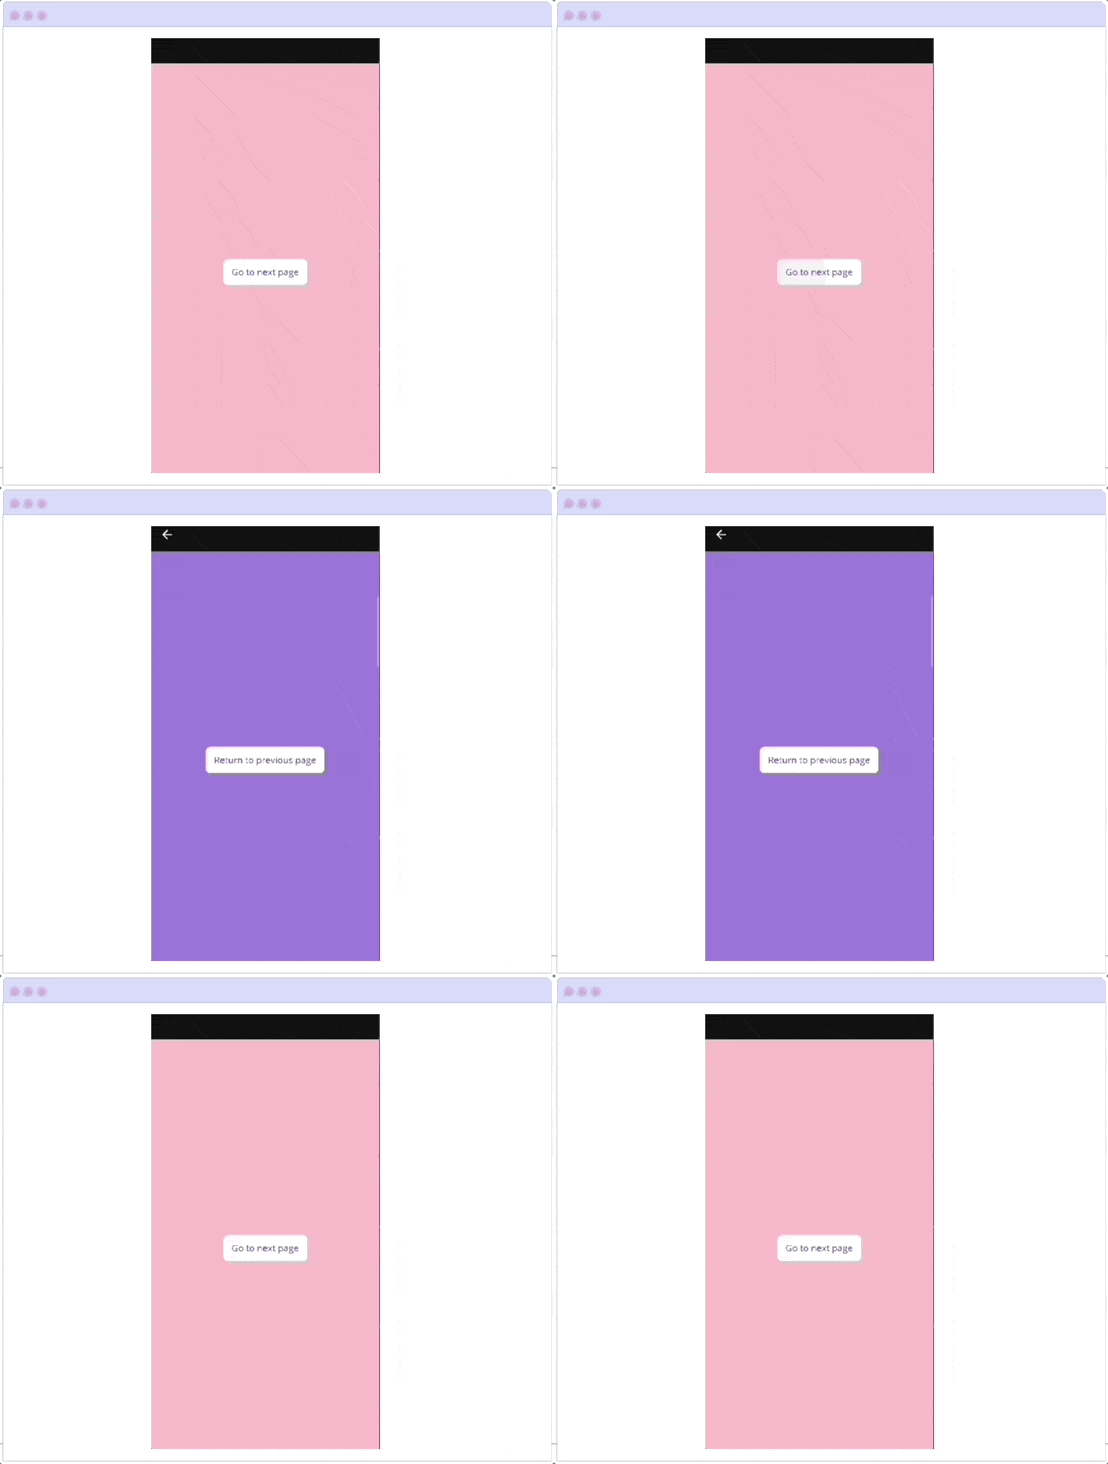
🎉 Your navigation is now complete! Adding navigation to your app doesn’t require anything fancy—these methods are simple and effective. Once you’ve mastered these techniques, we can explore other cool things you can do with navigation. Let’s continue!
Manipulating the Stack
As you may have noticed, the navigation stack is constructed based on the navigation operations in your application. However, it is also possible to manipulate the navigation stack by adding or removing pages using the following methods:
InsertPageBefore
The InsertPageBefore method allows you to place a specific page before another page that you specify in the navigation stack. Below is a visual representation of this behavior.
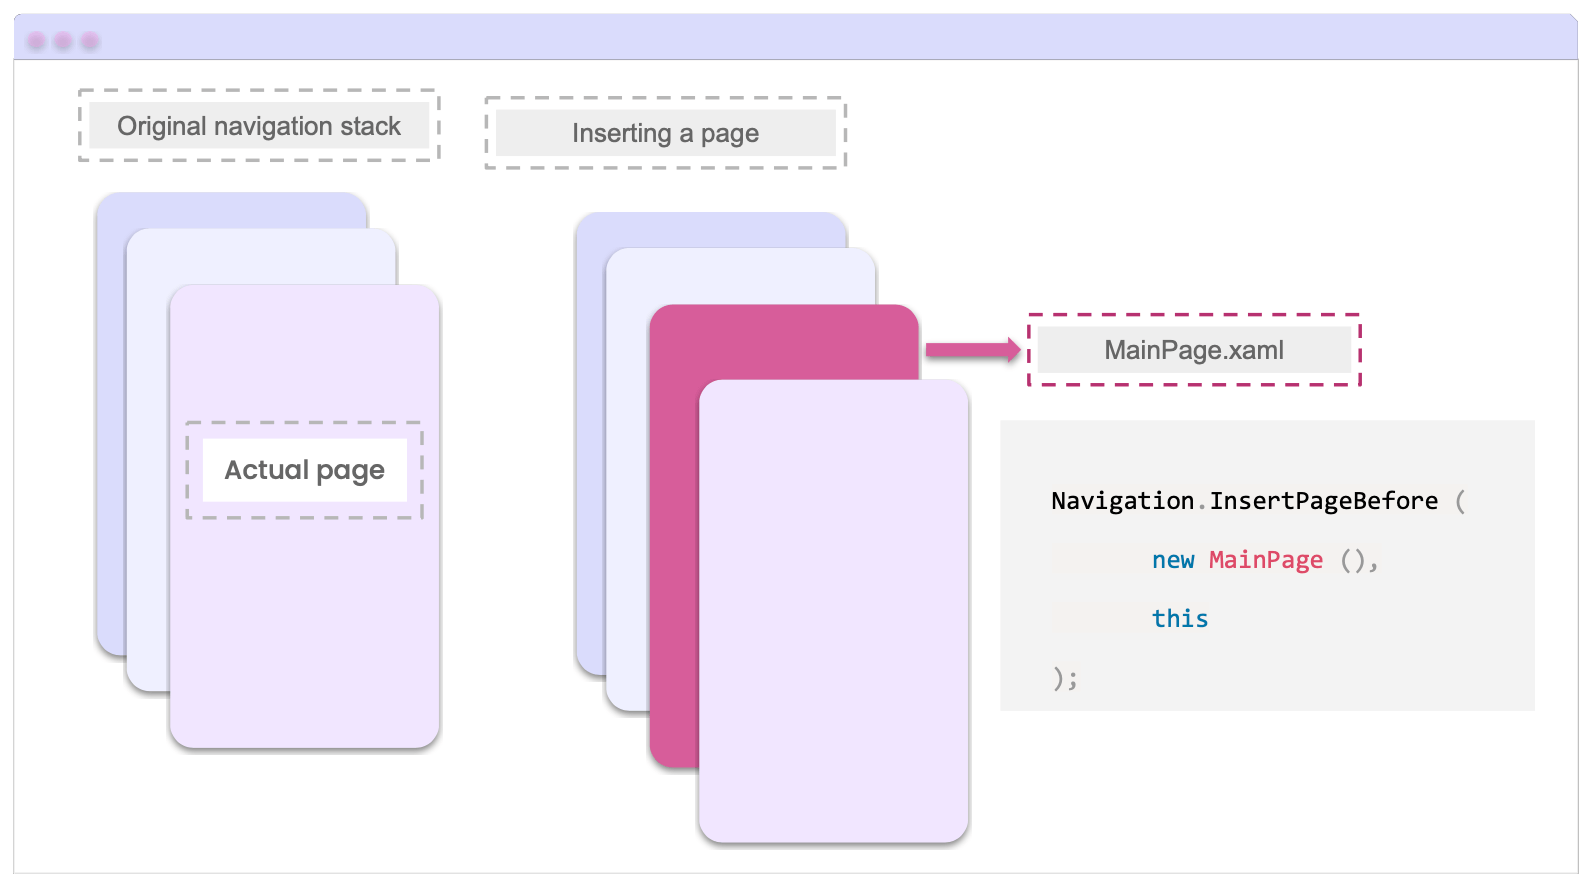
This method expects the following parameters:
- New page: Page that you want to insert in the stack.
- Base page: The new page can be inserted as a previous one by using this page’s position in the stack order as a reference.
Let’s see a code example:
Navigation.InsertPageBefore (new MainPage (), this);
RemovePage
To remove a specific page from the navigation stack, use the RemovePage method, which takes a single parameter: The page to be removed. The graphic below demonstrates this behavior.
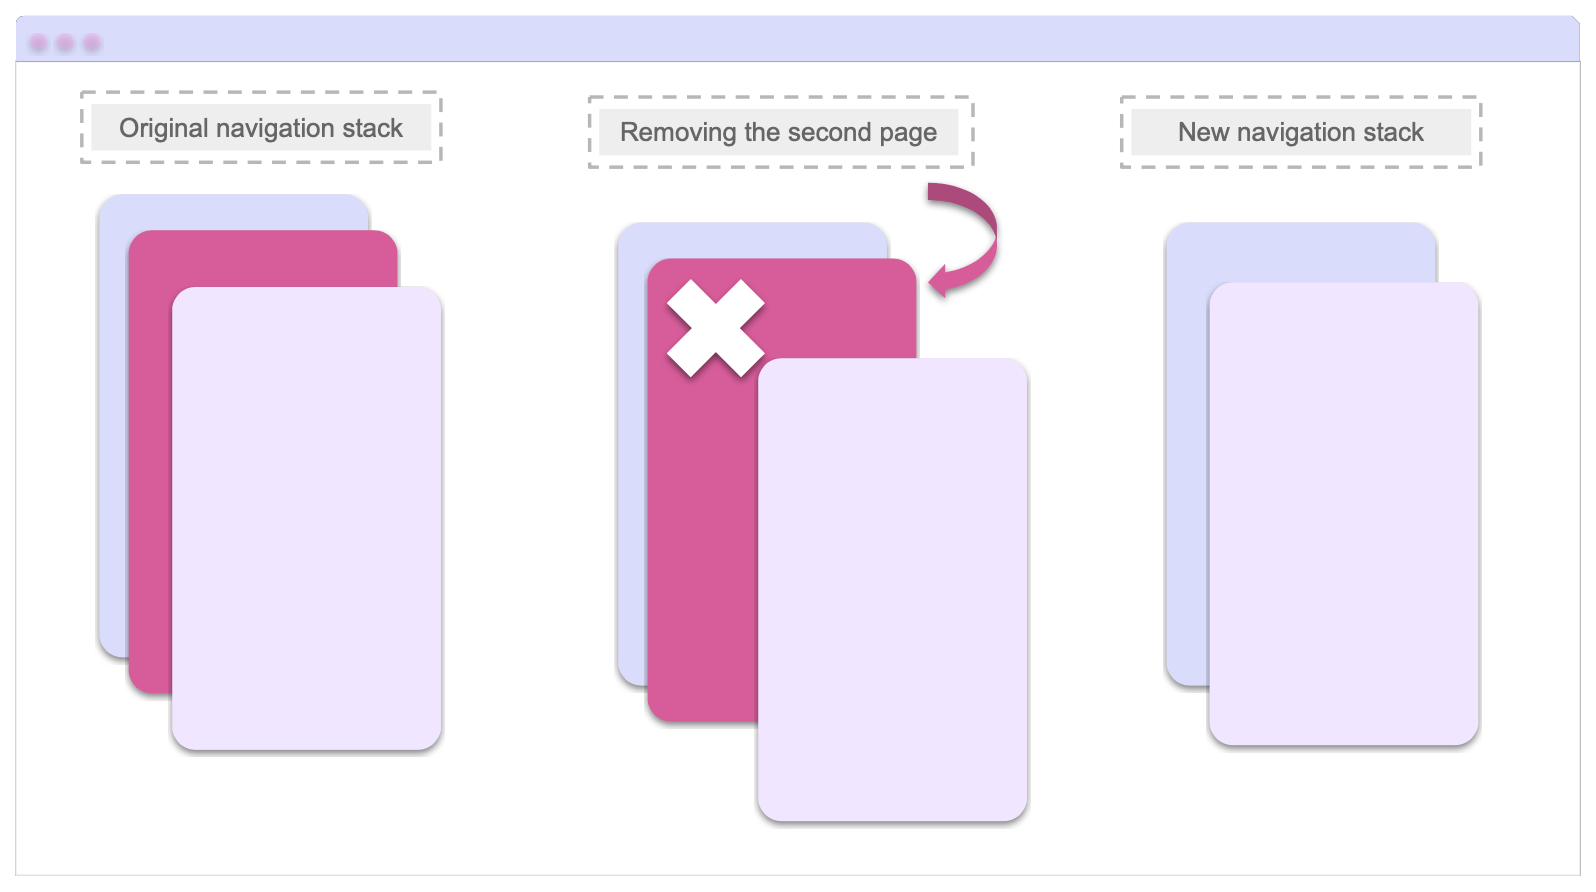
Code sample:
Navigation.RemovePage (new MainPage);
PopToRootAsync
The PopToRootAsync method removes all pages from the stack except the root page, making it the active page.
async void ClearNavigationStack (object sender, EventArgs e)
{
    await Navigation.PopToRootAsync ();
}
Modal Navigation
With .NET MAUI, it is possible to use modal page navigation to help users complete a separate task that cannot be skipped. The Navigation property’s modal navigation methods enable users to navigate to the next or previous page. These methods are the following:
➖ PushModalAsync: This method is used to open modal pages. It shares the same parameters as the PushAsync method detailed previously, but is tailored for modals.
async void NextModalNavigation(System.Object sender, System.EventArgs e)
{
    await Navigation.PushModalAsync(new DetailsPage());
}
➖ PopModalAsync: This method allows you to return to the previous page on the stack. It shares the same parameters as the PopAsync method detailed previously, but is tailored for modals.
async void BackToModal (object sender, EventArgs e)
{
await Navigation.PopModalAsync();
}
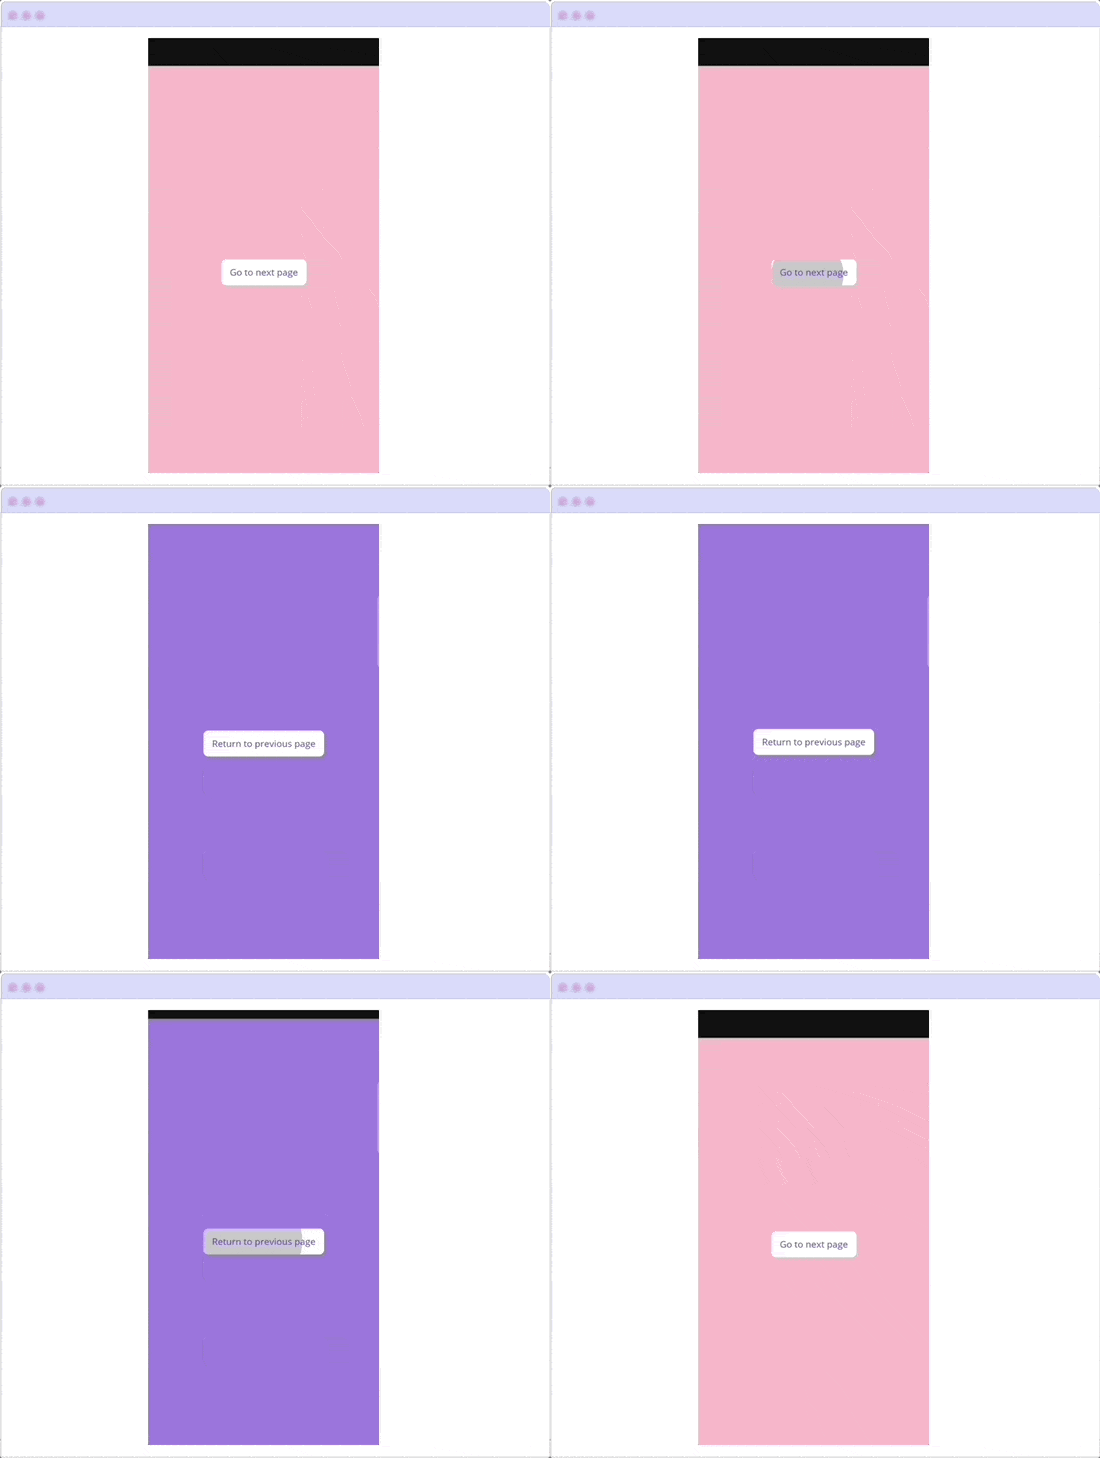
Let’s see a demo of what navigation looks like with Modal:
Passing Arguments
There are different ways to pass data between pages. Here are two options to consider. One way is to pass data through the constructor, while the other is through the use of BindingContext. Let’s explore each of these options!
Constructor
To use the constructor, apply the following steps:
➖ Add a parameter that you need in the constructor page.
public MainPage (string YourName)
{
    InitializeComponent ();
    Name = YourName;
}
➖ Pass the data when you call the page that was used before (MainPage).
await Navigation.PushAsync(new YourPageName("KathyMcDonald"));
BindingContext
In this example, the Contact object is filled with mock data, and then passed to the page through the BindingContext.
async void FillDataClicked (object sender, EventArgs e)
{
    var contact = new Contact {
    Name = "Joseph",
    LastName = "McDonald",
    Country = "Spain"
    };

    var contactsPage = new ContactsPage ();
    contactsPage.BindingContext = contact;
    await Navigation.PushAsync (contactsPage);
}
⚠ Keep in mind that this is just an example to help you understand navigation, so there may be different ways to achieve the same result!
Additional Information
You can also interact with the navigation bar. To facilitate a better interaction with this bar, I have compiled some important points that can be very useful when developing your app:
➖ You can remove the BackButton. To make this happen, simply set NavigationPage.HasBackButton to False. Include this property in your page’s header and your code
should look like the following:
<ContentPage xmlns="http://schemas.microsoft.com/dotnet/2021/maui"
    xmlns:x="http://schemas.microsoft.com/winfx/2009/xaml"
    NavigationPage.HasBackButton="False"
    x:Class="SimpleNavigationMAUI.MainPage">

    <!-- Your content goes here -- >

</ContentPage>
➖ You can hide the Navigation Bar. Simply set NavigationPage.HasNavigationBar to False to make this happen. Add this property to the header of your page and your code
will look like the following:
<ContentPage xmlns="http://schemas.microsoft.com/dotnet/2021/maui"
	  xmlns:x="http://schemas.microsoft.com/winfx/2009/xaml"
      NavigationPage.HasNavigationBar="false"
      x:Class="SimpleNavigationMAUI.MainPage">

    <!-- Your content goes here -- >

</ContentPage>
➖ It’s possible customize the Navigation Bar. To customize your navigation bar, simply include the <NavigationPage.TitleView> tags and add necessary controls within them. For instance,
you can add a button, label or image. In this example, a Picker was added to select an age range:
<NavigationPage.TitleView>
    <Picker Title="Select age range:">
	    <Picker.Items>
		    <x:String>18 - 21</x:String>
		    <x:String>21 - 30</x:String>
		    <x:String>30 onwards</x:String>
	    </Picker.Items>
    </Picker>
</NavigationPage.TitleView>
Important Considerations ✍️
- To ensure optimal performance,
NavigationPagesshould exclusively contain ContentPages. - Keep in mind that this navigation is different from Shell, so they are not compatible. If you try to use them together, an exception will be thrown.
- You do not need a
NavigationPageobject to perform modal page navigation.
Conclusion
That’s all! You have learned how to make your applications navigable thanks to the NavigationPage of .NET MAUI. I hope this article was helpful to you! I encourage you to start implementing it in your daily life! 💚💕
See you next time! 💁♀️
Reference
This article was based on the official documentation.

Leomaris Reyes
Leomaris Reyes is a Software Engineer from the Dominican Republic, with more than 5 years of experience. A Xamarin Certified Mobile Developer, she is also the founder of Stemelle, an entity that works with software developers, training and mentoring with a main goal of including women in Tech. Leomaris really loves learning new things! 💚💕 You can follow her: Twitter, LinkedIn , AskXammy and Medium.

