
Guide to Creating an Angular-based Micro-frontend Application Using Native Federation

Summarize with AI:
Micro-frontends break a large frontend application into smaller, independent components. Follow these steps to create a micro-frontend in Angular with Native Federation.
Micro-frontends are an architectural pattern that extends the concept of microservices to frontend development. It involves breaking a large frontend application into smaller, independent and deployable components.
In this article, we will learn how to implement a micro-frontend architecture using Native Federation. We will:
- Create one host application
- Create two remote client applications
- Load the remote applications dynamically in the host application using routing or dynamic component loading
Let’s begin by creating the remote applications.
Creating Remote Apps
We can use the Angular CLI to scaffold the client application. Let’s create a remote app using the CLI command below.
ng new remote-app1
After successfully creating the project, configure the Angular application as a remote app in the micro-frontend (MFE) setup by running the schematic command shown below.
ng add @angular-architects/native-federation --project remote-app1 --port 4201 --type remote
Make sure to pass your project name after the --project flag (in this case, remote-app1). The CLI will then prompt you to confirm. After that, it will run the schematics and configure the Angular project as a remote application.

After the installation completes successfully, you will see a new federation.config.js file added to the project.
const { withNativeFederation, shareAll } = require('@angular-architects/native-federation/config');

module.exports = withNativeFederation({
  name: 'remote-app2',


  exposes: {
    './Component': './src/app/app.ts',
  },

  shared: {
    ...shareAll({ singleton: true, strictVersion: true, requiredVersion: 'auto' }),
  },

  skip: [
    'rxjs/ajax',
    'rxjs/fetch',
    'rxjs/testing',
    'rxjs/webSocket',
    // Add further packages you don't need at runtime
  ],

  // Please read our FAQ about sharing libs:
  // https://shorturl.at/jmzH0

  features: {
    // New feature for more performance and avoiding
    // issues with node libs. Comment this out to
    // get the traditional behavior:
    ignoreUnusedDeps: true
  }
});
Also, you will see changes in the angular.json file. Ideally, you should not change anything in this file except the exposes object. By default, it exposes the AppComponent, but you can also choose to expose routes if needed.
In the project, add home, product and invoice components. Then modify the route as shown below:
export const routes: Routes = [
    {
        path: '',
        component: App,
        children: [
            { path: 'home', component: Home1 },
            { path: 'product', component: Product },
            { path: 'invoice', component: Invoice },
        ],
    }
];
On the AppComponent, add router-outlet and buttons to navigate as shown below.
<h2>Client App</h2>
<hr/>
<button routerLink="home" routerLinkActive="active">Home</button>
<button routerLink="product" routerLinkActive="active">Product</button>
<button routerLink="invoice" routerLinkActive="active">Invoice</button>
<hr/>
<router-outlet></router-outlet>
After that, expose the route by updating the exposes section in federation.config.js, as shown below.
const { withNativeFederation, shareAll } = require('@angular-architects/native-federation/config');

module.exports = withNativeFederation({
  name: 'remote-app1',


  exposes: {
    './Routes': './src/app/app.routes',
  },

  shared: {
    ...shareAll({ singleton: true, strictVersion: true, requiredVersion: 'auto' }),
  },

  skip: [
    'rxjs/ajax',
    'rxjs/fetch',
    'rxjs/testing',
    'rxjs/webSocket',
    // Add further packages you don't need at runtime
  ],

  // Please read our FAQ about sharing libs:
  // https://shorturl.at/jmzH0

  features: {
    // New feature for more performance and avoiding
    // issues with node libs. Comment this out to
    // get the traditional behavior:
    ignoreUnusedDeps: true
  }
});
In the same way, let’s create one more remote application, but this time we won’t add any routes to it. To create this application, run the following commands:
ng new remote-app2ng add @angular-architects/native-federation --project remote-app2 --port 4202 --type remote
In this application, we will not configure any routes. This helps us understand how the host application can work with both an exposed route and an exposed component. So the federation.config.js of this application should look like:
const { withNativeFederation, shareAll } = require('@angular-architects/native-federation/config');

module.exports = withNativeFederation({
  name: 'remote-app2',


  exposes: {
    './Component': './src/app/app.ts',
  },

  shared: {
    ...shareAll({ singleton: true, strictVersion: true, requiredVersion: 'auto' }),
  },

  skip: [
    'rxjs/ajax',
    'rxjs/fetch',
    'rxjs/testing',
    'rxjs/webSocket',
    // Add further packages you don't need at runtime
  ],

  // Please read our FAQ about sharing libs:
  // https://shorturl.at/jmzH0

  features: {
    // New feature for more performance and avoiding
    // issues with node libs. Comment this out to
    // get the traditional behavior:
    ignoreUnusedDeps: true
  }
});
So far, we have configured two client applications, and you should be able to run them independently on ports 4201 and 4202. In this way, you can create any number of client applications and set up independent deployment pipelines for each of them.
Creating Host App
Let’s create a host app using the Angular CLI command:
ng new host-app
After scaffolding the application, use the following schematic command to configure it as the host application.
ng add @angular-architects/native-federation --project host-app --port 4200 --type dynamic-host
After the installation completes successfully:
- A new federation.config.js file is added to the project.
- The federation.manifest.json file is added to the public folder.
- The main.ts file is updated.
- The angular.json file is updated.
The updated main.ts should look like this:
import { initFederation } from '@angular-architects/native-federation';

initFederation('federation.manifest.json')
  .catch(err => console.error(err))
  .then(_ => import('./bootstrap'))
  .catch(err => console.error(err));
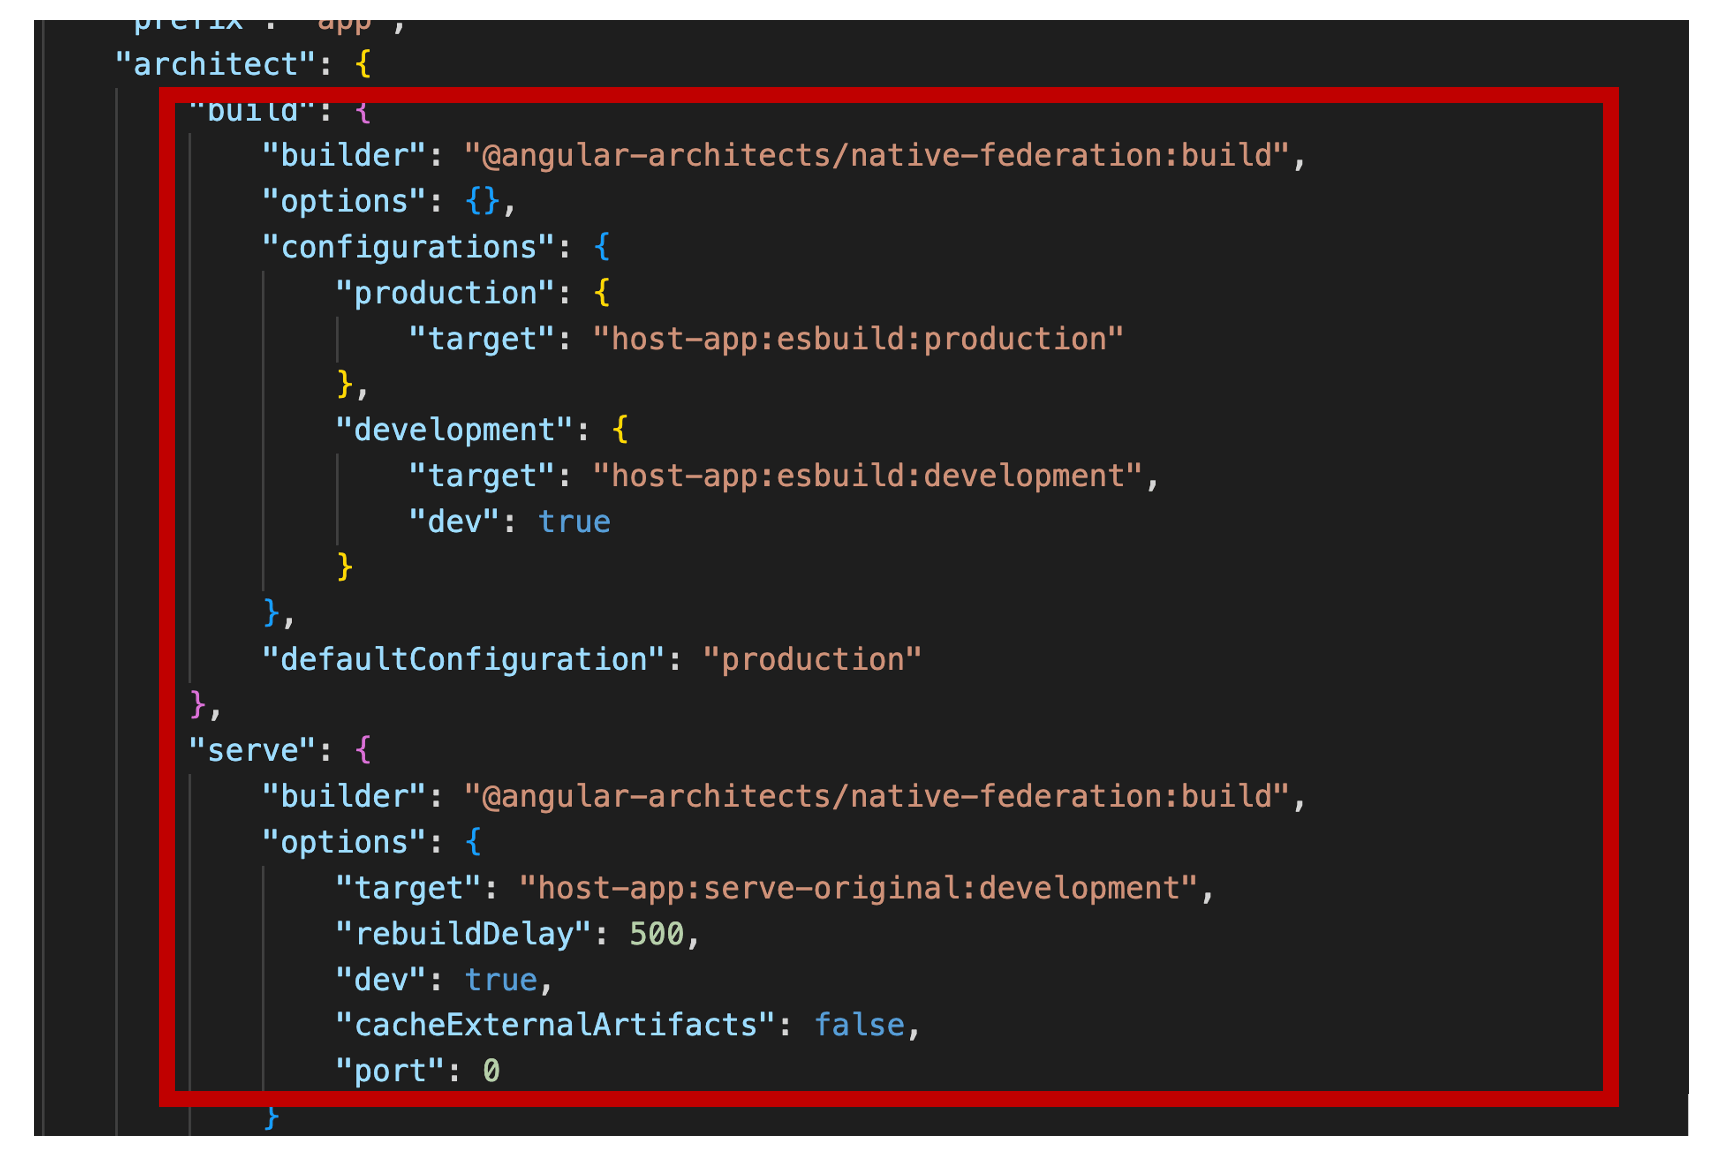
You can also see the corresponding changes reflected in the angular.json file build and serve section, as shown below.
Loading Remote Applications Dynamically
Ideally, you should not make any changes to the scaffolded configuration, including the federation.config.ts file. The only file you need to update is federation.manifest.json, where you add the client application information.
{
    "client1": "http://localhost:4201/remoteEntry.json",
    "client2": "http://localhost:4202/remoteEntry.json"
}
Here, client1 and client2 correspond to the two remote applications. You can choose any names you like, but make sure to use the same names when configuring the routes in the host application.
In the host application, you can create routes corresponding to the remote apps as shown below:
export const routes: Routes = [
{
   path:'home',
   component:Home
},
 {
    path: 'client1',
    loadChildren: () =>
      loadRemoteModule('client1', './Routes').then((m) => m.routes),
  },
   {
    path: 'client2',
    loadComponent: () =>
      loadRemoteModule('client2', './Component').then((m) => m.App),
  },
  { path: '', redirectTo: 'home', pathMatch: 'full' },

];
Next, add the router-outlet and the navigation links to move between the different remote applications, as shown below.
<h1>MFE APP</h1>
<hr/>
<button routerLink="/home" routerLinkActive="active">Home</button>
<button routerLink="/client1" routerLinkActive="active">Client1</button>
<button routerLink="/client2" routerLinkActive="active">Client2</button>
<hr/>
<router-outlet></router-outlet>
Now, when you navigate to client1, the first remote application loads. Similarly, when you navigate to client2, the second remote application loads.
If you want to load applications side by side without navigating to different URLs, you can achieve this by using Angular’s dynamic component loading feature.
@ViewChild('vcHostClient1', { read: ViewContainerRef, static: true }) vcHostClient1!: ViewContainerRef;

   @ViewChild('vcHostClient2', { read: ViewContainerRef, static: true }) vcHostClient2!: ViewContainerRef;

  async loadCient1(){

     const {App} = await loadRemoteModule('client1','./Component');
     console.log(App);
     this.vcHostClient1.clear();
     this.vcHostClient1.createComponent(App);
  }

  async loadClient2(){
    const {App} = await loadRemoteModule('client2','./Component');
     console.log(App);
     this.vcHostClient2.clear();
     this.vcHostClient2.createComponent(App);
  }
And on the template, create ng-template to load as shown below:
<button (click)="loadCient1()">Load Client 1</button>
<button (click)="loadClient2()">Load Client 2</button>

<ng-template #vcHostClient1></ng-template>
<ng-template #vcHostClient2></ng-template>
So that's how you can load remote apps in different ways.
Summary
In this article, we learned step by step how to build a micro-frontend application using Native Federation. I hope you found it helpful—thanks for reading!

Dhananjay Kumar
Dhananjay Kumar is the founder of nomadcoder, an AI-driven developer community and training platform in India. Through nomadcoder, he organizes leading tech conferences such as ng-India and AI-India. He partners with startups to rapidly build MVPs and ship production-ready applications. His expertise spans Angular, modern web architecture and AI agents, and he is available for training, consulting or product acceleration from Angular to API to agents.