
Build Accessible Components with Angular Aria

Summarize with AI:
A simple way to add accessibility to your Angular app is with Angular Aria, which gives you production-ready, WCAG-compliant directives.
Building accessible components is one of those things we know we should do, but often skip because it feels overwhelming. We need to read about accessibility tips and tricks and a lot of documentation.
You start with a simple dropdown menu, knowing you need to handle keyboard navigation, ARIA attributes, focus management and screen reader support. Before you know it, your “simple” component has 200 lines of accessibility code you’re not even sure is correct. (Unless you’re using the Progress Kendo UI for Angular library, which has accessibility baked in for you. 😉)
What if I told you there’s a way to get the accessibility magic you need, regardless of component library, with full control over your styling with the magic of Angular Aria?
But what is Angular Aria? Let’s make a small intro.
What Is Angular Aria?
Think of Angular Aria as a collection of accessibility superpowers for your components, but instead of manually implementing keyboard navigation, ARIA attributes and focus management, you import a directive, add it to your HTML and, boom, your component is accessible.
The Angular team built these directives following the W3C Accessibility Guidelines, so you don’t have to become an accessibility expert to build compliant components.
Hold On, What About Angular Material?
Great question! If you’ve been using Angular for a while, you’re probably thinking: “We already have Angular Material. Why do we need another library?”
Here are the key differences:
Angular Material gives you complete, prestyled components. They look great out of the box, but they come with Material Design opinions baked in. If you want a button that doesn’t look like a Material button, you’re going to fight the framework.
Angular Aria gives you headless directives—just the accessibility logic, zero styling. You get all the keyboard navigation, ARIA attributes and screen reader support, but you control every pixel of how it looks.
Think of it this way:
- Angular Material: It is plug and play, looks good, works immediately, but everyone has the same result. If you were building a physical doorway to your business, it would look like all other businesses, just with your business name on the sign.
- Angular Aria: This tool is more like the ramp to your front door, enabling anyone to access the business entrance, while allowing you to choose the awning, the window display and the door color.
So when should you use each one? We’ll dive deeper into that later in the article, but here’s the quick answer:
- Use Angular Material when you need to ship fast and Material Design works for you.
- Use Angular Aria when you have custom design requirements and need full control.
Remember, accessibility isn’t optional anymore. It’s a legal requirement in many countries, and, more importantly, it’s the right thing to do.
But implementing accessibility correctly is hard. You need to know:
- Which ARIA attributes to use (and when)
- How keyboard navigation should work for each pattern
- How to manage focus properly
- How screen readers interpret your markup
Angular Aria handles this complexity for you. You focus on the HTML structure, CSS styling and business logic, and Angular Aria takes care of accessibility.
But, as always, the best way to learn is by building something. Let’s do it!
Set Up the Project
First, create a new Angular application. In your terminal, run the following command (be sure to have Node.js installed).
npx @angular/cli@latest new angular-aria-demo
When CLI prompts stylesheet format, pick CSS.
- **Which stylesheet format would you like to use?** → CSS
Now, navigate to your project and add Angular Aria:
cd angular-aria-demo
npm install @angular/aria
That’s it. We now have a fresh Angular project with Angular Aria installed. Let’s build something accessible!
Building an Accessible Toolbar
Let’s build a text formatting toolbar, the kind you see in rich text editors. This is a perfect example because it looks simple but has surprising accessibility complexity.
Using the CLI, generate a new component editor-toolbar:
ng generate c components/editor-toolbar
Perfect! Open the component with your editor, and import Toolbar, ToolbarWidget and ToolbarWidgetGroup directives provided by @angular/aria/toolbar.
  import { Component } from '@angular/core';
  import { Toolbar, ToolbarWidget, ToolbarWidgetGroup } from '@angular/aria/toolbar';

  @Component({
    selector: 'app-editor-toolbar',
    templateUrl: './editor-toolbar.component.html',
    styleUrl: './editor-toolbar.component.css',
    imports: [Toolbar, ToolbarWidget, ToolbarWidgetGroup],
  })
  export class EditorToolbarComponent {}
Now it’s time to build the HTML structure. We create a div container with the directive [ngToolbar], which works as the main container. We also need ToolbarWidget to use with individual buttons and ToolbarWidgetGroup for groups of related buttons.
In the following HTML, we use every directive with divs and button elements. Copy it and paste into the editor-toolbar.html.
  <div ngToolbar aria-label="Text Formatting Tools">
  <div class="group">
   <button ngToolbarWidget
           value="undo"
           type="button"
           aria-label="undo">
     Undo
   </button>
   <button ngToolbarWidget
           value="redo"
           type="button"
           aria-label="redo">
     Redo
   </button>
 </div>

 <div class="separator" role="separator"></div>

 <!-- Text formatting group -->
 <div class="group">
   <button ngToolbarWidget
           value="bold"
           type="button"
           aria-label="bold"
           #bold="ngToolbarWidget"
           [aria-pressed]="bold.selected()">
     Bold
   </button>
   <button ngToolbarWidget
           value="italic"
           type="button"
           aria-label="italic"
           #italic="ngToolbarWidget"
           [aria-pressed]="italic.selected()">
     Italic
   </button>
 </div>

 <div class="separator" role="separator"></div>

 <!-- Alignment group (radio buttons) -->
 <div ngToolbarWidgetGroup
      role="radiogroup"
      class="group"
      aria-label="Text alignment options">
   <button ngToolbarWidget
           role="radio"
           type="button"
           value="align left"
           aria-label="align left"
           #leftAlign="ngToolbarWidget"
           [aria-checked]="leftAlign.selected()">
     Left
   </button>
   <button ngToolbarWidget
           role="radio"
           type="button"
           value="align center"
           aria-label="align center"
           #centerAlign="ngToolbarWidget"
           [aria-checked]="centerAlign.selected()">
     Center
   </button>
   <button ngToolbarWidget
           role="radio"
           type="button"
           value="align right"
           aria-label="align right"
           #rightAlign="ngToolbarWidget"
           [aria-checked]="rightAlign.selected()">
     Right
   </button>
 </div>
</div>
The final step is adding some CSS styles to make it look nice. Open the editor-toolbar.css and paste the following style:
  [ngToolbar] {
 display: flex;
 gap: 8px;
 padding: 8px;
 background: #f5f5f5;
 border-radius: 4px;
}

.group {
 display: flex;
 gap: 4px;
}

.separator {
 width: 1px;
 background: #ddd;
}

button {
 padding: 8px 12px;
 border: 1px solid #ddd;
 background: white;
 border-radius: 4px;
 cursor: pointer;
}

button[aria-pressed="true"],
button[aria-checked="true"] {
 background: #007acc;
 color: white;
}
Perfect, we just added HTML, CSS and Angular Aria directives. To test it, open the app.html and add <app-editor-toolbar></app-editor-toolbar>, save changes and run your app.
ng serve
Initial chunk files | Names         | Raw size
main.js             | main          | 10.50 kB |
styles.css          | styles        | 95 bytes |

                    | Initial total | 10.59 kB

Application bundle generation complete. [0.641 seconds] - 2026-01-25T10:16:33.843Z

Watch mode enabled. Watching for file changes...
NOTE: Raw file sizes do not reflect development server per-request transformations.
  ➜  Local:   http://localhost:4200/
  ➜  press h + enter to show help
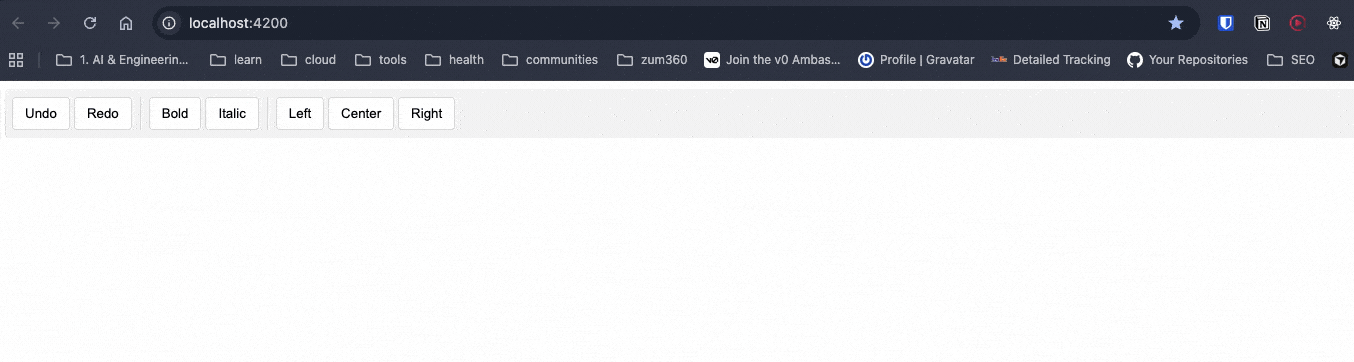
Try to use your toolbar with your keyboard. You’ll find it works, and we didn’t have to write any code for keyboard navigation logic (like: Arrow keys, Home, End), focus management, ARIA role attributes, screen reader announcements or selection state management. All of that complexity? Gone.
The ngToolbar, ngToolbarWidget and ngToolbarWidgetGroup directives handle all of that automatically.
We now have a fully accessible toolbar that works with keyboard navigation and screen readers, and we only wrote the HTML structure and CSS.
Angular Aria provides directives for the most common interactive patterns, we can get components for search and selection (like Autocomplete, Listbox and Select), navigation and actions (Menu, Menubar and Toolbar like we just built), and content organization (Accordion, Tabs, Tree and Grid). Every directive comes with complete documentation, working examples and API references. You can see the full list of available components in the official Angular Aria documentation.
But I’m a Fan of Angular Material
Yes, I understand Angular Material has a long relationship with Angular devs. You can continue using Angular Material when you:
- Need to ship fast – You’re building an MVP or internal tool and don’t want to spend time on custom styling.
- Like Material Design – You’re OK with the Google Material Design aesthetic.
- Have limited design resources – Your team doesn’t have dedicated designers.
Remember, Angular Material is amazing, but it comes with opinions about how things should look.
If you try to heavily customize Material components, you’ll spend more time fighting the framework than building features. I’ve been there—overriding Material styles with ::ng-deep and !important until the CSS becomes unmaintainable.
And don’t even get me started on theming. Creating a custom theme for Angular Material is… let’s just say “special.” It’s doable, but it’s tricky and requires deep knowledge of Sass and Material’s theming system. (If you’re curious about the complexity, I wrote about it in Theme UI Frameworks in Angular: Part 2 - Custom Theme for Angular Material.)
Angular Aria solves this by giving you zero styles. You start with a blank canvas and build exactly what you need.
Remember for simple cases, native elements are already accessible when you use <button> for buttons, <input type="radio"> for radio buttons or <select> for simple dropdowns. But Angular Aria gives you a third option: headless accessible components that you can style however you want, we can meet accessibility requirements, maintain full design control and avoid reinventing the wheel.
Recap
We learned that accessibility doesn’t have to be overwhelming. Angular Aria gives you production-ready, WCAG-compliant directives that handle the complex parts.
We provide the HTML structure and CSS and Angular Aria provides the accessibility without pain!
But What About Kendo UI?
Maybe you want to ship faster (really fast) and have complex scenarios with datalist, charts, schedulers and complex UI patterns. If you read this article and are thinking: “This is great, but I still have to write all the HTML and CSS myself. Why not just use a complete component library?” you’re asking the right question.
Here’s when Progress Kendo UI for Angular makes more sense than Angular Aria or Angular Material:
Use Kendo UI when you want:
- Everything out of the box – Prebuilt components with professional styling, themes and accessibility already done
- Advanced features included – Things like data grids with sorting/filtering, charts, schedulers and complex UI patterns
- Consistent design system – A cohesive look across all components without writing custom CSS
- Enterprise-grade support – Professional support, regular updates and guaranteed compatibility
- Speed PLUS customization – You need to ship fast and need options to customize (you’ll have five fully built theme options plus the ability to tweak those or create your own theme)
There’s no “wrong” choice—just different tools for different jobs.
If you’re building internal tools or you like the Kendo UI design system, Kendo UI saves you weeks of work, and, honestly? I can build complex stuff (data grids, schedulers, charts) in minutes, making Kendo UI the right answer for me.
Plus, you can use the Kendo UI for Angular AI Coding Assistant, an MCP server that automatically scaffolds components for AI agents. Instead of manually writing Kendo UI components, your AI assistant can do it for you. 😁
Want to learn more? Check out my article: Angular and Kendo UI MCP: Making Agents Work for You

Dany Paredes
Dany Paredes is a Google Developer Expert on Angular and Progress Champion. He loves sharing content and writing articles about Angular, TypeScript and testing on his blog and on Twitter (@danywalls).
Related Posts
Comments
All articles
Topics
Web MobileMobile
Desktop
Design
Productivity
People
