Getting Started with the HtmlTextBox
This guide shows how to create and use the Telerik Reporting HtmlTextBox report item in reports with the Standalone Report Designer.
- First, you will add an HtmlTextBox item in an empty Report created with the Standalone Designer.
- Then, you will fill the HtmlTextBox with some styled content.
- Finally, you will add an image to the HtmlTextBox.
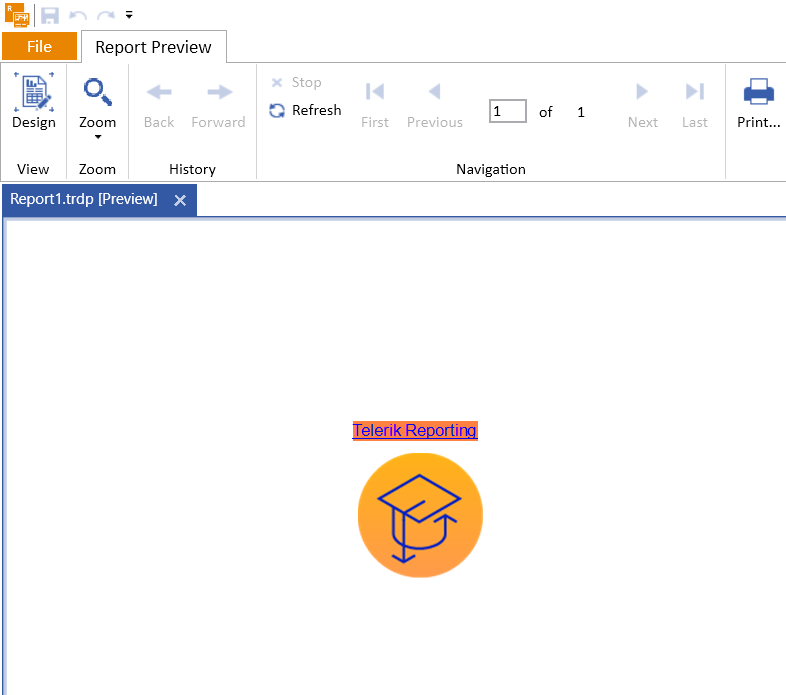
After the completion of this guide, you will also be able to configure the HtmlTextBox in the Standalone Designer and achieve the following result:

Adding the HtmlTextBox
-
Select the Report Section where you want to add the HtmlTextBox. For the purposes of this guide, you will choose the
Detailsection. -
From the Designer menu, select the
Inserttab. As a result, the available items will be displayed in the toolbar below the main menu. -
Click the HTML Text Box item to add it in the middle of the Report section you selected in the first step.
The following image shows the result:

Adding Some Styled Content
The HtmlTextBox you have just created contains the default text that is the item name. When this HtmlTextBox is the first HtmlTextBox you add to your report, its default value will be htmlTextBox1.
Now, you will add some styled content to your HtmlTextBox report item:
-
Change the HtmlTextBox content by either of the following ways:
-
Go to the property
Valueof the item in the Properties pane and click the ellipses. -
Right-click the item and select
Expression...from the popped-up context menu.
As a result, the Edit Expression dialog of the HtmlTextBox will open in the Design view.
-
-
In the Design view of the editor, type Telerik Reporting.
-
Select the text and use the background color button from the toolbox to set an orange background.
-
Use the last button from the toolbar of the editor to add a link to the Telerik Reporting online demos. As a result, a Hyperlink Editor will open and you can now type https://demos.telerik.com/reporting/ as a URL, and select _blank as Target to open the web page on a new browser tab like shown in the following image:

-
Switch to the Html view of the editor to see the generated HTML code. The code will look like the following:
HTML<span style="background-color: #ff8000"><a href="https://demos.telerik.com/reporting/">Telerik Reporting</a></span> -
Click OK to close the HtmlTextBox editor dialog.
-
Preview the report and test the link by clicking the Telerik Reporting orange text.
Adding an Image
You can also embed images in the HtmlTextBox using the <img> tag. To add an image:
-
Right-click the HtmlTextBox and select
Expression...to open the editor. -
Switch to the Html view.
-
Add an image tag to your content. For example, you can modify the existing HTML to include an image:
html<span style="background-color: #ff8040"><a href="https://demos.telerik.com/reporting/">Telerik Reporting</a></span> <div><img style="margin: 10px auto; display: block" alt="Telerik Reporting Support Logo" src="https://demos.telerik.com/reporting/images/reporting-icons/reporting-icons_support-recources.png" width="100" height="100"/></div> -
Click OK and preview the report to see the image displayed under the text.
For more information about image support including supported attributes and CSS styling options, see Image Support.