Customizing Report Parameters Area in Web Report Designer using CSS and JavaScript
Environment
| Version | Product | Author |
|---|---|---|
| 18.3.24.1112 | Telerik Web Report Designer | Desislava Yordanova |
Description
Customizing the style of the report parameters area and highlighting selections can enhance the usability and visual appeal of the Web Report Designer. This article demonstrates how to adjust the layout of CheckBox parameters and apply a darker color to selected items in the parameters area.
This knowledge base article explains how to customize the parameters area in the Web Report Designer using CSS and JavaScript.
Solution
Let's start with a sample report that offers IsActive and IsChecked Boolean report parameters. They are presented as checkboxes in the Web Report Designer:
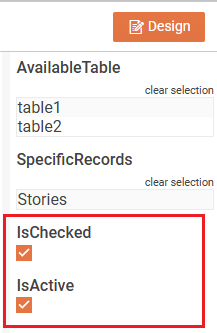
However, the checkmark is displayed below the header text. If you want to align horizontally the checkmark next to the text, it is necessary to:
-
Modify the webReportDesigner.html and insert the following JavaScript in the
<script type="text/javascript">section. This script utilizes theviewerInitializingevent to apply CSS Flex Container styling to CheckBox parameters.The viewerInitializing event is used to add the
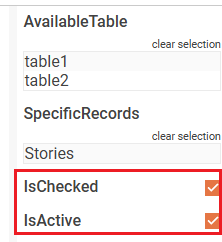
reportViewerOptions.pageReadyevent handler that accesses the checkboxes by using the style class ".trv-parameter-editor-boolean" and apply the CSS Flex Container:HTML<script type="text/javascript"> function onViewerInitializing(e, args) { args.reportViewerOptions.pageReady = (e, args) => { $(".trv-parameter-editor-boolean").parent().parent().parent().css("display", "flex"); }; } $(document).ready(function () { // For a complete overview over all the options used to initialize Web Report Designer, check: // https://docs.telerik.com/reporting/designing-reports/report-designer-tools/web-report-designer/web-report-designer-initialization $("#webReportDesigner").telerik_WebReportDesigner({ toolboxArea: { layout: "list" //Change to "grid" to display the contents of the Components area in a flow grid layout. }, serviceUrl: "api/reportdesigner/", report: "Reportbool.trdp", viewerInitializing: onViewerInitializing, startMode: "design", // Change to "preview" to start the designer in a preview mode }).data("telerik_WebDesigner"); }); </script>Now, the checkmark is displayed on the same horizontal line:
-
To bring the CheckBox closer to its header text, add the following CSS in the
<head>of your HTML file for the Web Report Designer:HTML<style> #webReportDesigner .trv-parameter-header { width: auto; margin-right: 15px; } </style>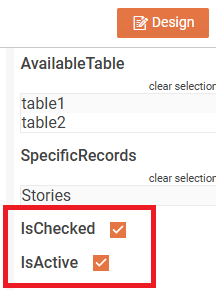
-
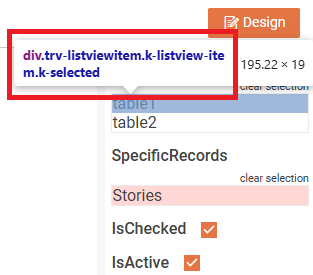
To highlight the selected listview items, extend the CSS style further:
HTML<style> #webReportDesigner .trv-parameter-header { width: auto; margin-right: 15px; } #webReportDesigner .trv-listviewitem.k-listview-item.k-selected { background-color: rgba(255, 99, 88, 0.25); /* Adjust the RGB color as desired */ } </style>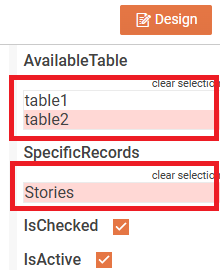
To identify the CSS class, feel free to inspect the respective HTML element on the page:
Replace
#webReportDesignerwith the actual ID of your Web Report Designer element if it differs.
These adjustments will improve the layout and visual feedback in the parameters area of the Web Report Designer. Inspect the HTML elements to identify specific CSS classes if further customization is needed.