Install Telerik Reporting with NuGet Packages
This article explains how to install Telerik Reporting with NuGet packages, choose the correct package source, and add the package references that your application needs.
Use one of the following installation paths:
- Install Telerik Reporting from NuGet.org
- Install Telerik Reporting from the Telerik NuGet server
- Install Telerik Reporting from a local NuGet feed
How to Choose the Right NuGet Installation Path
For current Telerik Reporting releases, use NuGet.org. NuGet.org is the default package source in Visual Studio and the .NET CLI, so it requires the least configuration and avoids unnecessary package-source ambiguity.
Use a local NuGet feed when you need offline installation, reproducible restores inside a controlled network, or a mirrored package source for build agents.
Use the Telerik NuGet server only when you need older package versions that predate the NuGet.org release or when your organization already standardizes on the Telerik private feed.
How to Install Telerik Reporting from NuGet.org
As of 2026 Q3, the Telerik Reporting packages are available on NuGet.org package hosting. This is the recommended installation path for new development because both Visual Studio and the .NET CLI use NuGet.org by default.
How to Install from NuGet.org in Visual Studio
- In Solution Explorer, right-click the project and select Manage NuGet Packages....
- In Package source, verify that nuget.org is selected.
- In the Browse tab, search for the package you need, for example
Telerik.Reporting. - Select the package and then select Install.
How to Install from NuGet.org with the .NET CLI
Use the .NET CLI when you want repeatable setup steps for local development, containers, or automation scripts.
dotnet add package Telerik.ReportingHow to Install from NuGet.org with Package Manager Console
Use the Visual Studio Package Manager Console when you manage packages inside Visual Studio and want PowerShell-based commands.
Install-Package Telerik.ReportingHow to Install from the Telerik NuGet Server
As of 2026 Q3, NuGet.org is the recommended source for current Telerik Reporting packages. Use the Telerik NuGet server for backward compatibility, for older releases, or when your organization requires the Telerik private feed.
The Telerik NuGet server provides authenticated access to Telerik packages and older versions that may not be part of your standard NuGet.org-based workflow.
Before you add the Telerik NuGet server, please confirm these prerequisites:
- Your Telerik account has access to Telerik Reporting.
- You can sign in to your Telerik account in a browser.
- You are ready to use an API key as the NuGet password.
If Visual Studio never shows a sign-in dialog, you can still complete the setup by using the NuGet CLI or by updating NuGet.Config through a tool that stores the credentials for you.
Generate an API Key
The Telerik NuGet server requires authentication, so the first step is to generate an API key. Use the API key instead of a password when a NuGet client asks for credentials.
Using an API key is more secure than using an account password, especially when you work with [.NET CLI](slug: restoring-nugets-in-ci#using-only-cli-commands) or the [NuGet.Config file](slug: restoring-nugets-in-ci#using-a-nugetconfig-file-with-your-projects).
-
Go to the API Keys page in your Telerik account.
-
Click Generate New Key +.

-
In the Key Note field, add a note that describes the API key.
-
Click Generate Key.
-
Select Copy and Close. Once you close the window, you can no longer copy the generated key. For security reasons, the API Keys page displays only a portion of the key.
-
Store the generated NuGet API key as you will need it in the next steps. Whenever you need to authenticate your system with the Telerik NuGet server, use
api-keyas the username and your generated API key as the password.
API keys expire after two years. Telerik sends an email when a key is about to expire, but you should also track where you used the key so you can replace it quickly.
Setup in Visual Studio
Use this method when you install Telerik Reporting packages through the Visual Studio NuGet Package Manager.
-
Open Visual Studio.
-
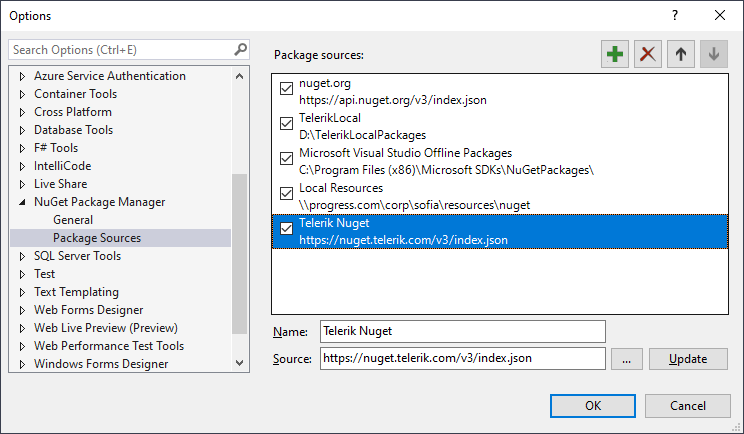
Go to Tools > NuGet Package Manager > Package Manager Settings.
-
Select Package Sources and click +.
-
Enter a feed name such as Telerik.
-
Set the feed URL to
https://nuget.telerik.com/v3/index.jsonand click OK.The Visual Studio NuGet Package Manager and the Telerik NuGet feed
-
Create or load your project.
-
Go to Tools > NuGet Package Manager > Manage NuGet Packages for Solution.
-
In the upper-right corner of the Manage Packages for Solution window, select the Telerik Package source that you just added.
-
Click the Browse tab to see the available packages.
-
If a credentials dialog appears, enter
api-keyin the User name field and the generated API key in the Password field.Credential prompt for the Telerik NuGet feed in Visual Studio
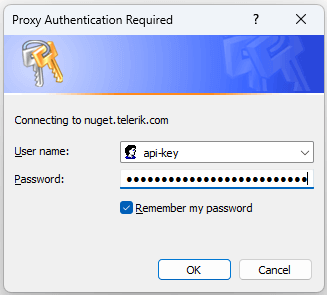
After you authenticate successfully, the Telerik packages available to your account appear in the NuGet package list.
What to Do If No Sign-In Dialog Appears in Visual Studio
Some environments do not show a credentials dialog automatically. That does not block you from using the Telerik feed.
Use these checks and fallback options:
- Make sure you selected the Telerik package source and clicked Browse. In many cases, Visual Studio asks for credentials only when it first queries the feed.
- If no dialog appears, close the package manager, reopen it, and select the Telerik source again.
- If the feed still shows no Telerik packages, configure the source with the NuGet CLI by following the steps in Setup with NuGet CLI. This path stores the credentials directly and does not depend on a Visual Studio popup.
- If cached credentials are incorrect or expired, update the Telerik source credentials with the NuGet CLI
Sources Updatecommand shown later in this article. - If you still see only trial packages or no packages, verify that the API key belongs to a Telerik account with access to Telerik Reporting.
This article does not depend on a proxy authentication dialog. The supported authentication method is an API key, and you can configure it without any popup by using the NuGet CLI.
Setup with NuGet CLI
Use the NuGet CLI when you work in Visual Studio Code, on Linux or macOS, in CI environments, or when Visual Studio does not show a credentials dialog.
-
Download the latest NuGet CLI executable.
-
Open a command prompt and change to the directory that contains
nuget.exe. -
Run the following command to store the Telerik feed definition and your API key in
%AppData%\NuGet\NuGet.config.powershellNuGet Sources Add ^ -Name "telerik.com" -Source "https://nuget.telerik.com/v3/index.json" ^ -UserName "api-key" -Password "YOUR-API-KEY" ^ -StorePasswordInClearText
If you need to update expired or invalid credentials, run this command:
NuGet Sources Update ^
-Name "telerik.com" -Source "https://nuget.telerik.com/v3/index.json" ^
-UserName "api-key" -Password "YOUR-API-KEY" ^
-StorePasswordInClearText
After you run the command, reopen Visual Studio, Rider, or any other NuGet client so it reloads the updated source configuration.
Setup in JetBrains Rider
Use this method when you install packages through JetBrains Rider.
-
Open JetBrains Rider.
-
From the main menu, select
Tools>NuGet>NuGet Quick List, or pressAlt+Shift+N. -
Choose
Show NuGet Packages.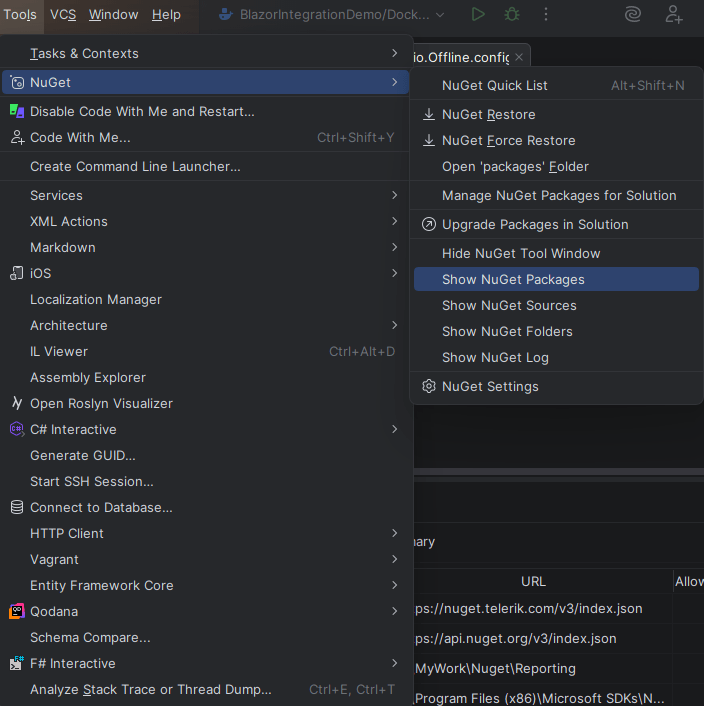
-
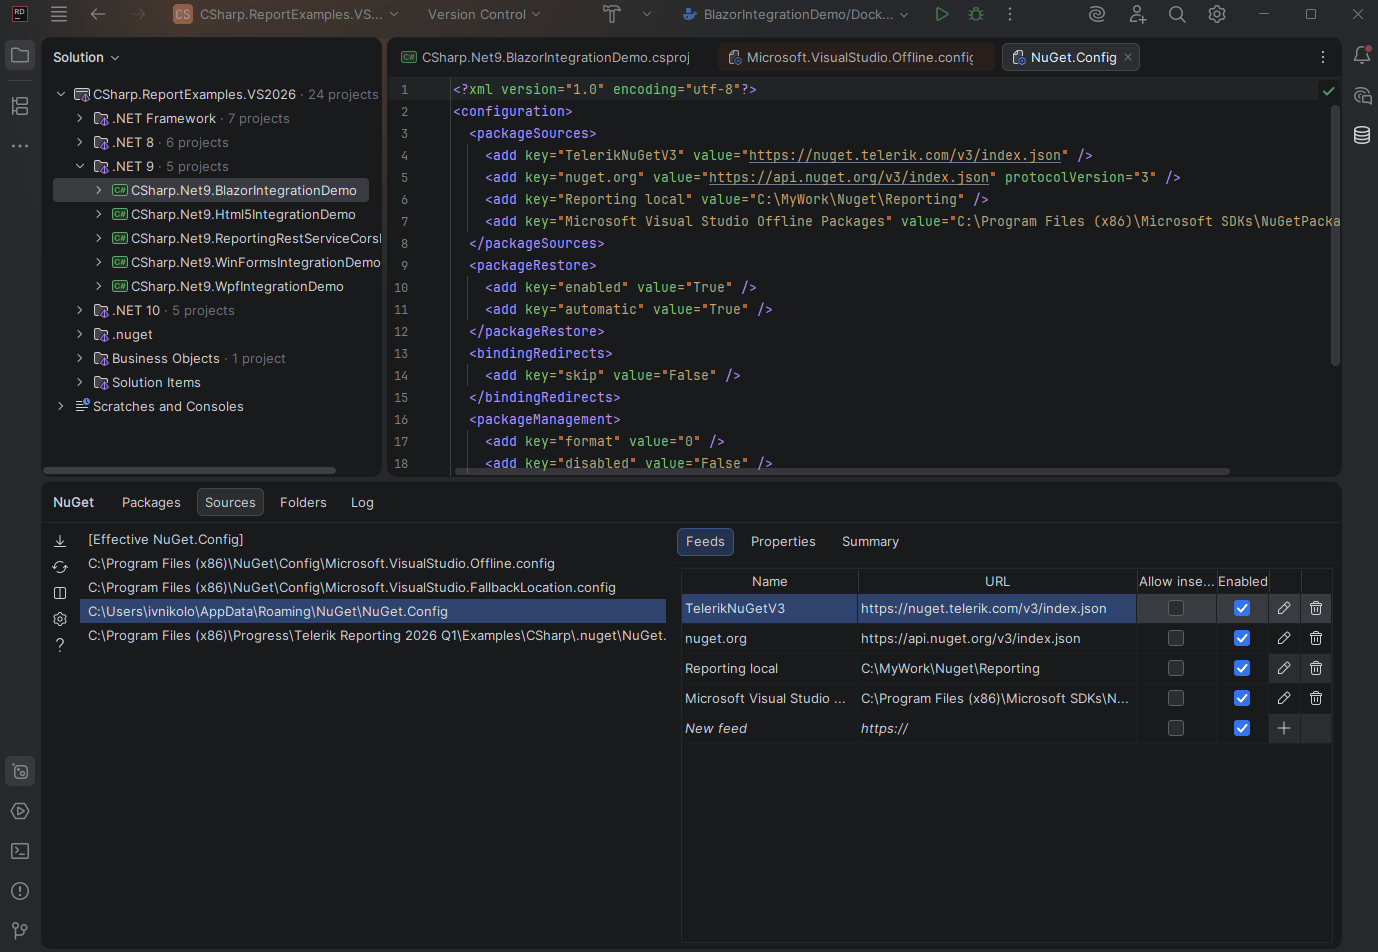
At the top of the NuGet tool window, switch to the
Sourcestab. -
In the left panel, select a specific
NuGet.Configfile, for exampleC:\Users\username\AppData\Roaming\NuGet\NuGet.Config. -
After selecting a concrete NuGet.Config file, the Feeds list will appear on the right.
-
From this view, you can:
- Add new package sources.
- Edit existing feeds.
- Enable or disable feeds.
- Review feed URLs and configuration.
If Rider does not prompt for Telerik feed credentials, configure the feed first with the NuGet CLI and then reopen Rider.
Reset Store Credentials
If you previously stored credentials for the Telerik NuGet server, you need to reset them to authenticate with your new API key. Follow these steps:
-
Remove the saved credentials in the Windows Credential Manager. These credentials will appear as
nuget.telerik.comorVSCredentials_nuget.telerik.comentries. -
Remove the Telerik NuGet package source from Visual Studio.
-
If you have added the Telerik package source by using the .NET CLI, try to remove it by running the following commands:
-
Check if you have any credentials stored in
%AppData%\NuGet\Nuget.Config. If so, remove them. Here is an example of how yourNuGet.Configfile can look like:XML<?xml version="1.0" encoding="utf-8"?> <configuration> <packageSources> <add key="nuget.org" value="https://api.nuget.org/v3/index.json" /> <add key="TelerikOnlineFeed" value="https://nuget.telerik.com/v3/index.json" /> </packageSources> <packageSourceCredentials> <TelerikOnlineFeed> <add key="Username" value="api-key" /> <add key="ClearTextPassword" value="Your API KEY" /> </TelerikOnlineFeed> </packageSourceCredentials> </configuration> -
Try to reset the Visual Studio user data by forcing NuGet to ask for authentication.
-
Restart Visual Studio.
-
Add the Telerik NuGet package source again through Visual Studio or .NET CLI.
How to Verify the Feed Setup
After you add the feed and authenticate, confirm that the setup works:
- The Telerik feed appears in your NuGet package sources.
- Telerik Reporting packages are visible when you browse the Telerik source.
- Package installation succeeds without repeated authentication failures.
- If you use the CLI path, the Telerik source is stored in
NuGet.Configwith the expected URL.
Troubleshoot Common Problems
Use the following checks when the feed still does not work:
- If no sign-in dialog appears, use the CLI method to add or update the Telerik source credentials.
- If you see no Telerik packages, confirm that the Telerik source is selected and the account behind the API key has Telerik Reporting access.
- If authentication keeps failing, generate a new API key and update the stored credentials.
- If the feed worked earlier and stopped working, check whether the API key expired.
- If a corporate network blocks package restore, verify that the system can reach
https://nuget.telerik.com/v3/index.json.
See Also
- [Restoring NuGet Packages in Your CI Workflow](slug: restoring-nugets-in-ci)
- NuGet V2 Feed Error about Returned Unexpected 401 Status Code
- Setup a Local NuGet Package Feed