Setting Styles for Appointments
The following Appointment properties allow you to customize their appearance:
-
BackColor
-
BorderColor
-
BorderStyle
-
BorderWidth
For example:
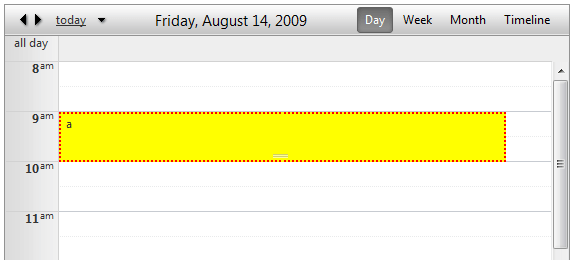
protected void RadScheduler1_AppointmentDataBound(object sender, SchedulerEventArgs e)
{
	e.Appointment.BackColor = System.Drawing.Color.Yellow;
	e.Appointment.BorderColor = System.Drawing.Color.Red;
	e.Appointment.BorderStyle = BorderStyle.Dotted;
	e.Appointment.BorderWidth = Unit.Pixel(2);
}
Alternatively, you can take advantage of the 10 predefined, skin-independent CSS styles that we offer with Q1 2009 SP1.RadScheduler will automatically recognize the following class names:
-
rsCategoryDarkBlue
-
rsCategoryBlue
-
rsCategoryDarkGreen
-
rsCategoryGreen
-
rsCategoryDarkRed
-
rsCategoryOrange
-
rsCategoryPink
-
rsCategoryRed
-
rsCategoryViolet
-
rsCategoryYellow
Here is how each style looks like:
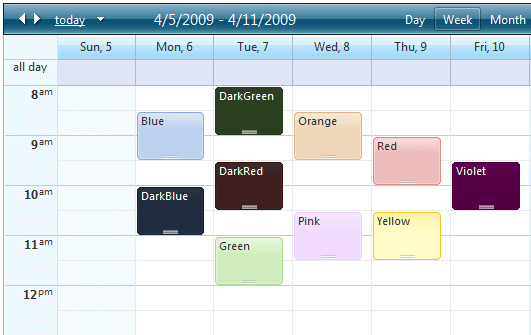
You can handle the AppointmentDataBound event and use a custom condition based on attributes, resources or any other property of theAppointment object to set the appointment CssClass property. For example, the above screenshot can be replicated with the following code:
protected void RadScheduler1_AppointmentDataBound(object sender, Telerik.Web.UI.SchedulerEventArgs e)
{
	e.Appointment.CssClass = "rsCategory" + e.Appointment.Subject;
}
This code causes RadScheduler to render the value of the CssClass property that you set in theAppointmentDataBound event to the rsApt div of the appointments. Here is the resulting html output for the "Green" appointment:
 <div class="rsWrap" style="z-index: 14;">
   <div id="RadScheduler1_22_0" class="rsApt rsCategoryGreen" style="height: 46px; width: 90%;
	   left: 0%;" title="Green">
	   <div class="rsAptOut">
		   <div class="rsAptMid">
			   <div class="rsAptIn">
				   <div class="rsAptContent">
					   Green <a class="rsAptDelete" href="#" style="visibility: hidden;">delete</a>
				   </div>
			   </div>
			   <div class="rsAptResize" style="z-index: 80;">
			   </div>
		   </div>
	   </div>
   </div>
</div>
Appointment style modes
The AppointmentStyleMode property of RadScheduler determines the rendering style of the appointments with customized background and border colors. The possible values are:
-
Auto- Appointments with set background or border color are rendered using the Simple style - without rounded corners or gradiented background.All others are rendered using their default style - with rounded corners and gradiented background.
-
Simple- Appointments are rendered using the simple style - without rounded corners or gradiented background.
-
Default- Appointments rendered with rounded corners and gradiented background. Custom background and border colorsare supported. Gradiented backgrounds for custom colors are not available in IE6.
It's recommended to explicitly set AppointmentStyleMode="Default" unless you have legacy custom skins. This willforce the use of the default rendering (with rounded corners and gradients) even to appointments with custom colors.
Resource style mapping
The BackColor, BorderColor and CssClass properties can be set based on the resources that the appointment is associated with.
<ResourceStyles>
	 <telerik:ResourceStyleMapping Type="User" Text="Alex" BackColor="Blue" />
	 <telerik:ResourceStyleMapping Type="User" Text="Bob" BackColor="Orange" />
	 <telerik:ResourceStyleMapping Type="User" Text="Charlie" ApplyCssClass="rsCategoryGreen" />
</ResourceStyles>
An illustration of this method can be seen in the Defining Resources demo.This is just a neater way of setting the CssClass property from code-behind and it is equivalent to the following:
protected void RadScheduler1_AppointmentDataBound(object sender, Telerik.Web.UI.SchedulerEventArgs e)
{
	if (e.Appointment.Resources.GetResourceByType("User") != null)
	{
		switch (e.Appointment.Resources.GetResourceByType("User").Text)
		{
			case "Alex":
				e.Appointment.BackColor = Color.Blue;
				break;
			case "Bob":
				e.Appointment.BackColor = Color.Orange;
				break;
			case "Charlie":
				e.Appointment.CssClass = "rsCategoryGreen";
				break;
			default:
				break;
		}
	}
}
Using custom background image
If you need to use your own custom style for the appointments, here is how to proceed:
-
Create your custom background image and add it to your application. Let's assume you have used a folder called "Scheduler".
-
Include the following css rule in the head of your page:
<style type="text/css">
   .RadScheduler .MyCustomAppointmentStyle .rsAptContent,
   .RadScheduler .MyCustomAppointmentStyle .rsAptMid .rsAptIn,
   .RadScheduler .MyCustomAppointmentStyle .rsAptMid,
   .RadScheduler .MyCustomAppointmentStyle .rsAptOut
   {
	background-image: url('Scheduler/MyCustomBackgroundImage.png');
   }
   .RadScheduler .MyCustomAppointmentStyle .rsAptContent
   {
	/*font style*/
	color: Blue;
   }
</style>
- Set the appointment CssClass property:
protected void RadScheduler1_AppointmentDataBound(object sender, Telerik.Web.UI.SchedulerEventArgs e)
{
	e.Appointment.CssClass = "MyCustomAppointmentStyle";
}
The background images for the appointment styles can be found in your local installation of the Telerik.Web.UIsuit -> Skins\Common\Scheduler and the css rules are defined in Scheduler.css in the Skins folder.