Getting Started Overview
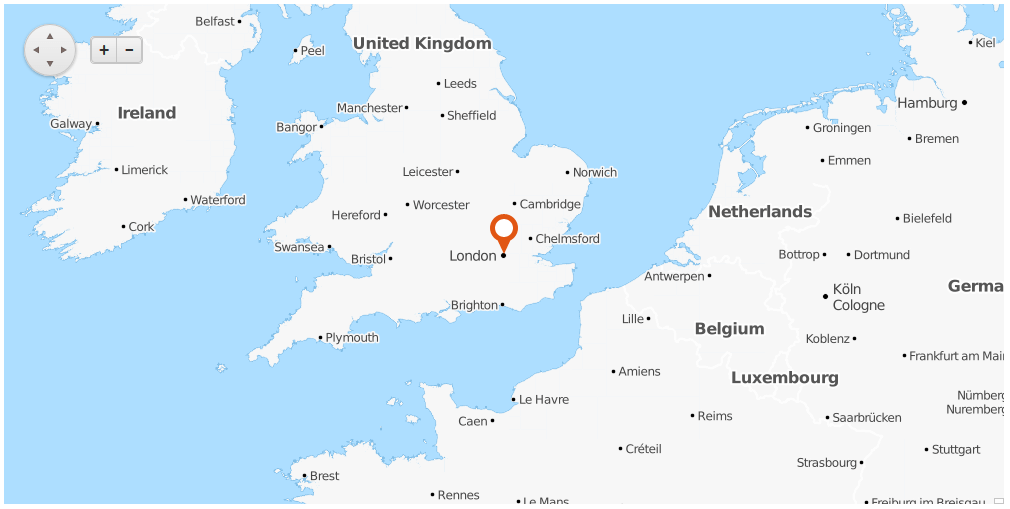
This article demonstrates how you can start using the RadMap control in an ASP.NET project. The illustrated Map in Figure 1 will be generated after following the steps and the code examples in the following sections.
Figure 1: Result of a basic RadMap configuration

Add a RadMap control into an ASP.NET project
To add a Map control into the page you can simply drag it from the Visual Studio Toolbox into anASP.NET page with correctly set ScriptManager control or paste the markup from Example 1 into the form element.
Example 1: Start-up RadMap declaration
<telerik:RadScriptManager runat="server" ID="RadScriptManager1" />

<telerik:RadMap RenderMode="Lightweight" runat="server" ID="RadMap1">
</telerik:RadMap>
Add a Tile Layer
The layer of type Tile is basically rendered using images requested from a corresponding web service. This article uses the OpenCycleMap service to populate the map images.
To configure the RadMap with the chosen service provider, follow these steps:
-
Use the LayersCollection inner tag of the RadMap;
-
Add a MapLayer item;
-
Use the Type attribute to set the layer type to Tile;
-
Use the UrlTemplate to set the URL template provided by the service.
Some providers like OpenCycleMap may require that you add an API key to the URL, for example:
https://{s}.tile.thunderforest.com/cycle/{z}/{x}/{y}.png?apikey=<insert-your-apikey-here>
These steps will lead you to a markup similar to the one in Example 2 and a rendered Map in the page.
Example 2: Sample RadMap markup with configured Tile Layer
<telerik:RadMap RenderMode="Lightweight" runat="server" ID="RadMap1">
	<LayersCollection>
		<telerik:MapLayer Type="Tile"
			UrlTemplate="http://a.tile.opencyclemap.org/transport/#= zoom #/#= x #/#= y #.png">
		</telerik:MapLayer>
	</LayersCollection>
</telerik:RadMap>
Configure the Layout of the Map
At this point you will already have a Map rendered if you run the page. The following instructions are optional and will explain how to configure it.
With the Telerik Map you can set initial zoom level, initial center location and change the size of the control:
-
Use the Zoom property of the RadMap to set a value for the initial zoom level (when using the OpenCycleMap service, this value should be between 0 and 18);
-
Set the Width and Height properties with desirable values to change the size of the map;
-
Add the CenterSettings inner tag;
-
Use its Latitude and Longitude attributes to set the exact location of the map center.
In Example 3 you can examine a sample code achieved by following these steps.
Example 3: Simple layout configuration of the RadMap.
<telerik:RadMap RenderMode="Lightweight" runat="server" ID="RadMap1" Zoom="6" Width="1000" Height="500" >
	<CenterSettings Latitude="51.525619" Longitude="-0.111802" />
	<LayersCollection>
		<telerik:MapLayer Type="Tile"
			UrlTemplate="http://a.tile.opencyclemap.org/transport/#= zoom #/#= x #/#= y #.png">
		</telerik:MapLayer>
	</LayersCollection>
</telerik:RadMap>
Place Markers in the Map
Based on the purpose of the Map, you may want to show points of interest. To do so, use the markers collection.
To configure a Marker:
-
Add the MarkerCollection inner tag;
-
Add a MapMarker item;
-
Use the Shape attribute to set the desired look of the Marker (Pin or PinTarget);
-
Use the Title attribute to set the text shown as a tooltip on mouse over;
-
Use the LocationSettings inner tag to set the exact position of the marker through the Latitude and Longitude attributes.
The code in Example 4 is a final result of the steps from the above sections and will render the Map displayed in Figure 1.
Example 4: Adding Markers in the RadMap.
<telerik:RadMap RenderMode="Lightweight" runat="server" ID="RadMap1" Zoom="6" Width="1000" Height="500" >
	<CenterSettings Latitude="51.525619" Longitude="-0.111802" />
	<LayersCollection>
		<telerik:MapLayer Type="Tile"
			UrlTemplate="http://a.tile.opencyclemap.org/transport/#= zoom #/#= x #/#= y #.png">
		</telerik:MapLayer>
	</LayersCollection>
	<MarkersCollection>
		<telerik:MapMarker Shape="Pin" Title="London, UK">
			<LocationSettings Latitude="51.525619" Longitude="-0.111802"/>
		</telerik:MapMarker>
	</MarkersCollection>
</telerik:RadMap>