Adding Templates
Adding templates at design time
Templates could be added using the Template Design Surface. This provides a surface where you can visually design the template with dragging and dropping controls from the Toolbox.
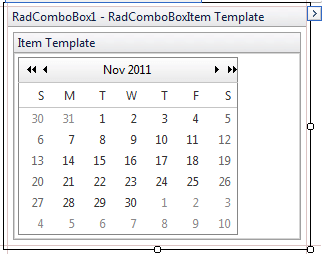
The following example demonstrates how to use the Template Design Surface to add a RadCalendar control to the ItemTemplate.
-
Drag a RadComboBox from the Toolbox onto your web page.
-
From the Smart Tag that appears when you drop the RadComboBox, choose Edit Templates.
-
The Template Design Surface appears, set for editing the ItemTemplate.
-
Drag a RadCalendar control from the Toolbox onto the Template Design Surface.

-
Right click on the RadCalendar control, choose Properties from its context menu, and set the following properties:
-
Set the TitleFormat property to "MMM yyyy".
-
Set the ShowRowHeaders property to False.
-
Set the AutoPostBack property to True.
-
Set the EnableMultiSelect property to True.
-
-
Subscribe the RadCalendar control to its SelectionChanged event:
protected void RadCalendar1_SelectionChanged(object sender,
	Telerik.Web.UI.Calendar.SelectedDatesEventArgs e)
{
	RadCalendar calendar = (RadCalendar)RadComboBox1.SelectedItem.FindControl("RadCalendar1");
	RadComboBox1.SelectedItem.Text = String.Format("{0}/{1}/{2}", calendar.SelectedDate.Year, calendar.SelectedDate.Month, calendar.SelectedDate.Day);
	RadComboBox1.OpenDropDownOnLoad = false;
}
Note that the event handler finds the RadCalendar control within the RadComboBox's SelectedItem and uses that to set the text of the selected item.
-
Use the Smart Tag anchor to display the Edit Templates pop-up, and choose End Template Editing to close the Template Design Surface.
-
From the Smart Tag, choose Build RadComboBox. In the RadComboBox Item Builder, add a single item to the RadComboBox with no Text property. At this point, the declaration for RadComboBox should look as follows:
<telerik:radcombobox id="RadComboBox1" runat="server">
<ItemTemplate>
	<telerik:RadCalendar RenderMode="Lightweight"
		ID="RadCalendar1"
		runat="server"
		TitleFormat="MMMM yyyy"
		ShowRowHeaders="false"
		OnSelectionChanged="FromDateChanged"
		AutoPostBack="true"
		EnableMultiSelect="false">
	</telerik:RadCalendar>
</ItemTemplate>
<Items>
	<telerik:RadComboBoxItem />
</Items>
</telerik:radcombobox>-
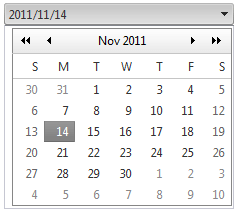
Run the application.When you click the RadComboBox's drop-down toggle, the RadCalendar appears. The RadCalendar selected date becomes the selected text in the RadComboBox:

Adding templates at runtime
You can also add templates to RadComboBox at runtime, using the ItemTemplate and HeaderTemplate properties. These properties are of type ITemplate, so you must assign objects that implement that interface.
The RadComboBox items should be dynamically added so that templates can be defined at run time. Also, items should be bound so that DataBinder.Eval expressions may be used. In other words, you should call the DataBind method of the RadComboBox object or bind the items that are about to use DataBinder.Eval . You can bind a specific item by calling the DataBind method of this specific item.
The ItemTemplate should be initialized in the OnInit event of the page. This is needed as the template should be instantiated before RadComboBox items are initialized.
protected override void OnInit(EventArgs e)
{
	RadComboBox1.ItemTemplate = new LabelTemplate();
	base.OnInit(e);
}
protected void Page_Load(object sender, EventArgs e)
{
	if (!Page.IsPostBack)
	{
		RadComboBox1.Items.Add(new RadComboBoxItem("RadComboBoxItem4"));
		RadComboBox1.Items.Add(new RadComboBoxItem("RadComboBoxItem5"));
	}

	RadComboBox1.DataBind();
}

class LabelTemplate : ITemplate
{
	public void InstantiateIn(Control container)
	{
		Label label1 = new Label();
		label1.ID = "ItemLabel";
		label1.Text = "Text";
		label1.Font.Size = 15;
		label1.Font.Bold = true;
		label1.DataBinding += new EventHandler(label1_DataBinding);
		container.Controls.Add(label1);
	}

	private void label1_DataBinding(object sender, EventArgs e)
	{
		 Label target = (Label)sender;
		 RadComboBoxItem item = (RadComboBoxItem)target.BindingContainer;
		 string itemText = (string)DataBinder.Eval(item, "Text");
		 target.Text = itemText;
	}
}
An alternate method of defining a template in the OnInit event of the page, is to instantiate each item on postback. In the previous example, the LabelTemplate class initializes a label in the InstantiateIn method. In the next example, the InstantiateIn method is called for the LabelTemplate object for each item.
protected void Page_Load(object sender, EventArgs e)
{
	if (!Page.IsPostBack)
	{
		RadComboBox1.Items.Add(new RadComboBoxItem("RadComboBoxItem4"));
		RadComboBox1.Items.Add(new RadComboBoxItem("RadComboBoxItem5"));
	}

	LabelTemplate template = new LabelTemplate();
	foreach (RadComboBoxItem item in RadComboBox1.Items)
	{
		template.InstantiateIn(item);
	}

	RadComboBox1.DataBind();
}
The end result of this code looks like the following:
