Adding the License Key to CI/CD Services
This article describes how to set up and activate your Telerik UI for .NET MAUI license key across a few popular CI/CD services by using deployment keys
Deployment keys are a dedicated type of license key for build pipelines. They’re tied to a specific application and the set of products that the application uses. Deployment keys cannot be used for application development.
To activate your license in a CI/CD environment:
-
Navigate to the Deployment Keys page.
-
Click Add Application. In the form that opens:
-
Add the application name.
-
Select the type of application—public or private.
-
Select the set of products used in the application.
-
-
Copy the key value and store it securely.
-
Create an environment variable named TELERIK_LICENSE and set it to the obtained key value. Alternatively, the key can be stored in a telerik-license.txt file, for example when using the Azure Secure files approach.
When working with CI/CD platforms, always add the Telerik.Licensing NuGet package as a project dependency. This package activates the Telerik UI for .NET MAUI components at build time by using the provided license key.
If you cannot use NuGet packages in your project, see the workaround in the Adding Your License Key to CI Platforms as a Code Snippet KB article.
Creating an Environment Variable
The recommended approach for providing your license key to the Telerik.Licensing NuGet package is to use environment variables. Each CI/CD platform has a different process for setting environment variables and this article lists only some of the most popular examples.
GitHub Actions
-
Create a new Repository Secret or an Organization Secret.
-
Set the name of the secret to
TELERIK_LICENSEand paste the contents of the license file as a value. -
After running npm install or yarn, add a build step to activate the license:
env:
    TELERIK_LICENSE: ${{ secrets.TELERIK_LICENSE }}
Azure Pipelines
-
Create a new secret variable named
TELERIK_LICENSE. -
Paste the contents of the license key file as a value.
Always consider the Variable size limit—if you are using a Variable Group, the license key will typically exceed the character limit for the variable values.
The only way to have a long value in the Variable Group is to link it from Azure Key Vault. If you cannot use a Key Vault, then use a normal pipeline variable instead (see above) or use the Secure files approach instead.
Using Secure Files on Azure DevOps
Secure files are an alternative approach for sharing the license key file in Azure Pipelines that does not have the size limitations of environment variables.
You have two options for the file-based approach. Set the TELERIK_LICENSE_PATH variable or add a file named telerik-license.txt to the project directory or a parent directory.
Make sure you’re referencing
Telerik.Licensingv1.4.10 or later.
YAML Pipeline
With a YAML pipeline, you can use the DownloadSecureFile@1 task, then use $(name.secureFilePath) to reference it. For example:
- task: DownloadSecureFile@1
name: DownloadTelerikLicenseFile # defining the 'name' is important
displayName: 'Download Telerik License Key File'
inputs:
    secureFile: 'telerik-license.txt'

- task: MSBuild@1
displayName: 'Build Project'
inputs:
    solution: 'myapp.csproj'
    platform: Any CPU
    configuration: Release
    msbuildArguments: '/p:RestorePackages=false'
env:
    # use the name.secureFilePath value to set TELERIK_LICENSE_PATH
    TELERIK_LICENSE_PATH: $(DownloadTelerikLicenseFile.secureFilePath)
Classic Pipeline
With a classic pipeline, use the Download secure file task and a PowerShell script to set TELERIK_LICENSE_PATH to the secure file path.
-
Add a Download secure file task and set the output variable's name to
telerikLicense.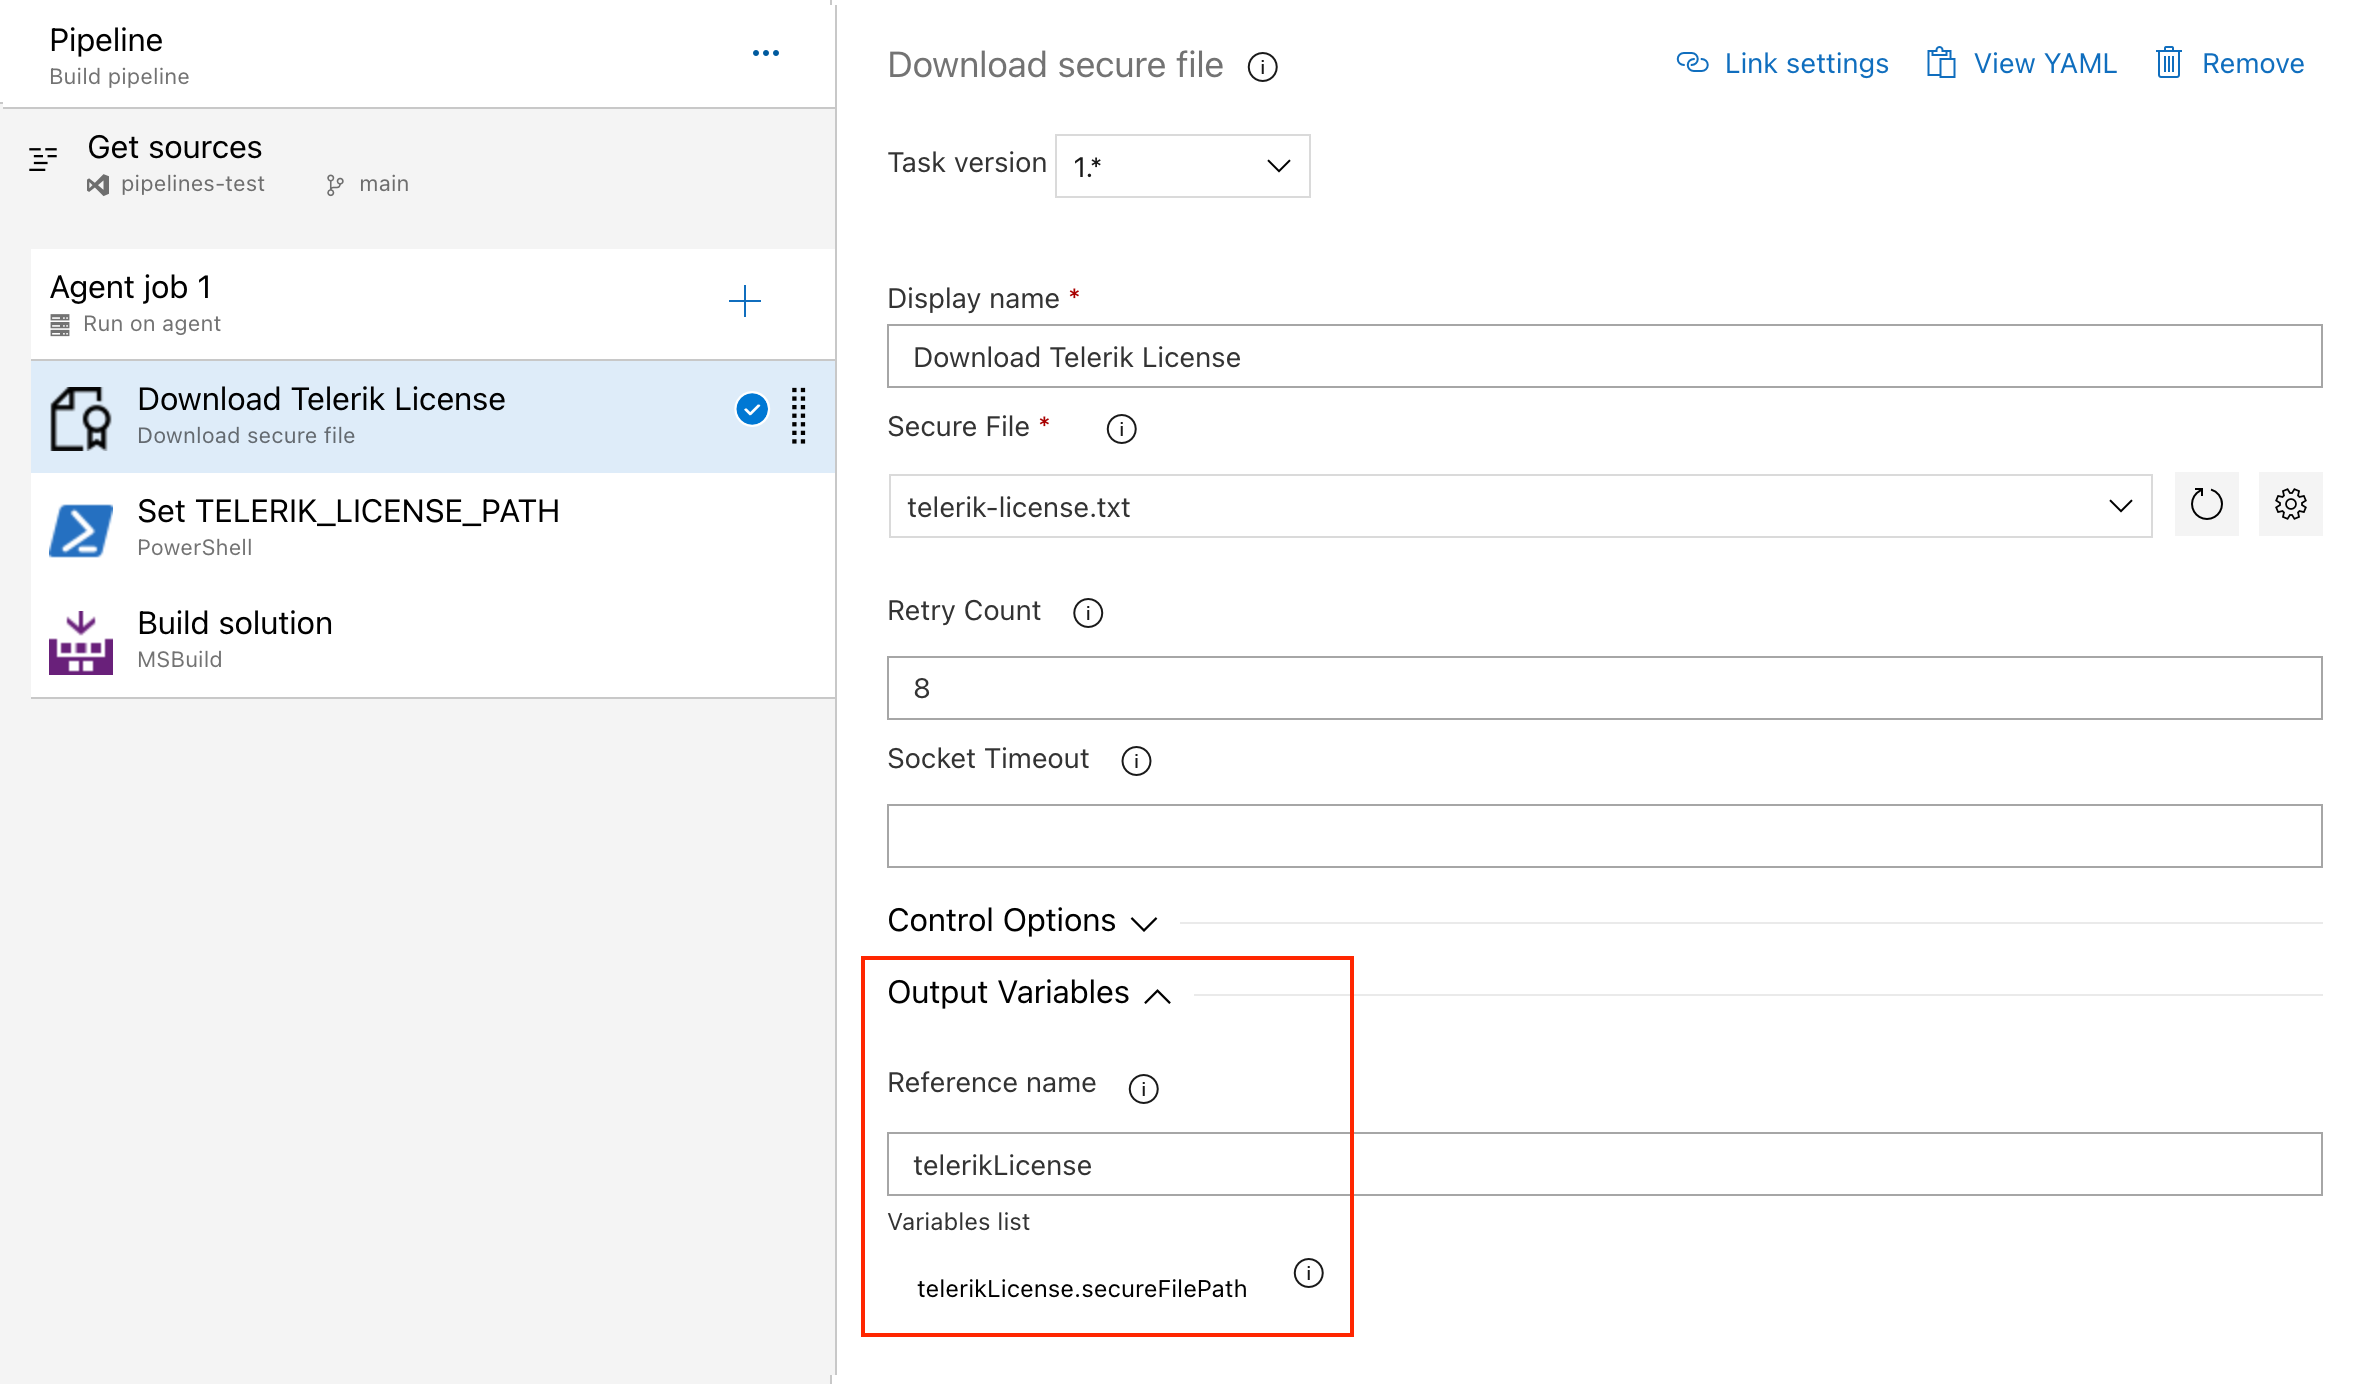
-
Add a PowerShell task and set the
TELERIK_LICENSE_PATHvariable to thesecureFilePathproperty of the output variable: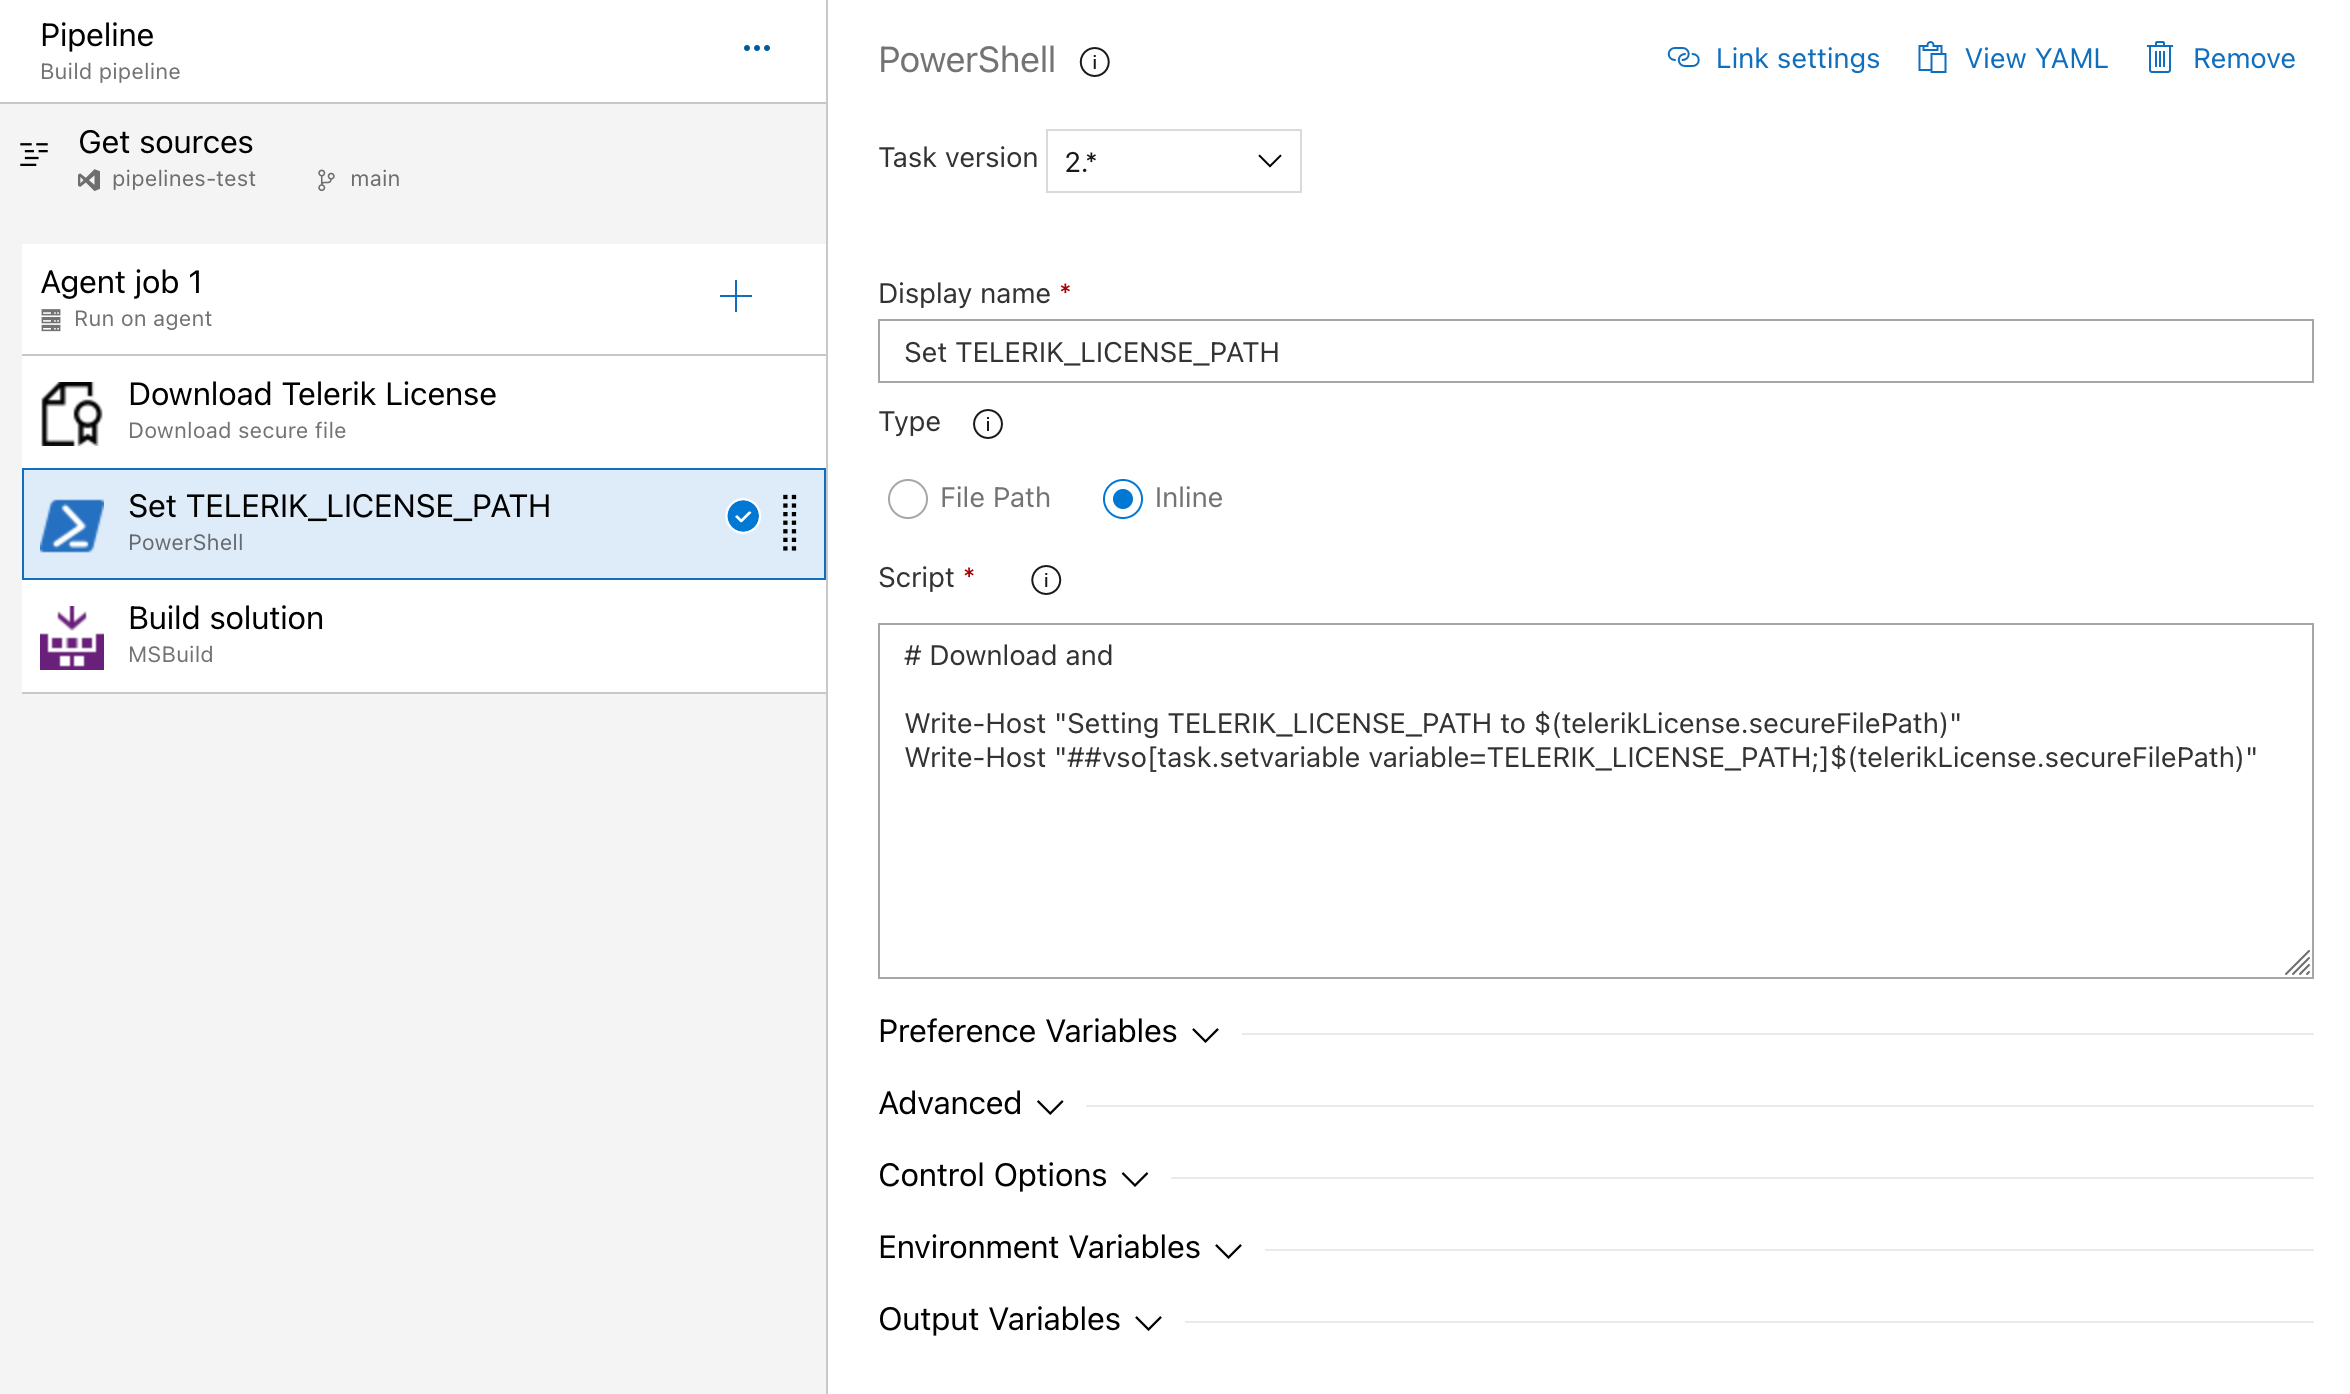
The script to set the environment variable is quoted below:
Write-Host "Setting TELERIK_LICENSE_PATH to $(telerikLicense.secureFilePath)"
Write-Host "##vso[task.setvariable variable=TELERIK_LICENSE_PATH;]$(telerikLicense.secureFilePath)"
Alternatively, copy the file into the repository directory:
echo "Copying $(telerikLicense.secureFilePath) to $(Build.Repository.LocalPath)/telerik-license.txt"
Copy-Item -Path $(telerikLicense.secureFilePath) -Destination "$(Build.Repository.LocalPath)/telerik-license.txt" -Force