Installing Your Telerik UI for .NET MAUI License Key
Starting with the Q1 2025 release, the UI components from the Telerik UI for .NET MAUI library require activation through a license key (trial or commercial). This article describes how to download your personal license key and use it to activate the Telerik UI for .NET MAUI components.
An invalid license results in errors and warnings during build and run-time indicators such as watermarks and banners.
To download a license key for Telerik UI for .NET MAUI, you must have either a developer license or a trial license. If you are new to Telerik UI for .NET MAUI, start a free Telerik UI for .NET MAUI trial first, and then follow the steps below.
Before You Start
- Download your license key from the License Keys page in your Telerik account.
- If your project uses NuGet packages, install the
Telerik.Licensingpackage. This is a required step. - If Telerik UI for .NET MAUI is referenced in a class library, install
Telerik.Licensingin the application project that consumes the class library too. - If the build runs under a service account, CI agent, or another user profile, do not rely on Windows
%AppData%\TelerikorC:\Users\[windows_username]\%AppData%\Roaming\Telerikand on Mac/Linux:~/.telerik/``%appdata%\Telerikalone. Use a project-level or environment-based setup instead.
Choose the Right Installation Approach
Depending on your development environment and preferences, you can install your license key in either of the following ways:
| Scenario | Recommended approach |
|---|---|
| Local development machine with Telerik productivity tools (Telerik.CLI, Progress Control Panel, Visual Studio Extensions, Visual Studio Code Extensions) | Use automatic installation |
| Projects with NuGet references | Use manual installation |
| Projects using assembly references (no NuGet packages) | Use manual installation |
Automatic License Key Installation
Telerik provides tools that automatically provision your license key. These tools include the Progress Control Panel, the Visual Studio Extensions and Visual Studio Code extensions.
To install the license key by using the Telerik.CLI:
- Open the terminal and run the following command to install the Telerik.CLI tool:
dotnet tool install -g Telerik.CLI --source https://api.nuget.org/v3/index.json- To download and install the license key, run the following command:
telerik license get-keyTo install your license key by using the Telerik UI for .NET MAUI Visual Studio extensions:
-
Open Visual Studio.
-
Go to Extensions > Telerik Licensing > Download Key.
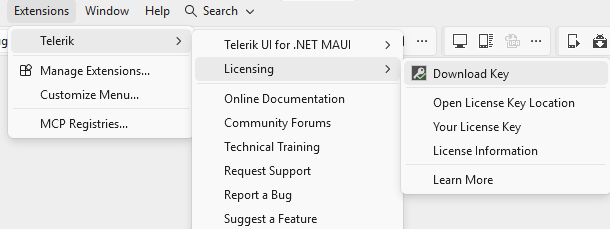
To install your license key by using the Telerik UI for .NET MAUI Visual Studio Code extensions menu:
-
Open Visual Studio Code
-
Open the Visual Studio Code extensions menu:
Ctrl+Shift+Pon Windows/LinuxCmd+Shift+Pon Mac.
-
Select Telerik UI for .NET MAUI Template Wizard: Launch from the menu and press Enter.
-
The Telerik UI for .NET MAUI Template Wizard opens.
-
Check the TELERIK ACCOUNT DETAILS field in the wizard and press the Download License Key File button.
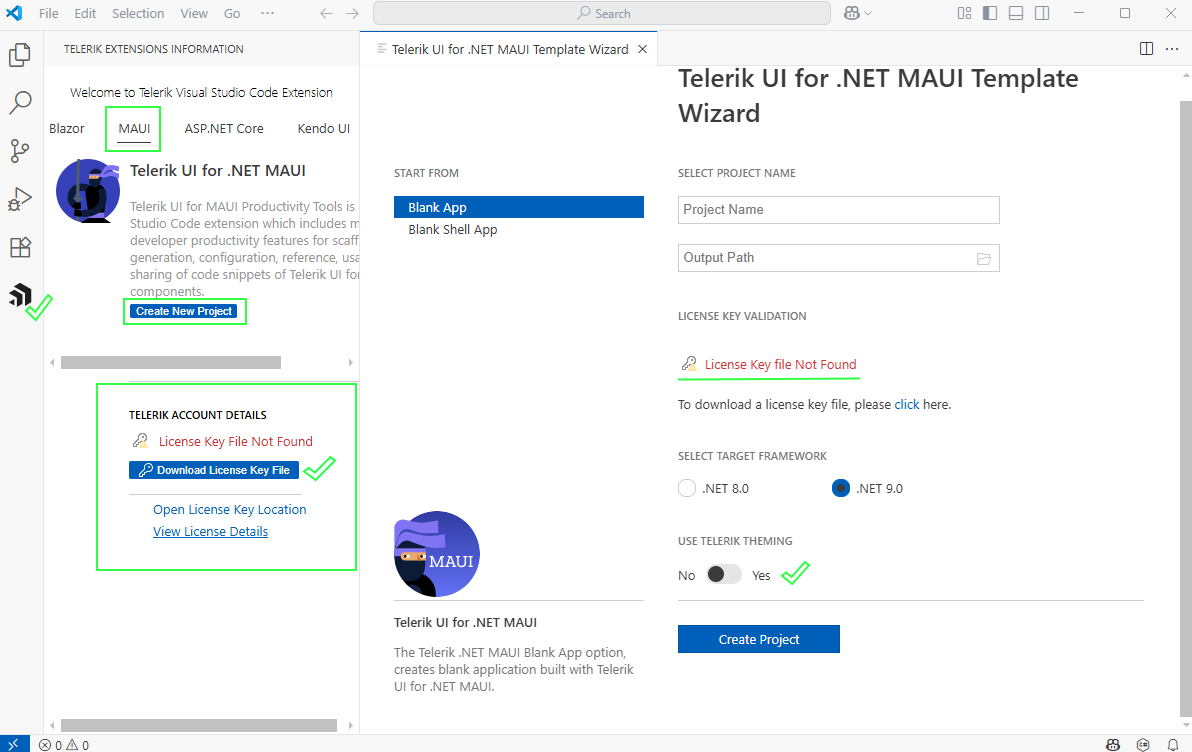
To install your Telerik License Key by using the Progress Control Panel, start the application. It automatically downloads your license key file telerik-license.txt to your home directory:
- On Windows
%AppData%\TelerikorC:\Users\[windows_username]\%AppData%\Roaming\Telerik. - On Mac/Linux:
~/.telerik/.
Manual License Key Installation
To manually download and install a license key for Telerik UI for .NET MAUI:
-
Go to the License Keys page in your Telerik account.
-
Choose the Manual Setup option.
-
Press the Set Up License Key button.
-
Press the Download License Key button to download the
telerik-license.txtfile. -
Copy the downloaded license key file
telerik-license.txtto your home directory. This makes the license key available to all projects that you develop on your computer:- For Windows:
%AppData%\Telerik\telerik-license.txt. For the standard Windows user, that path resolves toC:\Users\[windows_username]\AppData\Roaming\Telerik\telerik-license.txt, it can resolve differently for service accounts. - For Mac/Linux:
~/.telerik/telerik-license.txt. If.telerikfolder does not exist, create such, and paste thetelerik-license.txtfile in it.
- For Windows:
Alternatively, copy the telerik-license.txt license key file to the root folder of your project. This makes the license key available only to this project. Do not commit the file to source control as this is your personal license key.
When you build the project, the Telerik.Licensing NuGet package automatically locates the license file and uses it to activate the MAUI controls.
If your project doesn’t use NuGet packages, see the next document section.
Adding a License Key in Projects Without NuGet References
Telerik strongly recommends the use of NuGet packages whenever possible. Only include the license key as a code snippet when NuGet packages are not an option.
If you cannot use NuGet packages in your project, add the license as a code snippet:
-
Go to the License Keys page in your Telerik account.
-
Press the View Script Keys button inside the Script Keys column.
-
Choose the Telerik UI for .NET MAUI as a product.
-
Copy the C# code snippet into a new file, for example,
TelerikLicense.cs. -
Add the
TelerikLicense.csfile to your project.
Do not publish the license key code snippet in publicly accessible repositories. This is your personal license key.
Updating Your License Key
Whenever you purchase a new Telerik UI for .NET MAUI license or renew an existing one, always download a new license key. The new license key includes information about all previous license purchases. This process is referred to as a license key update. Once you have the new license key, use it to activate the Telerik UI for .NET MAUI.