Getting Started with the .NET MAUI TreeView
This guide provides the information you need to start using the Telerik UI for .NET MAUI TreeView by adding the control to your project.
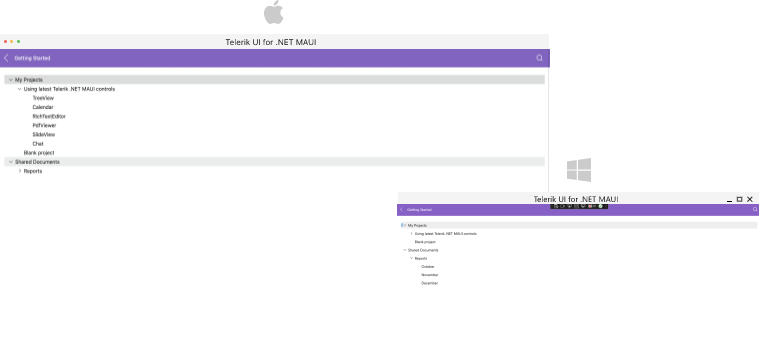
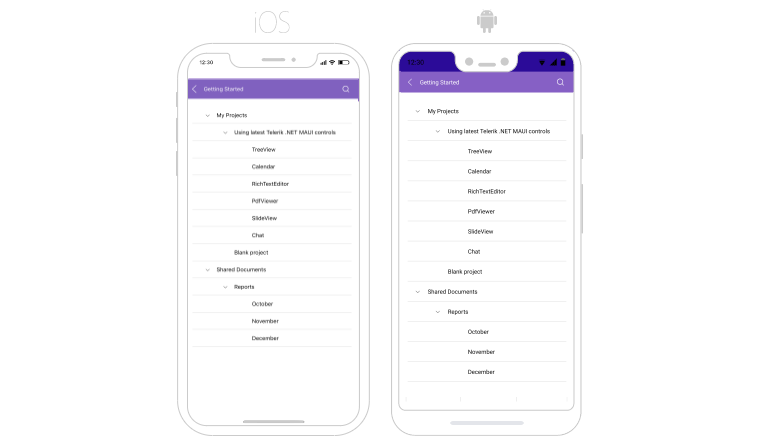
At the end, you will be able to achieve the result on the first image on desktop platforms and the results on the second image on mobile platforms:
Prerequisites
Before adding the TreeView, you need to:
Define the Control
When your .NET MAUI application is set up, you are ready to add a TreeView control to your page. The following example shows a sample TreeView definition populated with sample data.
The TreeView uses UI virtualization and requires its parent container to provide a defined vertical or horizontal space. Virtualization will not work if the TreeView is measured with infinite width or height.
Avoid placing the TreeView in the following layouts, as this will prevent virtualization from functioning:
- Do not place the TreeView inside a
StackLayoutthat is wrapped in aScrollView. - Do not place the TreeView directly inside a
ScrollView.
Place the TreeView control inside a Grid layout with a row height set to * (star) or a specific value.
1. Set up the RadTreeView instance:
<telerik:RadTreeView x:Name="treeView"
                     AutomationId="treeView"
                     ItemsSource="{Binding Items}">
    <telerik:TreeViewDescriptor DisplayMemberPath="Name"
                                ItemsSourcePath="Children"
                                TargetType="{x:Type local:Item}" />
    <telerik:RadTreeView.BindingContext>
        <local:ViewModel/>
    </telerik:RadTreeView.BindingContext>
</telerik:RadTreeView>
2. Add the telerik namespaces:
xmlns:telerik="http://schemas.telerik.com/2022/xaml/maui"3. Create a sample Item class:
public class Item
{
    public Item(string name)
    {
        this.Name = name;
        this.Children = new ObservableCollection<Item>();
    }

    public string Name { get; set; }
    public IList<Item> Children { get; set; }
}
4. Add the ViewModel class:
public class ViewModel
{
    public ViewModel()
    {
        Items = new ObservableCollection<Item>();
        Items.Add(new Item("My Projects")
        {
            Children = new List<Item>()
            {
                new Item("Using latest Telerik .NET MAUI controls")
                {
                    Children = new ObservableCollection<Item>()
                    {
                        new Item("TreeView"),
                        new Item("Calendar"),
                        new Item("RichTextEditor"),
                        new Item("PdfViewer"),
                        new Item("SlideView"),
                        new Item("Chat"),
                    }
                },
                new Item("Blank project")
            }
        });
        Items.Add(new Item("Shared Documents")
        {
            Children = new List<Item>()
            {
                new Item("Reports")
                {
                    Children = new List<Item>()
                    {
                        new Item("October"),
                        new Item("November"),
                        new Item("December")
                    }
                }
            }
        });
    }
    public ObservableCollection<Item> Items { get; set; }
}
5. Register the Telerik controls through the Telerik.Maui.Controls.Compatibility.UseTelerik extension method called inside the CreateMauiApp method of the MauiProgram.cs file of your project:
using Telerik.Maui.Controls.Compatibility;

public static class MauiProgram
{
	public static MauiApp CreateMauiApp()
	{
		var builder = MauiApp.CreateBuilder();
		builder
			.UseTelerik()
			.UseMauiApp<App>()
			.ConfigureFonts(fonts =>
			{
				fonts.AddFont("OpenSans-Regular.ttf", "OpenSansRegular");
			});

		return builder.Build();
	}
}
For a runnable example with the TreeView Getting Started scenario, see the SDKBrowser Demo Application and go to TreeView > Getting Started category.
Additional Resources
- Expand and Collapse TreeView Items
- CheckBoxes in TreeView
- Styling the TreeView Item
- Scrolling options
- Multiple and Single Selection
- Events
- Available Commands in .NET MAUI TreeView