Using GitHub and NextAuth.js for Single Sign-on in Next.js

Summarize with AI:
See how to implement single sign-on with GitHub and OAuth in Next.js for straightforward and secure authentication management.
Next.js supports multiple authentication patterns, each designed for different use cases. This article will guide you through the process of implementing single sign-on (SSO) using GitHub as an OAuth provider, and NextAuth.js as a library for managing authentication scenarios easily and in a secure manner.
I’ve written about SSO in Next.js using Clerk. In that article, I covered what SSO is and how it can be beneficial to you and your users. In this article, I’ll skip explaining SSO and go straight to showing you how to use GitHub and NextAuth.js for authentication. The example you’ll see will cover a few basic use cases such as:
- adding a login button and route to handle authentication
- protecting a page so that it’s only visible to authenticated users
- retrieving a user’s session on the client and server-side
- logging users out of the system
That said, let’s jump right in.
Creating a GitHub OAuth App
Since we’re making use of GitHub as the provider, we first need to create that. You can create and register a GitHub OAuth app under your account or under any organization you have administrative access to. Follow these instructions to create an OAuth app.
- In the upper-right corner of any GitHub page, click your profile photo, then click Settings.
- In the left sidebar, click <> Developer settings.
- In the left sidebar, click OAuth Apps.
- Click the New OAuth App button (or the Register a new application button).
- Enter a name for your app in the Application name input box.
- Type the full URL to your app’s website in the Homepage URL input box.
- Enter localhost:3000/auth/github/callback URL as the Authorization callback URL.
- Click the Register application button to complete the process.
You will be redirected to the general information page for your OAuth app. Copy the Client ID for later use. You also need a client secret. Click the Generate a new client secret button to generate one.

Copy the secret to a text editor so that you can find it when you need it in the coming sections.
Now let’s create our Next.js app 👩🏽💻
Set up a Next.js App with NextAuth.js
Create a Next.js app using the command npx create-next-app. Then add the next-auth package to it using the command npm i next-auth.
Let’s start with adding environment variables. Add a new file env.local to your Next app. Then add the following variables to it:
GITHUB_ID=CLIENT_ID
GITHUB_SECRET=CLIENT_SECRET
NEXTAUTH_SECRET=b84a26fghcda3f883e01
The GITHUB_ID and GITHUB_SECRET represent your GitHub OAuth app’s Client ID and Secret, so make sure to use the right values you got from the previous section. The NEXTAUTH_SECRET is used to encrypt the NextAuth.js JWT and to hash email verification tokens. It is the default value for the secret option in NextAuth and Middleware.
To configure NextAuth.js for a project, create a file called [...nextauth].js in pages/api/auth.
import NextAuth from "next-auth";
import GithubProvider from "next-auth/providers/github";

export const authOptions = {
  // Configure one or more authentication providers
  providers: [
    GithubProvider({
      clientId: process.env.GITHUB_ID,
      clientSecret: process.env.GITHUB_SECRET,
    }),
    // ...add more providers here
  ],
};

export default NextAuth(authOptions);
This contains the dynamic route handler for NextAuth.js as well as its configuration options (i.e., authOptions). If you have more OAuth providers (e.g., Twitter), you can add them to the providers array.
This API route will handle all requests to api/auth/*, which includes the callback, signin and signout URLs.
If you’re using Next.js 13.2 or above with the new App Router (
app/), you can initialize the configuration using the new Route Handlers by following our guide.
Configure Shared Session State
To be able to use the useSession() hook, you’ll need to expose the session context through the <SessionProvider />. This should be done at the top level of your application, that is, in pages/_app.jsx .
Open pages/_app.jsx and update it to the following:
import { SessionProvider } from "next-auth/react";
import "../styles/globals.css";

function MyApp({ Component, pageProps: { session, ...pageProps } }) {
  return (
    <SessionProvider session={session}>
      <Component {...pageProps} />
    </SessionProvider>
  );
}

export default MyApp;
Using the provided <SessionProvider> allows instances of useSession() to share the session object across components, using React Context under the hood. It also takes care of keeping the session updated and synced between tabs/windows.
Add a Login/Logout Component
Let’s add a component that will display a logout button if the user is authenticated, and a login button if they aren’t. Add a new file components/auth-btn.jsx and paste the code snippet below in it.
import { useSession, signIn, signOut } from "next-auth/react";
export default function Component() {
const { data: session } = useSession();
if (session) {
return (
<>
Signed in as {session.user.name} <br />
<button onClick={() => signOut()}>Sign out</button>
</>
);
}
return (
<>
Not signed in
<button onClick={() => signIn("github")}>Sign in</button>
</>
);
}
Here we’re using the useSession() hook to check if the user is logged in. You can use the useSession() hook from anywhere in your application, except server-side code (e.g., getServerSideProps and API routes). The signOut() function is used to log the user out, while the signIn() function is used to log them in. In our case, we passed sign("github") the name of the provider, which causes it to authenticate directly with that provider. Otherwise, it’ll redirect the user to the login page.
Let’s render that component on the Home page. Open pages/index.js and update the paragraph on line 20 to the following markup.
<p className={styles.description}>
  <LogIn />
</p>
Then at the top of that file, add the following import statement:
import LogIn from "../components/auth-btn";
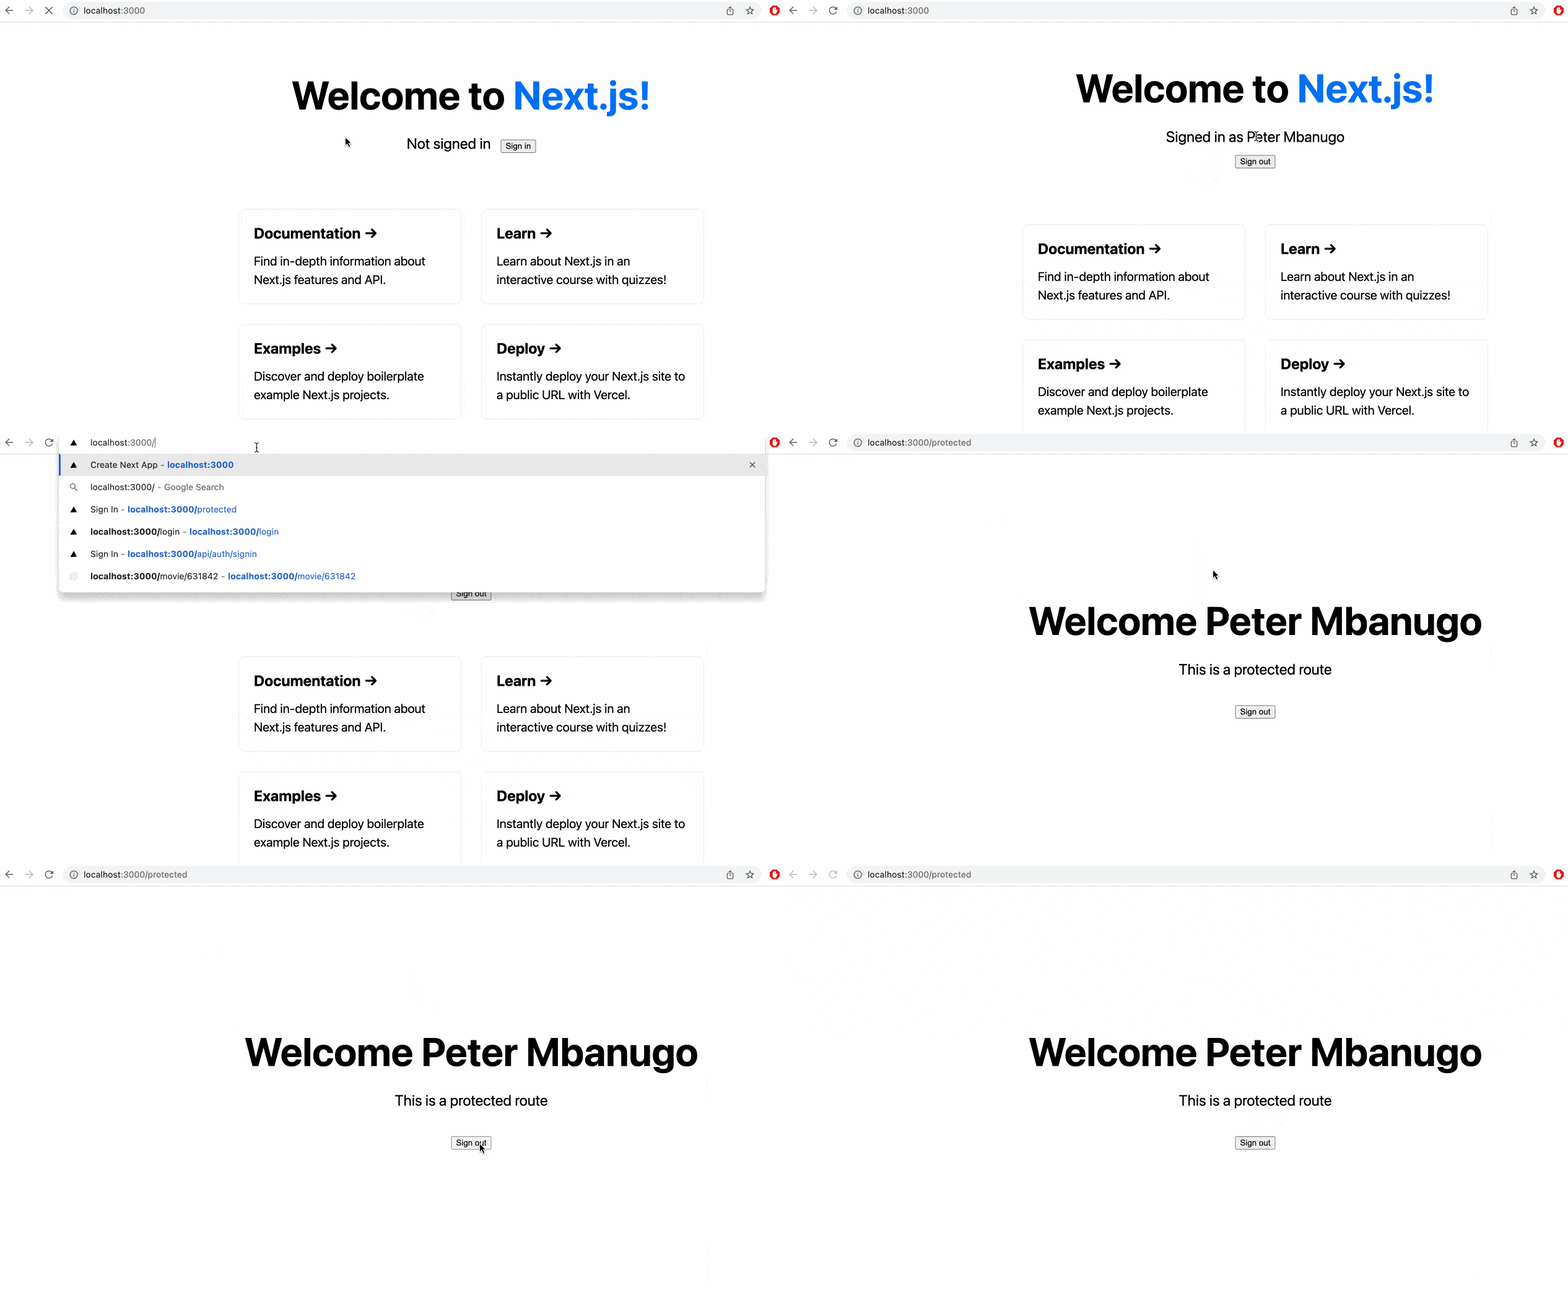
The Home page will greet a logged-in user and present them with a button to log out. For unauthenticated users, they’ll get a button to log in.
We have NextAuth.js configured, and a means to log in and out from the Home page. We can use the useSession hook you saw to check if a user is authenticated within the React components. Let me show you how to protect a page from the server side.
Adding a Protected Page
We will create a page that should only be accessible to authenticated users. For that, add a new file pages/protected.js and paste into it the code below.
import { authOptions } from "./api/auth/[...nextauth]";
import Image from "next/image";
import { getServerSession } from "next-auth/next";
import { signOut } from "next-auth/react";
import styles from "../styles/Home.module.css";

export async function getServerSideProps(context) {
  const session = await getServerSession(context.req, context.res, authOptions);

  if (!session) {
    return {
      redirect: {
        destination: "/api/auth/signin",
        permanent: false,
      },
    };
  }

  return {
    props: {
      user: session.user,
    },
  };
}

export default function Protected({ user }) {
  return (
    <div className={styles.container}>
      <main className={styles.main}>
        <h1 className={styles.title}>
          Welcome <b>{user.name}</b>
        </h1>

        <p className={styles.description}>This is a protected route</p>
        <p>
          <button onClick={() => signOut()}>Sign out</button>
        </p>
      </main>

      <footer className={styles.footer}>
        <a
          href="https://vercel.com?utm_source=create-next-app&utm_medium=default-template&utm_campaign=create-next-app"
          target="_blank"
          rel="noopener noreferrer"
        >
          Powered by{" "}
          <span className={styles.logo}>
            <Image src="/vercel.svg" alt="Vercel Logo" width={72} height={16} />
          </span>
        </a>
      </footer>
    </div>
  );
}
This page checks if the user is authenticated on the server side. It does this using the getServerSession() function. If they’re authenticated, the page is rendered with some basic user info and a logout button. Otherwise, they’re redirected to /api/auth/signin which is the built-in login page from NextAuth.
The built-in pages from NextAuth are used by default when none is configured. This tutorial uses the pages that come with NextAuth.js.
Demo
We have all the code we need, so let’s try out the app. Open your terminal and run npm run dev and open localhost:3000 in your browser.

There you have it! Users can sign in and out from the app, and you can retrieve their profile data from their session.
What About Error Authenticating with GitHub?
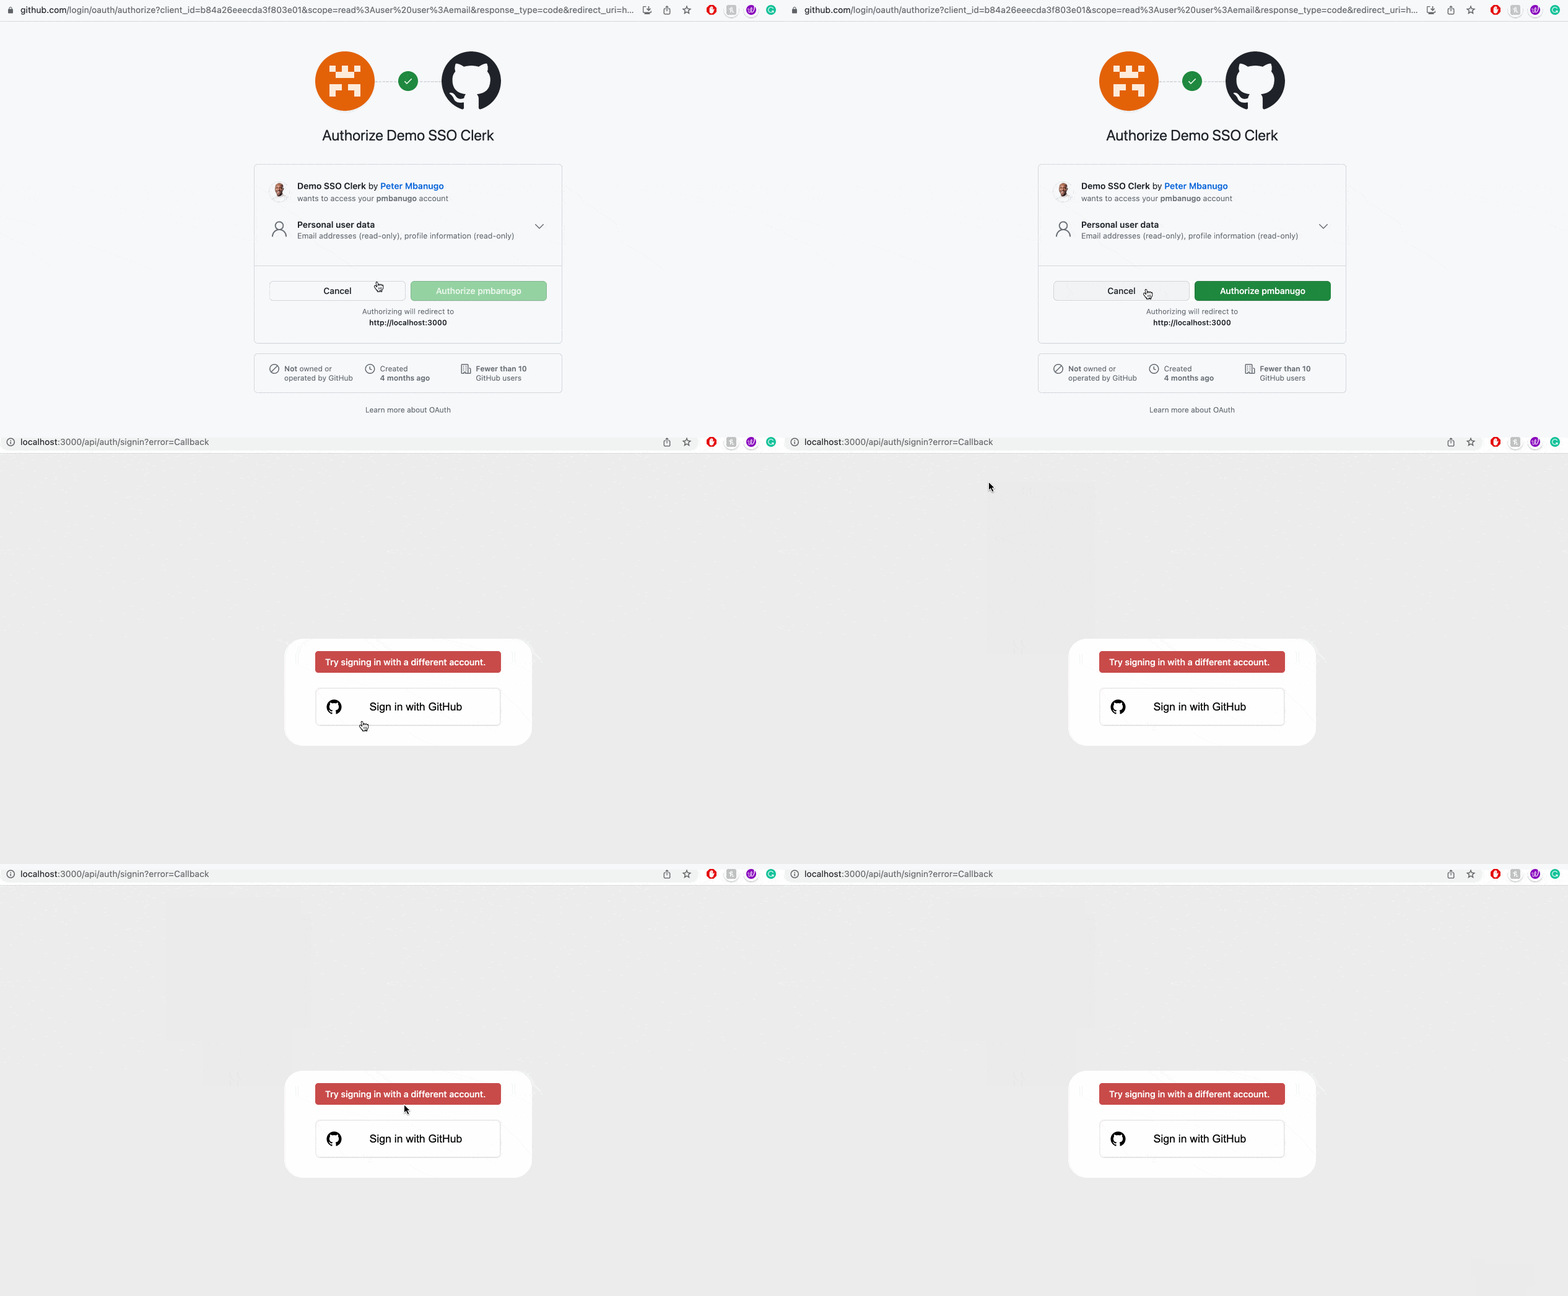
So what happens when the user doesn’t authorize your OAuth app to have access to their data?

As you can see from the recording above, the user is redirected to NextAuth’s default login page, with the error code passed in the query string as ?error=Callback. This page knows how to handle such a response. In this case, display an error message and ask the user to try with a different account.
For more info about the kinds of errors that get sent to the login page, see the NextAuth documentation.
Custom Auth Pages
We relied on the built-in pages from NextAuth for this article, but it’s possible to use your own pages and tell NextAuth the route to those pages. You can specify URLs to be used for the custom sign-in, sign out and error pages, in the pages options when instantiating the NextAuth object.
The NextAuth options would look like the following if you choose to use custom pages:
export const authOptions = {
  // Configure one or more authentication providers
  providers: [
    GithubProvider({
      clientId: process.env.GITHUB_ID,
      clientSecret: process.env.GITHUB_SECRET,
    }),
    // ...add more providers here
  ],
  // Pages specified will override the corresponding built-in page
  pages: {
    signIn: '/signin',
    signOut: '/signout',
    error: '/auth-error', // Error code passed in query string as ?error=
    }
};
See the documentation for the pages option for more information.
Wrap-up
Let’s go over what we covered in this article.
We built a Next.js app that uses GitHub to verify and authenticate users. For that, we created a GitHub OAuth app and used NextAuth.js to manage authentication requirements in the code.
We created an API route that handles the callback response from GitHub and also used the built-in pages from NextAuth.js for login. We briefly covered error handling and using custom pages as well.
Although we didn’t cover callbacks in NextAuth, you can use them to implement access controls without a database and to integrate with external databases or APIs. You can read more about them in the callbacks documentation.
You can find the code for the example on GitHub.

Peter Mbanugo
Peter is a software consultant, technical trainer and OSS contributor/maintainer with excellent interpersonal and motivational abilities to develop collaborative relationships among high-functioning teams. He focuses on cloud-native architectures, serverless, continuous deployment/delivery, and developer experience. You can follow him on Twitter.

