Using Biometric Identification in .NET MAUI

Summarize with AI:
Learn how to integrate biometric identification into your .NET MAUI applications.
Creating applications with enhanced security for the information they contain provides users with a safer experience. Common methods include facial or fingerprint identification, which verify the user’s identity before granting access. A prime example of this is banking applications. They require a high level of security and typically employ this kind of authentication.
Essentially, we can obtain a direct response about whether the fingerprint and facial recognition match the registered owner. It’s crucial to note that we don’t have access to this information, so it cannot be manipulated or modified. We only have the necessary information to grant access to the desired app.
In this article, you’ll learn how to implement biometric identification in .NET MAUI using Plugin.Maui.Biometric, in a straightforward manner.
Initial Setup
To correctly implement Biometric Identification, please follow these instructions:
1. Installation: First, make sure to install the Plugin.Maui.Biometric NuGet package.

2. Let’s proceed with adding some platform settings. To implement these, please follow the instructions provided below:
![]() On Android: We have two ways to do it. Let’s see:
On Android: We have two ways to do it. Let’s see:
A. Navigate to Platform ➖ Android ➖ AndroidManifest.cs ➖ Right click ➖ Source Code Editor and add the android.permission.USE_BIOMETRIC. This indicates that our application requires biometric authentication.
<uses-permission android:name="android.permission.USE_BIOMETRIC" />
B. Or just navigate to Platform ➖ Android ➖ AndroidManifest.cs➖ Double-click to open a graphical interface. Scroll down to the bottom and find the “Required Permissions” section. Write “biometric” in the search bar, and the “UseBiometric” permission will appear. Simply check the checkbox to apply that permission.
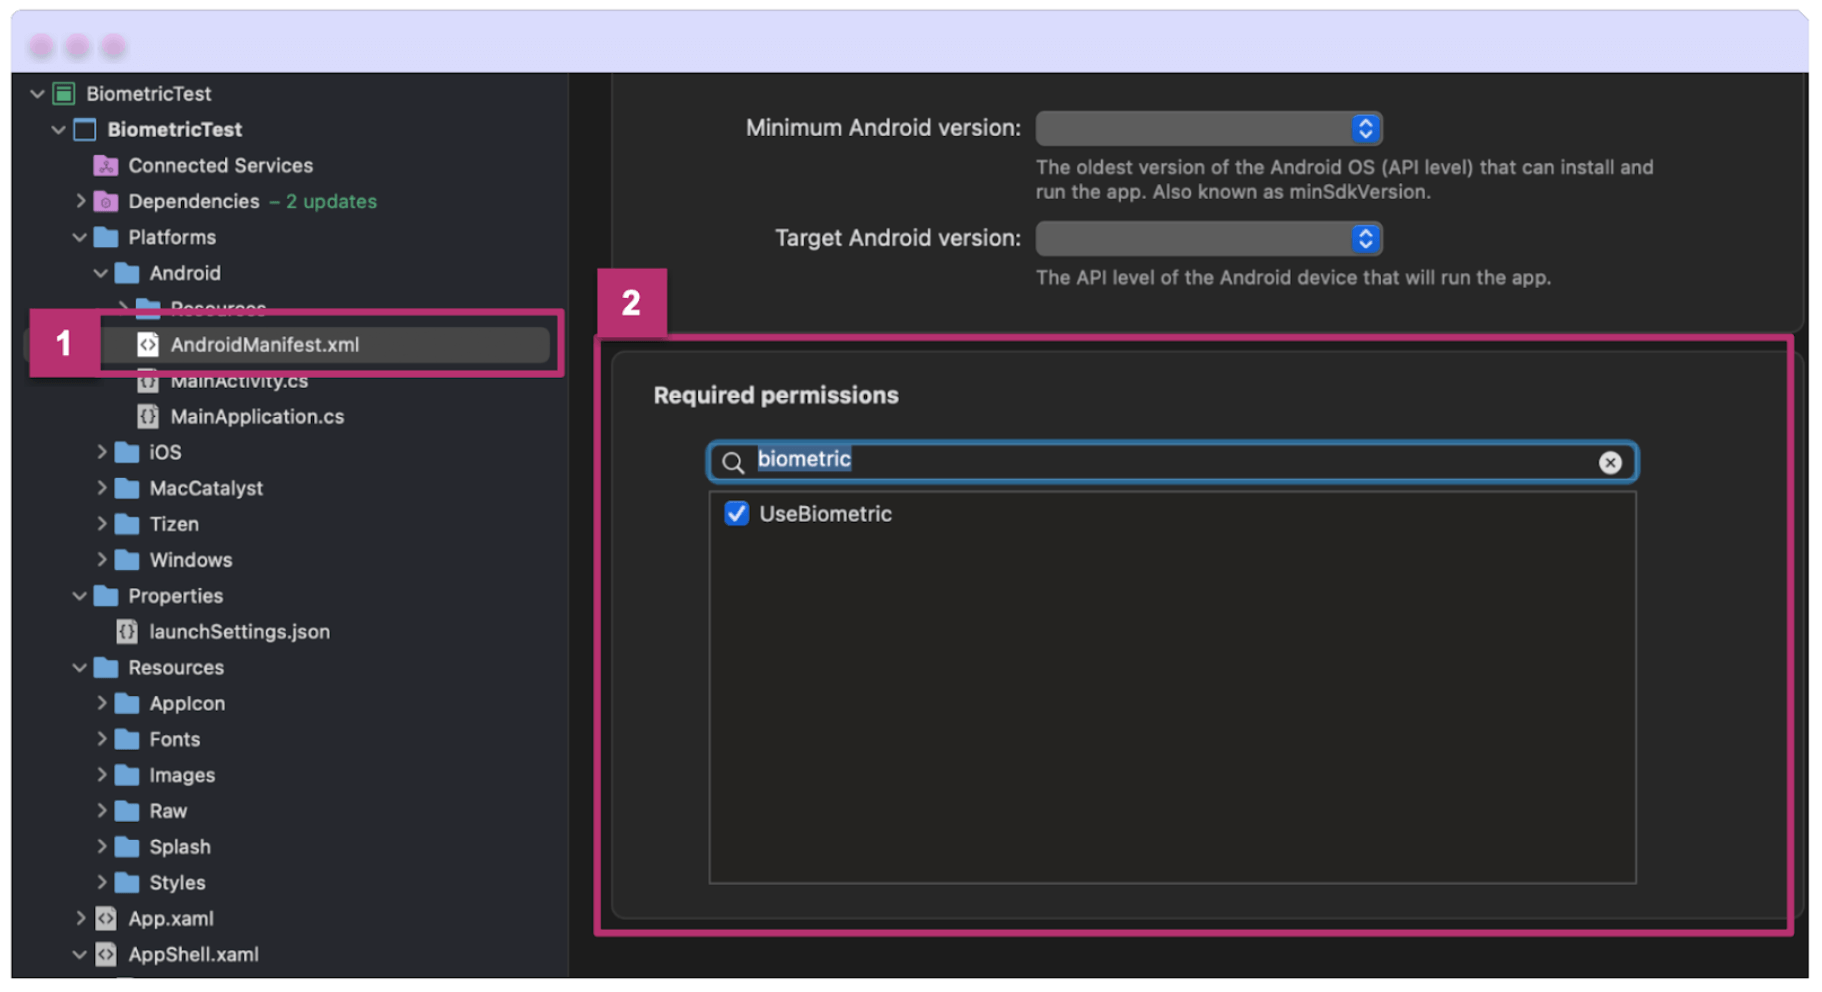
![]() On iOS: Navigate to Platform ➖ iOS ➖ Info.plist ➖ Double-click to open a graphical interface.
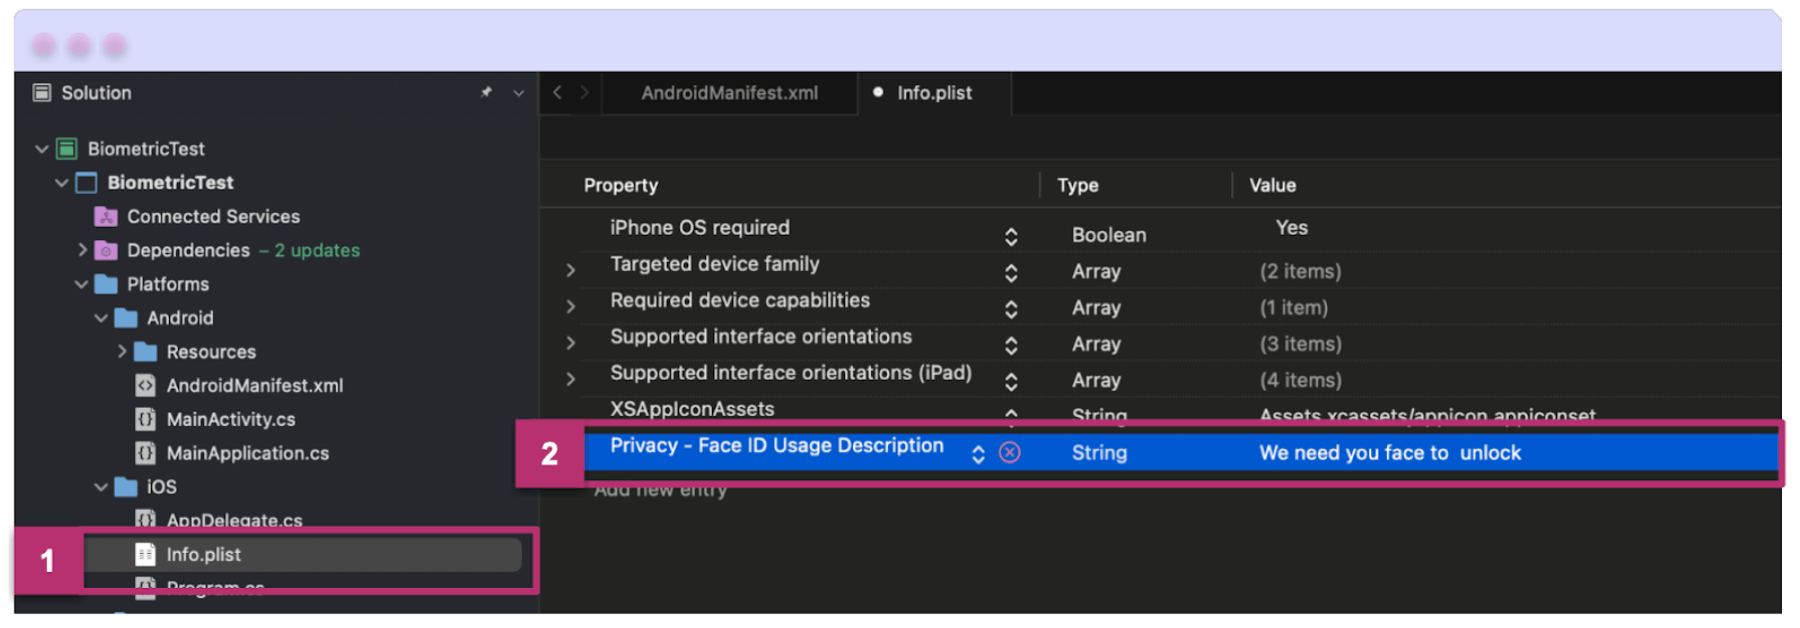
On iOS: Navigate to Platform ➖ iOS ➖ Info.plist ➖ Double-click to open a graphical interface.
- Add the NSFaceIDUsageDescription permission.
- Additionally, provide a description for the permission. For this example, use “We need your face to unlock” as the value. This description will explain to the user why the app needs this permission.
After completing these steps, “Privacy - Face ID Usage Description” permission will appear in the Info.plist, as depicted in the image below:
Let’s Start!
Let’s see two options to develop this project:
- The first involves implementing dependency injection.
- And the second involves using a static implementation.
Let’s start with an introduction on how to prepare the environment for dependency injection if you choose to proceed this way. We will then continue with the static implementation steps, which we will use to develop the explanatory example of this article.
Dependency Injection
1. Navigate to the MauiProgram.cs file and apply the following steps:
➖ At the beginning of this file, add the following:
using Plugin.Maui.Biometric;
➖ Let’s register the authentication service:
builder.Services.AddSingleton <IBiometric>
(BiometricAuthenticationService.Default);
2. Go to your MauiProgram.cs nad navigate to the page where the plugin was implemented. In this example, refer to MainPage.xaml.cs. In the page constructor, include “IBiometric biometric” as detailed below:
using Plugin.Maui.Biometric;
namespace BiometricTest;

public partial class MainPage : ContentPage
{

    public MainPage(IBiometric biometric)
    {
	    InitializeComponent();
    }
}
With this implementation, you only need to refer to the alias “biometric” that we added in the previous step, instead of directly using BiometricAuthenticationService.Default (the static implementation).
For example, you can do the following:
biomeetric.GetAuthenticationStatusAsync();
Now, you are ready to access the method or property that you need! 🚀
Static Implementation
In this case, you must use the prefix “BiometricAuthenticationService.Default” every time you access a method or property. For example:
BiometricAuthenticationService.Default.GetAuthenticationStatusAsync();
The AuthenticateAsync Method
We will concentrate on the AuthenticateAsync method, which is central to this API. I encourage you to explore other methods to gain a deeper understanding.
In this example, we’ll use the default project created by Visual Studio, which includes the OnCounterClicked method.
To begin, please convert this method as an asynchronous one, as shown below:
private async void OnCounterClicked(object sender, EventArgs e)
{

}
Now you will be able to see the steps and code that you must add within the OnCounterClicked method explained in detail. First let’s look at the definition of the elements that make it up.
Let’s get the authentication result.
Let’s use the AuthenticateAsync method to determine if the authentication was successful. It requires two parameters:
🔹 The authentication request: This allows us to specify details for the biometric authentication request. It has various properties such as Title, Description, Subtitle, Negative Text and more that I encourage you to explore directly. For this example, we will add the Title and the Negative Text.
🔹 CancellationToken: Propagates notification that operations should be canceled. The CancellationToken allows us to cancel an ongoing action based on certain scenarios that we establish in the code. For instance, if a user presses the authenticate button but does not verify their fingerprint or interact with the app for several seconds, we can assume that they no longer wish to proceed. We can then cancel that specific execution, similar to a timeout.
However, if you don’t want to use this functionality, you can disable the cancellation token by setting it to CancellationToken.None.
Here, we provide an example of a variable storing these results. Note that you must precede it with await.
var result = await BiometricAuthenticationService.Default.AuthenticateAsync(

new AuthenticationRequest()
{
    Title = "Biometric Request",
    NegativeText = "Cancel authentication"
    },
    CancellationToken.None
);

    //// The following code block goes here
}
Let’s check the authentication status. If the authentication is successful, the button will start counting the number of clicks. (Insert this code block exactly at the point where it is written, “The following code block goes here,” as indicated in the previous block.)
if (result.Status == BiometricResponseStatus.Success)
{
    count++;
    if (count == 1)
	    CounterBtn.Text = $"Clicked {count} time";
	    else
	    CounterBtn.Text = $"Clicked {count} times";
	    SemanticScreenReader.Announce(CounterBtn.Text);
} else {
    await DisplayAlert("Error", "Authentication failed.", "Ok");
}
✍️ We used the BiometricResponseStatus enum with the Success value for a satisfactory outcome. If you want to handle an unsatisfactory outcome, use the Failure value.
Our implementation is complete! Now, let’s learn how to test it using the Android emulator for the final step. 😍
Testing in an Android Emulator
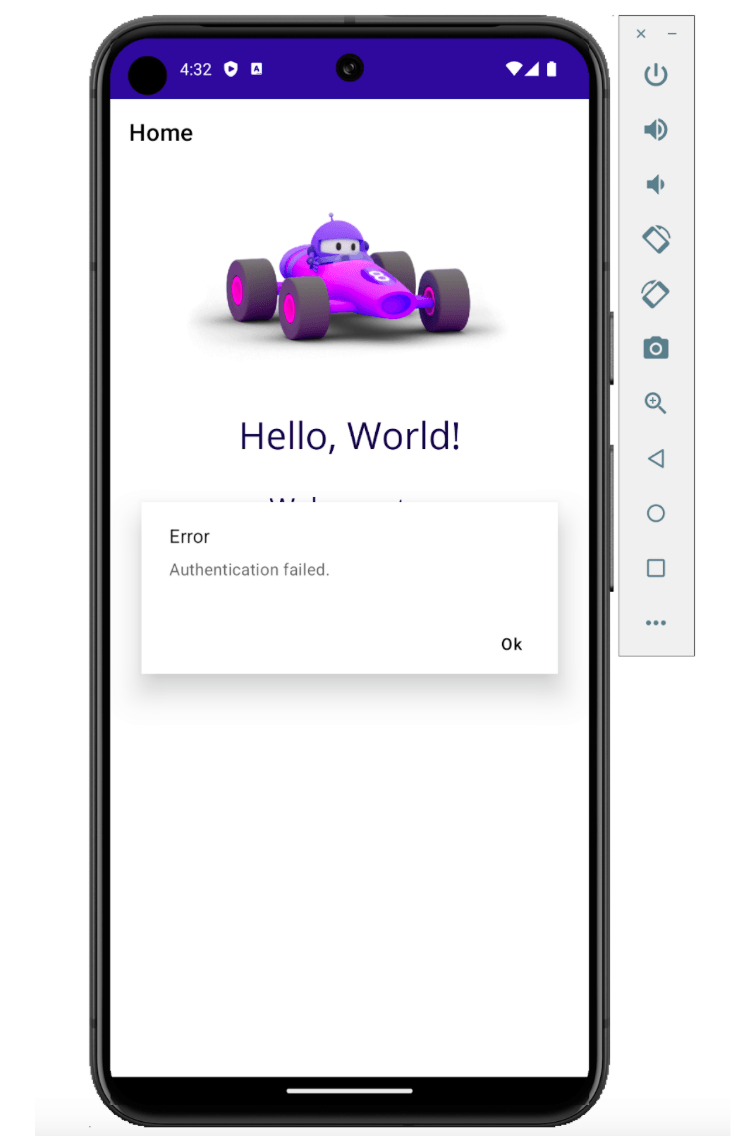
- If authentication fails, the sample app will display an error message as shown below:
Finally, let’s examine how to test the results upon successful authentication.
To do this, we need to configure a fingerprint in the emulator. Follow these steps:
Before we begin:
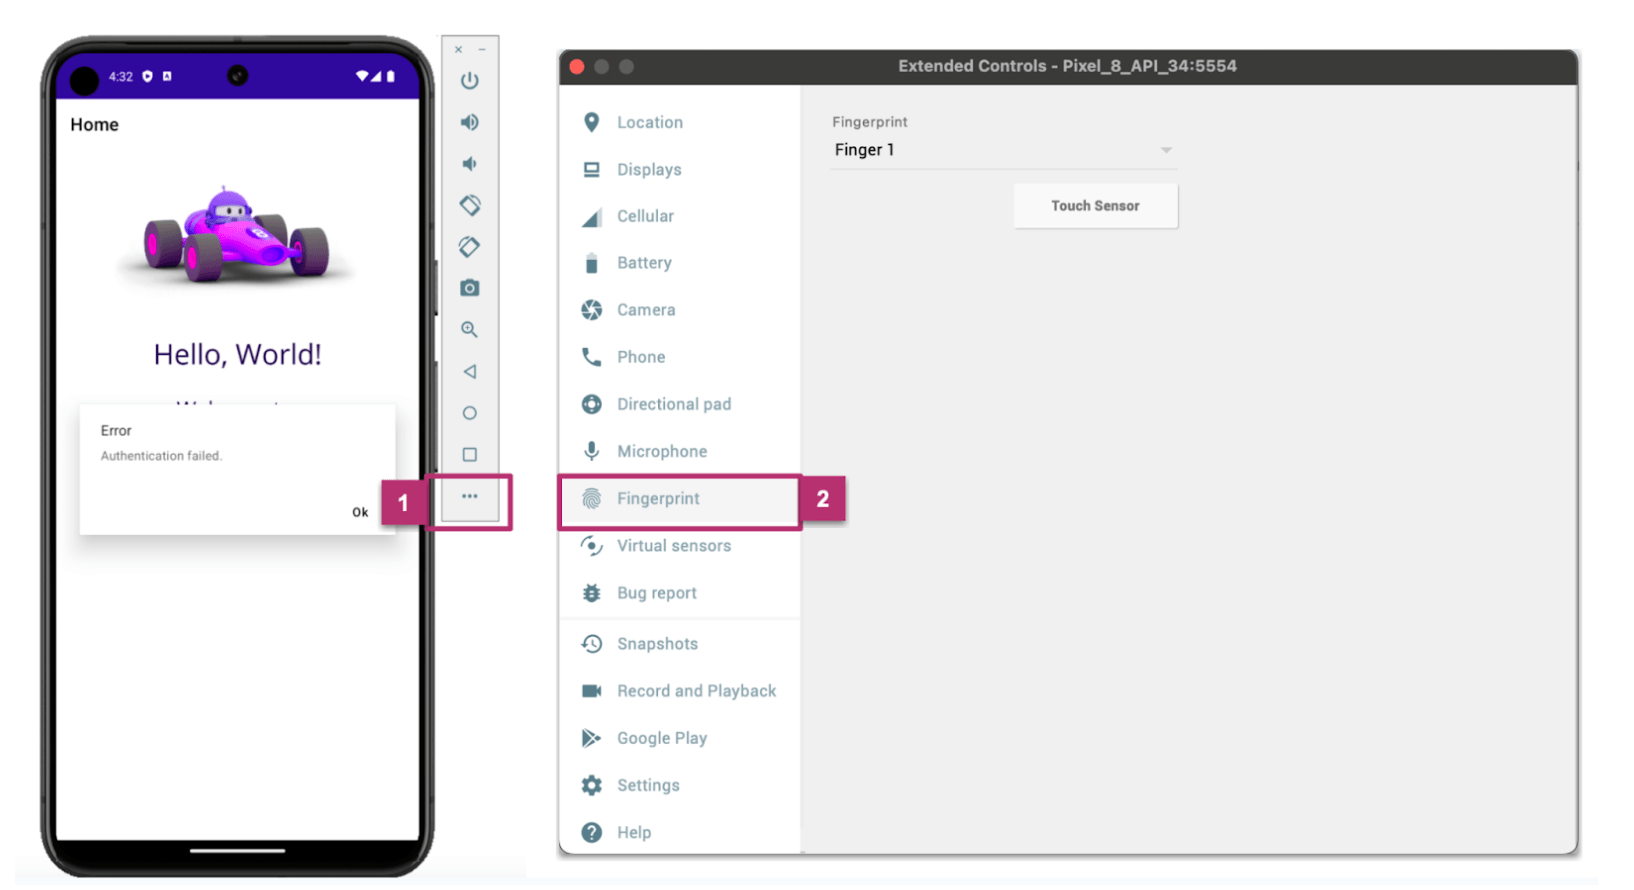
Locate the three dots on the right side of the emulator and click on them. This action will open a dialog box with several options. Find and select the FingerPrint option on the left side. Keep this dialog box open as we will need it later.
Let’s continue with the emulator:
- In your Emulator, close the app, then navigate to Settings ➡️ Type “fingerprint” in the search bar ➡️ This will bring up the Face & Fingerprint unlock option.
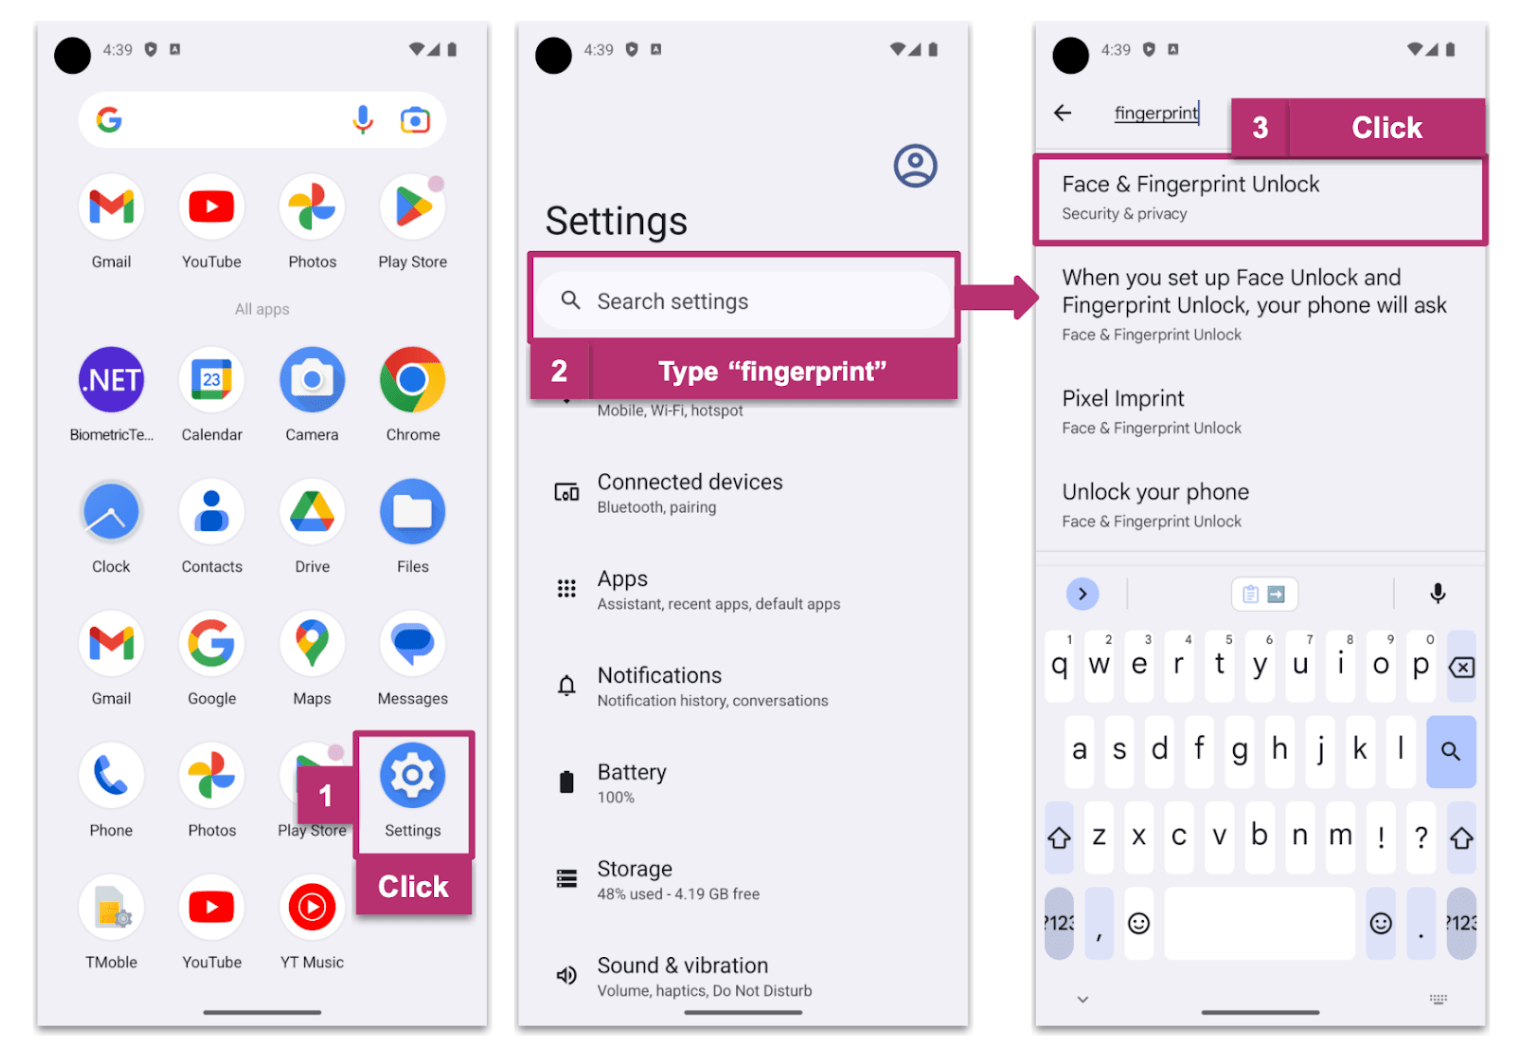
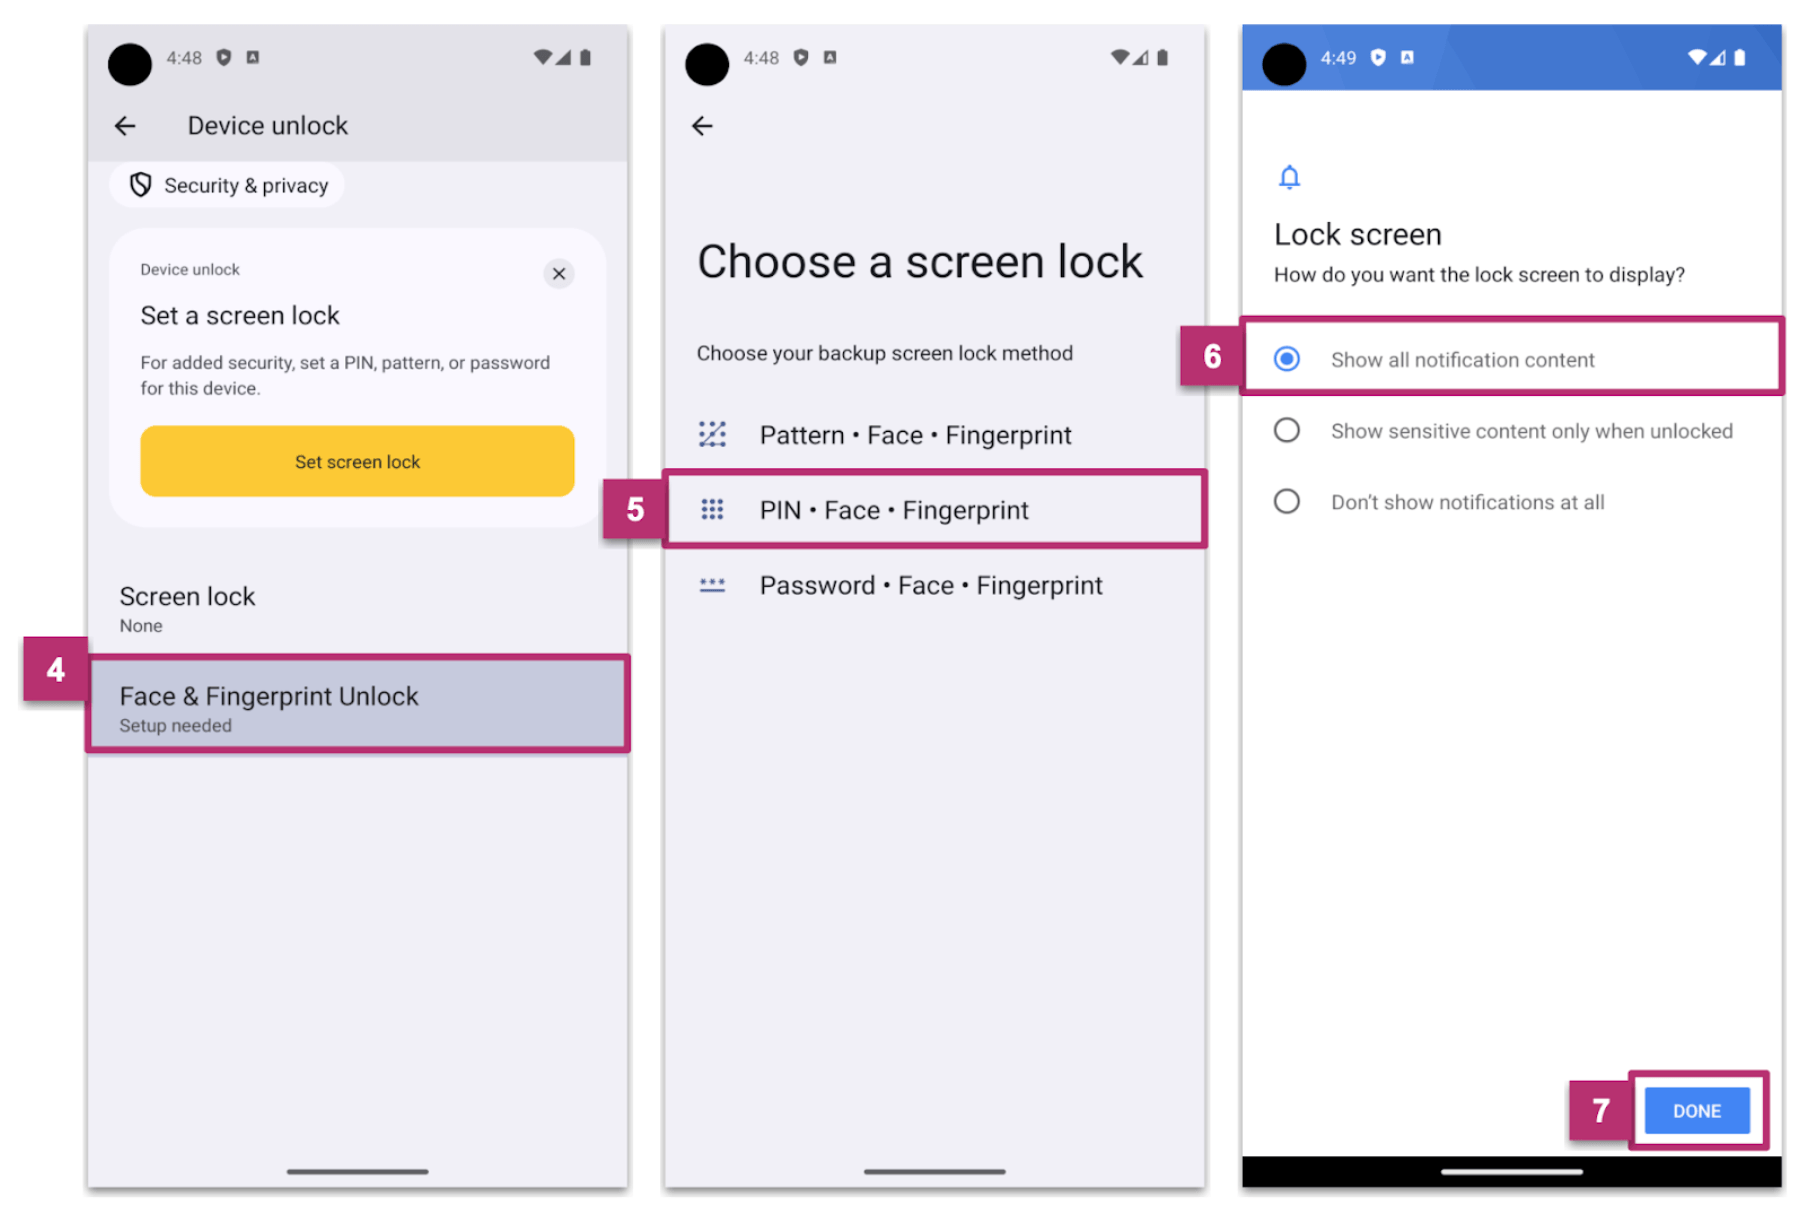
- To proceed, select Face & Fingerprint to unlock. Then navigate to PIN - Face - Fingerprint (we will use the PIN for this example), choose Show all notification content and click Done.
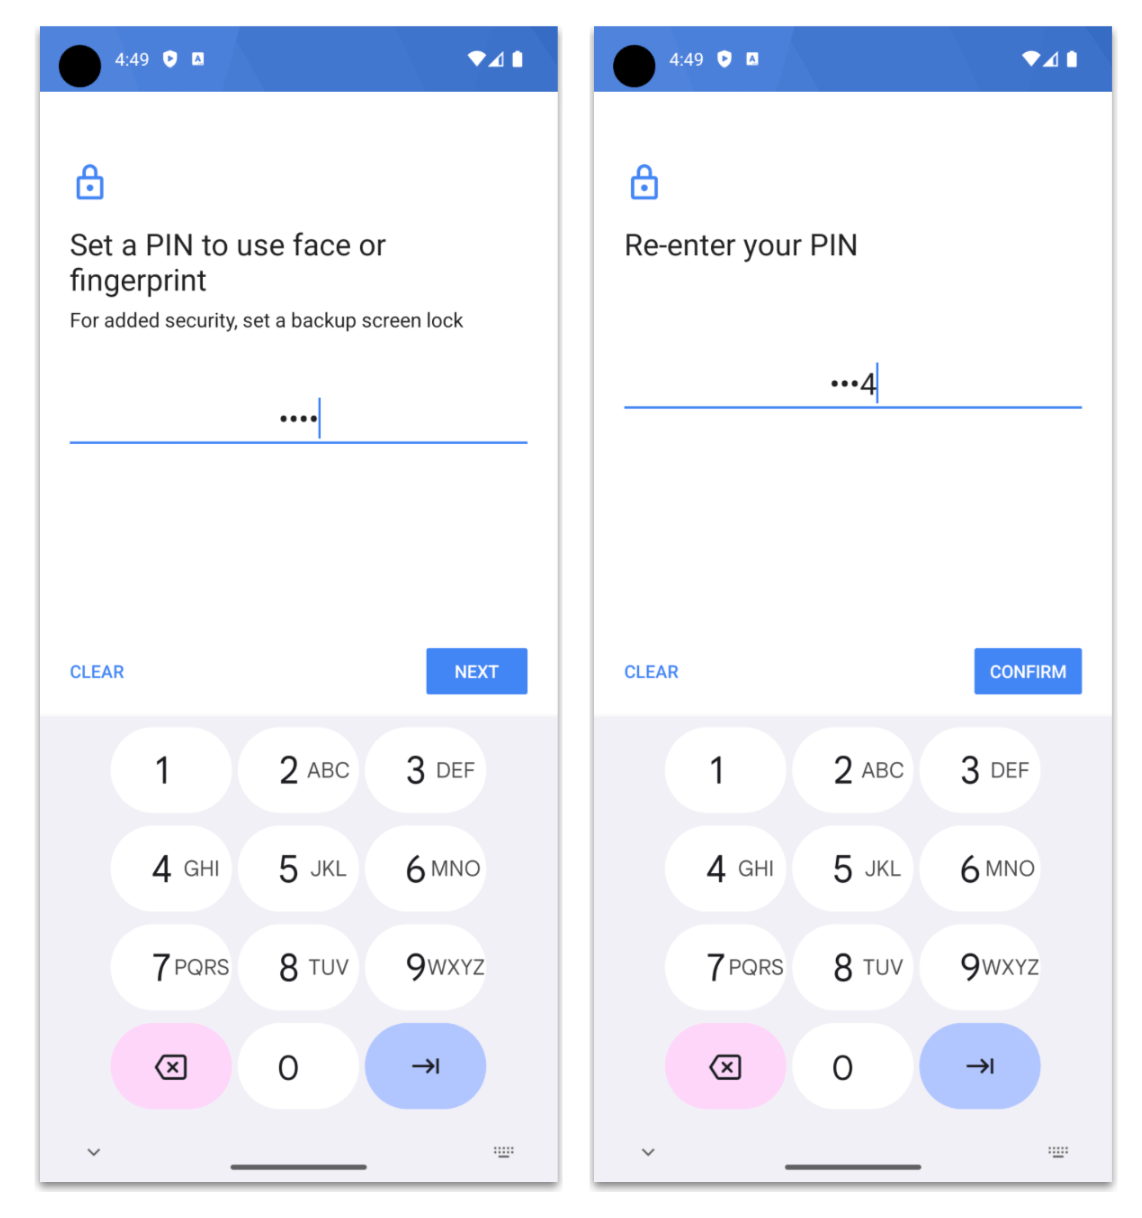
- It will ask you for a password, which you have to reconfirm.
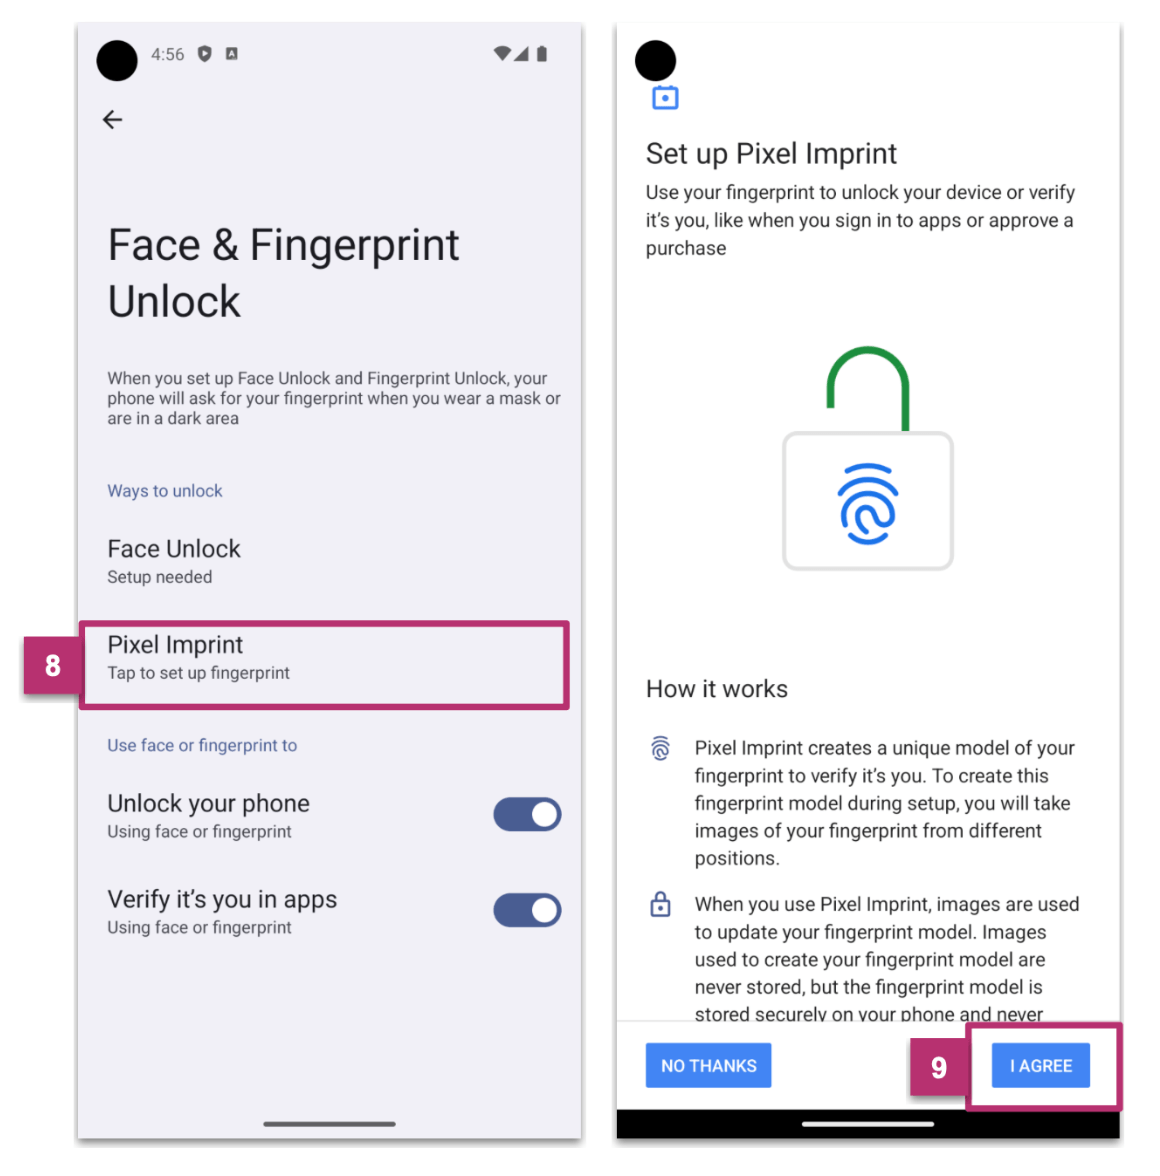
- Select the Pixel Imprint option. A message will appear which you need to scroll down through. Once you’ve reached the end, the button text will change to “I Agree.” Click on it.
- To input the data simulating the fingerprint, keep the current window open and also revisit the screen mentioned in the “Before we begin” section. (It’s the right screen displayed in the image.)
To store the test fingerprint, press the “Touch Sensor” button on the right screen.
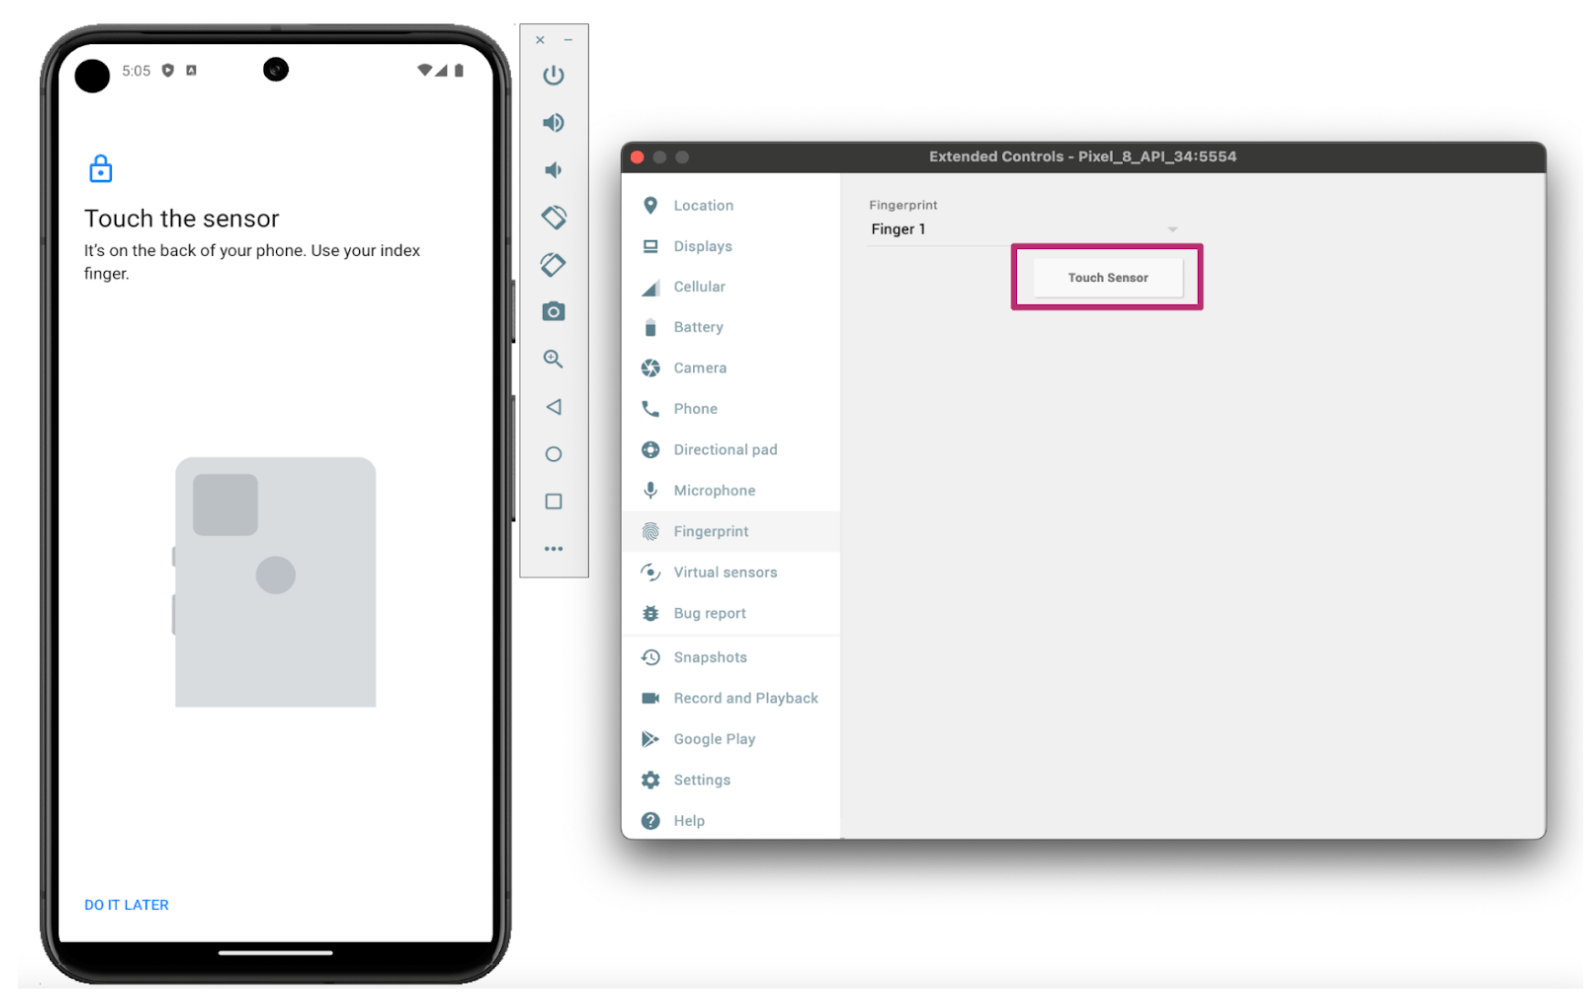
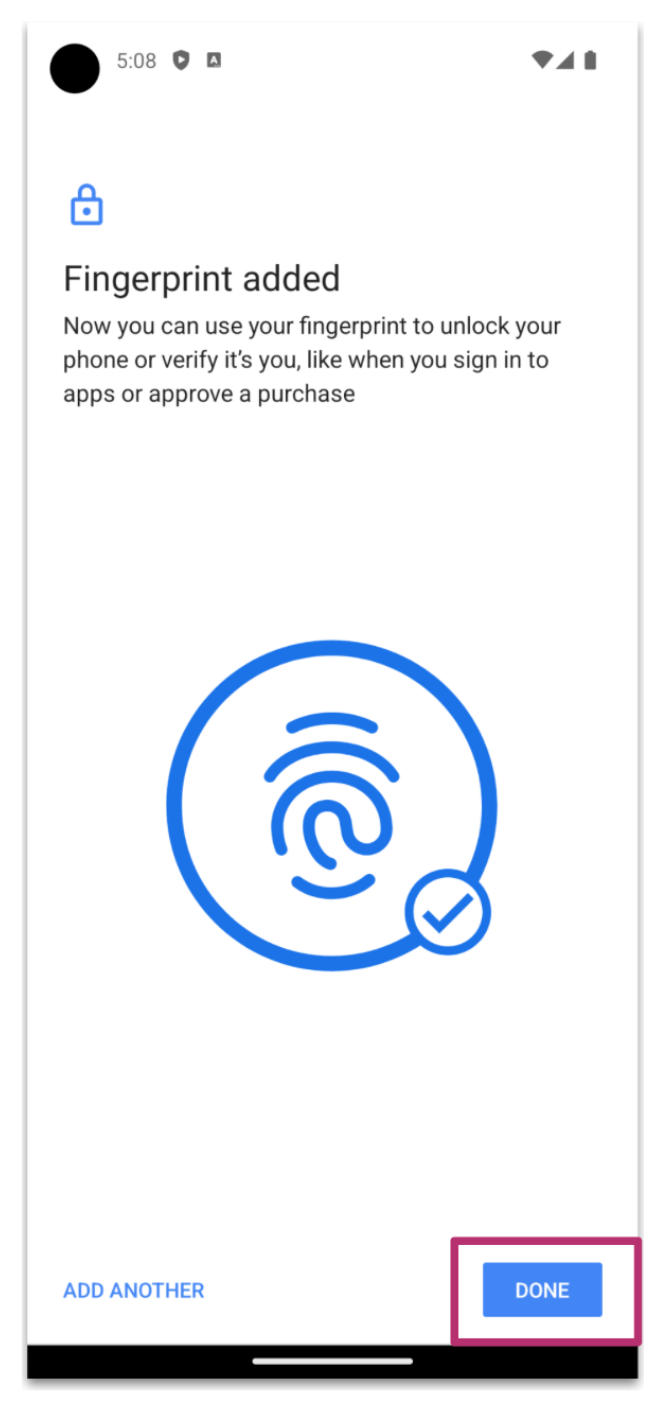
- Continue pressing the “Touch Sensor” button until the following screen appears. Once it does, simply hit the “Done” button.
Let’s Move to the App
The footprint has been configured! Now, let’s launch the example app again and give it a try!
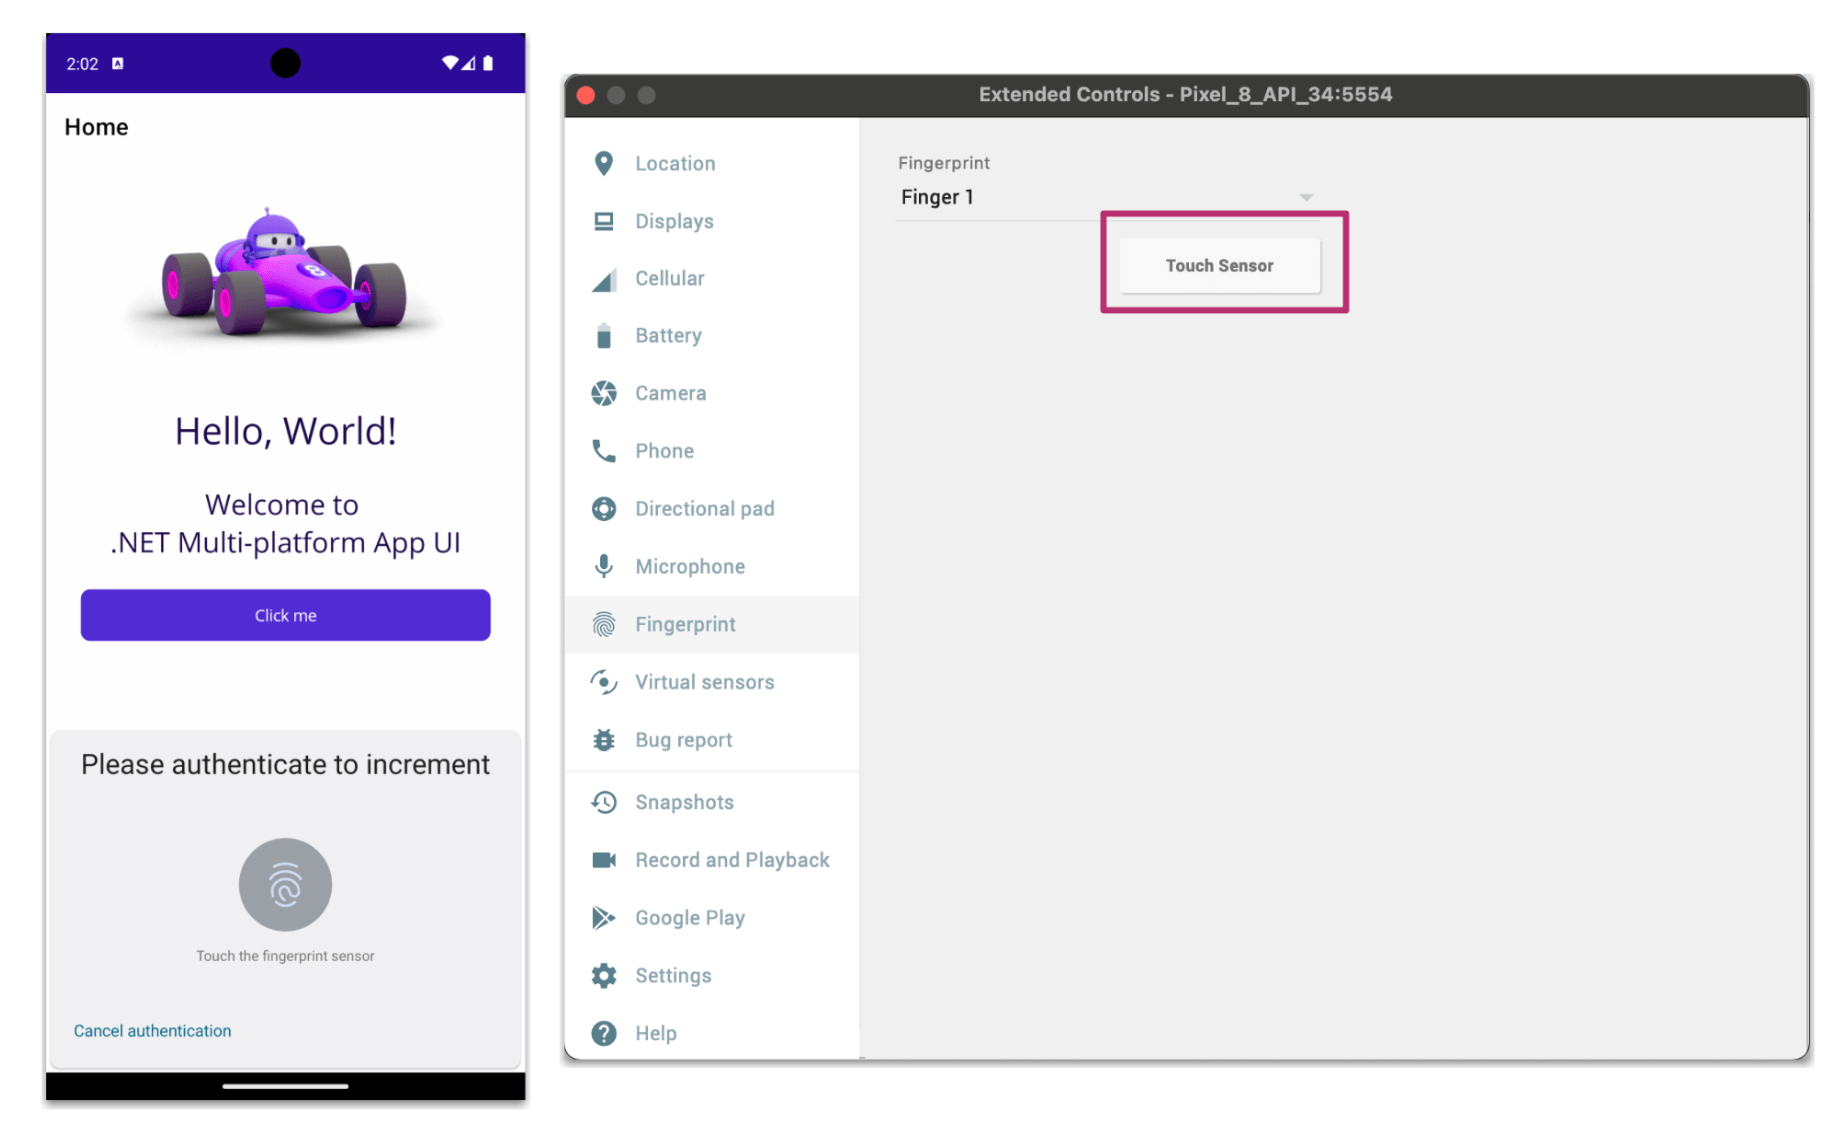
Now, when you click the button, a message prompting you to enter your fingerprint will appear. To simulate the fingerprint, simply press the button on the right image labeled “Touch Sensor.”
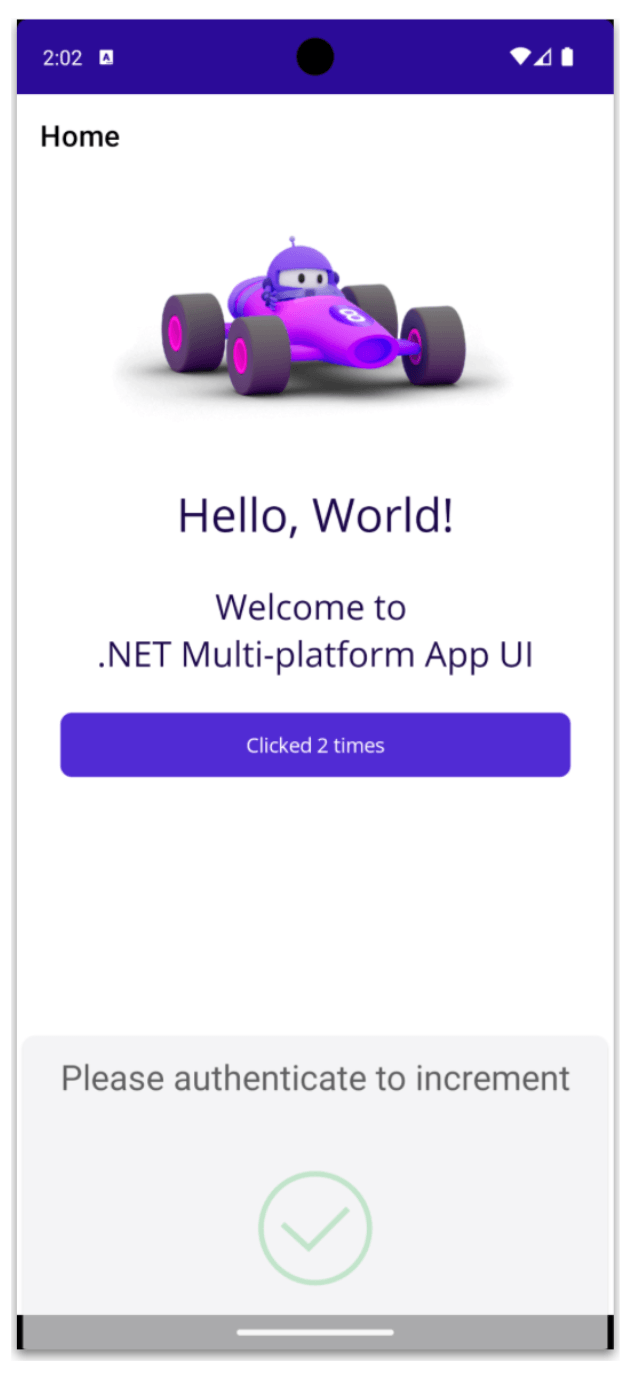
And finally, your fingerprint was successfully read, and the button achieved its goal of increasing the counter!
Wrap-up
Great, you’ve now learned how to integrate biometric identification into your .NET MAUI applications! I hope you’ll start using it in your future developments.
Thanks for reading, see you next time! 💚💕
🚫 Limitations
- Currently, it only supports Android and iOS.
References
This article was based on the official documentation:
And the Gerald Versluis video:

Leomaris Reyes
Leomaris Reyes is a Software Engineer from the Dominican Republic, with more than 5 years of experience. A Xamarin Certified Mobile Developer, she is also the founder of Stemelle, an entity that works with software developers, training and mentoring with a main goal of including women in Tech. Leomaris really loves learning new things! 💚💕 You can follow her: Twitter, LinkedIn , AskXammy and Medium.

