Real-Time Xamarin Apps

Summarize with AI:
We explore how to build SignalR powered real-time Xamarin mobile apps.
Modern software systems have an undeniable need for real-time communications - especially on mobile form factors. Thankfully, despite the hurdles, there are several techniques to enable real-time communications and polished frameworks that do much of the heavy lifting for developers. However, apps are not siloed to specific platforms, and as developers try to bring on newer platforms/devices to connect in real time, flexibility is key for technology stacks.
We previously explored SignalR on top of ASP.NET Core - one of the most popular real-time communication frameworks. The first step for incorporating real-time communications is to build the server backend. SignalR absolutely shines here with simple dependencies, pluggability, hosting and a flexible API model. It may be easy to hook up web clients to SignalR backend, but it is 2020 - a huge percentage of your user base is likely on mobile form factors. And real-time communications just have to light up within mobile apps.
Let's take a deep dive into how to build SignalR powered real-time apps with Xamarin. And yes, our chosen technology stack being Xamarin, we are building truly cross-platform mobile apps - with native UI, native API access and native performance. While it is obligatory to start with the classic chat apps to demonstrate real-time communications, let's explore more real-world scenarios with complex objects and polished UI.
This article is also a part of a long content series on Chasing Success with Xamarin Apps - we explore the Xamarin technology stack, tools and services that help developers build successful mobile apps. Let's go!
SignalR Chat Backend
SignalR facilitates adding real-time communication to web applications running on ASP.NET and connected clients across wide variety of platforms. While SignalR started years back with ASP.NET MVC, the latest reboot is called SignalR Core, which runs on ASP.NET Core and brings a ton of maturity.
Developers benefit from SignalR providing a uniform API canvas for connection and client management, as well as scaling to handle increased traffic. SignalR provides APIs for bidirectional remote procedure calls (RPCs) between server and client and abstracts away real-time communication complexities. Given a specific server/client pair, SignalR expertly chooses the best transport mechanism for real-time exchanges. The most common techniques used are: WebSockets, Server-Sent Events and Long Polling, in order of gracious fall-back plans.
SignalR uses the concept of Hubs on the server side - a literal hub in a hub-spoke model. The SignalR Hub works as an in-memory object on the server side that all clients connect up to for real time communications. The Hub allows SignalR to send and receive messages across machine boundaries, thus allowing clients to call methods on the server and vice versa.
In addition to method invocation across programming paradigms, hubs allows transport of named and strongly typed parameters - SignalR automatically provides object serialization/deserialization to aid the process. If we were building a real-time chat application, the first step would be to define a SignalR Hub - the backend that all clients can connect up to. Here's some sample code facilitating a SignalR Hub for chat communications:
using Microsoft.AspNetCore.SignalR;
using System.Threading.Tasks;

namespace SignalRChat.Hubs
{
    public class ChatHub : Hub
    {
        public async Task SendMessage(string user, string message)
        {
            await Clients.All.SendAsync("ReceiveMessage", user, message);
        }
    }
}
Essentially, the SignalR Hub defines a method called SendMessage() that all connected clients can call into and pass in parameters. The backend Hub then turns around and invokes a ReceiveMessage() method on every connected client - including the caller, and sends back the same parameters carrying chat dialogue. Hence, this ReceiveMessage() method needs to defined in every client platform that intends to connect up the SignalR Hub.
While building a SignalR powered web client isn't difficult, any users on mobile will likely demand a more native experience. Let's dive into supporting mobile app with a SignalR bacekend.
Xamarin Chat Client
Xamarin democratizes cross-platform mobile development for .NET developers - you get native apps from a single codebase supporting a variety of platforms. Xamarin.Forms makes it even easier, providing abstraction over not just shared C# code, but a common UI layer as well. At runtime, Xamarin.Forms renders platform-specific native UI, while maintaining native API access through C# code.
If we are to build a SignalR-powered real-time communications app for mobile form factors, Xamarin.Forms is a natural fit for .NET developers. A single mobile client with all shared code in a .NET Standard library just works across a wide variety of platforms - iOS, Android, Tizen & more. The shared UI layer in Xamarin.Forms is XAML - so let's create a new project and write the basics of a chat UI in our MainPage.xaml, like so:
<?xml version="1.0" encoding="utf-8"?>
<ContentPage xmlns="http://xamarin.com/schemas/2014/forms" xmlns:x="http://schemas.microsoft.com/winfx/2009/xaml"
               xmlns:d="http://xamarin.com/schemas/2014/forms/design" xmlns:mc="http://schemas.openxmlformats.org/markup-compatibility/2006"
               mc:Ignorable="d" x:Class="SignalRChatClient.MainPage">
    <StackLayout Orientation="Vertical" Margin="50">
        <Entry Placeholder="User" x:Name="UserName" />
        <Entry Placeholder="Message" x:Name="UserMessage" />
        <Button Text="Send Message" Clicked="ButtonSendEventHandler" />
        <Label x:Name="MessageHolder" />
    </StackLayout>
</ContentPage>
Essentially, we made a few placeholders in the visual tree for the user name, message, a button and a place to display chat messages. The first step towards integrating our Xamarin app with SignalR backend is to grab the client-side bits - the wonderful NuGet package Microsoft.AspNetCore.SignalR.Client. With references in place, we get access to SignalR artifacts & APIs - like the all-important HubConnection object to connect & work with the SignalR backend. Here's our C# code to work with the server-side SignalR ChatHub:
using System;
using System.Collections.Generic;
using System.ComponentModel;
using System.Linq;
using System.Text;
using System.Threading.Tasks;
using Xamarin.Forms;
using Microsoft.AspNetCore.SignalR.Client;

namespace SignalRChatClient
{
    public partial class MainPage : ContentPage
    {
        HubConnection hubConnection;

        public MainPage()
        {
            InitializeComponent();
            DoRealTimeSuff();
        }

        async private void DoRealTimeSuff()
        {
            SignalRChatSetup();
            await SignalRConnect();
        }

        private void SignalRChatSetup()
        {
            var ip = "localhost";
            hubConnection = new HubConnectionBuilder().WithUrl($"http://{ip}:5001/chatHub").Build();

            hubConnection.On<string, string>("ReceiveMessage", (user, message) =>
            {
                var receivedMessage = $"{user} says {message}";
                this.MessageHolder.Text += receivedMessage + "\n";
            });

        }

        async Task SignalRConnect()
        {
            try
            {
                await hubConnection.StartAsync();
            }
            catch (Exception ex)
            {
                // Connection failed. Fail graciously.
            }
        }

        private async void ButtonSendEventHandler (object sender, System.EventArgs e)
        {
            await SignalRSendMessage(this.UserName.Text, this.UserMessage.Text);
        }

        async Task SignalRSendMessage(string user, string message)
        {
            try
            {
                await hubConnection.InvokeAsync("SendMessage", user, message);
            }
            catch (Exception ex)
            {
                // Send failed. Fail graciously.
            }
        }
    }
}
A couple of fun things happen in the code above. The HubConnection provides a flexible set of APIs and we connect back to the SignalR Hub backend using HubConnectionBuilder().WithUrl().Build(). Notice that we're connecting back to localhost running on same machine as the SignalR backend and a specified ChatHub route off a port. This is important for SignalR Middleware in ASP.NET to route messages appropriately.
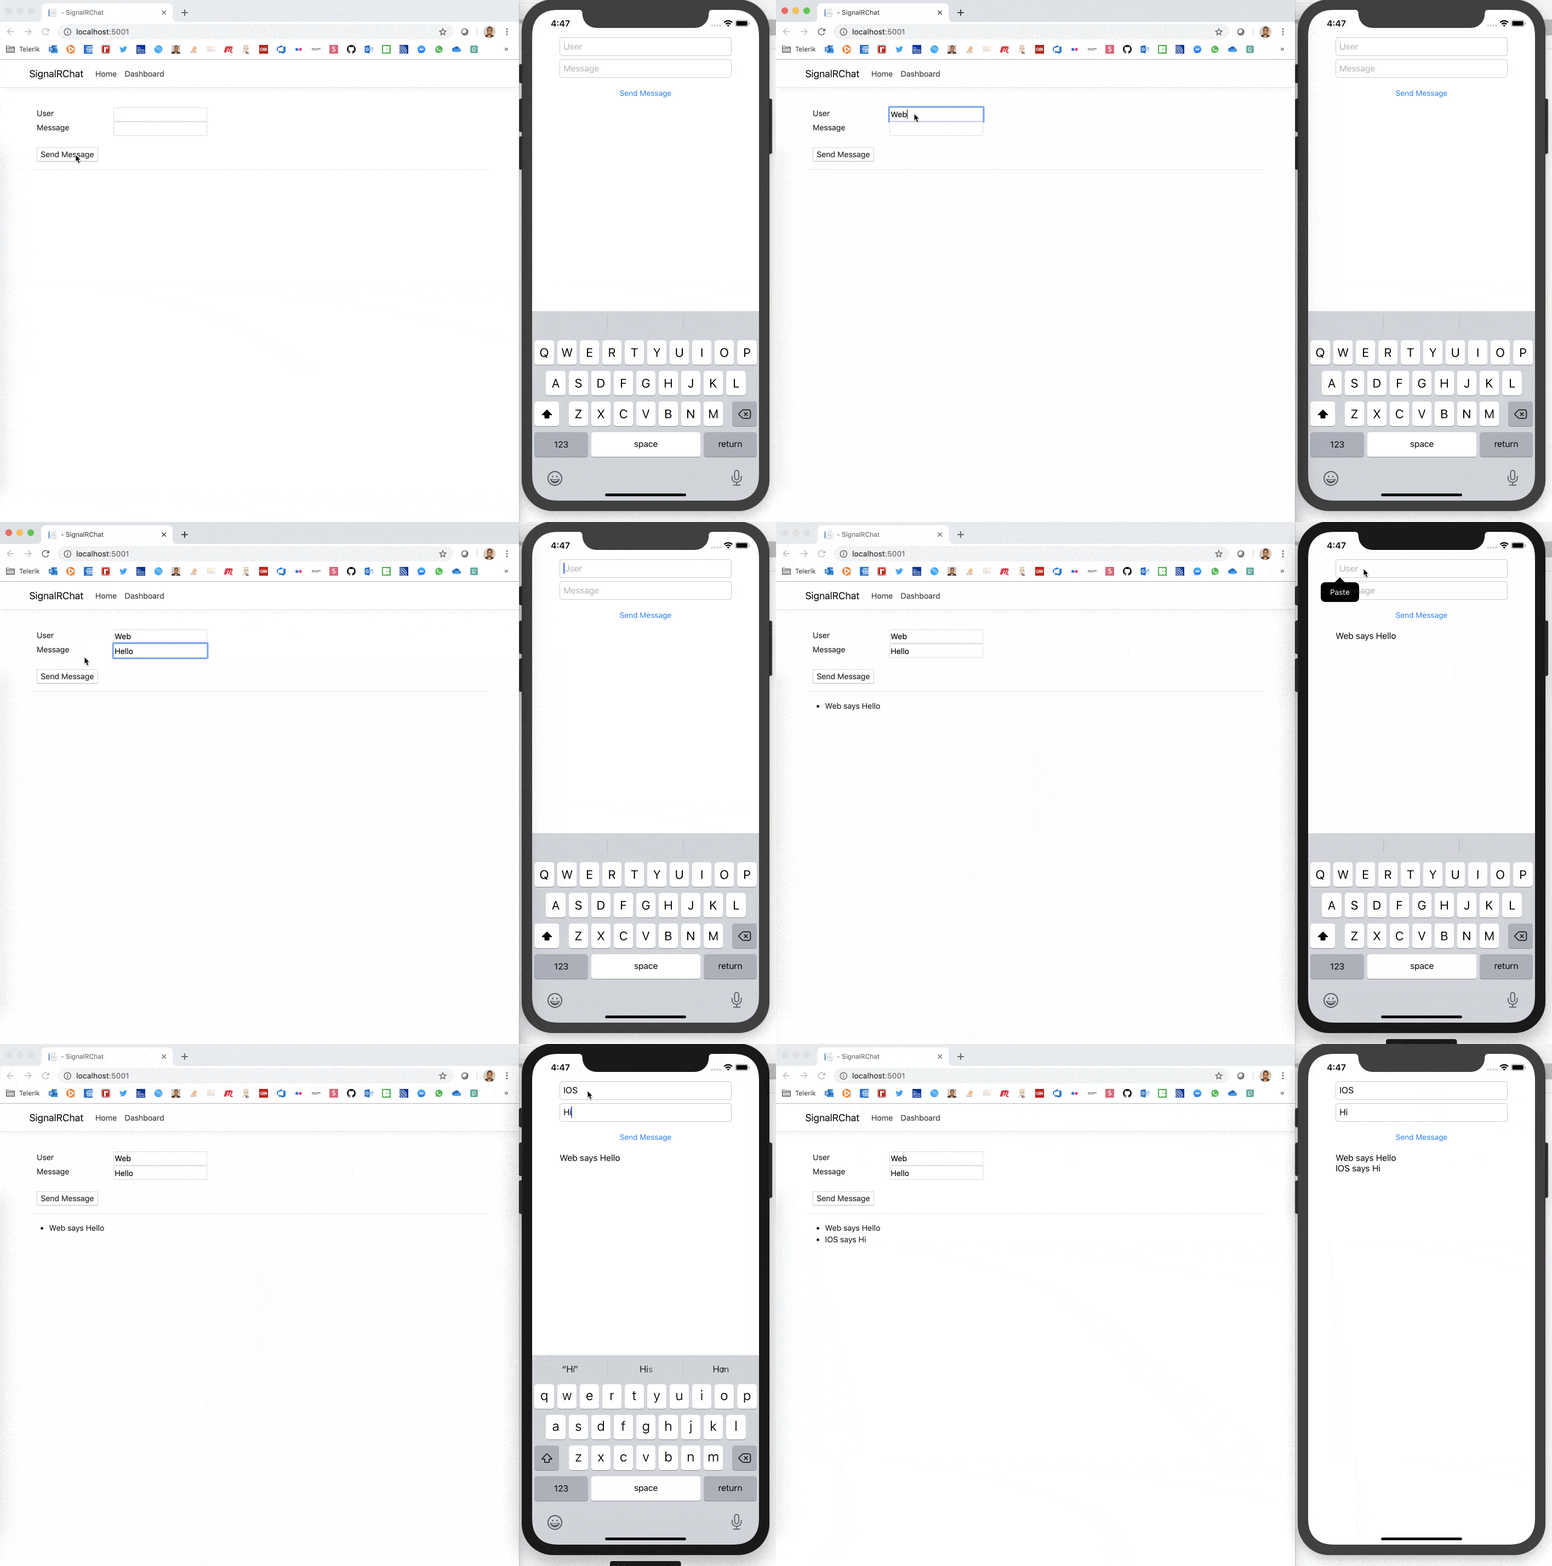
Given this is .NET client-side code, we get to use the Async-Await pattern to talk to SignalR backend without locking up the UI thread. Once connected to the SignalR Hub, we can invoke the SendMessage() method on the server and pass in what the user typed in from the Xamarin app. We also define the ReceiveMessage() method that the server gets to invoke to pass in chat messages and simply display them in our placeholder. All set? Let's fire up the SignalR backend and the Xamarin.Forms client together - simple real time chat working seamlessly between web & mobile!
Beyond Chat
Chat apps are the 'Hello World' for real-time communications. Sure you could be building the next amazing Chatroom/IRC/Messaging app, but more realistically, you are likely to get excited for what SignalR-powered apps can do for your enterprise workflows. Imagine your industry vertical having mobile apps for folks out on the field - wouldn't it be nice if server updates and data could be served up real-time? Let's step beyond Chat apps and build a dashboard-style app for mobile - connected to a SignalR backend.
SignalR Dashboard Backend
When you think of a dashboard, the first things to come to mind should be lots of data presented in grids/charts/graphs. Let's get our SignalR backend ready to serve up such data to connected clients - here's some server-side code:
using Microsoft.AspNetCore.SignalR;
using System.Text.Json.Serialization;
using System.Threading.Tasks;

namespace SignalRChat.Hubs
{
    public class DashboardHub : Hub
    {
        public async Task SendDashboardUpdate(string dashupdate)
        {
            await Clients.All.SendAsync("ReceiveDashUpdate", dashupdate);
        }

        public async Task SendObjectUpdate(GridData[] gridUpdate)
        {
            await Clients.All.SendAsync("ReceiveObjUpdate", gridUpdate);
        }
    }

    public class GridData
    {
        public string Category { get; set; }
        public int Value { get; set; }
    }
}
Essentially, we're defining a new SignalR Hub and pushing out two data variants from the SignalR server - a simple string/int to update a Gauge value and a POCO (Plain Old CLR Object) collection object to be displayed in a Grid. The SendDashboardUpdate() method pretty much grabs a value entered by the user from web client DOM and passes it along to all clients to update one value in a dashboard. The SendObjectUpdate() method deals with an array of GridData items - objects of a custom class type.
While simple, the point of passing around GridData[] is to showcase that SignalR Hubs can handle complex object types - serialization/deserialization of data over the wire is baked in. SignalR uses JSON serialization built into .NET by default, while configurability opens up options to use NewtonSoft.JSON or MessagePack for binary serialization/deserialization.
Having added a new DashboardHub to our SignalR backend, we could add a simple new Razor page to capture user inputs and hook up the web client to connect/work with the SignalR Hub. Here is some JS code:
"use strict";

var connection = new signalR.HubConnectionBuilder().withUrl("/dashboardHub").build();

connection.on("ReceiveDashUpdate", function (dashupdate) {
    var encodedMsg = "Dash Update: " + dashupdate;
    var li = document.createElement("li");
    li.textContent = encodedMsg;
    document.getElementById("dashUpdateList").appendChild(li);
});

document.getElementById("sendDashButton").addEventListener("click", function (event) {
    var gaugeupdate = document.getElementById("gaugeValue").value;
    connection.invoke("SendDashboardUpdate", gaugeupdate).catch(function (err) {
        return console.error(err.toString());
    });
    event.preventDefault();
});

document.getElementById("sendObjButton").addEventListener("click", function (event) {
    var griddata = [{ "category": "A", "value": 5 }, { "category": "B", "value": 10 }];
    connection.invoke("SendObjectUpdate", griddata).catch(function (err) {
        return console.error(err.toString());
    });
    event.preventDefault();
});
You can see we're setting up the web client to connect to the DashboardHub. The click-handler for a button invokes the SendDashboardUpdate() method on server - and passes along the proposed Gauge value entered by user. Another button-click handler invokes the SendObjectUpdate() SignalR server method, this time passing along a hard-coded array of key-value pairs. This could be pretty much be any JSON data or collection of objects, as long as the parameters match what the server is expecting.
If you are not happy with magic strings or dread runtime errors, another alternative SignalR offers is strongly typed Hubs. With a flexible API canvas, you can use Hub<T> and essentially abstract out client methods to implement Interfaces. This allows compile-time matching of client methods/parameters.
Xamarin Dashboard Client
With our SignalR backend Hub all set to push out complex data, let's turn to the cross-platform Xamarin mobile client. Envision a dashboard on a mobile app - you want to push real-time data from the server and want to light up content with fancy UI. Various charts, graphs and grid are almost synonymous with dashboard apps. Now, we could build our dashboard UI by hand - it's just painstaking, time consuming, not pixel perfect and lacking the guarantee of being performant.
A better option may be to pick up some polished UI for data visualization - enter Telerik UI for Xamarin, a comprehensive suite of sharp, performant cross-platform UI components for all Xamarin apps. It is pretty easy to integrate Telerik UI in your Xamarin projects - download/reference DLL(s) or pull in NuGet packages. Care is taken to do tree-shaking - the app package has only the UI you use and any corresponding dependencies. And Telerik UI for Xamarin has two enterprise-grade UI controls that are perfect for our proposed mobile app dashboard: a RadialGauge & a DataGrid. So let's create a new XAML page and add some markup, like so:
<?xml version="1.0" encoding="UTF-8"?>
<ContentPage xmlns="http://xamarin.com/schemas/2014/forms"
             xmlns:x="http://schemas.microsoft.com/winfx/2009/xaml"
             x:Class="SignalRChatClient.Dashboard"
             xmlns:d="http://xamarin.com/schemas/2014/forms/design"
             xmlns:mc="http://schemas.openxmlformats.org/markup-compatibility/2006"
             mc:Ignorable="d"
             xmlns:local="clr-namespace:SignalRChatClient"
             xmlns:telerikCommon="clr-namespace:Telerik.XamarinForms.Common;assembly=Telerik.XamarinForms.Common"
             xmlns:telerikGauges="clr-namespace:Telerik.XamarinForms.DataVisualization.Gauges;assembly=Telerik.XamarinForms.DataVisualization"
             xmlns:telerikDataGrid="clr-namespace:Telerik.XamarinForms.DataGrid;assembly=Telerik.XamarinForms.DataGrid">

    <d:ContentPage.BindingContext>
        <local:DummyViewModel/>
    </d:ContentPage.BindingContext>

    <ContentPage.Content>
        <StackLayout>
            <telerikGauges:RadRadialGauge x:Name="gauge" VerticalOptions="FillAndExpand">
                <telerikGauges:RadRadialGauge.Axis>
                    <telerikGauges:GaugeLinearAxis Maximum="200"
                                                   Minimum="0"
                                                   Step="25" />
                </telerikGauges:RadRadialGauge.Axis>
                <telerikGauges:RadRadialGauge.Indicators>
                    <telerikGauges:GaugeNeedleIndicator Offset="30" Value="{Binding GaugeValue}" />
                    <telerikGauges:GaugeShapeIndicator Value="80" />
                </telerikGauges:RadRadialGauge.Indicators>
                <telerikGauges:RadRadialGauge.Ranges>
                    <telerikGauges:GaugeRangesDefinition>
                        <telerikGauges:GaugeRange Color="Green"
                                                  From="0"
                                                  To="150" />
                        <telerikGauges:GaugeGradientRange From="150" To="200">
                            <telerikCommon:RadGradientStop Offset="150" Color="Yellow" />
                            <telerikCommon:RadGradientStop Offset="200" Color="Red" />
                        </telerikGauges:GaugeGradientRange>
                    </telerikGauges:GaugeRangesDefinition>
                </telerikGauges:RadRadialGauge.Ranges>
            </telerikGauges:RadRadialGauge>
            <telerikDataGrid:RadDataGrid x:Name="DataGrid" VerticalOptions="FillAndExpand"/>
        </StackLayout>
    </ContentPage.Content>
</ContentPage>
There are a few interesting things going on in the code above. For one, please watch the namespaces - they are needed for data visualization UI and very clearly documented. We're essentially defining a vertical UI stack and adding two things to it - the Telerik RadRadialGauge & RadDataGrid. The local code-behind file is hooked up for use - it is destined to have a DummyViewModel to be used in data binding. Here's some C# code to set up our UI:
namespace SignalRChatClient
{
    public partial class Dashboard : ContentPage
    {
        DummyViewModel vm = new DummyViewModel();

        public Dashboard()
        {
            InitializeComponent();
            BindingContext = vm;
            this.DataGrid.ItemsSource = vm.GridValues;
        }
    }

    public class DummyViewModel
    {
        public int GaugeValue { get; set; }
        public List<GridData> GridValues { get; set; }

        public DummyViewModel()
        {
            this.GaugeValue = 0;

            this.GridValues = new List<GridData> {
                                new GridData { Category = "A", Value = 20 },
                                new GridData { Category = "B", Value = 30 }
                                };
        }
    }

    public class GridData
    {
        public string Category { get; set; }
        public int Value { get; set; }
    }
}
As is evident, we defined a fake View Model in the spirit of the MVVM pattern that works really well for C#/XAML projects. The DummyViewModel exposes properties that can be used for UI data binding - in particular, the GaugeValue that is dynamically bound to the Value of GaugeNeedleIndicator in our Telerik RadialGauge. And the DummyViewModel also hosts an array of objects of the custom type GridData, which is fed as an ItemsSource to the data grid. And your observation is right - this matches the kind of JSON-serialized object collection we expect from the SignalR Hub.
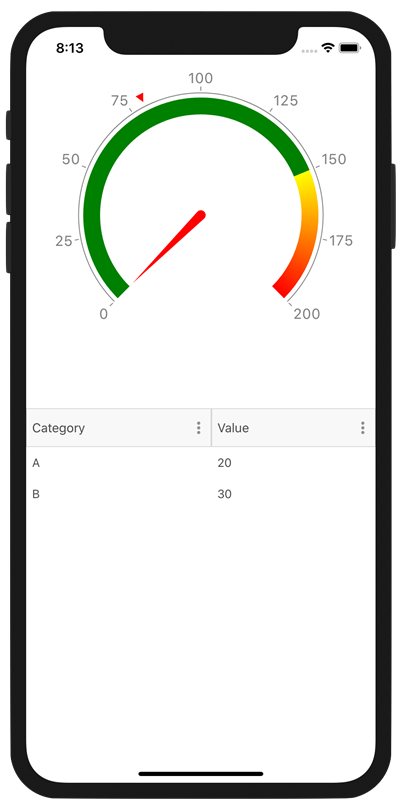
While we match custom types on the server and client side to dehydrate/rehydrate objects, a more efficient way would be to abstract out business data entities into a .NET Standard type library - and share it with the SignalR Hub and any connected clients. If we run our Xamarin app as is, the DummyViewModel provides initialized data to the bound dashboard UI, like so:
Now let's write the fun code of connecting our Xamarin client to the SignalR DashboardHub - here's the full C# code:
using System;
using System.Collections.Generic;
using System.ComponentModel;
using System.Linq;
using System.Text;
using System.Threading.Tasks;
using Xamarin.Forms;
using Microsoft.AspNetCore.SignalR.Client;
using Telerik.XamarinForms.DataVisualization.Gauges;
using System.Collections.ObjectModel;

namespace SignalRChatClient
{
    public partial class Dashboard : ContentPage
    {
        HubConnection hubConnection;
        DummyViewModel vm = new DummyViewModel();

        public Dashboard()
        {
            InitializeComponent();
            BindingContext = vm;
            this.DataGrid.ItemsSource = vm.GridValues;
            DoRealTimeSuff();
        }

        async private void DoRealTimeSuff()
        {
            SignalRDashSyncSetup();
            await SignalRConnect();
        }

        private void SignalRDashSyncSetup()
        {
            var ip = "localhost";
            hubConnection = new HubConnectionBuilder().WithUrl($"http://{ip}:5001/dashboardHub").Build();

            hubConnection.On<string>("ReceiveDashUpdate", (dashupdate) =>
            {
                var receivedDashUpdate = dashupdate;
                ((GaugeNeedleIndicator)this.gauge.Indicators[0]).Value = Int32.Parse(dashupdate);
            });

            hubConnection.On<GridData[]>("ReceiveObjUpdate", (gridUpdate) =>
            {
                var receivedChartUpdate = gridUpdate;
                this.DataGrid.ItemsSource = gridUpdate;
            });

        }

        async Task SignalRConnect()
        {
            try
            {
                await hubConnection.StartAsync();
            }
            catch (Exception ex)
            {
                // Connection failed.
            }
        }

    }

    public class DummyViewModel
    {
        public int GaugeValue { get; set; }
        public List<GridData> GridValues { get; set; }

        public DummyViewModel()
        {
            this.GaugeValue = 0;

            this.GridValues = new List<GridData> {
                                new GridData { Category = "A", Value = 20 },
                                new GridData { Category = "B", Value = 30 }
                                };
        }
    }

    public class GridData
    {
        public string Category { get; set; }
        public int Value { get; set; }
    }
}
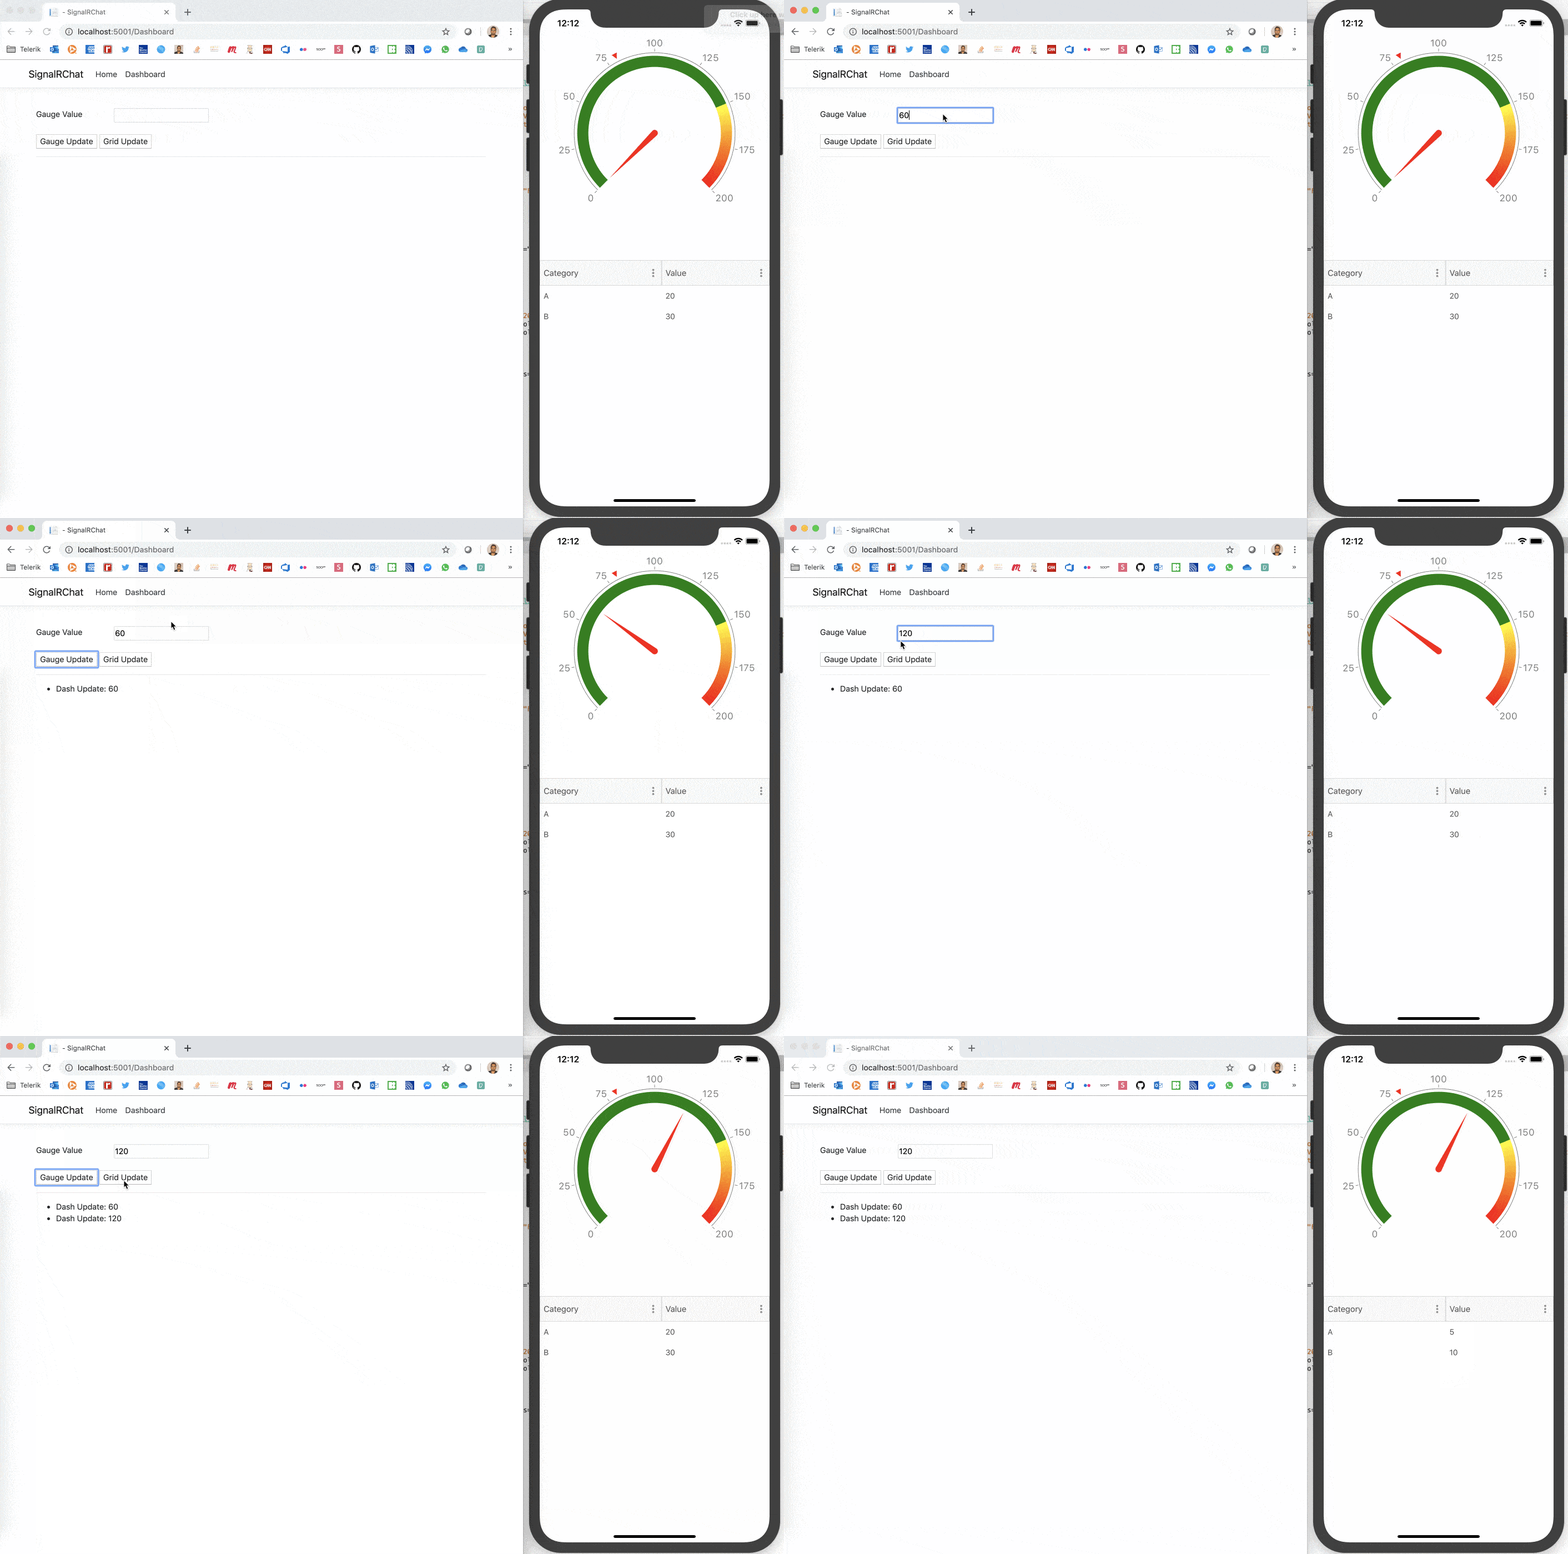
We should not have any surprises in the code above. Like in the chat sample, we connect to the DashboardHub from Xamarin client over Async-Await. The ReceiveDashUpdate() delegate is defined to read the Gauge value coming from the SignalR Hub and updating the Gauge needle UI appropriately. The ReceiveObjUpdate() method accepts the typed GridData[] from the server with SignalR providing built-in deserialization. We simply rebind to update the DataGrid UI. Let's fire up both the SignalR Hub backend and the Xamarin client - ain't real time updates a beautiful thing. Just as easily, native mobile apps can be connected to SignalR backends for real-time dashboards - imagine the possibilities.
Conversational UI for Xamarin Apps
Chat and Dashboard apps are wonderful showcases of how mobile apps can benefit from real-time communications. Real-time apps can also help automate complex enterprise workflows, especially if the chat backend includes intelligent Chatbots. There are a plethora of fabulous bot frameworks to hook up your chat apps to - all with rich tooling and SDKs for most platforms. And SignalR is happy to be the abstraction developers love over network complexities.
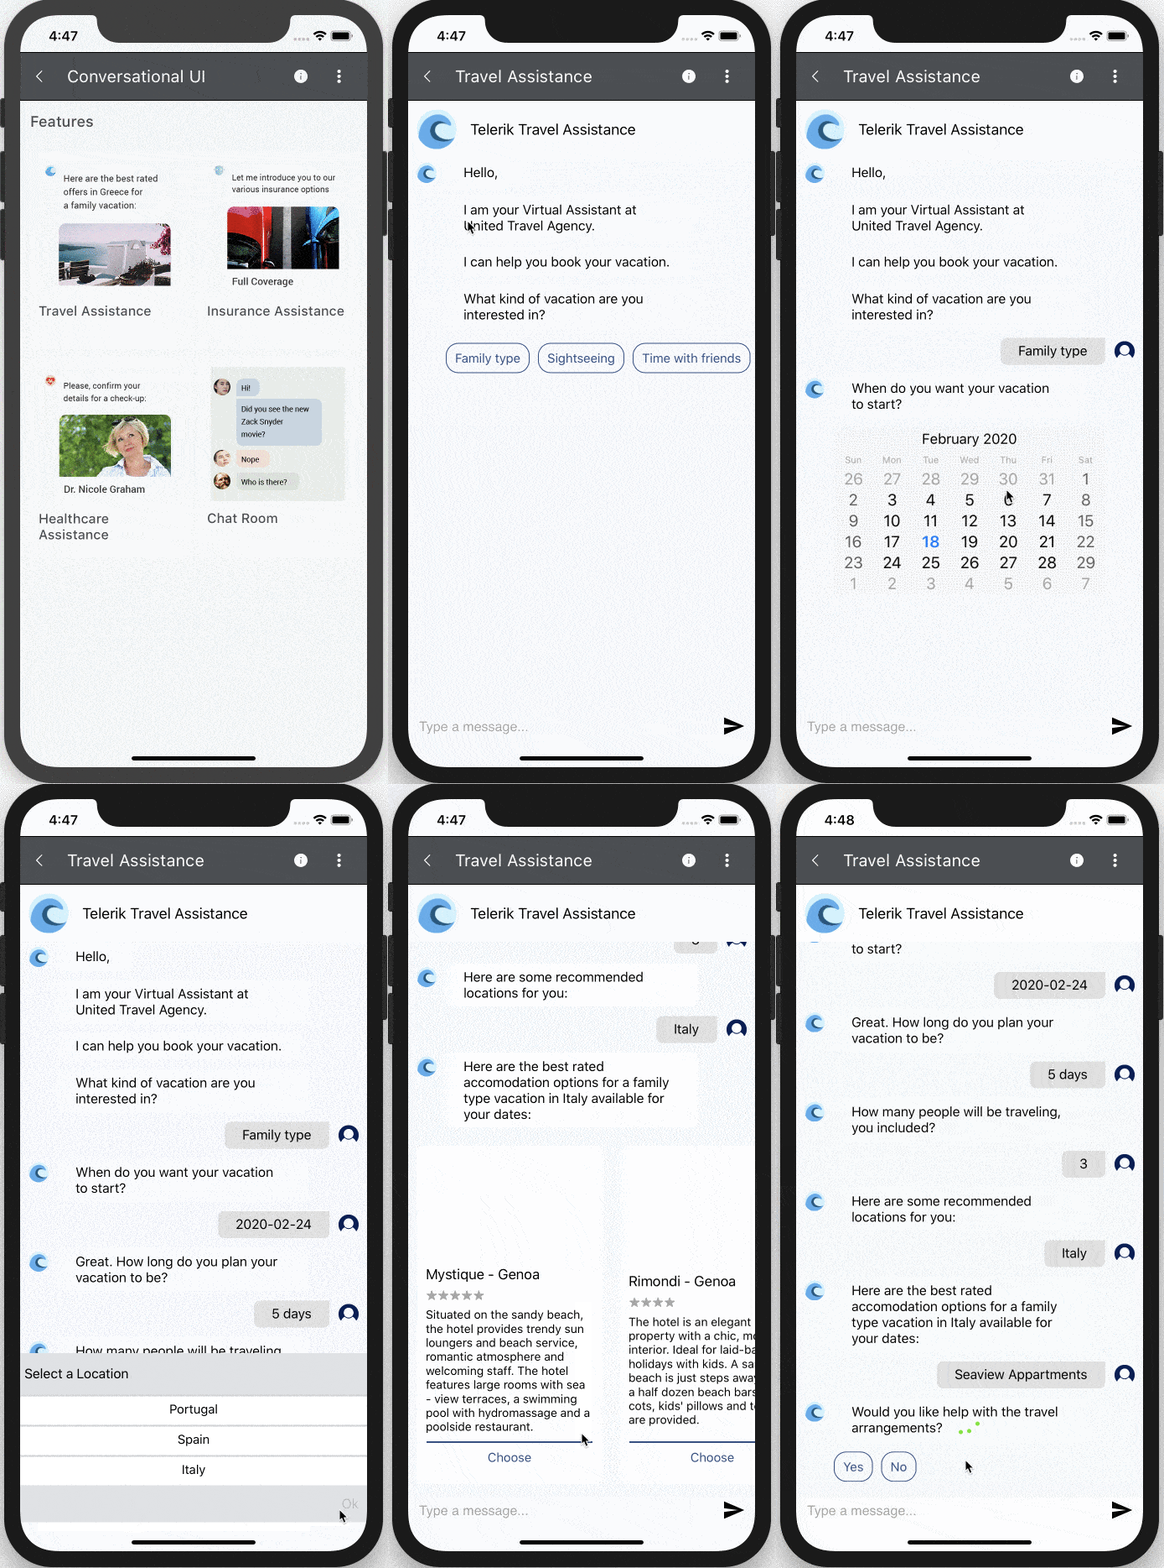
Real-world Chatbot mobile apps may benefit from one more thing for optimal UX - yes, polished and performant UI. When your goal is to automate workflows intelligently and deliver value, building Chat UI by hand is too laborious and time consuming. Enter Conversational UI - modern UI components for Chatbots across Telerik/Kendo UI technologies. With wide framework compatibility, polished chat UI with detailed documentation and flexible APIs, developers can be on their way to implementing natural chat conversational flow quickly.
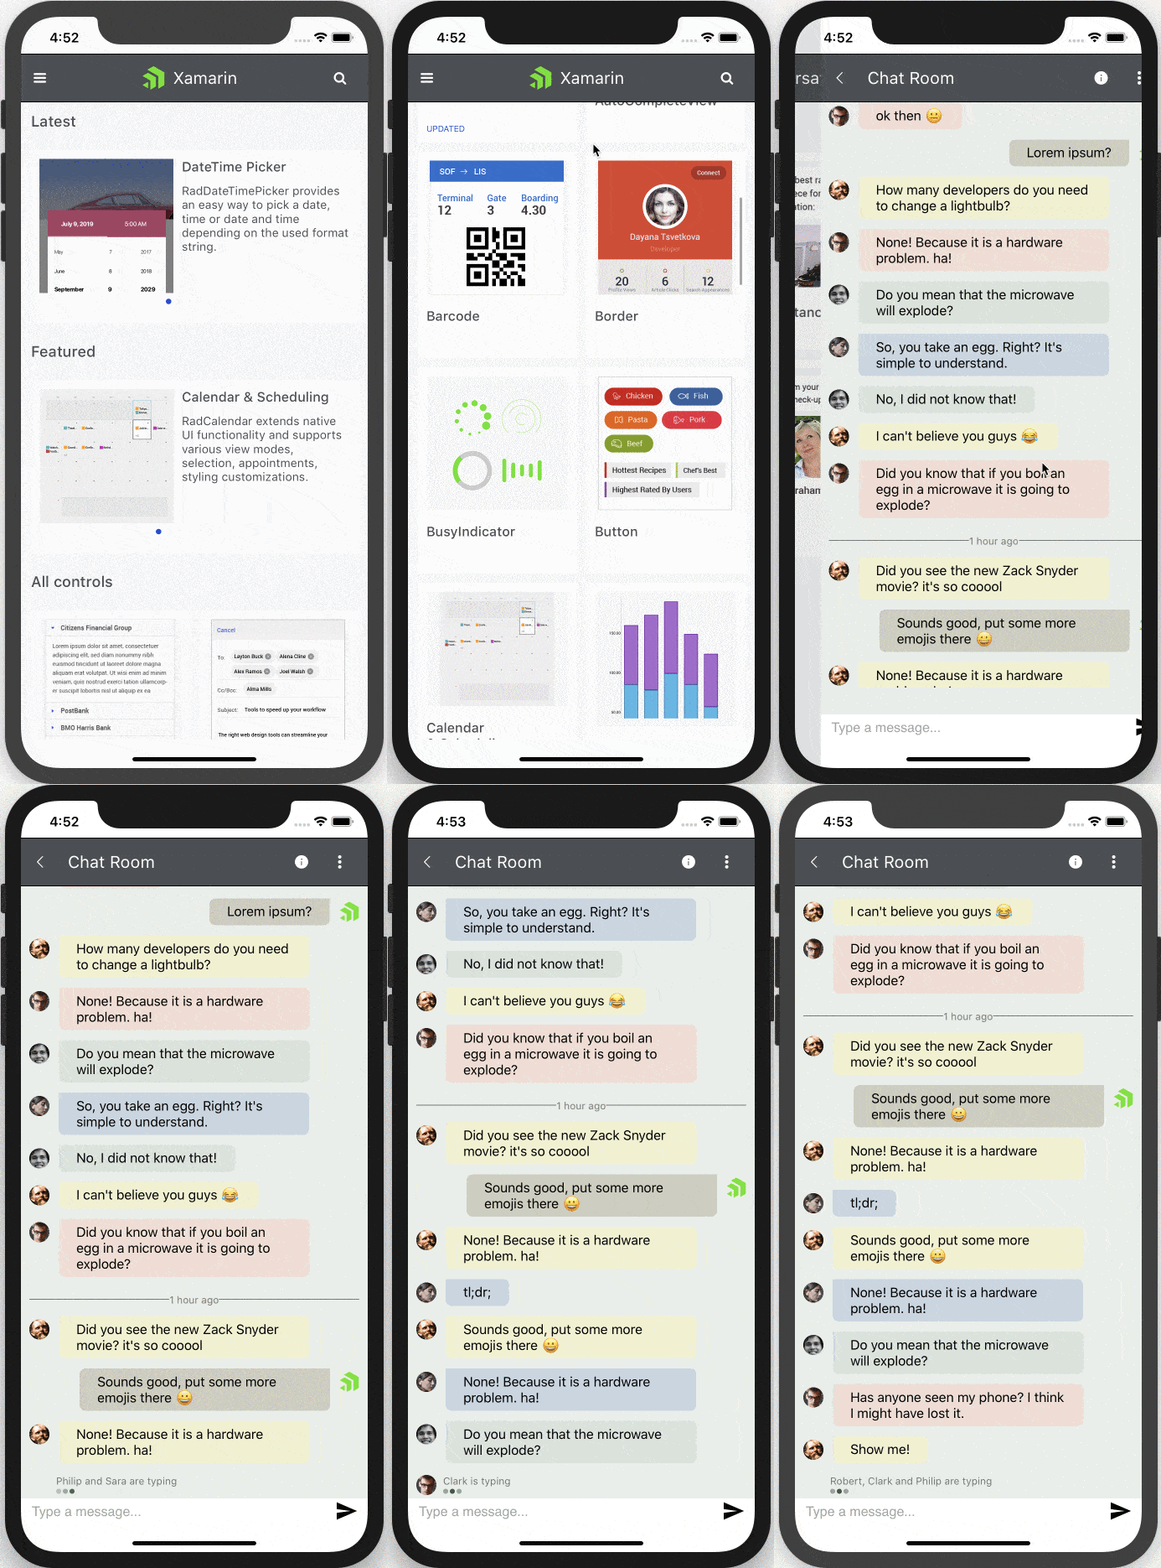
For Xamarin mobile clients connected to SignalR Hub backends, Telerik UI for Xamarin includes Conversational UI, with all the polished Chatbot UI you need to enable delightful UX. We can see examples of Conversational UI in Xamarin apps through the Telerik QSF app - this app is in the respective App stores for playing around, as well as the source code being part of Telerik UI for Xamarin downloads. Check out a couple of quick demos of what's possible with real-time Chatbot Xamarin apps that can automate workflows:
Wrap Up
Life happens in real time and information exchange should be the same way. Turns out, there are countless modern apps that don't just benefit, but actively depend on real-time communications to be functional. SignalR has tremendous promise as a framework that aids in building real-time apps. With a ton of configurability, SignalR Hubs are easy to set up server-side. And building mobile clients connected to SignalR Hubs is just as easy, with flexible APIs and wonderful abstraction of network complexities.
For .NET developers, Xamarin presents an enticing option to reuse code and build truly native cross-platform mobile apps. While Xamarin chat apps can be fun, the more realistic scenarios can be envisioned to be dashboard-style mobile apps - connected to SignalR Hubs for real-time data. Fun for the developers to hook up and delight for users!

Sam Basu
Sam Basu is a technologist, author, speaker, Microsoft MVP and gadget lover. With a long developer background, he also worked as a Developer Advocacy Manager for advocating modern web/mobile/cloud development platforms on Microsoft/Telerik/Kendo UI technology stacks. His spare times call for travel, fast cars, cricket and culinary adventures with the family.
