React vs. Angular: Component Architecture

Summarize with AI:
This in-depth guide compares the Angular framework and React library and their approaches to component creation, communication, change detection and more.
Virtually all modern frontend frameworks embrace the idea that a web application should be split into smaller reusable pieces called components, where each component is just a piece of UI, some logic and data required to render that piece. Furthermore, components may communicate with other components, giving birth to the idea that any web application is just a tree of components.
This guide provides a comparative analysis of the Angular framework and React library, focusing on their approaches to components. It’ll cover component creation, lifecycle, communication, and how these technologies allow components to detect and react to changes as users interact with the UI.
What Is Angular?
Angular is a TypeScript-first, full-fledged framework created by Google that allows you to create client or server-rendered enterprise-grade web applications at any scale. Some core concepts of this framework are components, services and directives, all of which are just classes annotated with @Compnent(), @Injectable() and @Directive() decorators, respectively.
Components encapsulate the following:
- Styling (CSS)
- The view, which is HTML written with the aid of the angular templating language
- The component logic, which is the data that the component needs and the functions required to manipulate them
Components may use services and directives. Services allow keeping related functionality in a separate class, and directives allow components to add or modify the behavior of their views.
Angular components rely heavily on dependency injection, enabling them to use the services they need to work. The Angular Injector provides services to components from their constructor or using the inject() function.
Create an Angular Project
Let’s create an Angular project. Start by installing the Angular CLI, a convenient tool for authoring Angular apps.
npm install -g @angular/cli
Next, create a project called my-angular-app
ng new my-angular-app
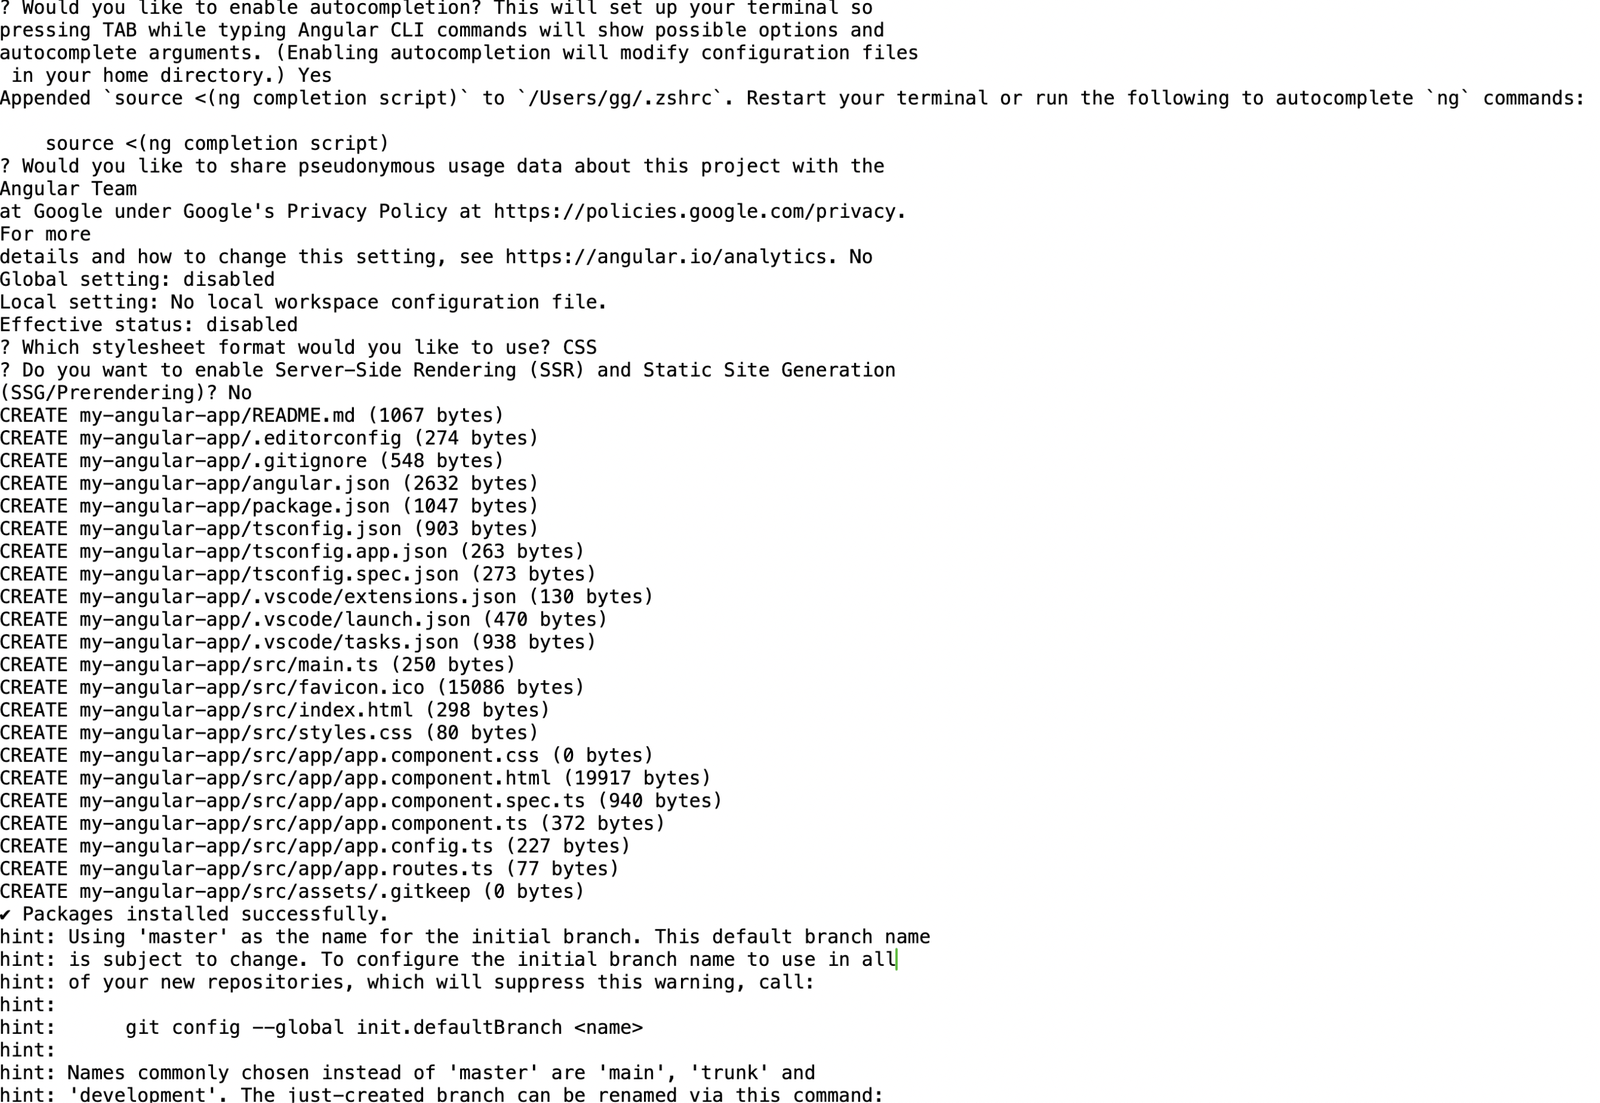
Follow the prompts and select all the default options from the CLI to create the angular project as shown below:
Our app uses Angular 17, the latest version of Angular at the time of writing.
To preview the running application, run npm start.
What Is React?
React is a JavaScript library that creates reusable client and server-side components for web applications. It was created by the Meta team in 2013.
In React, components are plain JavaScript functions. The React team has the philosophy that JavaScript is in charge of the markup rendered on the screen, which is why functions that are React components hold the logic, the styles and the markup at once.
Although not compulsory and not coupled to the React library, the templating language commonly used for the markup is JSX, an HTML-like representation of UI elements and components.
Create a React Project
Let’s create a basic client-side React app. Run the following command in your terminal to create a typescript-powered react project in a folder called my-react-app.
npm create vite@latest my-react-app -- --template react-ts
Next, run the following commands to install all the project dependencies and preview the application in your browser.
cd my-react-app
npm install
npm run dev
What We Will Be Building
To talk about components in both technologies, we will incrementally build a simple counter application like the one below.
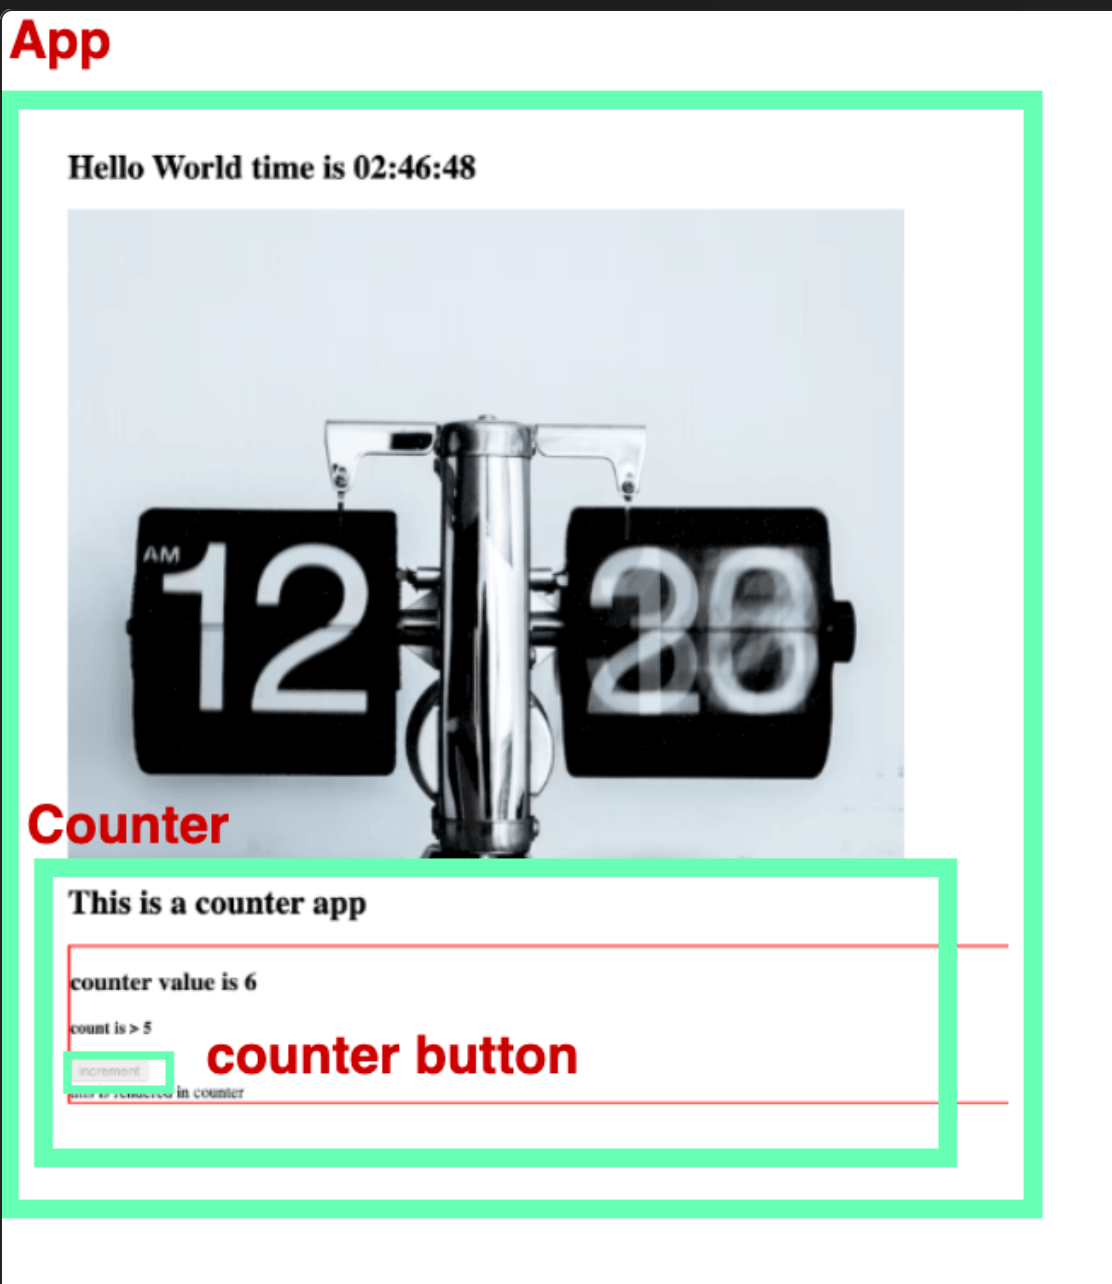
Our counter app above will consist of three components: the app shell, the counter and a counter button. A representation of our app as a tree of components is shown below.
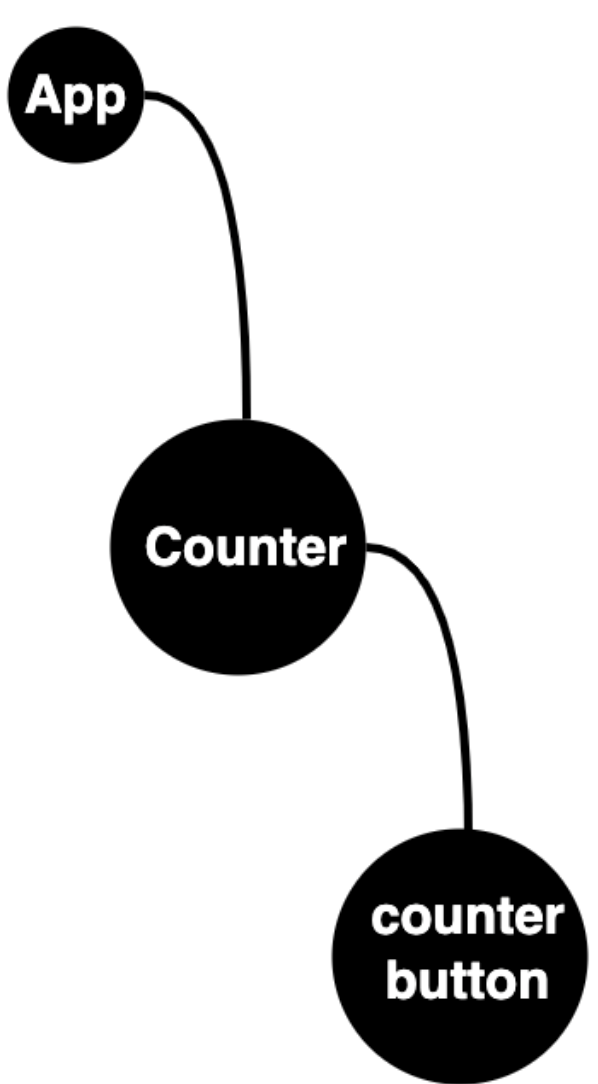
Our application logic is simple. The app renders some dummy text that includes the current time, a random image of a clock and the counter component, which allows the user to increment a number by interacting with the counter button. When the counter’s value is greater than 6, the button is disabled.
This simple app allows us to do some interesting things. To take a closer look at the component architecture of Angular and React, our focus will be on the following key areas:
- Creating components
- Rendering components on the browser
- Binding data to components
Now, we will build the counter and counter button components and then discuss the following.
- Composing components
- State management in components
- Component communication
- Change detection in components
- Conditional rendering in components
- Reusing component logic
- Component lifecycle
Creating Components
Let us create our root App component and render some basic markup.
React
Update the src/App.tsx file with the following:
import "./app.css";
function App() {
  return (
    <div>
      <h1>Hello World time is 2:46:48 </h1>
      <img src="" alt="clock" />
    </div>
  );
}
React components are plain JavaScript functions that must begin with a capital letter; notice that the returned JSX is wrapped in a single parent element (a div in our case). React components must return a single root element. This idea is not React-specific—all functions in Javascript can only return a single thing.
For TypeScript to handle JSX templates correctly, the file name has to have a
.tsxextension.
We also imported the styles for our component by importing an app.css file.
Angular
In the src/app folder, let’s create a component called app.component.ts by running these commands:
cd src/app
touch app.component.ts
Update this file with the following:
@Component({
  selector: 'app-root',
  template: `
    <h1>Hello World time is 2:46:48</h1>
    <img src="" alt="clock" srcset="" />
  `,
  styles: [
    `
      * {
        display: block;
      }
    `,
  ],
  standalone: true,
})
export class AppComponent implements {
}
As shown above, Angular components are classes decorated with the @Component() decorator, which holds the options used to configure the component.
The template and style hold the component’s markup and style, respectively. Templates are HTML markup that may use the Angular templating language.
Templates may also be passed using a templateURL prop holding a relative path to an HTML file. Also, styles can be passed using a styleURLs prop, an array of relative paths pointing to CSS files for the component. For a given component, the style and styleURLs options can be used at once, but for templates, you can only choose one template or templateURL. When both are specified, the latter takes precedence.
The selector property is a unique name for the component when it is rendered in another component, and ours is called app-root.
Older versions of Angular required that, before components were used, they had to be registered in a Module (a class decorated with @NgModule()) to configure it further. This is no longer necessary; the standalone prop makes our component self-contained to manage and configure all its dependencies. This is the recommended way to create components.
Rendering Components in the Browser
Let’s make our App.tsx React component and the app.component.ts Angular component visible in the browser. The key takeaway is that each technology renders components in an HTML file. This file is sent to the browser with the bundled JavaScript, CSS and other things the client requires and served by their respective build tools.
React
Update the main.tsx file in your React project to match the following:
import ReactDOM from "react-dom/client";
import App from "./App.tsx";
ReactDOM.createRoot(document.getElementById("root")!).render(<App />);
The ReactDOM library enables rendering our React components to the browser using its createRoot method. This method is called and fed an HTML DOM element. It receives an element with an id of root in the index.html file in our project root folder.
The render() function then receives the <App/> component and renders it to the browser.
Angular
Update the main.ts file in a root folder to match the following:
import { bootstrapApplication } from "@angular/platform-browser";
import { appConfig } from "./app/app.config";
import { AppComponent } from "./app/app.component";

bootstrapApplication(AppComponent).catch((err) => console.error(err));
Similarly, the @angular/platform-browser module allows us to mount our angular components in the browser using its bootstrapApplication() function, which accepts our AppComponent class. This function mounts the AppComponent to the main/index.html file using its app-root selector.
Binding Data to Components
If we run our application on both platforms, we should see our app display a static time and an empty image, as shown below.

Yes, this is expected because our template holds hardcoded values, and the image has an empty src property, as shown below.
<h1>Hello World time is 2:46:48 </h1>
<img src='' alt='clock' />
Remember, apart from the rendered UI template, components also hold data. Data binding allows components to include their data in the rendered components’s UI template. Let’s now bind some data to our components.
React
Update the App.tsx file to look like so:
function App() {
  const imageURL =
    "https://images.unsplash.com/photo-1456574808786-d2ba7a6aa654?w=800&auto=format&fit=crop&q=60&ixlib=rb-4.0.3&ixid=M3wxMjA3fDB8MHxzZWFyY2h8NHx8Y291bnR8ZW58MHx8MHx8fDA%3D";
  return (
    <div>
      <h1>Hello World time is {new Date().toLocaleTimeString()}</h1>
      <img src={imageURL} alt="" />
    </div>
  );
}
Data binding in React is done between a { and }, which could contain any primitive type, such as a string like the JavaScript expression imageURL above. An expression is just something that produces a value, like our new Date().toLocaleTimeString() function call that returns a value. The curly-brace syntax { and } is the only method for binding data in React components.
Angular
Update the app.component.ts file with the following:
@Component({
  selector: "app-root",
  template: `
    <h1>Hello World time is {{ now() }}</h1>
    <img [src]="" alt="clock" [srcset]="" />
  `,
  styles: [
    /*...*/
  ],
  standalone: true,
})
export class AppComponent {
  now() {
    return new Date().toLocaleTimeString();
  }
  imageURL =
    "https://images.unsplash.com/photo-1456574808786-d2ba7a6aa654?w=800&auto=format&fit=crop&q=60&ixlib=rb-4.0.3&ixid=M3wxMjA3fDB8MHxzZWFyY2h8NHx8Y291bnR8ZW58MHx8MHx8fDA%3D";
}
Angular provides us with four different syntaxes for data binding, which are:
{{ and }}: This is the default interpolation syntax for embedding primitives or expressions that return them. We used it to embed the time string by invoking thenow()method we included in ourAppComponent.Note that doing something like{{new Date().toLocaleTimeString()}}in Angular component templates is not supported. The framework allows developers to modify the{{and}}syntax by setting an interpolation property in the options fed to@Component. For example passing interpolation:["|_","_|"]will enable using|_ and _|in our templates.[ and ]: This is used for property binding, e.g., in the[src]property above that references ourAppComponent, theimageURLinstance variable.( and ): This is used for binding events, usually when we want to bind functions to components.[( and )]: This is used for two-way data binding in Angular components, commonly used with forms.
Running our app on both platforms, we get the current time printed on the screen.

Building the Counter
At this juncture, before we explain the remaining component-related concepts of Angular and React, let’s build the counter and counter button components.
React
We need to create two files in our src folder. These are Counter.tsx and CounterButton.tsx.
Update the Counter.tsx file with the following:
import { CSSProperties } from "react";
export default function Counter() {
  const styles: CSSProperties = {
    border: "2px solid red",
  };
  return (
    <div style={styles}>
      <h2>counter value is 0</h2>
    </div>
  );
}
Next, update the CounterButton.tsx file with the following:
function CounterButton() {
  return (
    <button onClick={() => onClick(1)} disabled={disabled}>
      increment
    </button>
  );
}
Angular
We need to create two files in our src/App folder. These are counter.component.ts and counter-button.component.ts.
Update the counter.component.ts file to match the following:
import { Component, EventEmitter, Input, OnInit, Output } from "@angular/core";
import { CounterButton } from "./counter-button.component";
@Component({
  selector: "counter-comp",
  template: `
    <div style="border:2px solid red">
      <h2>counter value is 0</h2>
    </div>
  `,
  styles: [],
  standalone: true,
})
export class CounterComponent {
  constructor() {}
}
Next, update the counter-button.component.ts file with the following:
import { Component } from "@angular/core";
@Component({
  selector: "counter-button",
  template: ` <button>increment</button> `,
  styles: [],
  standalone: true,
})
export class CounterButton {
  constructor() {}
}
Composing Components
We want to show how components render other components. We want to have all our components connected to end up with this structure.

Let’s do that in both applications. The idea is simple: We will connect the counter button component to the counter component and then connect the counter to the app component.
React
In React, Component A can be composed of Component B if A imports B and embeds it in its returned template.
Let’s now include the CounterButton in the Counter.
import CounterButton from "./CounterButton";
export default function Counter() {
  const styles: CSSProperties = {
    border: "2px solid red",
  };
  return (
    <div style={styles}>
      <h2>counter value is 0</h2>
      <h1>This is a counter app</h1>
      <CounterButton />
    </div>
  );
}
Next, let’s connect the Counter component to the AppComponent component.
import Counter from "./Counter";
function App() {
  const imageURL =
    "https://images.unsplash.com/photo-1456574808786-d2ba7a6aa654?w=800&auto=format&fit=crop&q=60&ixlib=rb-4.0.3&ixid=M3wxMjA3fDB8MHxzZWFyY2h8NHx8Y291bnR8ZW58MHx8MHx8fDA%3D";
  return (
    <div>
      <h1>Hello World time is {new Date().toLocaleTimeString()}</h1>
      <img src={imageURL} alt="" />
      <h1>This is a counter app</h1>
      <Counter />
    </div>
  );
}
Angular
In Angular, Component A can be composed of Component B if A imports B and includes B in its imports array in its @Component() decorator options.
Let’s now include the CounterButton in Counter:
import { CounterButton } from "./counter-button.component";
@Component({
  selector: "counter-comp",
  template: `
    <div style="border:2px solid red">
      <h2>counter value is 1</h2>
      <counter-button />
    </div>
  `,
  styles: [],
  standalone: true,
  imports: [CounterButton],
})
export class CounterComponent {
  constructor() {}
}
Likewise, let’s connect the Counter to the AppComponent:
import { Component, OnInit } from "@angular/core";
import { CounterComponent } from "./counter.component";
@Component({
  selector: "app-root",
  template: `
    <h1>Hello World time is {{ now() }}</h1>
    <img [src]="imageURL" alt="" [srcset]="" />
    <counter-comp />
  `,
  styles: [
    `
      * {
        display: block;
      }
    `,
  ],
  standalone: true,
  imports: [CounterComponent],
})
export class AppComponent {
  constructor() {}
  now() {
    return new Date().toLocaleTimeString();
  }
  imageURL =
    "https://images.unsplash.com/photo-1456574808786-d2ba7a6aa654?w=800&auto=format&fit=crop&q=60&ixlib=rb-4.0.3&ixid=M3wxMjA3fDB8MHxzZWFyY2h8NHx8Y291bnR8ZW58MHx8MHx8fDA%3D";
}
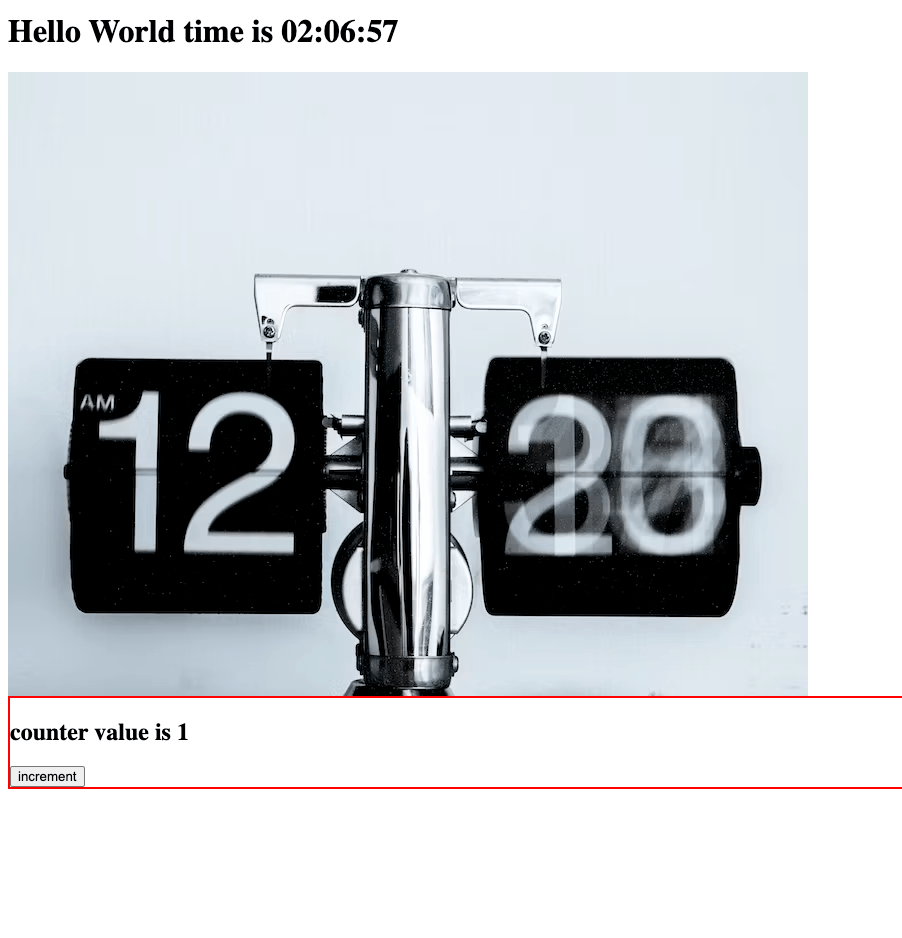
If we run both applications now, we should see the counter displayed on the browser, as shown below.
State Management in Components
So far, our application displays static data, so let’s add some states to our app. Hold on, what is the state? State is the data held by a component that is typically subject to change over time as the user interacts with the component’s template’s UI.
Our Counter component currently displays a static value. Let’s now add some state to hold the counter value and a function to increment the counter.
React
React provides several functions (called hooks) for state management, such as useState() and useReducer(). The React ecosystem also consists of libraries such as Redux, Mobx, Preact, etc., which are used to simplify state management.
Here, we will only describe state management using useState(). The fundamental idea about component state is similar irrespective of the option chosen.
Let’s now add state to our counter component by updating the Counter.tsx file with the following:
import { useState } from "react";
export function Counter() {
  const [count, setCount] = useState(0);
  function updateCounter(val: number) {
    setCount(count + val);
  }
  const styles: CSSProperties = {
    border: "2px solid red",
  };
  return (
    <div style={styles}>
      <h2>counter value is {count}</h2>
      <CounterButton />
      {props.children}
    </div>
  );
}
Our counter value, by default, holds a value of 1. The useState() call returns an array with two properties—the value (count) and a setter function (setCount).
We also define a function called updateCounter() that accepts a number and then updates the counter’s value using the setter function. Later, when we discuss change detection in components, the explanation will be clearer on why React specifies using a setter instead of directly changing the value using something like count+= val.
Angular
In Angular, state can be maintained using regular instance variables of your component class that can be set to primitive types, observables (using RxJs) and signals. Also, the Angular ecosystem provides developers with tools like the NgRx store (based on Redux) to further simplify the task of managing the app state at scale.
We will describe how to use the component’s instance variable for state management.
Let’s update our Counter component by updating the counter-component.ts file.
@Component({
  selector: "counter-comp",
  template: `
    <div style="border:2px solid red">
      <h2>counter value is {{ count }}</h2>
      <counter-button />
    </div>
  `,
  styles: [],
  standalone: true,
  imports: [CounterButton],
})
export class CounterComponent {
  constructor() {}
  count = 1;
  updateCounter(val: number) {
    this.count += val;
  }
}
We included an instance variable called count and a function called updateCounter that updates it.
Component Communication
Component communication focuses on how components interact; the interaction is typically done by passing data between components.
In React and Angular, data flow from parent to child is unidirectional, i.e., parents can only pass data to children rather than the other way around.
React
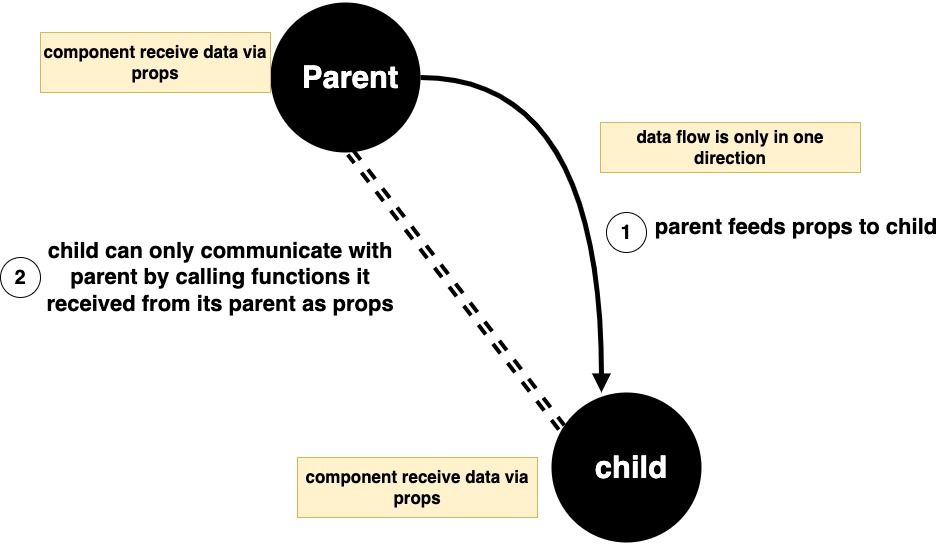
All React components receive data via props. A prop is just a key-value pair where the key name is a string, and the value can be a primitive or an object.
Our counter button is our concern at this point. It needs to be able to update the counter, and it also needs to be disabled when the counter value is greater than 5. We want our counter component to pass this data to this component.
Let’s configure our CounterButton component to receive some props.
interface CounterButtonProps {
  handleIncrement: (val: number) => void;
  disabled: boolean;
}
function CounterButton({ handleIncrement, disabled }: CounterButtonProps) {
  return (
    <button onClick={() => handleIncrement(1)} disabled={disabled}>
      increment
    </button>
  );
}
The CounterButton component accepts two props: a disabled prop to disable the button and the handleIncrement prop, which is a function to increment the counter. Let’s pass these props from our Counter component.
export function Counter(props: PropsWithChildren) {
const [count, setCount] = useState(0);
function updateCounter(val: number) {
setCount(count + val);
}
const styles: CSSProperties = {
border: "2px solid red",
};
return (
<div style={styles}>
<h2>counter value is {count}</h2>
{count > 5 ? <h4>count is > 5</h4> : null}
<CounterButton
handleIncrement={(val: number) => updateCounter(val)}
disabled={count > 5}
/>
{props.children}
</div>
);
}
The Counter component feeds data with the two properties with the respective values supported by the CounterButton.
React components can also be passed as props in React. So suppose our Counter component needs a prop named “special” which is expected to be a component. You can do something like
<CounterButton special={<SomeComponent/>}/>.
Angular
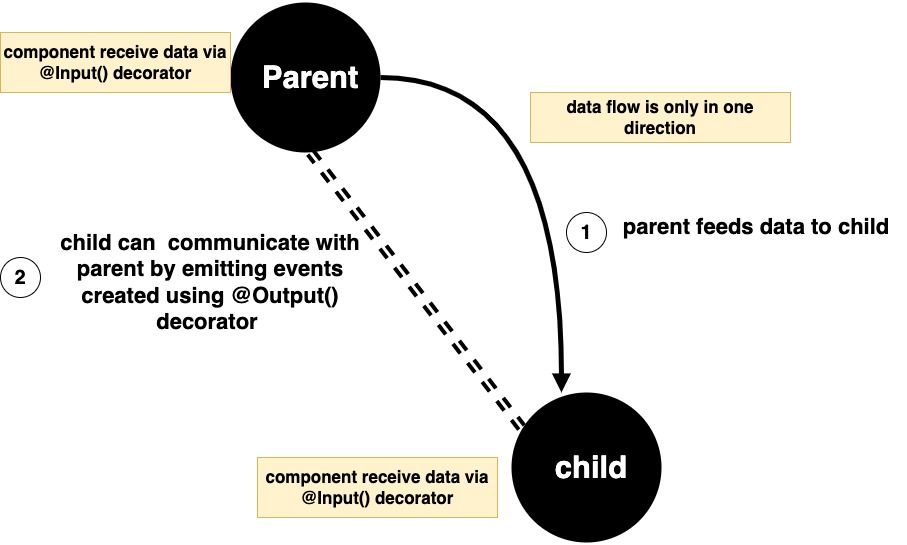
Similarly, Angular data is passed between parent and child components as key-value pairs; however, unlike React, Angular components cannot be passed as values between parent and child components.
Let’s go the other way around. Let’s feed data from the CounterComponent to the CounterButton component this time.
@Component({
  selector: "counter-comp",
  template: `
    <div style="border:2px solid red">
      <h2>counter value is {{ count }}</h2>
      <counter-button
        (handleIncrement)="updateCounter($event)"
        [disabled]="count > 5"
      />
    </div>
  `,
  styles: [],
  standalone: true,
  imports: [CounterButton],
})
export class CounterComponent {
  constructor() {}
  count = 1;
  updateCounter(val: number) {
    this.count += val;
  }
}
Let’s update the counter button in the counter-button.component.ts file to receive the props.
@Component({
  selector: 'counter-button',
  template: `
    <button (click)="incrementCounter()" [disabled]="disabled">
          increment
    </button>
  `,
  styles: [],
  standalone: true,
})
export class CounterButton {
  constructor() { }
  @Input("disabled") disabled!: boolean;

  @Output('handleIncrement')
  handleIncrementEmitter = new EventEmitter();
  incrementCounter() {
    this.handleIncrementEmitter.emit(1);
  }
}
When we start both applications, we see we can increment the counter, and the counter button gets disabled when the value exceeds 5.
Change Detection in Components
When we look at both applications, we notice that we can increment both counters. Let’s look closely at both applications
In the React application, we notice that only the counter gets incremented, but the time remains the same.

But in the Angular application, each time we increment the counter, the time is also updated in the app UI, as shown below.
This leads us to the question: How do Angular and React detect that a component has changed, and how does the changed component render itself and update the UI?
React
In React, state change is what enables React to know when a component needs to rerender. If you look at our Counter component, we use the useState hook to manage the value of the count whenever we call our setCount function. React knows that we most likely have changed, and it needs to re-render our Counter component and update the app UI with the new value, but how does this work?
Remember our app component tree as shown below.

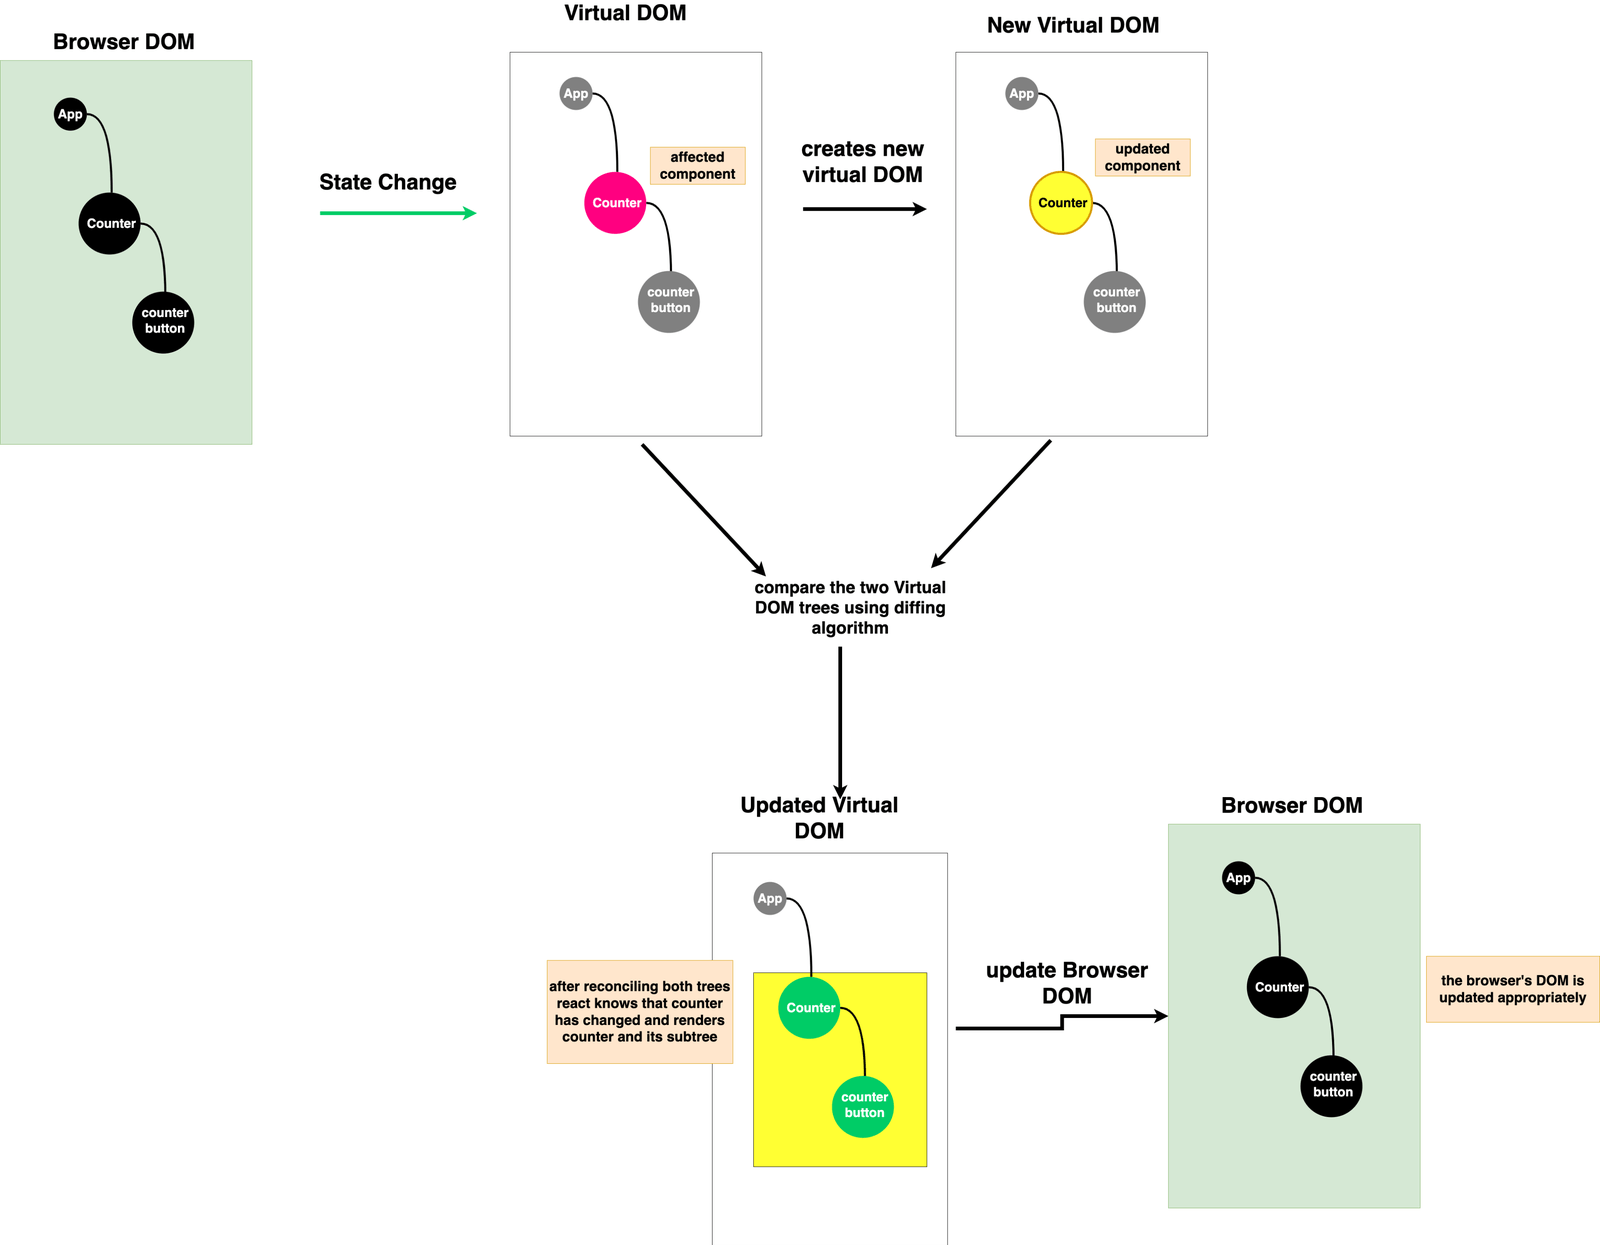
Let’s take a step back. Before our app tree (i.e., App, Counter and CounterButton) is rendered on the browser window, React represents our entire app as a tree of plain JavaScript objects (all the JSX we have included in our React app, and our App component functions are the nodes in this tree). This tree is referred to as the virtual DOM. This virtual DOM is then parsed and rendered on the browser’s DOM.

The browser’s DOM maintains references to all the functions and data that the virtual DOM knows.
As the user interacts with the app and triggers any state-changing function—e.g., when the user clicks the counter button and calls its handleIncrement() function, which in turn calls the setCount() function to update the counter—React is aware that something has changed in our counter.
React then creates a new version of the virtual DOM from the old one (immutability) with the count updated and then compares the old and the new virtual DOM to see what has changed using its special diffing algorithm.
React then only updates the counter and its subtree, i.e., the Counter and CounterButton, but not the App component in the browser’s DOM to reflect the new change. This efficient process React uses to update only what is necessary is referred to as reconciliation.
Angular
When an Angular component is created, the framework automatically creates a change detector for it. There are two types of change detection strategies supported by Angular, and these are:
- The default strategy
- OnPush strategy
By default, all components use the default strategy, but you can pass a changeDetector property to change this behavior.
In Angular applications, change detection is typically triggered when a DOM event is handled such as a button click, or when using the special async pipe, which may modify some internal state of the component and change the template the component renders.
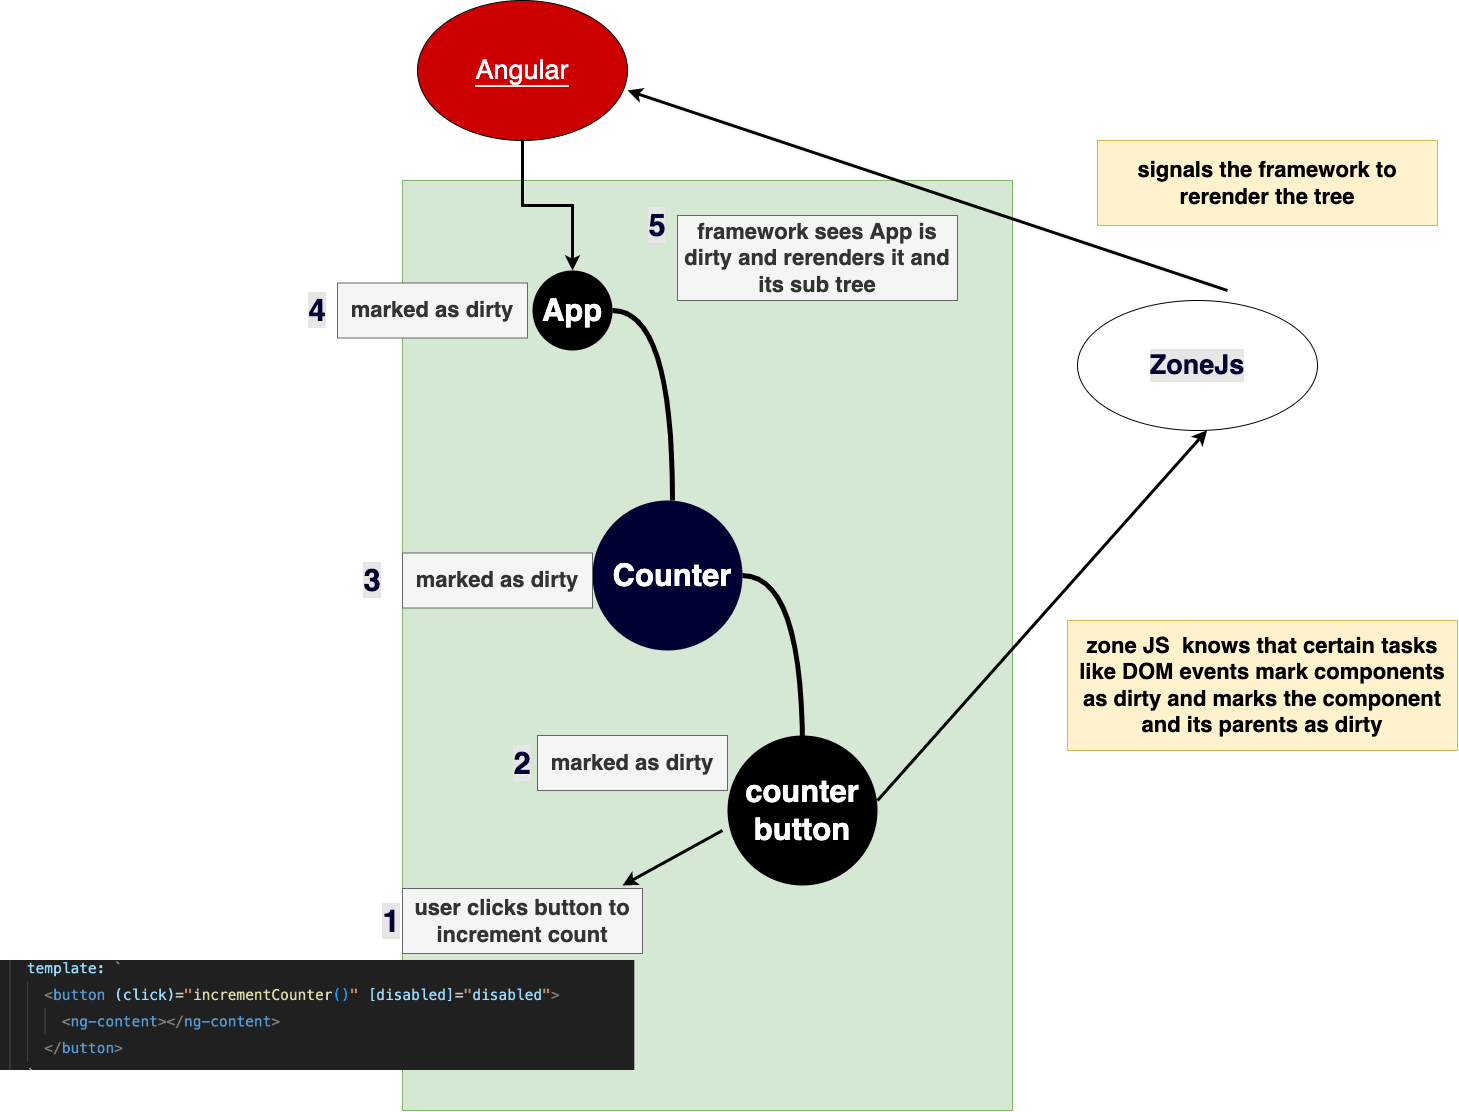
Generally, when change detection occurs in Angular, these things happen:
- The core library for detecting changes, Zone.js, notifies the Angular framework.
- Zone.js marks the changed component and its descendants as dirty.
- After that, the Angular framework traverses the component tree downward to re-render the dirty or changed components.
Let’s look at our application to see what happens in this framework’s default change detection mode.
When the counter button is clicked and we call its incrementCounter function since this function is bound to a DOM event, a click in our case, the Zone.js library wraps the incrementCounter function. Once this function is done executing, it marks the counter button component and its ancestors as dirty, then notifies Angular that it needs to look at the App component tree.
Angular traverses this tree from top to button, but it doesn’t look at its children since it already sees that the App component is dirty. It re-renders the whole tree, and the components update to reflect the new value. This is why the time changes in the App component after incrementing the counter.
To understand the OnPush strategy of change detection, let’s modify our app tree temporarily and include a component called OnPushComponent. We won’t create a new file for this dummy component since it is for demonstration.
@Component({
  selector: "on-push-comp",
  template: ` <h1>the time is{{ now() }}</h1> `,
  styles: [],
  standalone: true,
  changeDetection: ChangeDetectionStrategy.OnPush,
})
export class OnPushComponent {
  constructor() {}
  now() {
    return new Date().toLocaleTimeString();
  }
}
Notice that this component uses the OnPush change detection strategy. Let’s register it in our app component.
@Component({
  selector: 'app-root',
  // templateUrl: './x.htm',
  template: `
    <h1>Hello World time is {{ now() }}</h1>
    <img [src]="imageURL" alt="" />
    <h1>This is a counter app</h1>
    <counter-comp>
      <!-- <span>this is rendered in counter</span> -->
    </counter-comp>
    <on-push-comp />
  `,
  styles: [
    `
      * {
        display: block;
      }
    `,
  ],
  standalone: true,
  imports: [CounterComponent, OnPushComponent],
  providers: [WayooService],
  changeDetection: ChangeDetectionStrategy.OnPush,
})
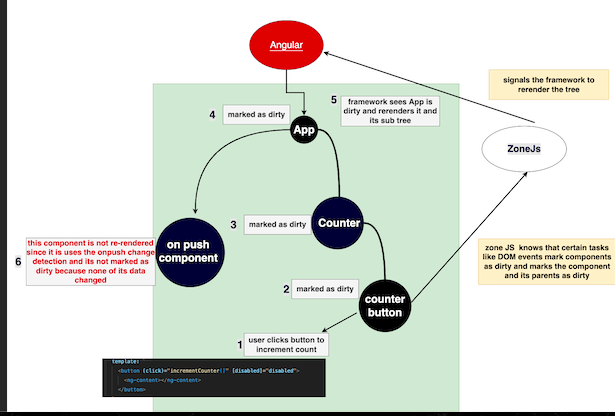
A component marked with the OnPush change event is not marked as dirty if its data or children subtree does not change. It is only marked as dirty in the following scenarios:
- If the developer uses the Angular
changeRefobject retrieved via dependency injection. - If there is a change in the data, if it gets fed as input, or if a DOM event modifies its state or the state of its children.
So, in our mini app, if the user increments the counter, Zone.js notifies Angular to check for dirty components and rerender the application. When Angular reaches our stubborn OnPush component, it tells it that it hasn’t changed and does not need a re-render, so it is not re-rendered, as shown below.
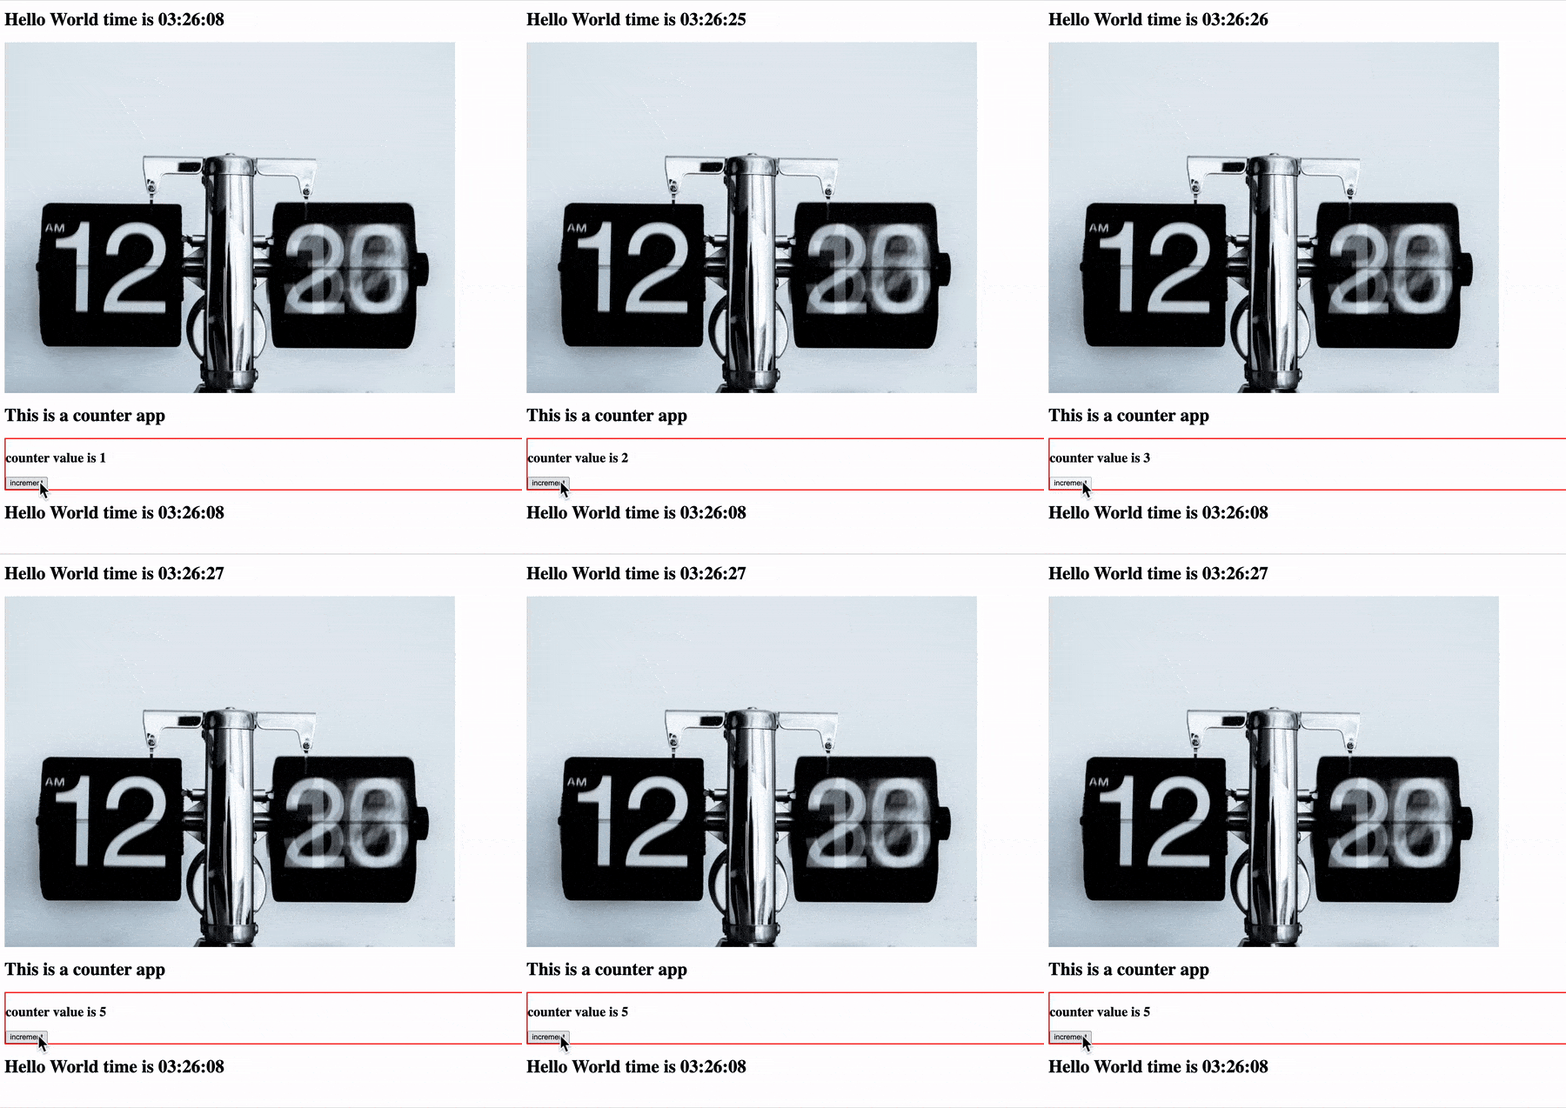
It is important to carefully analyze the performance benefits and clearly understand the behavior of the OnPush change detection strategy before using it so that you don’t end up with a broken application.
Conditional Rendering
We want to enable our Counter component to render a piece of UI when the counter value exceeds 5. Conditional rendering allows components to render something when certain conditions are met.
React
Update the Counter.tsx file to match the following:
export function Counter(props: PropsWithChildren) {
return (
<div style={styles}>
<h2>counter value is {count}</h2>
{count > 5 ? <h4>count is > 5</h4> : null}
<CounterButton
onClick={(val: number) => updateCounter(val)}
disabled={count > 5}
>
increment
</CounterButton>
{props.children}
</div>
);
}
Components can conditionally render other components using the ternary operator. For more control, you can also pass a function that returns a value using normal if-else statements.
Angular
Update the counter-component.ts file to look like so:
@Component({
  selector: 'counter-comp',
  template: `
    <div style="border:2px solid red">
      <h2>counter value is {{ count }}</h2>
      @if (count > 5) {
      <h4>count is > 5</h4>
      }
      <counter-button
        (handleIncrement)="updateCounter($event)"
        [disabled]="count > 5"
      >
        increment
      </counter-button>
      <ng-content></ng-content>
    </div>
  `,
  styles: [],
  standalone: true,
  imports: [CounterButton],
})
We can conditionally render components using the @if syntax.
Reusing Component Logic
React
React provides us with custom hooks. Let’s update the Counter.tsx file to include a custom hook called useCounter.
function useCounter() {
  const [count, setCount] = useState(0);
  function updateCounter(val: number) {
    setCount(count + val);
  }
  return { updateCounter, count };
}
export default useCounter;
You can put the useCounter hook in a separate file, but we are fine with our setup in this case.
Not all React components return UI. Here, we created a hook, which is just a function that, in our case, uses the useState hook to maintain the value of the counter and a function to update it.
Let’s include this hook in our counter component, as shown below.
export function Counter(props: PropsWithChildren) {
const { updateCounter, count } = useCounter();
const styles: CSSProperties = {
border: "2px solid red",
};
return (
<div style={styles}>
<h2>counter value is {count}</h2>
{count > 5 ? <h4>count is > 5</h4> : null}
<CounterButton
onClick={(val: number) => updateCounter(val)}
disabled={count > 5}
>
increment
</CounterButton>
{props.children}
</div>
);
}
Angular
Angular allows components to share logic via services. Let’s create a service called CounterService in a file called counter.service.ts
import { Injectable } from "@angular/core";
@Injectable({
  providedIn: "root",
})
export class CounterService {
  count = 1;
  x = 1;
  updateCounter(val: number) {
    this.count += val;
  }
}
Services are classes decorated with the @Injectable decorator. To use this service, we need to register it. Depending on our application needs, we can register a service in a component high in our component tree. This will make the component accessible to other child components.
In our case, since it’s only our counter that needs this service, let’s register it there. Update the counter-component.ts file as shown below:
import {
  Component,
  EventEmitter,
  Input,
  OnInit,
  Output,
  inject,
} from "@angular/core";
import { CounterButton } from "./counter-button.component";
import { CounterService } from "./counter.service";
@Component({
  selector: "counter-comp",
  template: `
    <div style="border:2px solid red">
      <h2>counter value is {{ counterService.count }}</h2>
      @if (counterService.count > 5) {
      <h4>count is > 5</h4>
      }
      <counter-button
        (handleIncrement)="counterService.updateCounter($event)"
        [disabled]="counterService.count > 5"
      >
        increment
      </counter-button>
      <ng-content></ng-content>
    </div>
  `,
  styles: [],
  standalone: true,
  imports: [CounterButton],
  providers: [CounterService],
})
export class CounterComponent {
  counterService: CounterService = inject(CounterService);
}
The counter service is registered to provide our counter service via its providers array; it is then accessed in the counter class using dependency injection using the inject function.
Component Lifecycle
Components also have a lifecycle that allows developers to perform actions on them when the component is created, updated or destroyed. It allows the user to write some logic at each point.
React
React provides developers with several hooks to write some code in the component lifetime, such as the following:
useLayoutEffect(): This allows you to write some code before a component is rendered to the screen.useEffect(): This hook allows you to write some code when the component mounts, properties change and the component gets deleted. Typically, this is where data gets fetched from the server for a component and where you write some clean-up code when the component gets destroyed. Let’s write some code to print a message to the screen each time our counter value changes.
import { CSSProperties, PropsWithChildren, useEffect, useState } from "react";
export function Counter(props: PropsWithChildren) {
const { updateCounter, count } = useCounter();
useEffect(() => {
console.log("count changed");
return () => console.log(" this function runs the cleanup");
}, [count]);
const styles: CSSProperties = {
border: "2px solid red",
};
return (
<div style={styles}>
<h2>counter value is {count}</h2>
{count > 5 ? <h4>count is > 5</h4> : null}
<CounterButton
onClick={(val: number) => updateCounter(val)}
disabled={count > 5}
>
increment
</CounterButton>
{props.children}
</div>
);
}
Angular
At the simplest level, to write some code when a component gets created, we can include some code in the component’s constructor. However, Angular also provides developers with a long list of methods to add to their components when the component is initialized (data-fetching operations are typically done here), when its view and all its children’s views are rendered, when inputs change, etc. You can learn more about this here.
Conclusion
Talking about modern frontend frameworks without talking about components is almost impossible. This guide allows developers to see hands-on component architecture in Angular and React; hopefully, this knowledge can help new and seasoned developers see the need to explore other frameworks and use them in their future work despite the nuances, similarities and differences between them.
Continue exploring Angular or React topics in our Basics series.

Christian Nwamba
Chris Nwamba is a Senior Developer Advocate at AWS focusing on AWS Amplify. He is also a teacher with years of experience building products and communities.

