
Push Notifications in ASP.NET Core with Angular

Summarize with AI:
Push notifications first appeared in native mobile apps, and now with Progressive Web Apps they have made their way into modern browsers. Learn how to use them in an ASP.NET Core-powered Angular application to expand the reach and enrich the UX of your application.
You certainly know what push notifications are — you have encountered them in the wild more than once. Yes, they can be misused, but used properly they can expand your reach to users and enrich their experience. In this post, we are going to create an Angular-powered ASP.NET Core web application with push notifications. We will go step-by-step so you can code along, but if you prefer to go through the entire thing and download a ready-to-use application, that's also an option. Along the way, I'll try to provide general information on push notifications, so you can understand them better.
First Things First: Creating an ASP.NET Core–Powered Angular Application
Creating new ASP.NET Core web application, which uses the Angular CLI project as a UI, is as easy as opening Visual Studio, clicking File → New → Project, selecting ASP.NET Core Web Application, and then choosing Angular from available templates. For those of you who prefer the command line, the equivalent command is dotnet new angular. The created application is ready to run, although the first start might take a few moments, as all npm packages need to be downloaded.
At first look, the application looks like any other ASP.NET Core project. The first noticeable difference is presence of AddSpaStaticFiles, UseSpaStaticFiles, and UseSpa in the Startup class:
namespace Demo.AspNetCore.Angular.PushNotifications
{
  public class Startup
  {
    public void ConfigureServices(IServiceCollection services)
    {
      // In production, the Angular files will be served from this directory
      services.AddSpaStaticFiles(configuration =>
      {
        configuration.RootPath = "ClientApp/dist";
      });
    }

    public void Configure(IApplicationBuilder app, IHostingEnvironment env)
    {
      app.UseSpaStaticFiles();
      app.UseSpa(spa =>
      {
        spa.Options.SourcePath = "ClientApp";
        if (env.IsDevelopment())
        {
          spa.UseAngularCliServer(npmScript: "start");
        }
      });
    }
  }
}
You probably guessed that the ClientApp folder is important. It's where the Angular CLI project resides. The UseSpa* methods are there to inform ASP.NET Core that it should take care of managing that Angular CLI project. When you run the application in development mode, ASP.NET Core will run an instance of the Angular CLI server in the background. When you publish the application, the production build will contain only compiled and minified code (you don't need Node.js on your server). With all those things out of the way, all that is left is implementation.
Modifying the Application
The newly created application is ready to use and it even shows some data, but to make it a proper demo material a few things should be modified.
Let's start with the backend. It contains a single controller.
[Route("api/[controller]")]
public class SampleDataController : Controller
{
  [HttpGet("[action]")]
  public IEnumerable<WeatherForecast> WeatherForecasts()
  {
    // ...
  }

  public class WeatherForecast
  {
    // ...
  }
}
First of all, the name is awful. If we want to provide weather forecasts, the controller should be named accordingly. Also, the ASP.NET Core part of the application is intended to serve as an API for the UI part, so it would be nice to make it a correct API controller. That means adding ApiControllerAttribute and renaming the method.
[Route("api/[controller]")]
[ApiController]
public class WeatherForecastsController : Controller
{
  [HttpGet]
  public IEnumerable<WeatherForecast> Get()
  {
    // ...
  }

  public class WeatherForecast
  {
    // ...
  }
}
Now we can move on to the UI part. The component responsible for fetching and displaying the weather forecasts is sitting in the ClientApp/src/app/ directory.
@Component({
  selector: 'app-fetch-data',
  templateUrl: './fetch-data.component.html'
})

export class FetchDataComponent {
  public forecasts: WeatherForecast[];

  constructor(http: HttpClient, @Inject('BASE_URL') baseUrl: string) {
    http.get<WeatherForecast[]>(baseUrl + 'api/SampleData/WeatherForecasts').subscribe(result => {
      this.forecasts = result;
    }, error => console.error(error));
  }
}

interface WeatherForecast {
  // ...
}
The first step should be changing fetch-data in the component directory and file names to weather-forecast. Then the component itself can be renamed, its selector changed, and the URL for GET adjusted to reflect changes on the server side. At the end, it should look like the below:
@Component({
  selector: 'app-weather-forecast',
  templateUrl: './weatherforecast.component.html'
})

export class WeatherForecastComponent {
  public forecasts: WeatherForecast[];

  constructor(http: HttpClient, @Inject('BASE_URL') baseUrl: string) {
    http.get<WeatherForecast[]>(baseUrl + 'api/WeatherForecasts').subscribe(result => {
      this.forecasts = result;
    }, error => console.error(error));
  }
}

interface WeatherForecast {
  // ...
}
There are two other components present: home and counter. Those can be simply removed. What is left is adjusting nav-menu component markup and top-level module to the changes:
<header>
  <nav class='navbar navbar-expand-sm navbar-toggleable-sm navbar-light bg-white border-bottom box-shadow mb-3'>
    <div class="container">
      <span class="navbar-brand">
        Demo.AspNetCore.Angular.PushNotifications
      </span>
    </div>
  </nav>
</header>
import { AppComponent } from './app.component';
import { NavMenuComponent } from './nav-menu/nav-menu.component';
import { WeatherForecastComponent } from './weather-forecast/weatherforecast.component';
@NgModule({
declarations: [
AppComponent,
NavMenuComponent,
WeatherForecastComponent
],
imports: [
BrowserModule.withServerTransition({ appId: 'ng-cli-universal' }),
HttpClientModule,
FormsModule,
RouterModule.forRoot([
{ path: '', component: WeatherForecastComponent, pathMatch: 'full' }
])
],
providers: [],
bootstrap: [AppComponent]
})
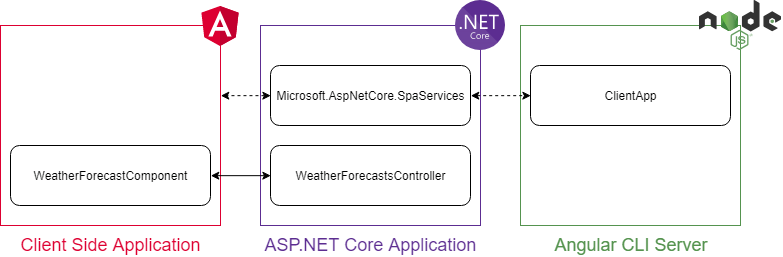
export class AppModule { }This way we have a simple web application which displays weather forecasts. The diagram below visualizes its key components.
What is Required for Push Notifications?
Before we can extend the application with push notifications, we must understand how they work. This is one of those cases where a picture is worth a thousand words.
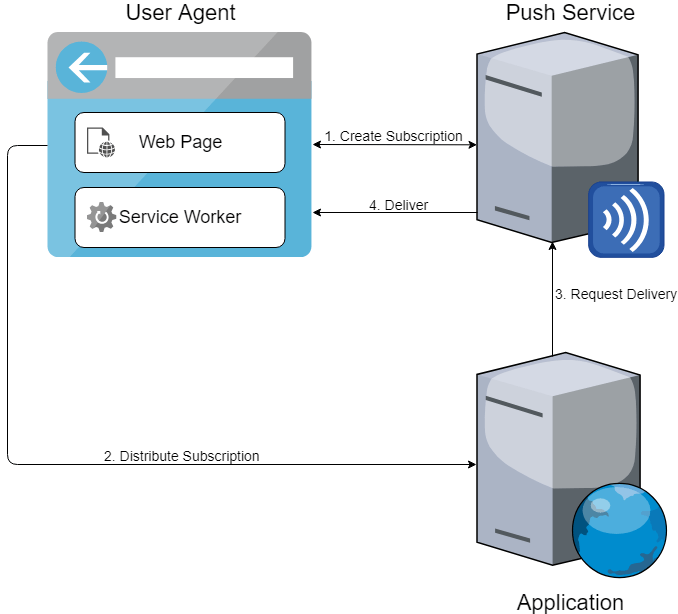
It should be clear from the diagram that push notifications are using a subscription model. If there is a subscription, there must be a subscriber. That can't be the web page itself — it wouldn't be convenient. Even if we would consider only single-page applications, where establishing a connection with push service can be done once at load, there would be a problem of passing subscription details back and forth. Browsers have something more suitable for this role, something that is always in the background: service workers. It's a service worker that acts as a subscriber, maintains a connection with push service, and can receive notifications. This way the subscription details need to be shared with the backend application only once.
The presence of a push service allows the backend application to disregard whether a client is currently connected or not. The backend simply requests delivery whenever it wants; the push service will take care of waiting for a client.
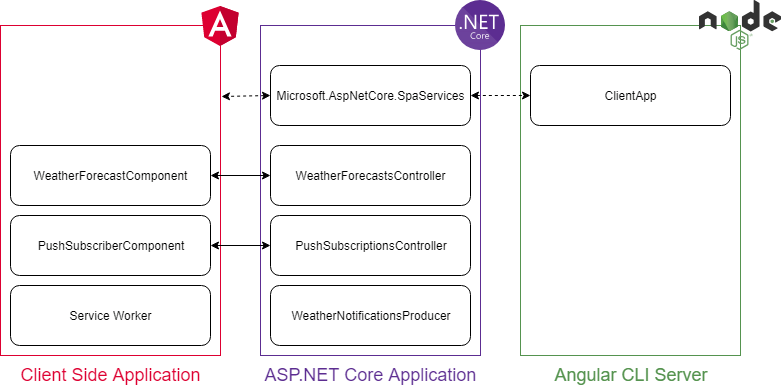
The way push notifications work forces us to add a few components to our application.
Adding Angular Service Worker
The most important component missing on the client side (the heart of push notifications) is the service worker. Angular comes with its own Angular Service Worker that needs to be added to the application. The best way to do it is to use the Angular CLI. Start a command prompt and navigate to the ClientApp folder.
Before the Angular Service Worker can be added, Angular itself needs to be updated from 6.1 to 7.X.
npm install -g rxjs-tslint
rxjs-5-to-6-migrate -p src/tsconfig.app.json
ng update @angular/cli @angular/core
Now the Angular Service Worker can be added to the project.
ng add @angular/pwa --project Demo.AspNetCore.Angular.PushNotificationsThis will add a couple of dependencies, modify some configuration files, and leave us with a service worker ready to receive notifications. The tricky part is that the application will not use this service worker when we try to run it from Visual Studio. That's because in Development mode, ASP.NET Core is using ng serve to run the ClientApp, while Angular deploys its service worker only with ng build --prod. The modification required here isn't hard. First, the UseAngularCliServer call from Startup needs to be removed, and then the project file needs to be changed to run ng build --prod not only after ComputeFilesToPublish but also before Build.
<Project Sdk="Microsoft.NET.Sdk.Web">
  <Target Name="DebugEnsureNodeEnv" BeforeTargets="Build" Condition="'$(Configuration)' == 'Debug' And !Exists('$(SpaRoot)node_modules')">
  </Target>
  <Target Name="BuildAngular" BeforeTargets="Build">
    <Exec WorkingDirectory="$(SpaRoot)" Command="npm install" />
    <Exec WorkingDirectory="$(SpaRoot)" Command="npm run build -- --prod" />
    <Exec WorkingDirectory="$(SpaRoot)" Command="npm run build:ssr -- --prod" Condition="'$(BuildServerSideRenderer)'=='true'" />
  </Target>
  <Target Name="PublishRunWebpack" AfterTargets="ComputeFilesToPublish">
  </Target>
</Project>
Preparing ASP.NET Core Backend for Push Notifications
The client side is ready to receive push notifications (there is still no way to subscribe, but we will get to that), so it's time to do some work on the server side. The server side requires two capabilities — managing subscriptions and sending notifications. Before we can start any work, we need to generate a pair of Voluntary Application Server Identification (VAPID) keys. Those keys are used for server application identification and notification signing. The easiest way to generate them is probably with help of Node.js web-push library.
npm install web-push -g
web-push generate-vapid-keys --json
The generated values are best to be put into appsettings.json.
"PushNotifications": {
  "PublicKey": "BMBuVtMBpcgwRtUNttNj2yXP3PGCSrf_fT94pCb1Bdl1JDnH8_CSK0GXqa8hOAkLq1EYnTH__zaXhy5jLoJ4s2A",
  "PrivateKey": "6GJW3jlOQonru2IsakRLpqj2d6qURK2C9GCZSlYwKq8"
}
Now we can get to the implementation. We don't want to implement all the details of Web Push Protocol — it's much better to use an existing Push Notifications client instead. Here I'm going to use Lib.Net.Http.WebPush. Let's start with managing subscriptions.
A subscription is represented by PushSubscription object. What is required is a controller that can handle a request to store and remove subscriptions.
[Route("api/[controller]")]
[ApiController]
public class PushSubscriptionsController : ControllerBase
{
  private readonly IPushSubscriptionsService _pushSubscriptionsService;

  public PushSubscriptionsController(IPushSubscriptionsService pushSubscriptionsService)
  {
    _pushSubscriptionsService = pushSubscriptionsService;
  }

  [HttpPost]
  public void Post([FromBody] PushSubscription subscription)
  {
    _pushSubscriptionsService.Insert(subscription);
  }

  [HttpDelete("{endpoint}")]
  public void Delete(string endpoint)
  {
    _pushSubscriptionsService.Delete(endpoint);
  }
}
The implementation of IPushSubscriptionsService is not that important, it must provide storage capabilities and that's it. For a simple demo, LiteDB is a great approach. It provides a single data file NoSQL document store, without requiring that we install anything.
public class PushSubscriptionsService : IPushSubscriptionsService, IDisposable
{
  private readonly LiteDatabase _db;
  private readonly LiteCollection<PushSubscription> _collection;

  public PushSubscriptionsService()
  {
    _db = new LiteDatabase("PushSubscriptionsStore.db");
    _collection = _db.GetCollection<PushSubscription>("subscriptions");
  }

  public void Insert(PushSubscription subscription)
  {
    _collection.Insert(subscription);
  }

  public void Delete(string endpoint)
  {
    _collection.Delete(subscription => subscription.Endpoint == endpoint);
  }

  public void Dispose()
  {
    _db.Dispose();
  }
}
So, the client side will now have a way to inform the server about changes to a subscription. But, before any subscription can be created, the client application must be able to retrieve the public VAPID key from the server. The server application can retrieve the keys from settings file the same way as any other options.
public class PushNotificationsOptions
{
  public string PublicKey { get; set; }
  public string PrivateKey { get; set; }
}

public class Startup
{
  public Startup(IConfiguration configuration)
  {
    Configuration = configuration;
  }

  public IConfiguration Configuration { get; }
  public void ConfigureServices(IServiceCollection services)
  {
    services.Configure<PushNotificationsOptions>(Configuration.GetSection("PushNotifications"));
  }
}
This will allow for exposing one more controller, which will handle GET request for the public key.
[Route("api/[controller]")]
[ApiController]
public class PublicKeyController : ControllerBase
{
  private readonly PushNotificationsOptions _options;

  public PublicKeyController(IOptions<PushNotificationsOptions> options)
  {
    _options = options.Value;
  }

  public ContentResult Get()
  {
    return Content(_options.PublicKey, "text/plain");
  }
}
The backend now provides the capability to manage subscriptions. What is missing is sending notifications. Here the best approach is a hosted service (in real-life scenarios one can go further and move the sending responsibility completely out of the web application). In this demo, the hosted service will be sending a new (random) temperature value to subscribed clients every minute.
public class WeatherNotificationsProducer : BackgroundService
{
  private const int NOTIFICATION_FREQUENCY = 60000;
  private readonly Random _random = new Random();
  private readonly IPushSubscriptionsService _pushSubscriptionsService;
  private readonly PushServiceClient _pushClient;

  public WeatherNotificationsProducer(IOptions<PushNotificationsOptions> options, IPushSubscriptionsService pushSubscriptionsService, PushServiceClient pushClient)
  {
    _pushSubscriptionsService = pushSubscriptionsService;
    _pushClient = pushClient;
    _pushClient.DefaultAuthentication = new VapidAuthentication(options.Value.PublicKey, options.Value.PrivateKey)
    {
      Subject = "https://angular-aspnetmvc-pushnotifications.demo.io"
    };
  }

  protected override async Task ExecuteAsync(CancellationToken stoppingToken)
  {
    while (!stoppingToken.IsCancellationRequested)
    {
      await Task.Delay(NOTIFICATION_FREQUENCY, stoppingToken);
      SendNotifications(_random.Next(-20, 55), stoppingToken);
    }
  }
}
Notice the PushServiceClient initialization in the above code. The instance itself comes from dependency injection (I would suggest usage of HttpClientFactory for registration), and the service sets authentication based on options. A new thing here is the Subject property. It should contain a URL which allows for identifying our application.
The Web Push Protocol (and PushServiceClient) doesn't make any assumptions about the format of notification. A PushMessage instance simply takes a string as content. But, the Angular Service Worker is expecting a very specific format. It needs to be the below object encoded as JSON.
public class AngularPushNotification
{
  public class NotificationAction
  {
    public string Action { get; }
    public string Title { get; }

    public NotificationAction(string action, string title)
    {
      Action = action;
      Title = title;
    }
  }

  public string Title { get; set; }
  public string Body { get; set; }
  public string Icon { get; set; }
  public IList<int> Vibrate { get; set; } = new  List<int>();
  public IDictionary<string, object> Data { get; set; }
  public IList<NotificationAction> Actions { get; set; } = new  List<NotificationAction>();
}
In order to make using this object easier, we can add the JSON encoding and wrapping in PushMessage through a convenient method.
public class AngularPushNotification
{
  private const string WRAPPER_START = "{\"notification\":";
  private const string WRAPPER_END = "}";
  private static readonly JsonSerializerSettings _jsonSerializerSettings = new JsonSerializerSettings
  {
    ContractResolver = new  CamelCasePropertyNamesContractResolver()
  };

  public PushMessage ToPushMessage(string topic = null, int? timeToLive = null, PushMessageUrgency urgency = PushMessageUrgency.Normal)
  {
    return new PushMessage(WRAPPER_START + JsonConvert.SerializeObject(this, _jsonSerializerSettings) + WRAPPER_END)
    {
      Topic = topic,
      TimeToLive = timeToLive,
      Urgency = urgency
    };
  }
}
With help of that method, sending notifications becomes just a couple of lines.
public class WeatherNotificationsProducer : BackgroundService
{
  private void SendNotifications(int temperatureC, CancellationToken stoppingToken)
  {
    PushMessage notification = new  AngularPushNotification
    {
      Title = "New Weather Forecast",
      Body = $"Temp. (C): {temperatureC} | Temp. (F): {32  + (int)(temperatureC /  0.5556)}",
      Icon = "assets/icons/icon-96x96.png"
    }.ToPushMessage();

    foreach (PushSubscription subscription in _pushSubscriptionsService.GetAll())
    {
      // fire-and-forget
      _pushClient.RequestPushMessageDeliveryAsync(subscription, notification, stoppingToken);
    }
  }
}
Subscribing to Push Notifications from Angular
There is one last piece of the puzzle missing — a way for users to subscribe and unsubscribe from notifications. For this purpose, we can create a component. It can have a very simple markup. In the end, we don't need anything more than a button.
<button class="push-subscriber" (click)="operation()">
  {{ operationName }}
</button>
We are binding the click event of the button and its label. Both the label and operation will depend on whether there is an active subscription or not. Let's add a component skeleton to go with the markup.
@Component({
  selector: 'app-push-subscriber',
  templateUrl: './pushsubscriber.component.html',
  styleUrls: ['./pushsubscriber.component.css']
})

export class PushSubscriberComponent {
  public operationName: string;
  constructor() { };
  operation() { };
}
How do we determine if there is an active subscription or not? Angular provides the SwPush class to manage push notifications for an Angular Service Worker. This class has a subscription property that provides an observable which emits the currently active subscription or null.
@Component({
  // ...
})

export class PushSubscriberComponent {
  private _subscription: PushSubscription;
  public operationName: string;

  constructor(private swPush: SwPush) {
    swPush.subscription.subscribe((subscription) => {
      this._subscription = subscription;
      this.operationName = (this._subscription === null) ? 'Subscribe' : 'Unsubscribe';
    });
  };

  operation() {
    (this._subscription === null) ? this.subscribe() : this.unsubscribe(this._subscription.endpoint);
  };

  private subscribe() { };
  private unsubscribe(endpoint) { }
}
So, we know which label to display and which operation to perform. Time for the operation itself. Subscribing is performed in three steps:
- Retrieve public VAPID key from the server
- Request subscription with the service worker
- Distribute subscription to the server
Requesting a subscription with the service worker can be achieved by calling SwPush.requestSubscription, and for the remaining steps we can use HttpClient.
@Component({
  // ...
})

export class PushSubscriberComponent {
  constructor(
    private swPush: SwPush,
    private httpClient: HttpClient,
    @Inject('BASE_URL') private baseUrl: string) {
      // ...
    };

  // ...

  private subscribe() {
    // Retrieve public VAPID key from the server
    this.httpClient.get(this.baseUrl + 'api/PublicKey', { responseType: 'text' }).subscribe(publicKey => {
      // Request subscription with the service worker
      this.swPush.requestSubscription({
        serverPublicKey: publicKey
      })
      // Distribute subscription to the server
      .then(subscription => this.httpClient.post(this.baseUrl + 'api/PushSubscriptions', subscription, this.httpOptions).subscribe(
        () => { },
        error => console.error(error)
      ))
      .catch(error => console.error(error));
    },
    error => console.error(error));
  };
}
Unsubscribing is simpler. First the SwPush.unsubscribe needs to be called and then the subscription must be removed on the server.
@Component({
  // ...
})

export class PushSubscriberComponent {
  constructor(...) {
    // ...
  };

  // ...

  private unsubscribe(endpoint) {
    this.swPush.unsubscribe()
      .then(() => this.httpClient.delete(this.baseUrl + 'api/PushSubscriptions/' + encodeURIComponent(endpoint)).subscribe(() => { },
        error => console.error(error)
      ))
      .catch(error => console.error(error));
  }
}
The ready-to-use component must be registered in the application module, and, after that, it can be placed anywhere you think is right for users.
Now you can run the application, click Subscribe, wait about a minute... and voilà! A nice notification about the new weather forecast will pop up in your notification center.
You can find the complete application here.
There Is More
This certainly didn't fully explore the subject of push notifications. There are some things about which this application doesn't care, but to make it production-ready there are a few other things it should handle. For example:
- 410 and 404 responses from Push Service. They inform that the subscription is no longer valid (expired, unsubscribed, etc.) and should be removed from storage.
- 429 response from Push Service. It informs that rate limit has been reached and the application needs to wait before attempting to request another delivery (usually they contain
Retry-Afterheader).
A separate subject is scaling push notifications delivery. Push notifications use strong signing and encryption algorithms. This is good as the Push Service is, in fact, a man-in-the-middle, but it makes them expensive from a resources perspective. In this context, it's important to keep in mind that requesting delivery doesn't require request/response context. As I've already hinted, it can be done outside of the web application (microservices and functions are an option here).
In general, I hope that the knowledge provided here will allow you a smooth start for working with push notifications in your Angular powered ASP.NET Core web application.
Looking for More on ASP.NET Core and Angular?
Looking for more great content on developing with ASP.NET Core and Angular? Check out this step-by-step guide on Creating an Angular 7 App with ASP.NET Core, and for the latest updates on everything Angular, be sure to visit our All Things Angular post.

Tomasz Peczek
For more than 10 years Tomasz Peczek has been creating software for health care, banking and e-learning industries. Currently, he is building web applications and microservices using ASP.NET Core and Azure. He is constantly sharing his knowledge through his blog or presentations at conferences and user groups.