
A Practical Guide for State Management Using Angular Services and Signals

Summarize with AI:
Learn how Angular Services with Signals can simplify your application architecture and handle state management. Let’s do it!
Let me start by saying that NgRx is excellent and the right choice in certain situations. But it also brings a lot of setup work and a steep learning curve.
For many years, Angular developers tried to avoid NgRx by using RxJS Subjects and complex observable pipelines, but that also gets difficult. You need to understand many operators, how they work and even learn marble diagrams.
For most applications, especially small- to medium-sized ones, you don’t need all this complexity.
With the introduction of Signals and modern data-fetching APIs like resource and httpResource, Angular now offers a simpler, more intuitive state management approach built directly into the framework.
In this article, we will explore how Angular Services + Signals can significantly simplify your application architecture and handle state management.
Let’s build a Signal-based store step by step. To start with, create an interface to model the API response.
export interface IProduct {
    id: string;
    name: string;
    description: string;
    price: string ;
    category: string;
}
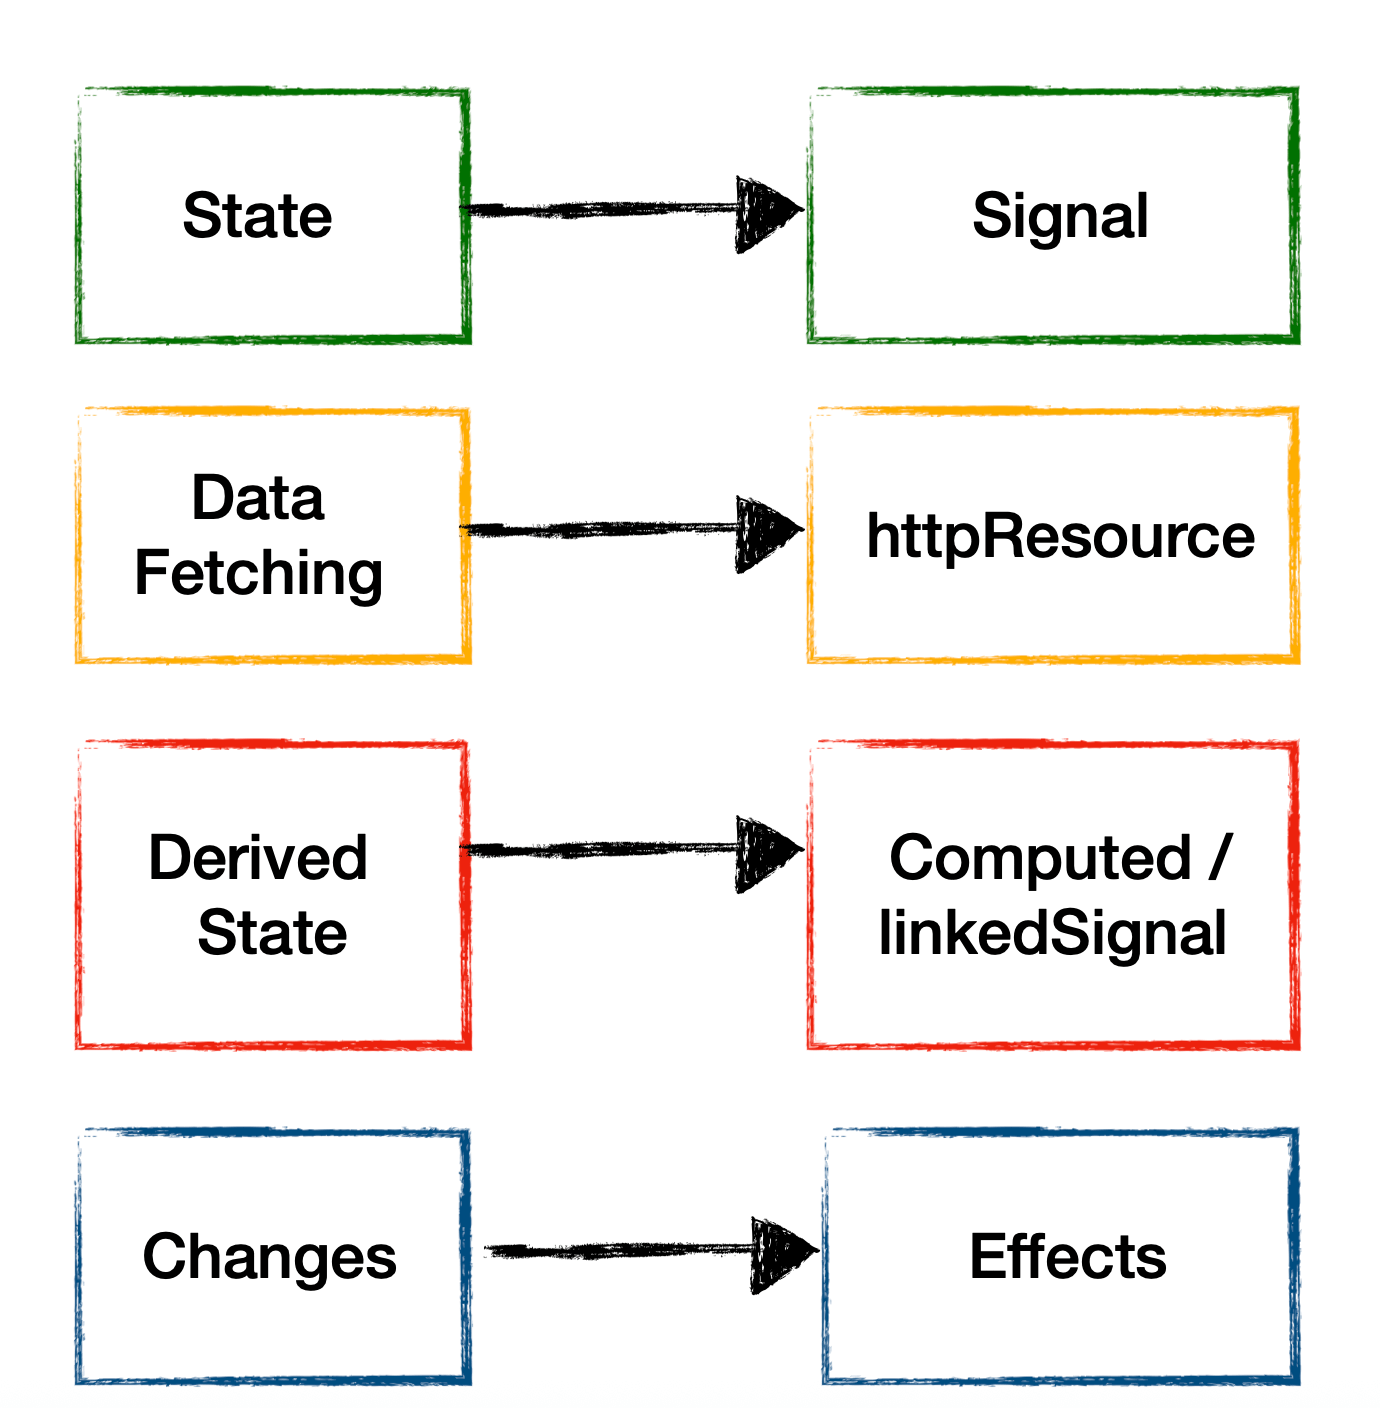
Then, add a service called ProductStore. You can consider it as a signal store that:
- Holds application state using
signal() - Computes derived values using
computed()orlinkedSignal() - Reacts to changes using
effect() - Exposes methods that update the state
import { Injectable } from '@angular/core';

@Injectable({
  providedIn: 'root',
})
export class Productstrore {

}
We are going to follow this approach:
Let’s start with fetching data from the API using the httpResource API.
productsResource = httpResource<IProduct[]>(() => ({
  url: this.apiUrl,
  method: 'GET'
}));
Next, let’s create a reactive state to hold the resource’s value, status and error. We’ll use computed() for this because httpResource exposes these fields as read-only signals.
products = computed(() => {
    if (this.productsResource.hasValue()) {
      return this.productsResource.value();
    }
    return [];
  });

  loading = computed(() => this.productsResource.isLoading());
  error = computed(() => this.productsResource.error());
  status = computed(() => this.productsResource.status());
Also, add a method to refresh the resource so that whenever data is added or mutated, it reloads.
refresh() {
    this.productsResource.reload();
  }
As of now, we have data in place in a reactive way. Now, let’s use this on a component to display the products.
@Component({
  selector: 'app-product',
  imports: [],
  templateUrl: './product.html',
  styleUrl: './product.css',
})
export class Product {

    store  = inject(Productstrore);

}
And in the template, we can use all the computed signals from the state, as shown below.
@if(store.products()){
<table class="table">
    <tr>
        <th>Id</th>
        <th>Name</th>
        <th>Price</th>
        <th>Cateogry</th>
    </tr>
    @for(product of store.products();track product.id) {
    <tr>
        <td>{{product.id}}</td>
        <td>{{product.name}}</td>
        <td>{{product.price}}</td>
        <td>{{product.category}}</td>
    </tr>
}
</table>
}
@else if(store.loading()){
    <div class="text-center">
        <div class="spinner-border text-primary" role="status">
            <span class="visually-hidden">Loading...</span>
        </div>
    </div>
}
@else if(store.error()){
    <div class="alert alert-danger text-center">
        {{store.error()?.message}}
    </div>
}
As of now, you have fetched data from the store and displayed it in the component.
Adding Record
Now, let’s add functionality to the store to create a new record using the API. To do this, we will add two signals and their corresponding computed signals to track the loading and error states.
  private addProductLoading = signal(false);
  private addProductError = signal<string | null>(null);
  isAddingProduct = computed(() => this.addProductLoading());
  isAddProductError = computed(() => this.addProductError());
Next, add a function that sends a POST request to the endpoint to create a new product. Since we’re adding a new record, we would not use httpResource. Instead, we will use HttpClient to perform the POST operation. In this function, we’ll also update the loading and error signals based on the response.
   addProduct = (product: IProduct) => {

    this.addProductLoading.set(true);
    this.http.post<IProduct>(this.apiUrl, product).subscribe({
      next: (newProduct) => {
        this.addProductLoading.set(false);
        this.refresh();
      },
      error: (error) => {
        console.error('Error adding product:', error);
        this.addProductLoading.set(false);
        this.addProductError.set('Failed to add product');
      }
    });

  }
As of now, we have added a product using the old httpClient, but handling the response in a reactive way using the signals. Now, let’s use this on a component to add a product. On the component, to add a product, let’s create a signal form.
export class AddProduct {

  store = inject(Productstrore);

  productModel = signal<IProduct>({
    id: "",
    name: "",
    description: "",
    price: "",
    category: "",
  })

  productForm = form(this.productModel)

  add(){
    let data = this.productModel();
    console.log('Adding product:', data);
    this.store.addProduct(data);
  }

}
Next, in the template, create a form and use the store’s loading and error signals to handle the UI, as shown below.
<h2 class="text-center text-info">Add Product</h2>
<hr />
<form class="form form-group">
    <input class="form-control" [field]="productForm.id" placeholder="Enter Id" />
    <br />
    <input class="form-control" [field]="productForm.name" placeholder="Enter Name" />
    <br />
    <input class="form-control" [field]="productForm.price" placeholder="Enter Price" />
    <br />
    <input class="form-control" [field]="productForm.description" placeholder="Enter Description" />
    <br />
    <input class="form-control" [field]="productForm.category" placeholder="Enter Cateogry" />
    <br />
</form>
<button class="btn btn-primary" (click)="add()">Add</button>

@if(store.isAddingProduct()){
<div class="text-center mt-3">
    <div class="spinner-border text-primary" role="status">
        <span class="visually-hidden">Adding...</span>
    </div>
</div>
}
@else if(store.isAddProductError()){
<div class="alert alert-danger text-center mt-3">
    {{store.isAddProductError()}}
</div>
}
<div>
</div>
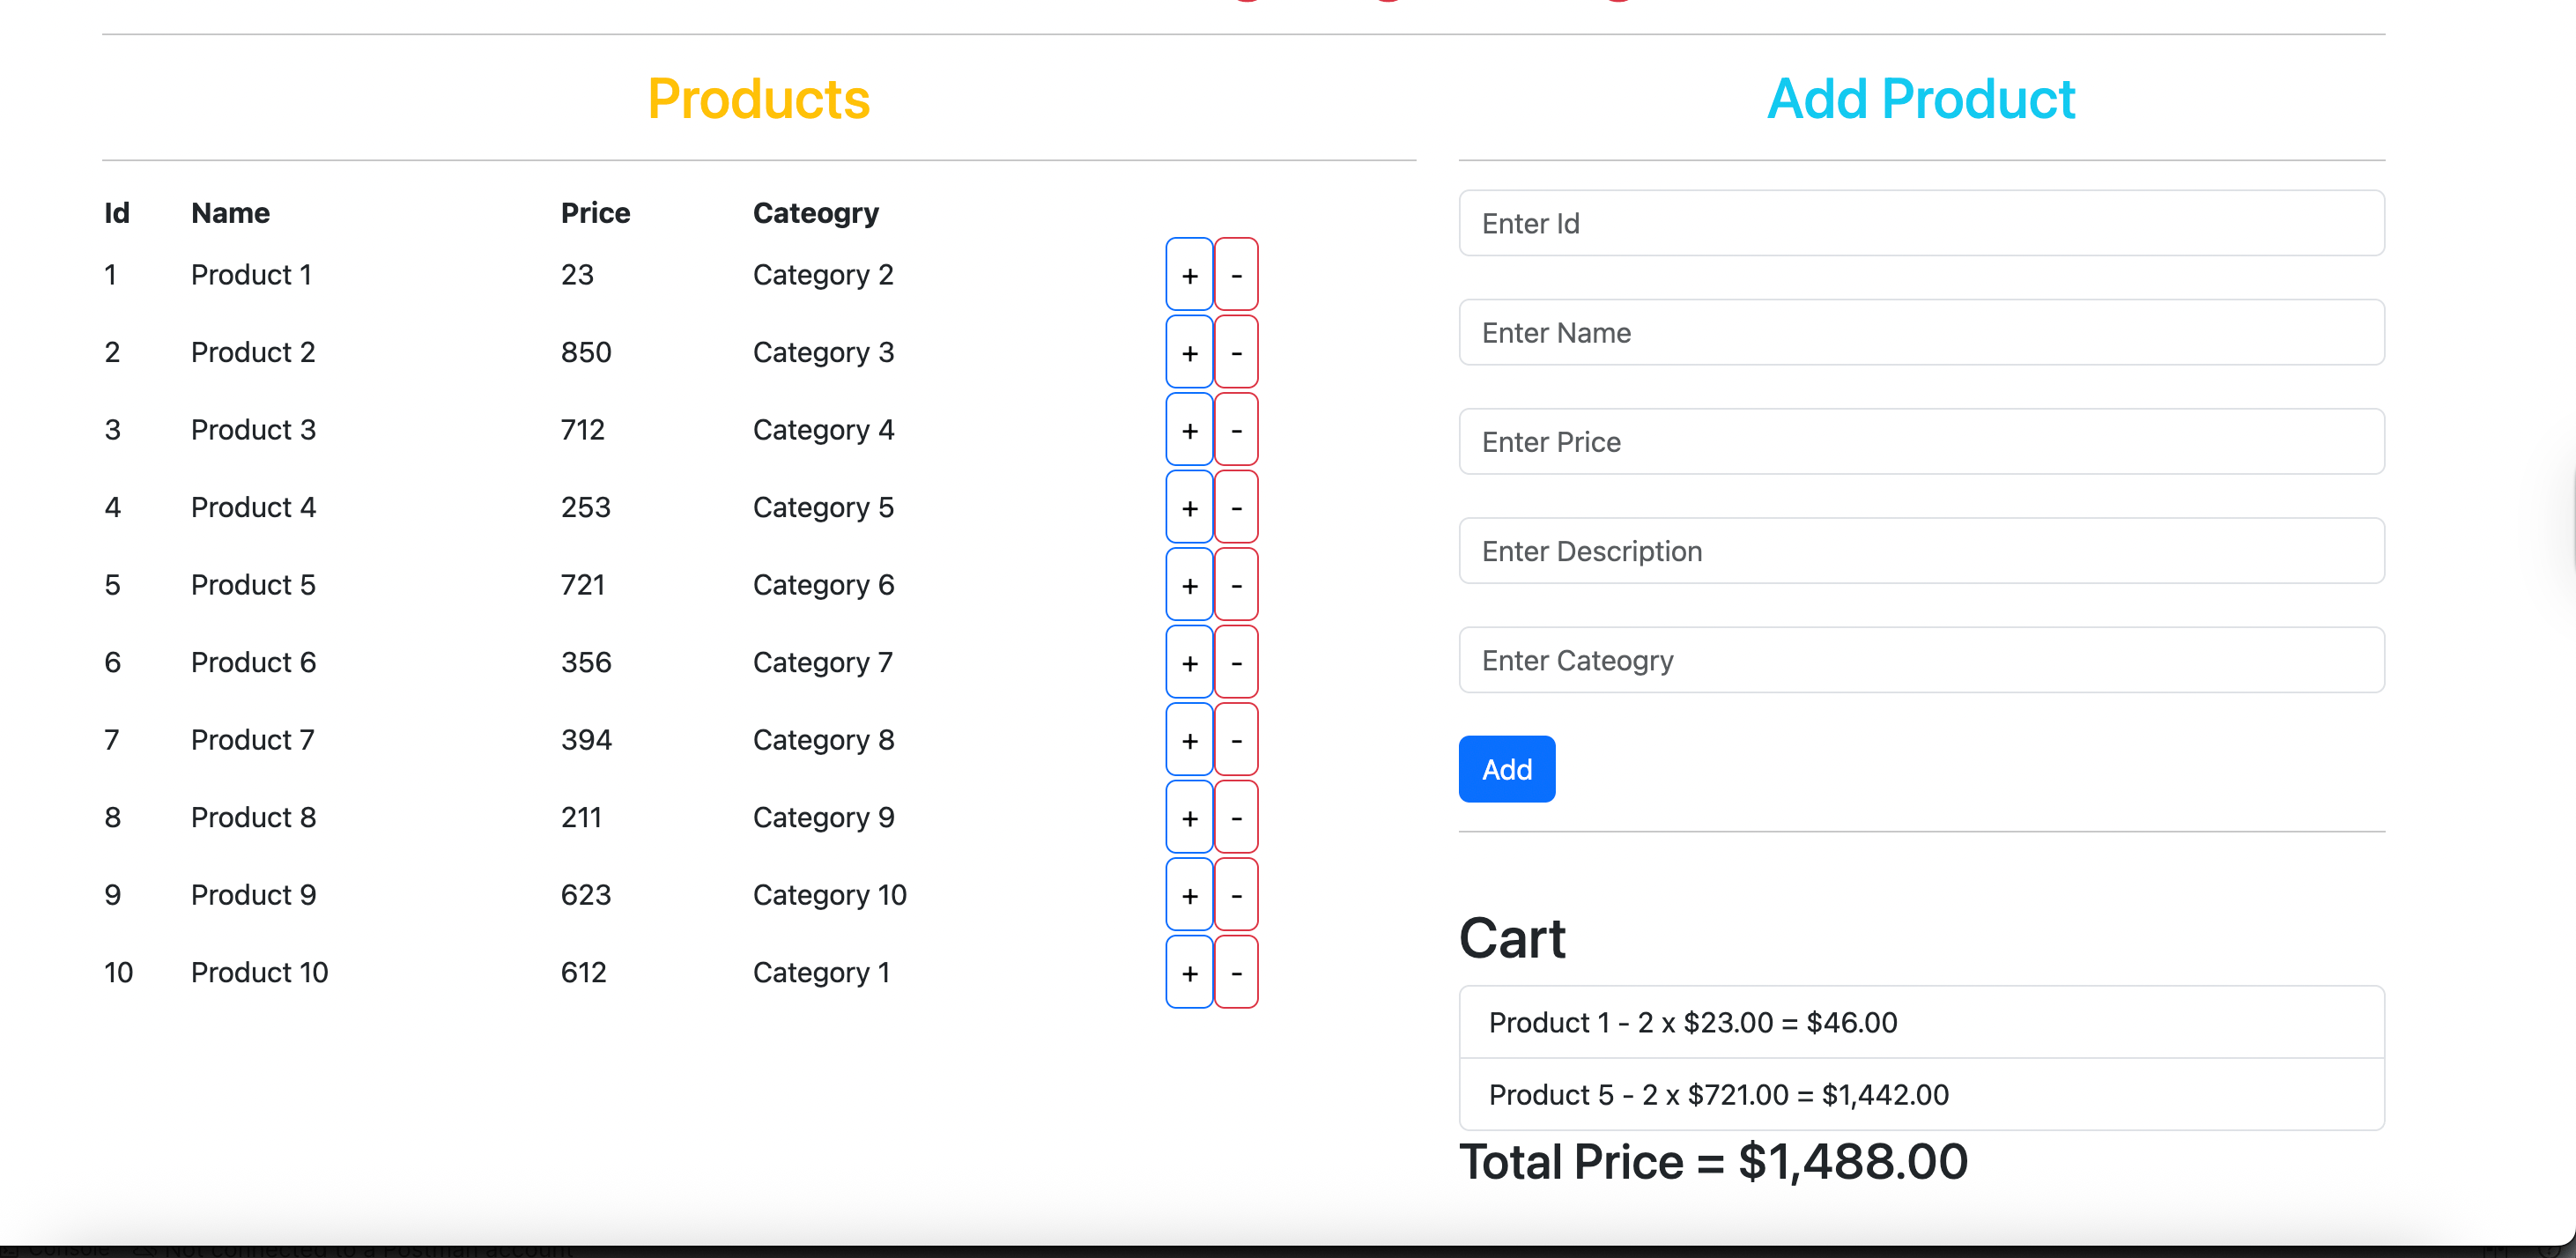
If you place the AddProduct component and the Product component next to each other, as shown below, then as soon as you add a new product, the Product component will automatically update with the latest list.
<div class="row">
    <div class="col-md-7">
     <app-product></app-product>
    </div>
    <div class="col-md-5">
      <app-add-product></app-add-product>
    </div>
  </div>
The expected output should be as follows: list products and add a product from the store.

Putting everything together, the ProductStore now looks like this. It fetches data from the API and adds new records using the API. The entire store is fully reactive and uses signals and related concepts for all operations.
import { HttpClient, httpResource } from '@angular/common/http';
import { computed, inject, Injectable, signal } from '@angular/core';
import { IProduct } from './product-model';

@Injectable({
  providedIn: 'root',
})
export class Productstrore {

  private readonly apiUrl = 'http://localhost:3000/product';
  private http = inject(HttpClient);

  productsResource = httpResource<IProduct[]>(() => ({
    url: this.apiUrl,
    method: 'GET'
  }));

  products = computed(() => {
    if (this.productsResource.hasValue()) {
      return this.productsResource.value();
    }
    return [];
  });

  loading = computed(() => this.productsResource.isLoading());
  error = computed(() => this.productsResource.error());
  status = computed(() => this.productsResource.status());

  refresh() {
    this.productsResource.reload();
  }

  private addProductLoading = signal(false);
  private addProductError = signal<string | null>(null);
  isAddingProduct = computed(() => this.addProductLoading());
  isAddProductError = computed(() => this.addProductError());

  addProduct = (product: IProduct) => {

    this.addProductLoading.set(true);
    this.http.post<IProduct>(this.apiUrl, product).subscribe({
      next: (newProduct) => {
        this.addProductLoading.set(false);
        this.refresh();
      },
      error: (error) => {
        console.error('Error adding product:', error);
        this.addProductLoading.set(false);
        this.addProductError.set('Failed to add product');
      }
    });
  }
}
Creating Cart Store
Building a cart is one of the most common examples of state management. So let’s walk through how to create it. In the cart store, the user should be able to:
- Add a product to the cart
- Increase quantity
- Decrease quantity
- Clear the cart
To start with, create an interface to model the Cart.
import { IProduct } from "./product-model";

export interface ICartItem {
  product: IProduct;
  quantity: number;
  subtotal: number;
}
Then, add a service called Cartstore.
@Injectable({
  providedIn: 'root',
})
export class Cartstore {

  private _cartItems = signal<ICartItem[]>([]);

  cartItems = computed(() => this._cartItems());

  cartCount = computed(() =>
    this._cartItems().reduce((total, item) => total + item.quantity, 0)
  );

  cartTotal = computed(() =>
    this._cartItems().reduce((total, item) => total + item.subtotal, 0)
  );

  isEmpty = computed(() => this._cartItems().length === 0);

}
In the Cartstore, we have added:
- Computed Signal to hold cart items
- Computed signal to count the total quantity
- Computed signal to calculate the total price
- Computed signal to empty the cart
Next, add a function that either adds a product to the cart or updates its quantity if the product is already in the cart.
addToCart(product: IProduct): void {
    const currentItems = this._cartItems();
    const existingItemIndex = currentItems.findIndex(item => item.product.id === product.id);

    if (existingItemIndex >= 0) {
      const updatedItems = [...currentItems];
      const existingItem = updatedItems[existingItemIndex];
      const newQuantity = existingItem.quantity + 1;
      const price = parseFloat(product.price);

      updatedItems[existingItemIndex] = {
        ...existingItem,
        quantity: newQuantity,
        subtotal: price * newQuantity
      };

      this._cartItems.set(updatedItems);

    } else {
      const price = parseFloat(product.price);
      const quantity = 1;
      const newItem: ICartItem = {
        product,
        quantity,
        subtotal: price * quantity
      };

      this._cartItems.update(items => [...items, newItem]);
    }
  }
If you look at the function above, most of the logic is simple array manipulation. After updating the array, we set the cartItems signal to share the updated state.
In the same way, you can create a function to remove a product from the cart.
removeFromCart(productId: string): void {
    const currentItems = this._cartItems();
    const item = currentItems.find(item => item.product.id === productId);
    if (item) {
      if (item?.quantity == 1) {
        this._cartItems.update(items =>
          items.filter(item => item.product.id !== productId)
        );
        return;
      }
      else {
        const price = parseFloat(item!.product.price);
        const quantity = item!.quantity - 1;
        this._cartItems.update(items =>
          items.map(item => {
            if (item.product.id === productId) {
              return {
                ...item,
                quantity,
                subtotal: price * quantity
              };
            }
            return item;
          })
        );
      }
      return;
    }
  }
Again, most of the logic is simple array manipulation. After updating the array, we set the cartItems signal to share the updated state.
As of now, we have Cartstore in place. Now, let’s use this on a component to display the carts. For that, first inject the store into the component.
@Component({
  selector: 'app-cart',
  imports: [CurrencyPipe],
  templateUrl: './cart.html',
  styleUrl: './cart.css',
})
export class Cart {

  store = inject(Cartstore);

}
On the template, display the carts and total price using the computed signals from the store as shown below:
<div>
    <h2>Cart</h2>
    <ul class="list-group">
        @for(item of store.cartItems();track item.product.id){
        <li class="list-group-item">
        {{ item.product.name }} - {{ item.quantity }} x {{ item.product.price | currency}} =  {{ item.subtotal |currency}}
        </li>
    }
    </ul>
    <h3>Total Price = {{store.cartTotal()|currency}}</h3>

</div>
Also, in the Product component, inject the Cartstore and add functions to add and remove from the cart as shown below:
 cartstore = inject(Cartstore);

  addToCart(product: IProduct) {
    this.cartstore.addToCart(product);
  }
  removeFromCart(productId: string) {
    this.cartstore.removeFromCart(productId);
  }
On the template, update the Product table with two buttons for add and remove as shown below:
<table class="table">
    <tr>
        <th>Id</th>
        <th>Name</th>
        <th>Price</th>
        <th>Cateogry</th>
    </tr>
    @for(product of store.products();track product.id) {
    <tr>
        <td>{{product.id}}</td>
        <td>{{product.name}}</td>
        <td>{{product.price}}</td>
        <td>{{product.category}}</td>
        <td>
            <button class="btn btn-primary" (click)="addToCart(product)">+</button>
            <button class="btn btn-danger" (click)="removeFromCart(product.id)">-</button>
        </td>
}
</table>
By putting everything together, the output should be:
We are using the Product, AddProduct and Cart components together within the App component.
<div class="row">
    <div class="col-md-7">
     <app-product></app-product>
     </div>
    <div class="col-md-5">
      <app-add-product></app-add-product>
      <app-cart></app-cart>
    </div>
  </div>
Summary
In this article, you learned that it is completely possible to create and manage state in an Angular application using signals, computed and httpResource. With these modern Angular features, you can avoid the complexity of NgRx and still build clean, reactive state management for your app.
I hope you found this helpful. Thanks for reading!

Dhananjay Kumar
Dhananjay Kumar is the founder of nomadcoder, an AI-driven developer community and training platform in India. Through nomadcoder, he organizes leading tech conferences such as ng-India and AI-India. He partners with startups to rapidly build MVPs and ship production-ready applications. His expertise spans Angular, modern web architecture and AI agents, and he is available for training, consulting or product acceleration from Angular to API to agents.
Related Posts
Comments
All articles
Topics
Web MobileMobile
Desktop
Design
Productivity
People
