
Power Up Your Dev Experience with Nx.io

Summarize with AI:
With Nx, you can use effective development practices pioneered at Google and Facebook. You can utilize monorepo style development by developing multiple applications within a workspace and employing reusable libraries across React, Angular, and Node applications. With Nx, you are sure to make use of modern frameworks and tools for effective development processes.
At first, you couldn’t envisage the project being bigger than a couple lines of code for the frontend. Fast-forward to ten feature requests later, and you have a backend running separately and your frontend is now a monolith. You’re struggling to incorporate new libraries and make changes to both applications. You now encounter bugs at every turn because your setup prevents you from discovering bugs early.
It sounds like a horror flick, but this experience isn’t a bit fictional. Almost every developer has had this experience when building personal or work projects. Managing a project as it grows in file quantity and complexity is a tad difficult, which is why a tool like NX is important.
Nrwl Extensions (Nx) is an open-source project created by a team of Google developers that provides tools useful for building robust and extensible monorepos. While previously only providing commands for managing complex and robust Angular projects, Nrwl Extensions now has extended support for other frontend libraries and technologies like React and Web Components. It can also be used for creating full-stack projects by providing support for backend technologies like Express, Nest.js and Next.js.
With Nx you get to overcome the following issues during development:
- Managing changes across multiple repositories as the project grows
- Lack of collaboration because sharing code is hard and expensive
- Lack of testing and linting, which leads to late discovery of bugs
Nx provides an opinionated organizational structure and a set of tools for generation, testing and linting. It uses TypeScript for static type checking, so it helps to know some of the basics of TypeScript such as type annotations and interfaces.
Getting Started with Nx—Workspaces
To get started using Nx, you have to create a workspace. Nx uses workspaces to store applications and libraries, as well as scaffolding to help with building, linting and testing.
To create an Nx workspace, you have to run the following command:
Using Yarn:
yarn create nx-workspace
Using npm:
npx create-nx-workspace
You will get a prompt for a workspace name. Enter any string you wish as the name of the organization. The workspace name is used by Nx to scope our libraries, just like npm scoped packages.
The next prompt will be to select a preset. Nx comes packed with seven presets that you can select from:
- empty [an empty workspace]
- web components [a workspace with a single app built using web components]
- angular [a workspace with a single Angular application]
- angular-nest [a workspace with a full-stack application (Angular + Nest)]
- react [a workspace with a single React application]
- react-express [a workspace with a full-stack application (React + Express)
- next.js [a workspace with a single Next.js application]
An Nx workspace is a simple folder with configurations for linting, testing and code running. To begin developing within the newly created workspace, you have to create a project within the workspace. Check out the next section where we select one of the presets and build on it.
Projects
An application or library within the workspace, an application is a package that utilizes multiple libraries to form a runnable program. An application is usually either run in the browser or by Node. To create a project, we’ll select one of the available presets. Let’s use the react-express preset.
Selecting this preset will display a prompt asking for the Application name; enter a simple name of your application and move to the next prompt. The next prompt will ask for the Default stylesheet format; you can select from the provided list or stick with the default selection if you’re not familiar with the options provided. After this, your project will be bootstrapped and the dependencies for each project will be installed and available for running.
When the command runs to completion, you should see a folder structure similar to the one presented below:
    <workspace name>/
    ├── apps/
    │   ├── <app name>/
    │   └── <app name-e2e/
    │   └── <api/
    ├── libs/
    ├── tools/
    ├── nx.json
    ├── package.json
    ├── tsconfig.json
    └── tslint.json
If you don’t wish to use any of the presets or you wish to add a new application to the workspace, you can make use of any of the following commands to install a new application:
To add a web components app, run:
yarn add --dev @nrwl/web

nx g @nrwl/web:app myapp # or just "nx g myapp"

npm install --save-dev @nrwl/web

nx g @nrwl/web:app myapp # or just "nx g myapp"
To add an Angular app, run:
yarn add --dev @nrwl/angular

nx g @nrwl/angular:app myapp # or just "nx g myapp"

npm install --save-dev @nrwl/angular

nx g @nrwl/angular:app myapp # or just "nx g myapp"
To add a React app, run:
yarn add --dev @nrwl/react

nx g @nrwl/react:app myapp # or just "nx g myapp"

npm install --save-dev @nrwl/react

nx g @nrwl/react:app myapp # or just "nx g myapp"
Use:
yarn nx g @nrwl/web:app myappornpm run nx -- g @nrwl/web:app myappif thenx gcommand fails.
To start and serve any generated application, use the following command:
nx serve <application name>
In the next section, we’ll see how we can create libraries and share them between applications in the workspace.
Libraries
A library in this context consists of a set of files that deal with related concerns. We can create a library and add that to our application. Before we create a library, let’s look at the different types of libraries that are available for use in Nx.
Types of Libraries
In a workspace, libraries are generally divided into four different types:
- Utility Libraries: contain common utilities that are shared by many projects
- Feature Libraries: implement user interfaces
- UI Libraries: contain only presentational components, that is components that render purely from their props and calls function handlers when interaction occurs
- Data-access Libraries: can be used for interacting with external services like communicating with backend services and other external endpoints
To generate libraries within your application, you can make use of any of the following commands:
React Libraries:
nx g @nrwl/react:library mylib # Generate a React Library
Angular Libraries:
nx g @nrwl/angular:library mylib # Generate an Angular Library
TypeScript Libraries:
nx g @nrwl/workspace:library mylib # Generate a Typescript Library
Creating a new library will result in something like this:
    <workspace name>
    ├── apps
    ├── libs
    │   └── mylib
    │       ├── src
    │       │   ├── lib
    │       │   └── index.ts
    │       ├── jest.conf.js
    │       ├── tsconfig.app.json
    │       ├── tsconfig.json
    │       └── tsconfig.spec.json
    ├── workspace.json
    ├── nx.json
    ├── package.json
    ├── tools
    └── tsconfig.json
No matter what kind of library it is, you can run:
-
nx test <lib name>to test the library -
nx lint <lib name>to lint the library
By default, libraries are only buildable in the context of an application. To be able to build a library independently, you can pass
--publishablewhen creating it. You can then runnx build mylibto build it, and then publish the results to an npm registry.
Understanding Your Nx Workspace
An Nx workspace can contain dozens (or hundreds) of applications and libraries. It can be difficult to understand how they depend upon each other, and the implications of making a particular change.
With Nx, you can see how your applications are linked using the following command: nx dep-graph. Running this command will generate a current dependency diagram of the workspace: the applications and libraries available and how they depend on each other. Nx runs code analysis in the workspace to collect this information.
The image below shows how a workspace looks when the nx dep-graph command is run:
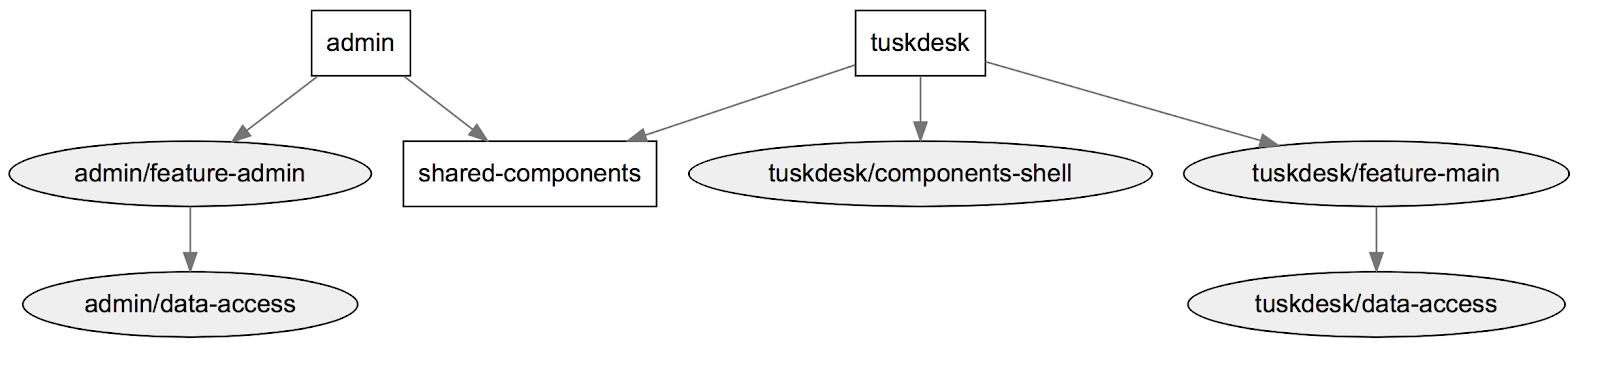
It doesn’t end there—Nx also provides a command to visually inspect which applications will be affected by a change to a reusable library. This will ensure that a code change to any library used by two or more applications isn’t affected negatively by any change made. This is achievable because Nx understands how our applications are linked within the workspace. To check affected applications after a change, use any of the following commands.
nx affected:apps  # prints the apps affected by a PR

nx affected:build  # reruns build for all the projects affected by a PR

nx affected:test  # reruns unit tests for all the projects affected by a PR

nx affected:e2e  # reruns e2e tests for all the projects affected by a PR

nx affected --target=lint  # reruns any target (for instance lint) for projects affected by a PR
Nx will topologically sort the projects and will run what it can in parallel. You can read more on how Nx manages your workspace here.
Testing and Code Formatting
Nx not only provides tools to better manage a monorepo workspace, but it also provides tools to ensure code quality, readability and modern testing tools.
Testing
For testing, Nx makes use of two of the best testing tools for modern web applications. Cypress is chosen as the e2e test runner; it possesses the following features to ensure proper testing of applications:
- Time travel
- Real-time reloads
- Automatic waiting
- Spies, stubs, and clocks
- Network traffic control
- Screenshots and videos
By default, when creating a new web application, Nx will use Cypress to create the e2e tests project. To run e2e tests after making a change in your application run any of the following commands:
- `nx e2e frontend-e2e` to run e2e tests

- `nx e2e frontend-e2e --watch` to run e2e tests in the watch mode

- `nx e2e frontend-e2e --headless` to run e2e tests in the headless mode (used in CI)
Jest is a delightful JavaScript testing framework from Facebook that requires zero-config and runs isolated (them in their processes to maximize performance) tests. By default, Nx uses Jest for both web and Node.js applications.
Some of the benefits of Jest as testing framework are the following:
- Zero configs: Jest aims to work out of the box, config free, on most JavaScript projects.
- Isolated tests: Tests are parallelized by running them in their processes to maximize performance.
-
Great API: From
ittoexpect, Jest has the entire toolkit in one place. Well documented, well maintained, well and good.
To run tests for your applications run the following command:
npm run test
Code Formatting
Pointing out code formatting issues during code reviews is not the best way to review code. That’s why Nx comes with Prettier support. Prettier is an opinionated code formatter that has support for multiple languages. With Nx, you can use Prettier to check the formatting of your application files and also format them. You can use the following commands to check and format your code within an Nx workspace:
nx format:write # formats the files

nx format:check # checks that the formatting is correct (used in CI)
Read more about it here.
Summary
With Nx, you can use effective development practices pioneered at Google and Facebook. You can utilize monorepo style development by developing multiple applications within a workspace and employing reusable libraries across React, Angular, and Node applications. With Nx, you are sure to make use of modern frameworks and tools for effective development processes.

Christian Nwamba
Chris Nwamba is a Senior Developer Advocate at AWS focusing on AWS Amplify. He is also a teacher with years of experience building products and communities.