KendoReact: What Can It Do for You?

Summarize with AI:
In this first post in the Getting Started with KendoReact series, you'll learn what KendoReact can do for you, the React developer.
The Kendo UI team has been building component libraries for over 15 years and they have gained a lot of experience with user interface components in particular. They've built them for jQuery, Angular, Vue, and now they're out with a true native component library built specifically for React.
A license holder will gain access to the React libraries as well as all of the other Kendo UI flavors (Angular, React, Vue and jQuery) with the Kendo UI bundle, though you can also purchase the KendoReact license exclusively. Not that anybody would ever stray from React or have different projects where they use different libraries 😋. But, just in case, you can easily have all of our JavaScript libraries at your disposal.
Why React?
We decided to build a library specifically for React, because React is cool 😎. Okay, but more importantly, a lot of developers use it, including myself and probably you. The Kendo UI team wanted to build a library that would make React applications more efficient, faster, and easier to build. This is why we have a library that's specifically made with native React components. No funny business behind the scenes with wrappers and such, although we do have jQuery wrappers for React if that's what you prefer. But we advise those starting fresh to use our native component library for React instead.
What all does that mean for your React application? These React components are composable and precisely configurable to give you the ability to work with them just as you would any other React component. They support controlled and uncontrolled state - in both cases, we got you covered!
What Other Components are There?
To check out a list of all of the components (to date), just head over to the KendoReact page and explore. It's a long list, so feel free to take a minute before getting back to the article. I should also mention that we have a roadmap to see what's coming in the future.
To use these components, all you need to do is install them using npm, import them into your existing React project, add them to your JSX template, and that's it!
If you have a basic Create React App started we can try it with the following npm install command:
npm install @progress/kendo-react-ripple @progress/kendo-react-buttons @progress/kendo-theme-defaultThen, in the App.js file, we would import the following:
import { Ripple } from '@progress/kendo-react-ripple';
import { Button } from '@progress/kendo-react-buttons';
import '@progress/kendo-theme-default/dist/all.css';
With the following component definition:
class App extends React.Component {
  render() {
    return (
      <div className="example-wrapper">
        <Ripple>
          <p>Ripple on Buttons</p>
          <Button>Primary Button</Button>
        </Ripple>
      </div>
    );
  }
}
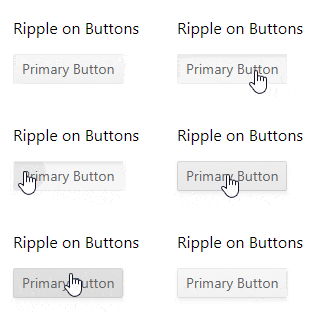
Here is the output we will get:

It's pretty easy, and one of my favorite things about using KendoReact is that styling is done for you when using our Sass themes. We know CSS isn't easy for everyone, and even if it is easy for you, it's still nice to have a theme to work with. For this reason we have created several of them, including our Kendo Default theme, Material theme, and a Bootstrap theme. With these, all you need to do is install the theme with npm and then import it into your project. As we did in the example above, the theme is one npm install and an import:
npm install @progress/kendo-theme-defaultimport '@progress/kendo-theme-default/dist/all.css';With minimal effort, the themes give you lovely styled components that are consistent across your application, across components, and across projects. You don't have to touch the CSS files unless you want to provide overrides or additional customization. You also get different interactions and animations with these style libraries.
Accessibility
Support for accessibility is very important to us, we want everyone using your applications to feel comfortable. It can take time and effort to meet standard accessibility guidelines, but for our components, again, we got you covered. When you use the Kendo UI components we give you a lot of accessibility right out of the box. This includes Section 508 compliance, W3C web content accessibility guidelines, WCAG 2.1, WAI-ARIA and keyword navigation. This relieves you from having to put major development hours into custom-built components of your own. Instead, just use KendoReact because accessibility comes with the components.
Internationalization
We also provide standard internationalization support if using dates (or numbers like date input) as well as grids, numeric text boxes, etc.
Support When You Need it
At some point, everybody needs a little help! In those cases where you may hit some bumps in the road or you may not understand something, for our license holders, we offer different sources of help and support. This includes three support options for rapid help from the developers who make the product, as well as an option for 24-7 human support for tailor-made projects. You can also visit community forums where other people who are using the Kendo UI library and actual Kendo UI team members are there to help you answer questions, have discussions, and talk about different strategies they using our components.
Demos, Tutorials and Examples
There are more resources like interactive demos that you can explore. We also have example projects, webinars, blog posts, and tutorials that will give you more resources to help you. A little extra to help guide you beyond the documentation that we already have for each component.
Check out the next in the series, KendoReact: What Can It Do for You?

Eric Bishard
Eric Bishard is a Developer Advocate and former member of the KendoReact team at Progress. A software engineer with experience building web based applications with a focus on components for user interfaces in Angular and React, Eric works with @Couchbase, tweets @httpJunkie and blogs at ReactStateofMind.com.
