
Kendo UI for jQuery: AI Coding Assistant

Summarize with AI:
See how the Kendo UI for jQuery AI Coding Assistant can help speed up development and prototyping with an MCP server that provides contextually aware code that follows Kendo UI patterns.
AI-powered coding assistants have become an important part of modern software engineering workflows. While AI tools excel at generating code quickly, they still require solid context to deliver their full value. This context becomes even more important when working with a UI library like Progress Kendo UI for jQuery, where correct APIs and configuration patterns matter. This is where the Kendo UI for jQuery AI Coding Assistant comes in.
In this article, we’ll explore what the AI Coding Assistant offers and how it helps speed up component development and prototyping when building applications with Kendo UI for jQuery.
Prerequisites: To use the Kendo UI for jQuery AI Coding Assistant, you’ll need a compatible MCP client (we’ll be using Cursor in this article), an active Kendo UI for jQuery license (or trial) and an application that includes Kendo UI for jQuery.
MCP (Model Context Protocol)
Model Context Protocol (MCP) is an open standard developed by Anthropic that standardizes how applications provide context to AI models and agents. Think of it as a common language that allows different systems to share information with AI in a structured way.
MCP works through servers that expose specific tools and knowledge to AI clients. When we install an MCP server, we’re essentially giving our AI assistant access to specialized expertise in a particular domain. For Kendo UI for jQuery, this means the AI can understand component APIs, configuration options and implementation patterns that it wouldn’t otherwise know about.
The Kendo UI for jQuery AI Coding Assistant is integrated into an MCP Server, which means any MCP-compatible client (like Cursor or VS Code) can tap into this specialized knowledge.
Check out the article The Promise of Model Context Protocol for more details on MCP and what it offers.
Setting Up the MCP Server with Cursor
Cursor is an AI-powered code editor that has native support for MCP servers. Let’s walk through the setup process.
Configuring the MCP Server
The first step is creating the MCP configuration file. In the root of our Kendo UI for jQuery project, we’ll create a .cursor folder with an mcp.json file:
{
  "mcpServers": {
    "kendo-jquery-assistant": {
      "type": "stdio",
      "command": "npx",
      "args": ["-y", "@progress/kendo-jquery-mcp@latest"],
      "env": {
        "TELERIK_LICENSE_PATH": "./telerik-license.txt"
      }
    }
  }
}
This configuration tells Cursor to set up the Kendo UI for jQuery MCP server with the name kendo-jquery-assistant. The TELERIK_LICENSE_PATH environment variable should point to the location of our Telerik license file.
After creating the
mcp.jsonfile, you may need to restart Cursor to pick up the new MCP configuration.
Enabling MCP in Cursor Settings
Once we’ve set up the configuration file, we’ll need to verify the MCP server is enabled in Cursor’s settings. We can open Cursor settings and navigate to the “MCP Tools” section, and we should see our kendo-jquery-assistant server listed there. We can toggle it on to enable the server.
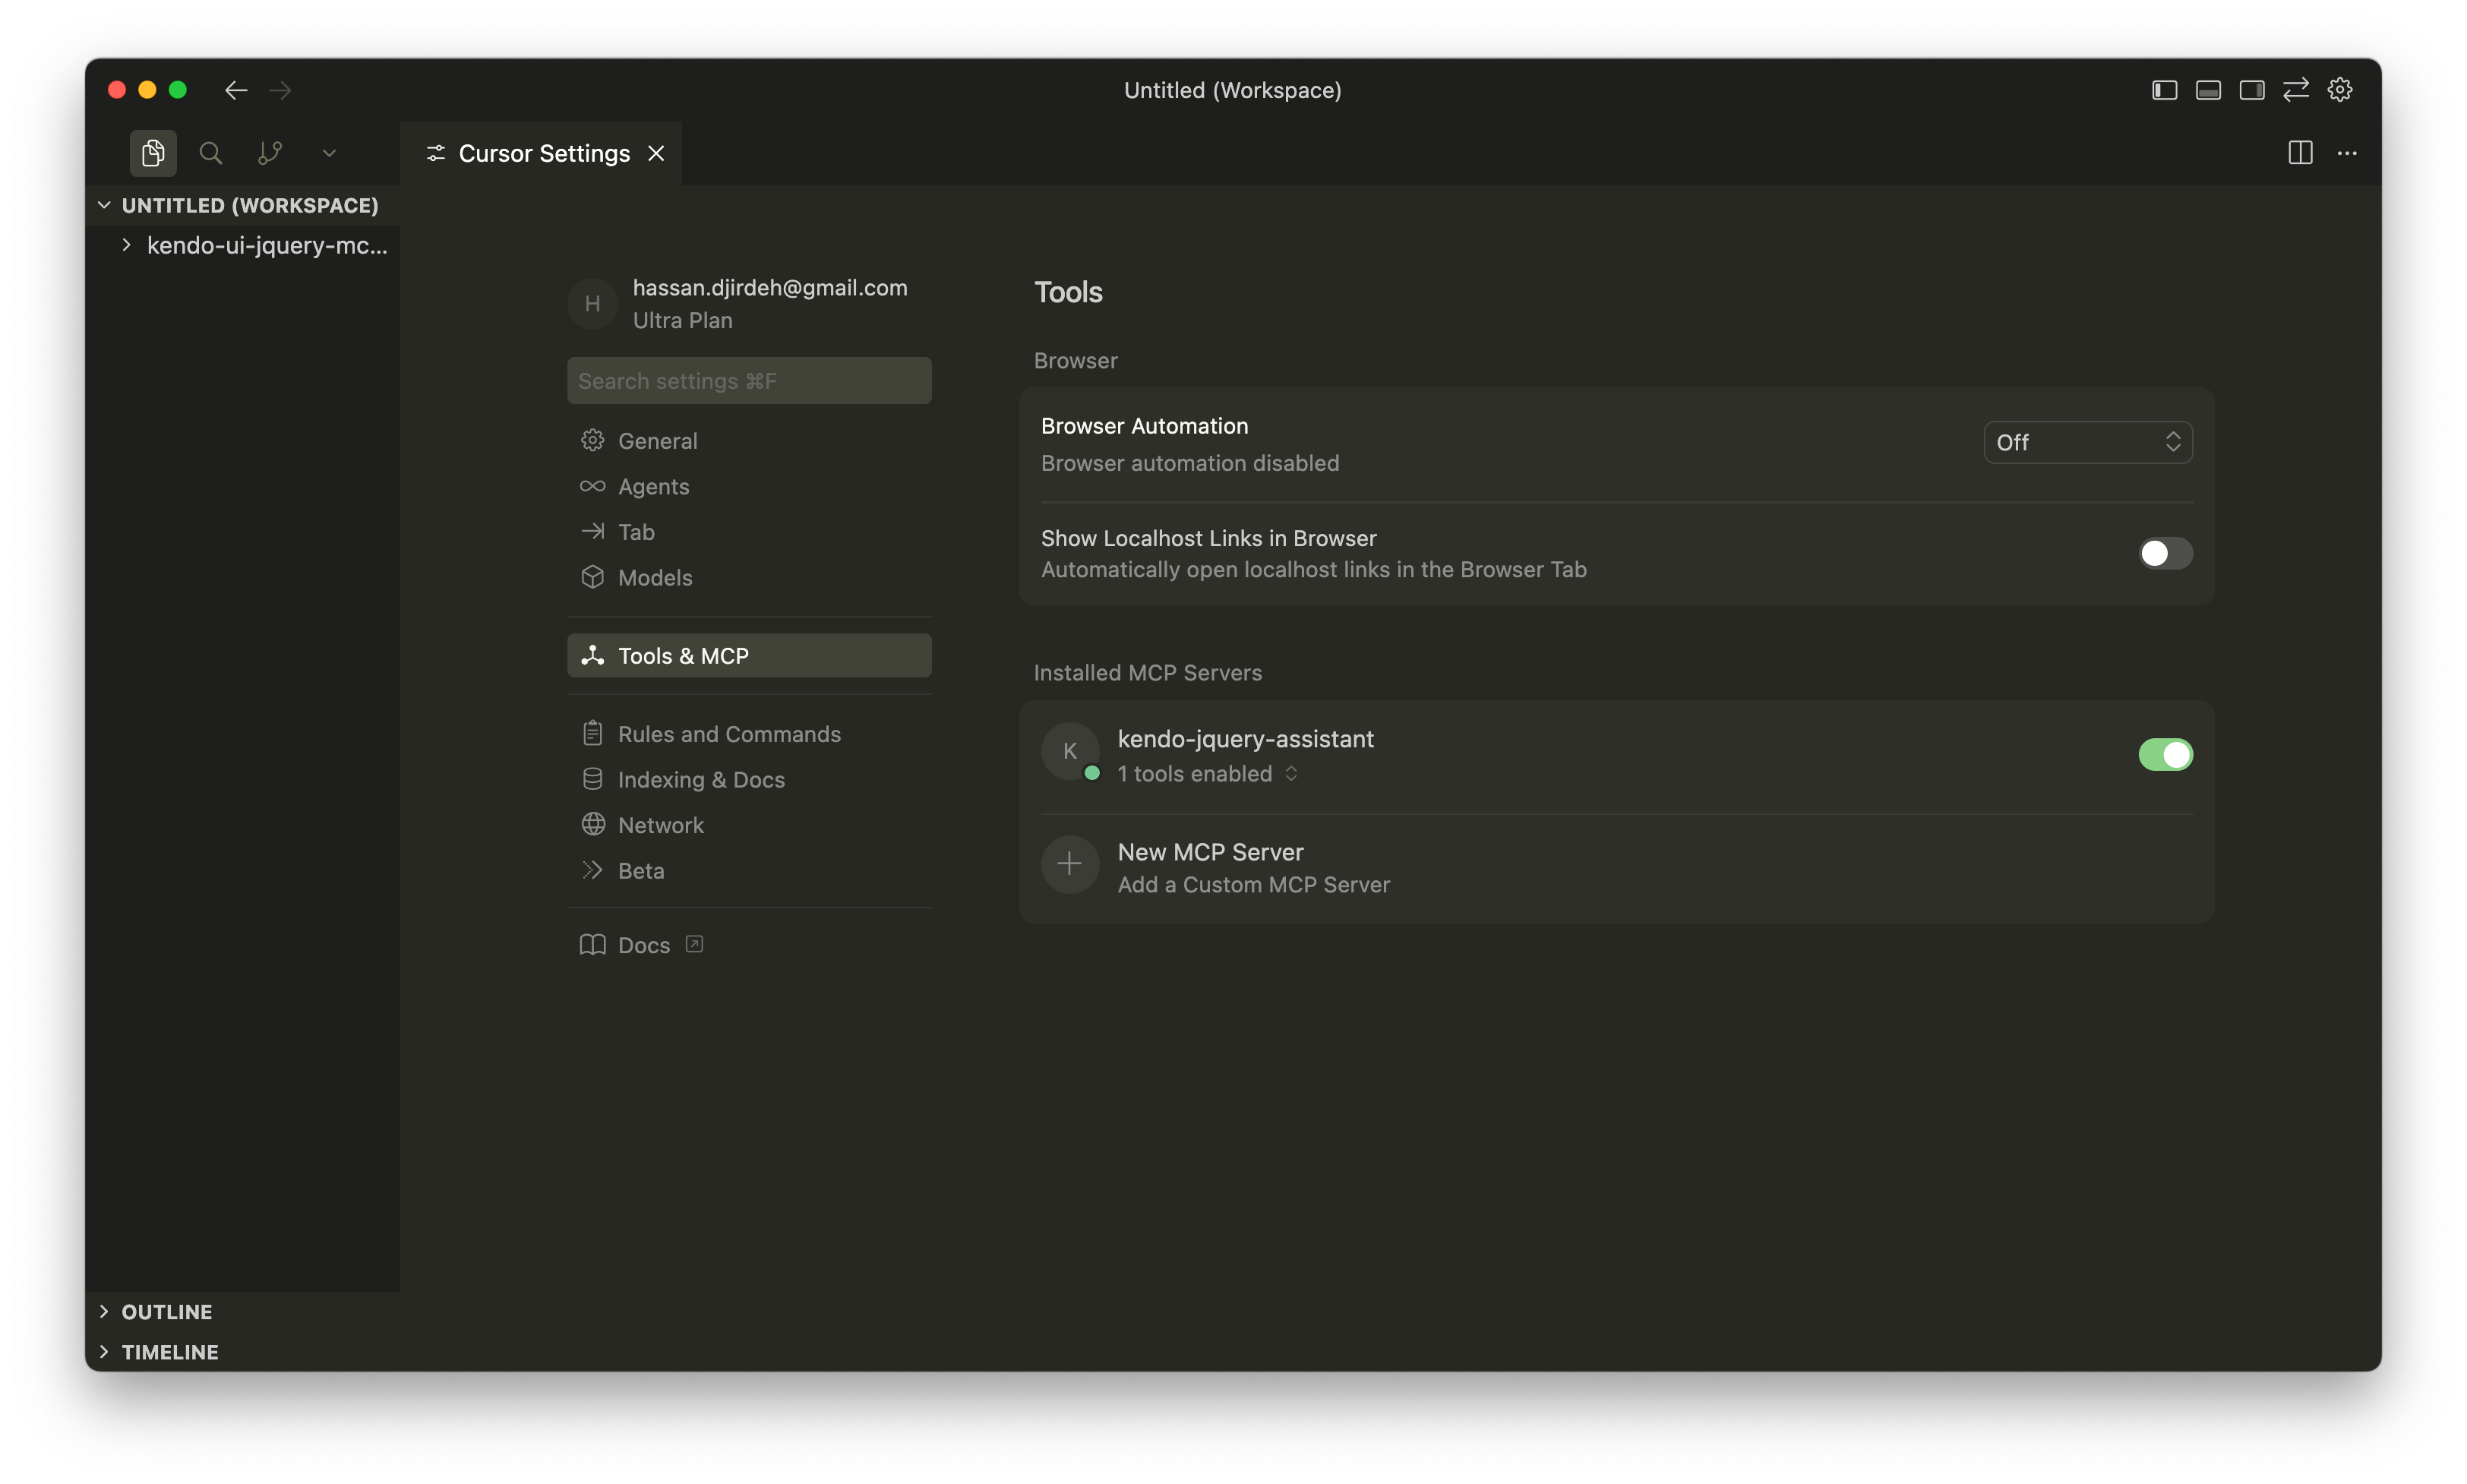
When the server appears in the list and is enabled, we’re ready to start using the AI Coding Assistant.
Using the AI Coding Assistant
Before we dive into examples, there are a couple of things to keep in mind when working with the Kendo UI for jQuery AI Coding Assistant.
First, we need to make sure our prompts start with one of these trigger phrases: /kendojquery or @kendojquery, which tells Cursor to use the MCP server.
Second, we should verify that the MCP server is actually being used. We’ll look for confirmation messages like “Running kendo-jquery-assistant” or similar statements in the output. If we don’t see this, we might need to rephrase our prompt or check our configuration.
Building a Grid with the Help of the AI Coding Assistant
Now that we have the Kendo UI for jQuery AI Coding Assistant configured, let’s explore how it enhances our development workflow by building a Kendo UI Grid.
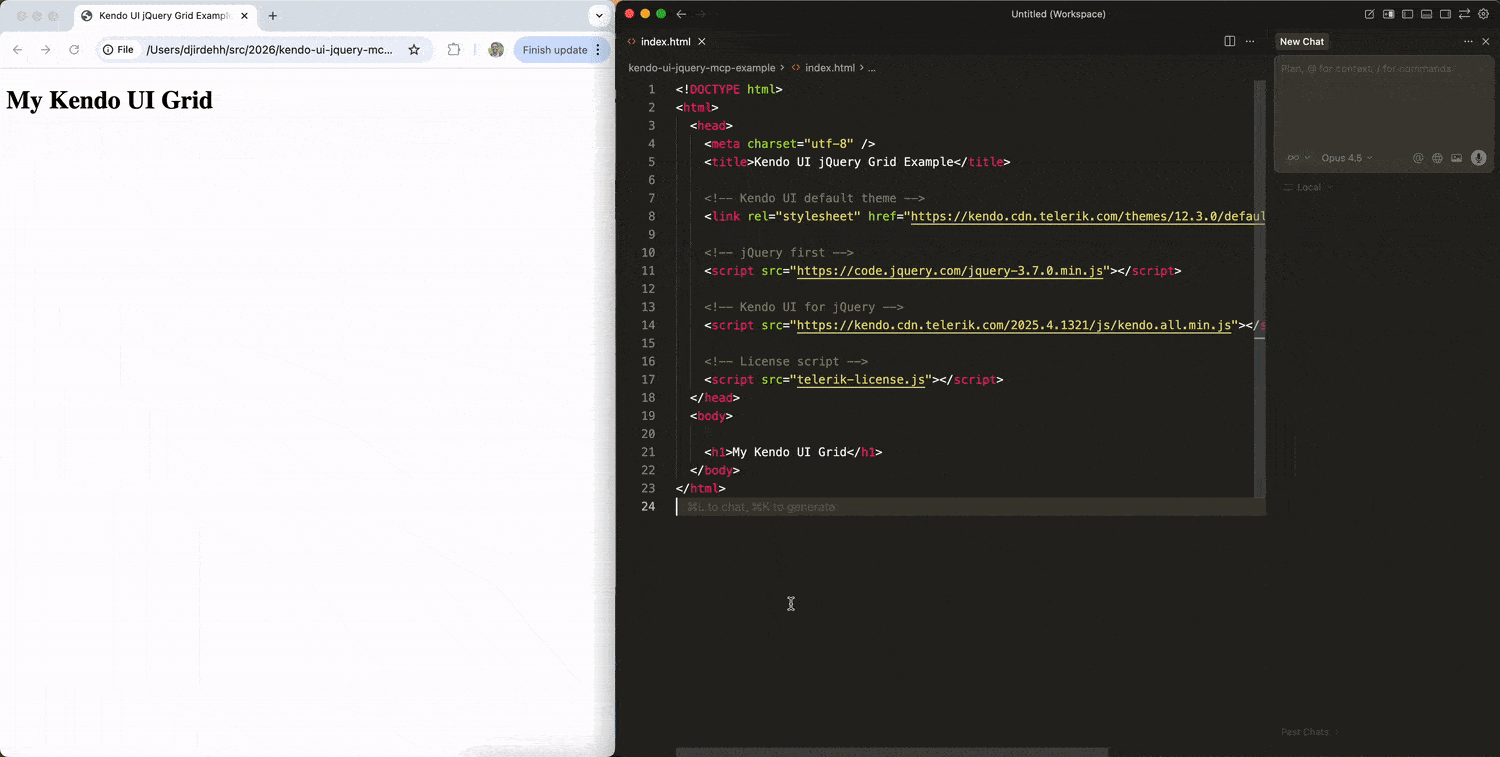
Before we start prompting, here’s the base HTML file we’ll be working with. It includes the Kendo UI theme, jQuery and the Kendo UI for jQuery scripts:
<!DOCTYPE html>
<html>
  <head>
    <meta charset="utf-8" />
    <title>Kendo UI jQuery Grid Example</title>

    <!-- Kendo UI default theme -->
    <link rel="stylesheet" href="https://kendo.cdn.telerik.com/themes/12.3.0/default/default-main.css" />

    <!-- jQuery first -->
    <script src="https://code.jquery.com/jquery-3.7.0.min.js"></script>

    <!-- Kendo UI for jQuery -->
    <script src="https://kendo.cdn.telerik.com/2025.4.1321/js/kendo.all.min.js"></script>

    <!-- License script -->
    <script src="telerik-license.js"></script>
  </head>
  <body>
    <h1>My Kendo UI Grid</h1>
  </body>
</html>
With this foundation in place, we can start using the AI Coding Assistant to build our Grid.
Creating a Basic Grid with Sorting and Paging
We’ll start with a simple prompt to create a Grid from scratch:
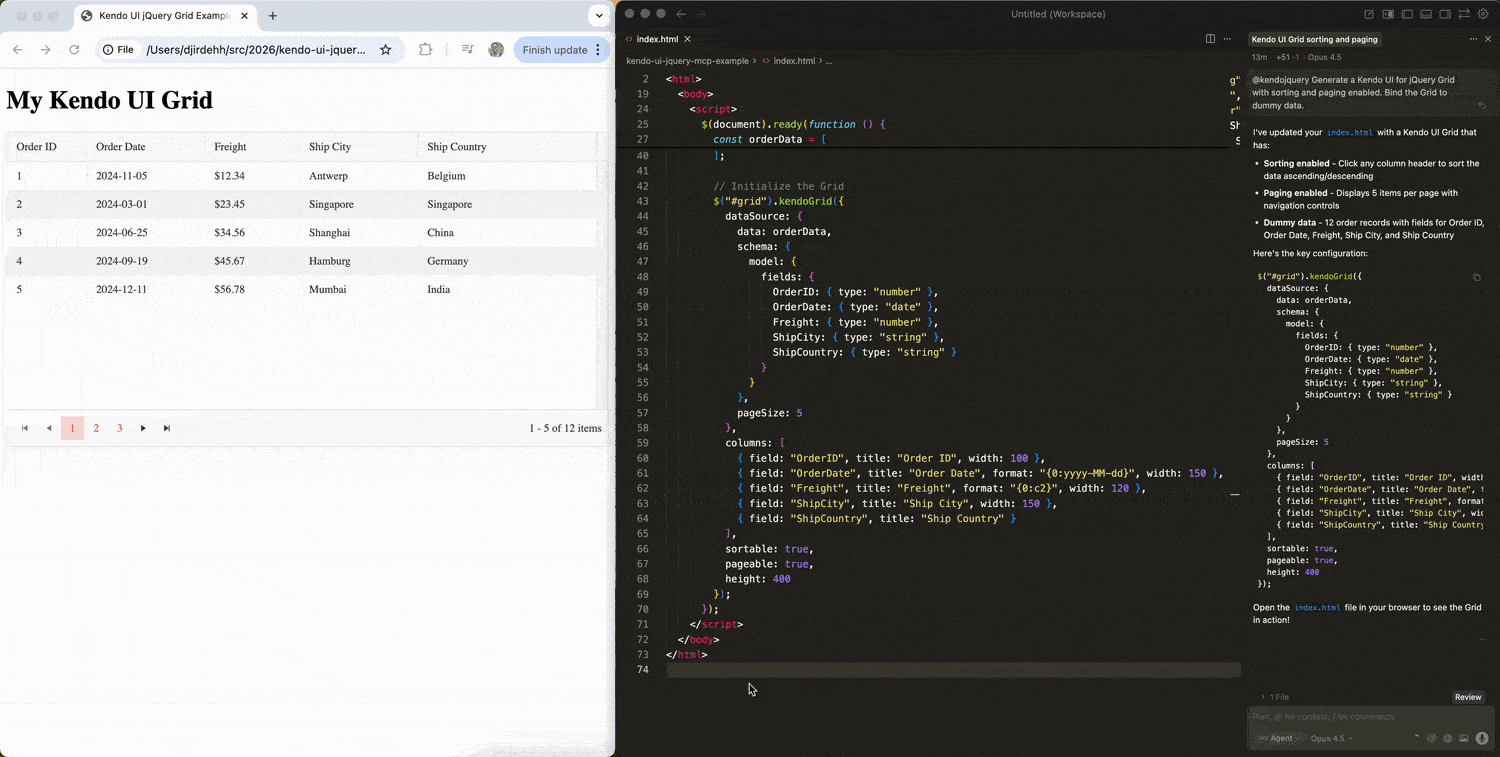
Prompt: @kendojquery Generate a Kendo UI for jQuery Grid with sorting and paging enabled. Bind the Grid to dummy data.
The MCP server processes this request and provides us with a complete implementation.
The generated code includes everything we need to get started:
<!DOCTYPE html>
<html>
  <head>
    <meta charset="utf-8" />
    <title>Kendo UI jQuery Grid Example</title>

    <!-- Kendo UI default theme -->
    <link rel="stylesheet" href="https://kendo.cdn.telerik.com/themes/12.3.0/default/default-main.css" />

    <!-- jQuery first -->
    <script src="https://code.jquery.com/jquery-3.7.0.min.js"></script>

    <!-- Kendo UI for jQuery -->
    <script src="https://kendo.cdn.telerik.com/2025.4.1321/js/kendo.all.min.js"></script>

    <!-- License script -->
    <script src="telerik-license.js"></script>
  </head>
  <body>
    <h1>My Kendo UI Grid</h1>

    <div id="grid"></div>

    <script>
      $(document).ready(function () {
        // Dummy data for the Grid
        const orderData = [
          { OrderID: 1, OrderDate: new Date("2024-11-06"), Freight: 12.34, ShipCity: "Antwerp", ShipCountry: "Belgium" },
          { OrderID: 2, OrderDate: new Date("2024-03-02"), Freight: 23.45, ShipCity: "Singapore", ShipCountry: "Singapore" },
          { OrderID: 3, OrderDate: new Date("2024-06-26"), Freight: 34.56, ShipCity: "Shanghai", ShipCountry: "China" },
          { OrderID: 4, OrderDate: new Date("2024-09-20"), Freight: 45.67, ShipCity: "Hamburg", ShipCountry: "Germany" },
          { OrderID: 5, OrderDate: new Date("2024-12-12"), Freight: 56.78, ShipCity: "Mumbai", ShipCountry: "India" },
          { OrderID: 6, OrderDate: new Date("2025-02-08"), Freight: 67.89, ShipCity: "Shanghai", ShipCountry: "China" },
          { OrderID: 7, OrderDate: new Date("2025-05-05"), Freight: 78.90, ShipCity: "Tokyo", ShipCountry: "Japan" },
          { OrderID: 8, OrderDate: new Date("2025-08-03"), Freight: 89.01, ShipCity: "Port Klang", ShipCountry: "Malaysia" },
          { OrderID: 9, OrderDate: new Date("2025-10-29"), Freight: 90.12, ShipCity: "Rotterdam", ShipCountry: "Netherlands" },
          { OrderID: 10, OrderDate: new Date("2025-01-23"), Freight: 10.32, ShipCity: "Vancouver", ShipCountry: "Canada" },
          { OrderID: 11, OrderDate: new Date("2024-04-17"), Freight: 21.43, ShipCity: "Colón", ShipCountry: "Panama" },
          { OrderID: 12, OrderDate: new Date("2024-07-11"), Freight: 32.54, ShipCity: "Manila", ShipCountry: "Philippines" }
        ];

        // Initialize the Grid
        $("#grid").kendoGrid({
          dataSource: {
            data: orderData,
            schema: {
              model: {
                fields: {
                  OrderID: { type: "number" },
                  OrderDate: { type: "date" },
                  Freight: { type: "number" },
                  ShipCity: { type: "string" },
                  ShipCountry: { type: "string" }
                }
              }
            },
            pageSize: 5
          },
          columns: [
            { field: "OrderID", title: "Order ID", width: 100 },
            { field: "OrderDate", title: "Order Date", format: "{0:yyyy-MM-dd}", width: 150 },
            { field: "Freight", title: "Freight", format: "{0:c2}", width: 120 },
            { field: "ShipCity", title: "Ship City", width: 150 },
            { field: "ShipCountry", title: "Ship Country" }
          ],
          sortable: true,
          pageable: true,
          height: 400
        });
      });
    </script>
  </body>
</html>
The code includes realistic dummy data, proper Grid initialization with jQuery’s document ready pattern and appropriate configuration for sorting and paging.
This is where the AI Coding Assistant really shines. Instead of receiving generic code that may not work correctly with Kendo UI for jQuery, we’re getting code that follows the library’s practices and patterns.
Adding Filtering Capabilities
Building on our basic Grid, let’s add filtering functionality with a follow-up prompt:
Prompt: @kendojquery Can we add filtering to this Grid?
The MCP server understands our existing context and enhances the implementation:
$("#grid").kendoGrid({
  dataSource: {
    data: orderData,
    schema: {
      // ...
    },
    pageSize: 5
  },
  columns: [
    // ...
  ],
  sortable: true,
  filterable: true, // filterable is added
  pageable: true,
  height: 400
});
The MCP server intelligently added the filterable: true property to our Grid configuration, which demonstrates how we can iteratively build up our components through conversation with the AI.
Enabling Inline Editing
We’ll take our Grid one step further by adding the ability to edit cells inline:
Prompt: @kendojquery Can we make the ship city and ship country columns editable inline?
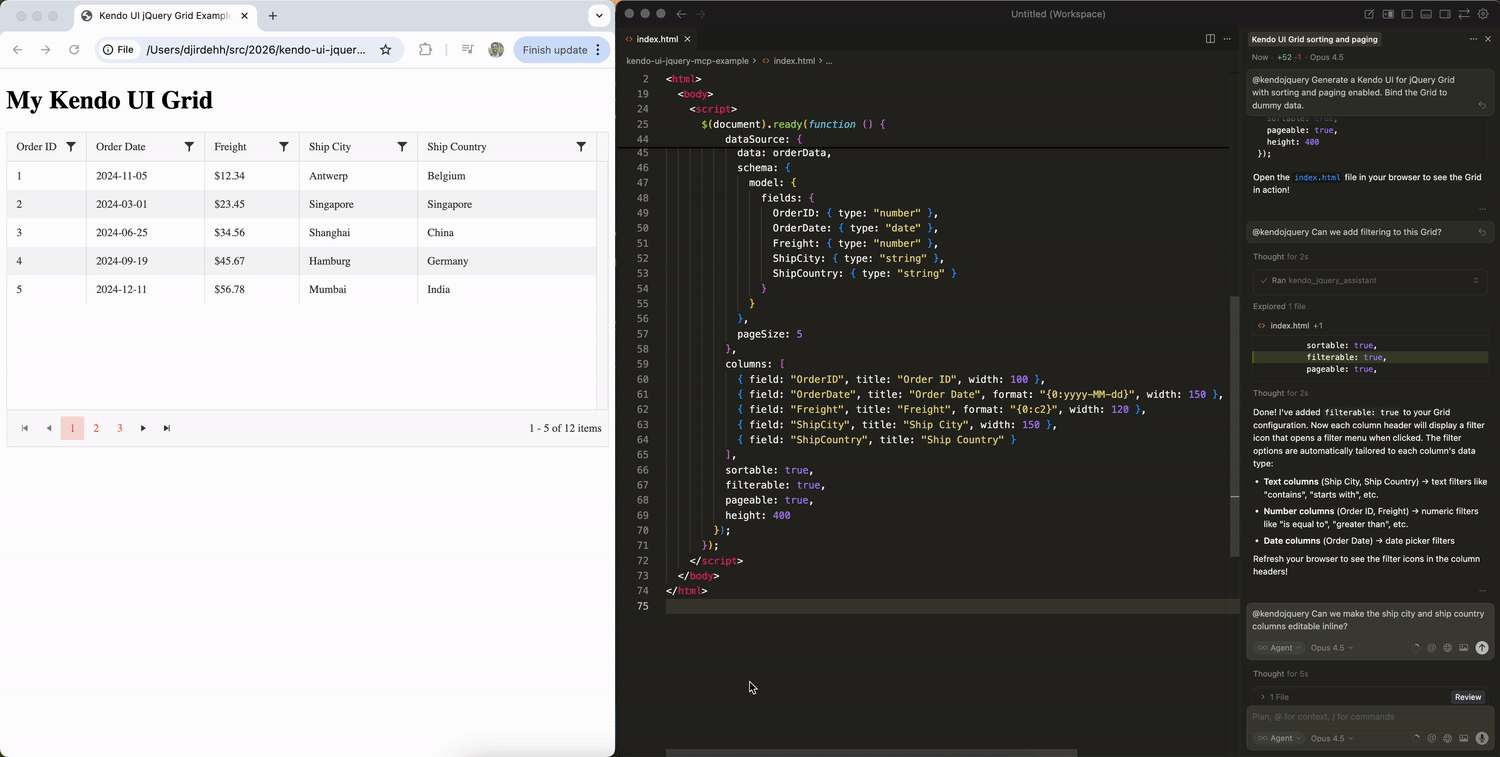
The MCP server enhances our Grid with editing capabilities:
$("#grid").kendoGrid({
  dataSource: {
    data: orderData,
    schema: {
      OrderID: { type: "number", editable: false },
      OrderDate: { type: "date", editable: false },
      Freight: { type: "number", editable: false },
      // adding editable: true to these columns
      ShipCity: { type: "string", editable: true },
      ShipCountry: { type: "string", editable: true }
    },
    pageSize: 5
  },
  columns: [
    // ...
  ],
  // ...
});
The MCP server understood exactly what we needed. It added the editable property and configured the dataSource schema to specify which fields should be editable. The OrderID, OrderDate and Freight fields are marked as non-editable, while ShipCity and ShipCountry can be edited directly in the Grid cells.
This iterative approach shows the power of working with the AI Coding Assistant. We started with a basic Grid and progressively added sorting, paging, filtering, and now inline editing, all through natural conversation.
Wrap-up
While much of the AI coding hype focuses on newer frameworks, the Kendo UI for jQuery AI Coding Assistant shows that teams working with established technologies like jQuery can still benefit from these same productivity gains.
In this article, we’ve seen how the MCP server provides contextually aware code that follows Kendo UI patterns. Instead of fixing generic AI output or cross-referencing documentation, we can iterate quickly and let the assistant handle the component-specific details.
For more details, check out the official Kendo UI for jQuery AI Coding Assistant documentation. And don’t forget, you can try it yourself, free for 30 days!

Hassan Djirdeh
Hassan is a senior frontend engineer and has helped build large production applications at-scale at organizations like Doordash, Instacart and Shopify. Hassan is also a published author and course instructor where he’s helped thousands of students learn in-depth frontend engineering skills like React, Vue, TypeScript, and GraphQL.
Related Posts
Comments
All articles
Topics
Web MobileMobile
Desktop
Design
Productivity
People
