Introduction to gRPC as a Tool for Connecting Microservices

Summarize with AI:
Learn how to build and connect to gRPC servers by creating a movie listing microservice. We’ll define an API contract using Protocol Buffers, set up a NestJS gRPC server with streaming support, and connect clients using both grpcurl and .NET.
The microservices architectural style breaks applications into smaller, independent services that can use different technologies and communicate with each other to accomplish tasks.
Services communicate by sending messages or emitting events through channels connecting them. gRPC (Google Remote Procedure Call) is a framework created by Google in 2016 that makes it easy for microservices to communicate with each other.
Prerequisites
This article assumes you have:
- Familiarity with REST or GraphQL APIs
- Basic programming knowledge, preferably in TypeScript
Microservices Communication Unpacked
Interprocess communication (IPC) is how processes share information and coordinate tasks. When processes run on the same machine, they use techniques like message passing or shared memory. When they’re distributed across multiple machines (like in microservices), they communicate over the network. To simplify this, microservices communication is IPC that happens over the network.
Whether processes are local or distributed, they need these key components to communicate:
- Client/Producer: The process initiating communication
- Server/Consumer: The process receiving communication
- Message or Event: What gets sent between them
- Communication Channel: The path the data travels
- Protocol: The rules for encoding and decoding messages
For example, when a browser (client) makes an HTTP POST request to create a product, it establishes a TCP connection to the server. The payload (JSON) representing the product information is serialized and sent in the request. The server processes it and sends back a response.
Microservices use the same components, but add some key differences:
- Communication Patterns: Microservices support two patterns. The request-response pattern is like a typical HTTP request, where the client sends a request and waits for a response. This is what gRPC uses. Microservices also support event-based messaging, where the client sends one or more messages without expecting a response. The server can process them immediately or later, asynchronously.
- Network Mechanisms: While HTTP is the most common way to connect distributed processes, microservices also use other mechanisms. gRPC is built on top of HTTP by default. Other options include NATS, Redis, MQTT, Kafka and RabbitMQ. Some are HTTP-based, some are not.
gRPC in Clear Terms
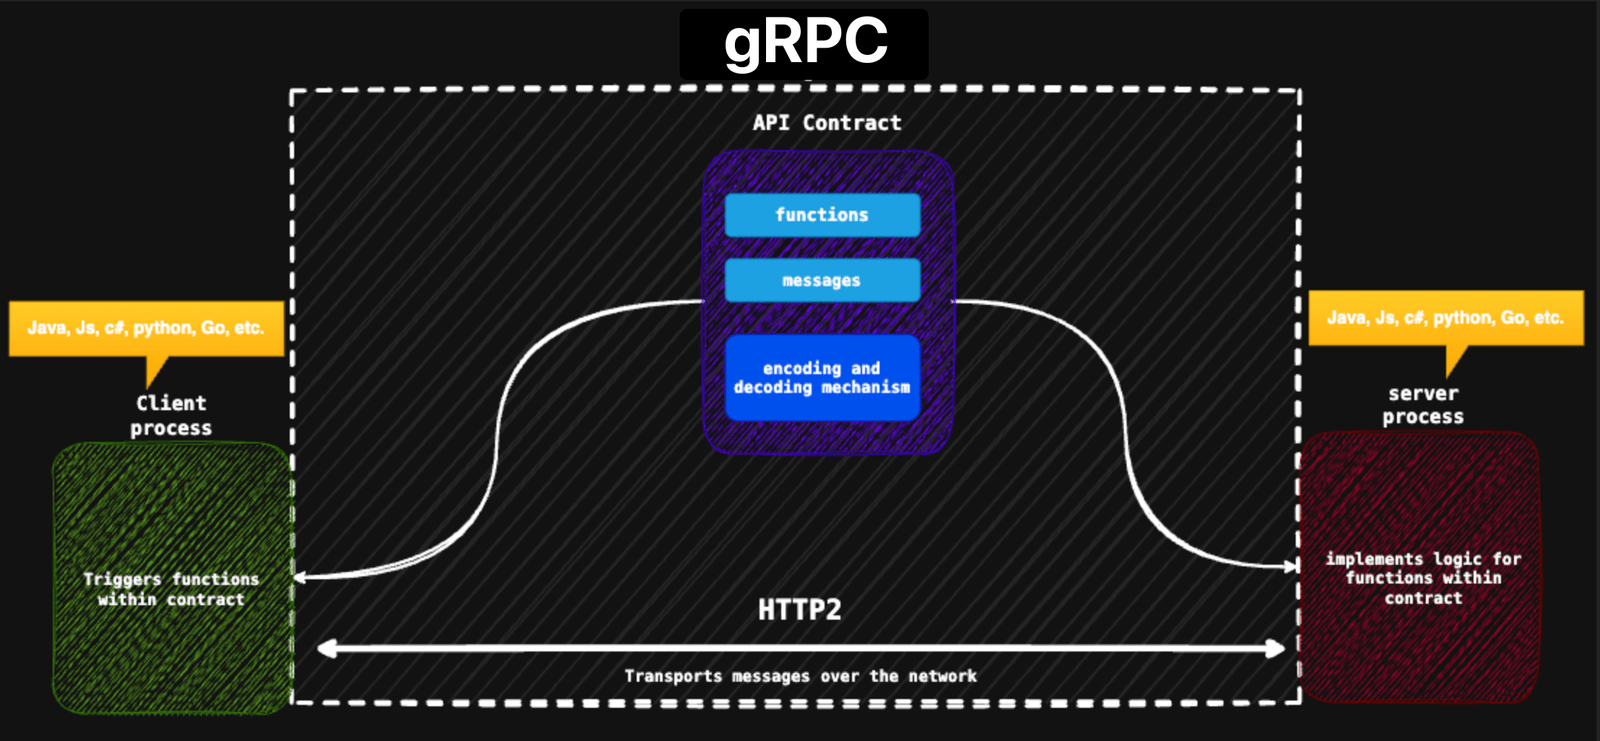
gRPC’s goal is to allow any two distributed processes to communicate, regardless of their runtime or programming language.
As a remote procedure framework, gRPC provides the necessary abstractions that allow the client to call functions on the server as if they were local. It handles all the complexity behind the scenes: connection management, serialization, encoding, transportation and decoding results.
Here are some of gRPC’s key highlights:
- Contract-First Approach: The contract is a file that defines the functions the server exposes, along with their parameters and return types (called message types in gRPC). The server implements these functions, and the client calls them as needed. The contract also handles message encoding and decoding. gRPC uses Protocol Buffers (protobuf) by default, but also supports JSON, Thrift, Avro and FlatBuffers. This improves development since clients don’t need to remember endpoint names or parse data, and servers only focus on handling requests and sending responses.
- Type Safety: Since gRPC uses API contracts, it is type-safe and helps catch type errors at compile time, not at runtime like REST APIs do.
- Built on HTTP/2: gRPC uses HTTP/2, a binary protocol that improves speed and efficiency with the following advantages:
- Binary frames: Messages are sent as binary, which is faster than text-based protocols like HTTP/1.1
- Multiplexing: Multiple requests and responses travel over one TCP connection. The server can prioritize requests and return responses in any order. This solves HTTP/1.1’s head-of-line blocking problem
- Header compression: Uses HPACK compression for more efficient headers and better performance
- Request-Response Pattern: gRPC uses the request-response pattern. The client sends a request, the server processes it, and sends back a response.
- Language Agnostic: gRPC is platform and language agnostic, supported by 13+ languages.
Key Uses
gRPC is designed for server-to-server communication, not for connecting browsers to servers. Browser JavaScript can’t make gRPC calls directly, even though most browsers support HTTP/2.
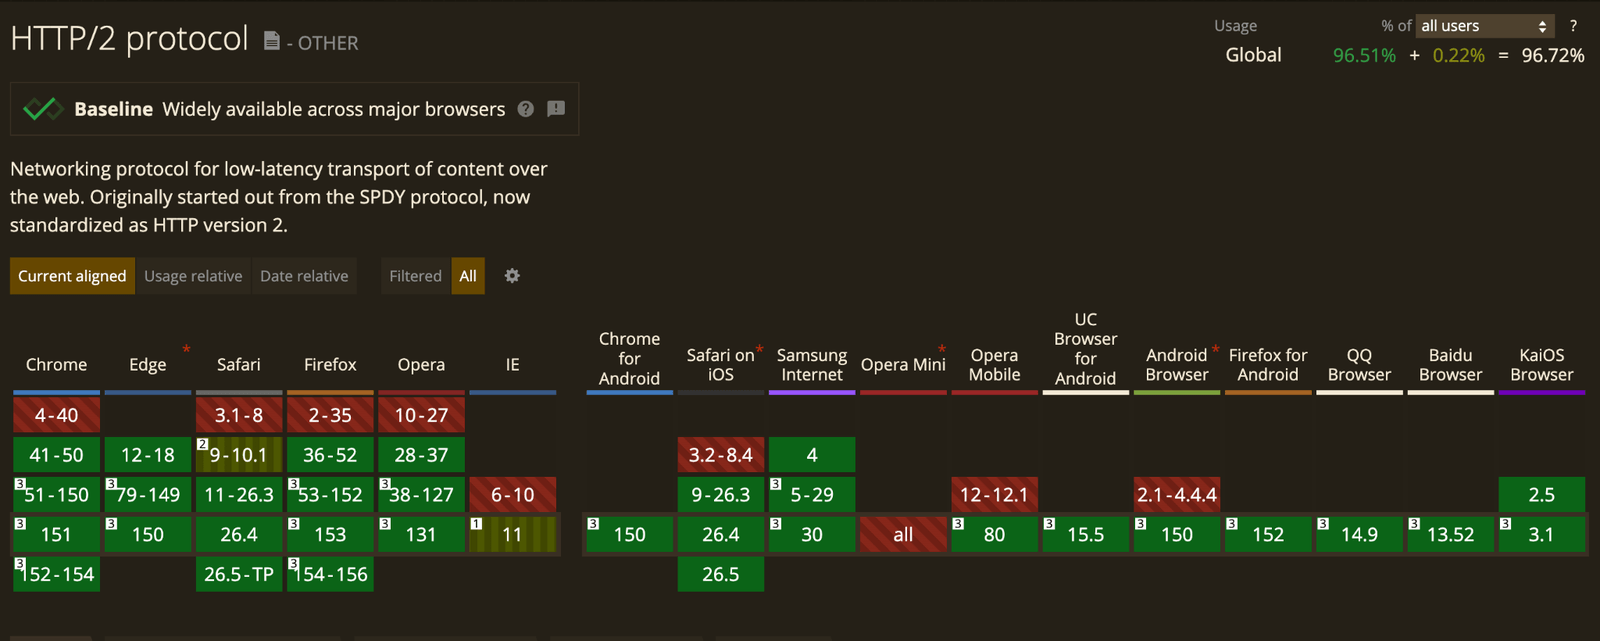
JavaScript running in a browser doesn’t control which HTTP protocol is used. It relies on wrapper APIs like fetch and XHR, which abstract away the underlying protocol, and the browser manages that internally.
There are packages like grpc-web that let you call gRPC servers from the web, but they work around this limitation. They make HTTP/1 requests to a proxy server (like Envoy) that you set up, which then converts those requests to HTTP/2 and calls the target gRPC server.
In short, JavaScript running in a client application in the browser can’t make gRPC calls directly because it can’t control which HTTP protocol gets used, and gRPC requires HTTP/2.
What We’ll Be Building
We’ll build a simple movie listing application that performs basic CRUD operations on movies. We’ll use Protocol Buffers to define the API contract, since it’s gRPC’s default serialization mechanism.
Here’s what we’ll do:
- Define the API contract using Protocol Buffers
- Set up a NestJS server that implements the contract methods
- Connect to the server using grpcurl
- Connect from a .NET application
Steps to Set Up a gRPC Server and Connect a Client
Now that we understand what we’re building, here are the steps we’ll follow:
- Define the API Contract: We’ll introduce Protocol Buffers as gRPC’s interface definition and serialization engine. Then we’ll create proto files that define the services and methods the server will implement and clients will call.
- Create the Server: We’ll use the proto files to generate a server stub for NestJS. This is code we’ll use to implement the service methods. We’ll cover static and dynamic proto file parsing, and learn about protoc (the Protocol Buffer compiler) and language-specific plugins.
- Create Clients: We’ll build clients to interact with the server. We’ll expose server documentation using the Reflection API and demo a simple interaction between server and client.
- Add Authentication: We’ll show how clients can authenticate at the channel level using SSL credentials or at the function level using metadata.
Protocol Buffers and Proto Files
Protocol Buffers (protobuf) is the default way to define the API contract in gRPC. You use it to define services, methods and messages in files with the .proto extension. Protobuf handles encoding and decoding of messages sent between client and server over the channel.
The tool that compiles proto files is called protoc. Since protobuf is language-neutral, you can use protoc with .proto files to generate stubs in any programming language. A stub is just generated code that mirrors the contract defined in the .proto file, ready for you to implement on the server or call from the client.
When protoc generates a stub at build time, it’s called static parsing. However, you can also dynamically parse .proto files using community or native packages without generating a stub. This means you don’t need to install protoc.
Some of the benefits of dynamic parsing is faster development with fewer tools and configurations. The trade-off is less type hinting when developing.
Since proto files define the API contract, they’re usually shared across projects. Typically, they’re stored in a separate repository and imported via a submodule. For this guide, we’ll define them once and manually copy them to each project.
Defining a Proto File
Create a file called movie_service.proto in your preferred directory and add the following to it:
edition ="2023";

package movie;

service MovieService {
  rpc ListMovies (ListMoviesRequest) returns (MediaList);
  rpc StreamMovies (ListMoviesRequest) returns (stream MediaItem);
  rpc SearchMovies (FindMovieRequest) returns (MediaItem);
}

message ListMoviesRequest {}

message FindMovieRequest {
  uint32 id = 1;
}

message MediaItem {
  string title = 1;
  string type = 2;
  string genre = 3;
  string poster = 4;
  string released = 5;
  float imdb_rating = 6;
  repeated string images = 7;
  uint32 id = 8;
}

message MediaList {
  repeated MediaItem items = 1;
}
We defined a simple proto file following standard conventions. Proto file names should be in lower_snake_case. The file starts by specifying the 2023 edition. Editions are the modern approach; older versions used syntax = "proto2" or syntax = "proto3".
Next, we define the package name movie. Think of the package name as a namespace where all messages and services declared here belong to the “movie” package. So the full reference to MovieService is movie.MovieService.
A proto file can have multiple services and messages. Message and service names should be in TitleCase. We have four message types and one service.
Our MovieService has three RPC methods: ListMovies, StreamMovies and SearchMovies. Every RPC method takes an input message and returns an output message. The package, service and method names form the endpoint the client calls.
For example, to call ListMovies, the endpoint is:
<server-url>/movie.MovieService/ListMovies
To understand these RPC methods and the communication patterns they support, let’s look at the four communication patterns gRPC supports.
Communication Patterns in gRPC
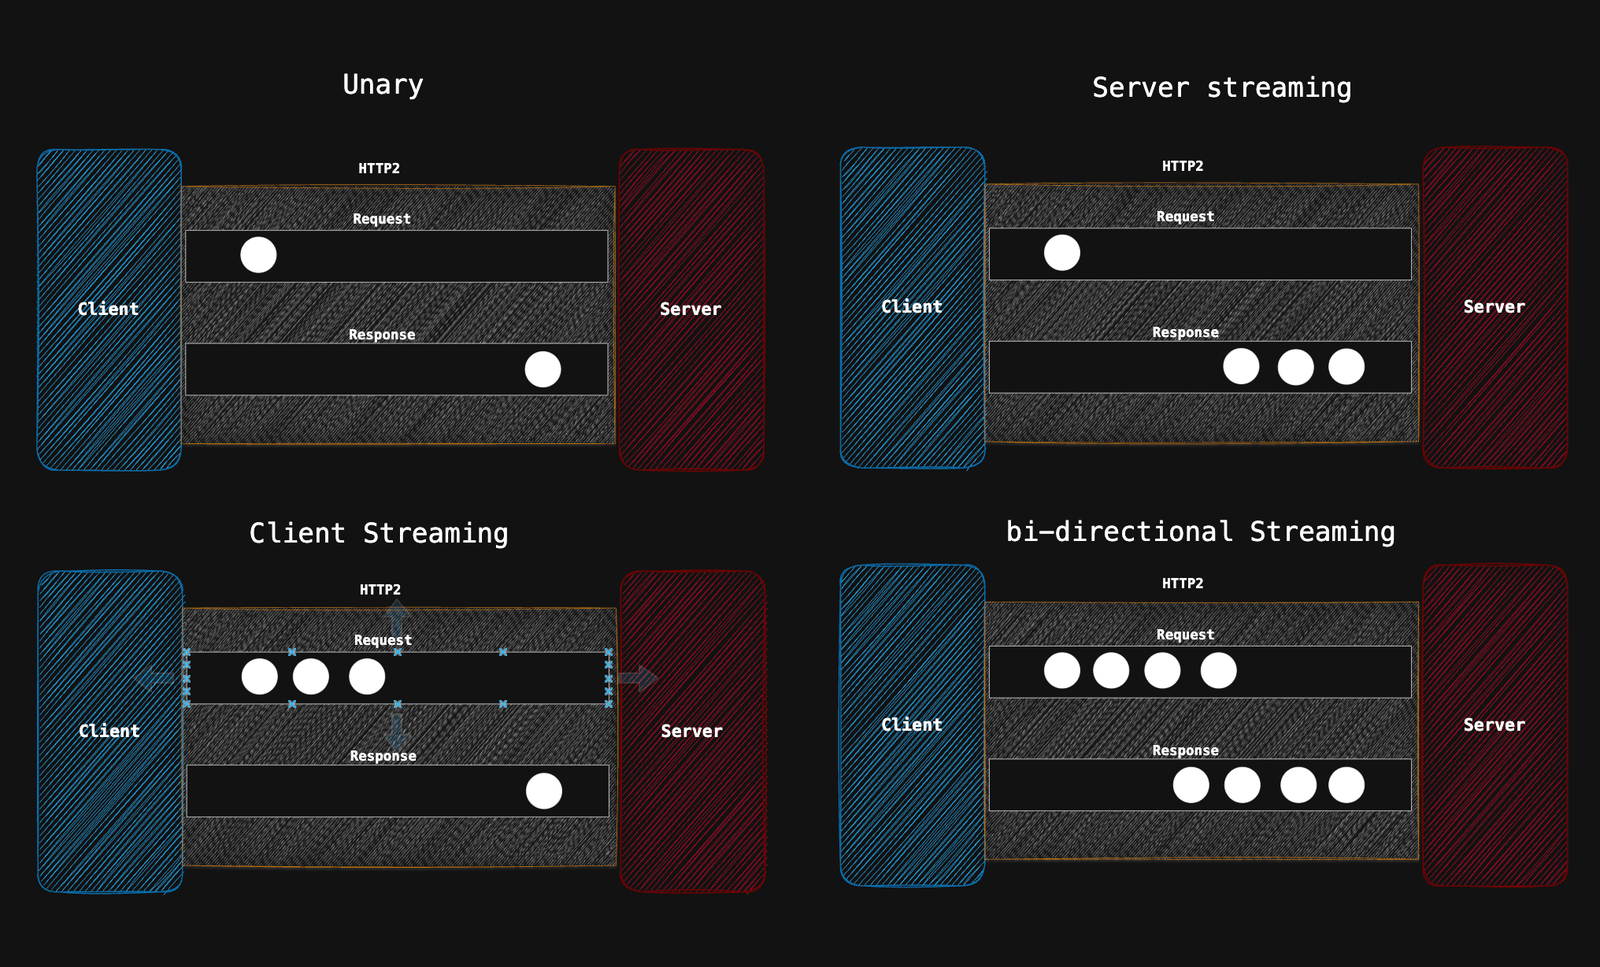
gRPC’s communication patterns (or streaming models) are abstractions that represent streams of data sent between client and server over HTTP/2. Streaming is possible because of HTTP/2’s multiplexing capability.
In Unary streaming, the client sends a request and the server sends back a response, like a regular HTTP/1 REST API call. ListMovies uses this pattern.
In server streaming, the client sends a request and the server streams data back. Use this when the server needs to send large amounts of data in chunks. StreamMovies uses this pattern.
In client streaming, the client streams data to the server by sending it in chunks and receives a single response. Use this when the client has large payloads to send.
In bidirectional streaming, both client and server stream data simultaneously in real time. Think of this like WebSockets, but strictly for server-to-server communication.
The choice of communication pattern depends on several factors, such as the volume of messages, induced latency and communication frequency.
We also defined message types, which represent the payload sent over the network. Each field has a type, name and field number.
For example, in string poster = 4;:
stringis the field type (any Protocol Buffers supported type)posteris the field name4is the field number
The field name (poster) is arbitrary. You choose it as long as it’s not a keyword and is in snake_case. This name is only for developers to identify the field; it doesn’t affect how data is sent over the network.
The field number (4) identifies the field when encoded and sent over the network. In the 2023 edition, field numbers range from 1 to 536,870,111, excluding 19,000–19,999 (reserved). Each field number must be unique within its message.
Cardinality defines how many values a field can hold:
- Single value: Holds one string, e.g.,
string released = 5; - Multiple values: Holds an array of strings, e.g.,
repeated string images = 7;
Protobuf also supports Maps.
Fields can also be scalar or composite. Scalar fields (like string released = 5;) are primitives that can’t be decomposed further. Composite fields use custom types (other messages or enums).
For example:
message MediaList {
  repeated MediaItem items = 1;
}
Here, items is a multi-valued composite field of type MediaItem.
Setting Up the gRPC Server
Now let’s set up the server using the movie_service.proto file. gRPC is supported by many programming languages. We’ll use TypeScript and build a NestJS microservice for its elegant architecture and developer-friendly approach.
Assuming you have the NestJS CLI installed, open your terminal and run the following command to set up the project:
nest new grpc-movie-app
cd grpc-movie-app
npm i --save @nestjs/microservices @grpc/grpc-js @grpc/proto-loader
We set up a NestJS project called grpc-movie-app and installed three key dependencies:
@nestjs/microservices– NestJS’s microservices framework for building microservices@grpc/grpc-js– gRPC implementation for JavaScript and TypeScript@grpc/proto-loader– Dynamically loads and parses proto files at runtime
Adding the Proto Files
Now, let’s move the proto files to a folder within our project. In the grpc-movie-app folder, run these commands:
cd src
mkdir proto
cp <PATH-TO-PROTO-FILE>/movie_service.proto ./proto
The command above creates a folder called proto within the ./src directory of our NestJS app and copies our movie_service.proto file to it.
Setting Up the NestJS gRPC Microservice
Update your main.ts file with the following:
import { NestFactory } from '@nestjs/core';
import { AppModule } from './app.module';
import { MicroserviceOptions, Transport } from '@nestjs/microservices';
import { join } from 'path';

async function bootstrap() {
  const app = await NestFactory.createMicroservice<MicroserviceOptions>(
    AppModule,
    {
      transport: Transport.GRPC,
      options: {
        package: ['movie'],
        protoPath: [join(__dirname, '/proto/movie_service.proto')],
        url: 'localhost:4190',
      },
    },
  );
  await app.listen();
}

bootstrap();
In the code above, we configured the microservice using createMicroservice(). The second parameter is the configuration object that specifies what kind of microservice to create. We set transport: Transport.GRPC to use gRPC, then passed the options object to configure our gRPC service.
Our service listens on port 4190. Using the protoPath option, we can specify as many proto files as we want to implement in our service. In our case, we only specified one, movie_service.proto. The package option allows us to specify which packages within these files we want to implement.
NestJS internally validates the file paths and proto file contents for correctness. Syntax errors or missing package names throw appropriate errors.
For example, if we had specified a non-existent package name like moviell and started our application by running npm run start:dev, we’d see an error like:

A Note on Dynamic Parsing
Notice that our NestJS application can work with proto files and validate them without installing protoc. The @grpc/proto-loader package dynamically parses .proto files at runtime, which provides a smooth developer experience and makes gRPC integration easy.
Optional: Improving Type Safety with ts-proto
To improve type safety and ease contract implementation, we can use ts-proto, a protoc plugin. Protoc (the protobuf compiler) doesn’t natively support JavaScript/TypeScript, which is why plugins like ts-proto exist. It generates interfaces for services and messages, provides type safety and catches compile-time errors when working with proto files. This is helpful when dynamically parsing .proto files.
To use ts-proto, first install protoc. Open your terminal and run the following command:
brew install protobuf
Next, run the following command to install ts-proto in your grpc-movie-app folder:
npm i ts-proto
Then update your package.json to add a script that uses protoc with the ts-proto plugin:
"scripts": {
  "compile:proto": "protoc --plugin=./node_modules/.bin/protoc-gen-ts_proto --ts_proto_out=. --ts_proto_opt=nestJs=true,addGrpcMetadata=true,addNestjsRestParameter=true ./src/proto/movie_service.proto"
}
In the code above, we added a script called compile:proto that tells protoc to use the ts-proto plugin on movie_service.proto and generate TypeScript output in the same directory as the proto file.
Since ts-proto is framework-agnostic, we need to configure it for NestJS. We do this with the --ts_proto_opt option, which accepts a comma-separated list of options. We set nestJs=true to target NestJS, and addGrpcMetadata=true and addNestjsRestParameter=true to include metadata and rest parameters the generated interfaces, as shown in the sample snippet below:
listMovies(
  request: ListMoviesRequest,
  metadata: Metadata,
  ...rest: any
): Promise<MediaList> | Observable<MediaList> | MediaList;
Now, running npm run compile:proto will generate a new movie_service.ts file in the proto folder with the generated TypeScript interfaces as shown below.
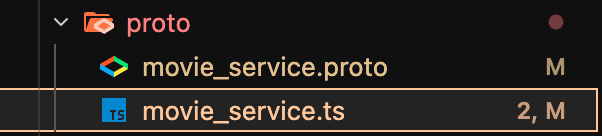
Let’s preview the contents of the generated movie_service.ts file incrementally. It generates variables for the package name and TypeScript types for the respective messages.
import type { Metadata } from "@grpc/grpc-js";
import { GrpcMethod, GrpcStreamMethod } from "@nestjs/microservices";
import { Observable } from "rxjs";

export const protobufPackage = "movie";

export interface ListMoviesRequest {}

export interface FindMovieRequest {
  id: number;
}

export interface MediaItem {
  title: string;
  type: string;
  genre: string;
  poster: string;
  released: string;
  imdbRating: number;
  images: string[];
  id: number;
}

export interface MediaList {
  items: MediaItem[];
}

export const MOVIE_PACKAGE_NAME = "movie";
It also generates the client interface with the MovieService methods for calling the gRPC server. We won’t be needing this though.
export interface MovieServiceClient {
  listMovies(request: ListMoviesRequest, metadata: Metadata, ...rest: any): Observable<MediaList>;
  streamMovies(request: ListMoviesRequest, metadata: Metadata, ...rest: any): Observable<MediaItem>;
  searchMovies(request: FindMovieRequest, metadata: Metadata, ...rest: any): Observable<MediaItem>;
}
The generated file also includes a server-side interface called MovieServiceController that we’ll implement. It also generates a decorator called MovieServiceControllerMethods() that binds the method names to the GrpcMethod() function, automatically registering them as request handlers.
export interface MovieServiceController {
  listMovies(
    request: ListMoviesRequest,
    metadata: Metadata,
    ...rest: any
  ): Promise<MediaList> | Observable<MediaList> | MediaList;
  streamMovies(request: ListMoviesRequest, metadata: Metadata, ...rest: any): Observable<MediaItem>;
  searchMovies(
    request: FindMovieRequest,
    metadata: Metadata,
    ...rest: any
  ): Promise<MediaItem> | Observable<MediaItem> | MediaItem;
}

export function MovieServiceControllerMethods() {
  return function (constructor: Function) {
    const grpcMethods: string[] = ["listMovies", "streamMovies", "searchMovies"];
    for (const method of grpcMethods) {
      const descriptor: any = Reflect.getOwnPropertyDescriptor(constructor.prototype, method);
      GrpcMethod("MovieService", method)(constructor.prototype[method], method, descriptor);
    }
    const grpcStreamMethods: string[] = [];
    for (const method of grpcStreamMethods) {
      const descriptor: any = Reflect.getOwnPropertyDescriptor(constructor.prototype, method);
      GrpcStreamMethod("MovieService", method)(constructor.prototype[method], method, descriptor);
    }
  };
}

export const MOVIE_SERVICE_NAME = "MovieService";
Notice that method and class variable names follow TypeScript conventions. For example, ListMovies in the proto file becomes listMovies in TypeScript.
Implementing Contract Methods
First, let’s add some dummy movie data. Create a file called media-data.json in the src folder and add the following to it:
[
  {
    "id": 1,
    "title": "Avatar",
    "type": "movie",
    "genre": "Action, Adventure, Fantasy",
    "poster": "http://ia.media-imdb.com/images/M/MV5BMTYwOTEwNjAzMl5BMl5BanBnXkFtZTcwODc5MTUwMw@@._V1_SX300.jpg",
    "released": "18 Dec 2009",
    "imdbRating": 7.9,
    "images": [
      "https://images-na.ssl-images-amazon.com/images/M/MV5BMjEyOTYyMzUxNl5BMl5BanBnXkFtZTcwNTg0MTUzNA@@._V1_SX1500_CR0,0,1500,999_AL_.jpg",
      "https://images-na.ssl-images-amazon.com/images/M/MV5BNzM2MDk3MTcyMV5BMl5BanBnXkFtZTcwNjg0MTUzNA@@._V1_SX1777_CR0,0,1777,999_AL_.jpg",
      "https://images-na.ssl-images-amazon.com/images/M/MV5BMTY2ODQ3NjMyMl5BMl5BanBnXkFtZTcwODg0MTUzNA@@._V1_SX1777_CR0,0,1777,999_AL_.jpg",
      "https://images-na.ssl-images-amazon.com/images/M/MV5BMTMxOTEwNDcxN15BMl5BanBnXkFtZTcwOTg0MTUzNA@@._V1_SX1777_CR0,0,1777,999_AL_.jpg",
      "https://images-na.ssl-images-amazon.com/images/M/MV5BMTYxMDg1Nzk1MV5BMl5BanBnXkFtZTcwMDk0MTUzNA@@._V1_SX1500_CR0,0,1500,999_AL_.jpg"
    ]
  },
  {
    "id": 2,
    "title": "I Am Legend",
    "type": "movie",
    "genre": "Drama, Horror, Sci-Fi",
    "poster": "https://m.media-amazon.com/images/M/MV5BMGE1OWZkZmItNmVhMC00YzAxLTgxOTctNjg3NWExM2RmOWJkXkEyXkFqcGc@._V1_.jpg",
    "released": "14 Dec 2007",
    "imdbRating": 7.2,
    "images": [
      "https://images-na.ssl-images-amazon.com/images/M/MV5BMTI0NTI4NjE3NV5BMl5BanBnXkFtZTYwMDA0Nzc4._V1_.jpg",
      "https://images-na.ssl-images-amazon.com/images/M/MV5BMTIwMDg2MDU4M15BMl5BanBnXkFtZTYwMTA0Nzc4._V1_.jpg",
      "https://images-na.ssl-images-amazon.com/images/M/MV5BMTc5MDM1OTU5OV5BMl5BanBnXkFtZTYwMjA0Nzc4._V1_.jpg",
      "https://images-na.ssl-images-amazon.com/images/M/MV5BMTA0MTI2NjMzMzFeQTJeQWpwZ15BbWU2MDMwNDc3OA@@._V1_.jpg"
    ]
  }
]
Now create a controller to implement the contract methods:
nest g co movie
The command above generates a movie.controller.ts file in a movie folder. Update its content with the following:
import { Controller } from '@nestjs/common';
import { from, Observable } from 'rxjs';
import movies from '../media-data.json';
import {
  FindMovieRequest,
  ListMoviesRequest,
  MediaItem,
  MediaList,
  MovieServiceController,
  MovieServiceControllerMethods,
} from 'src/proto/movie_service';

@Controller()
@MovieServiceControllerMethods()
export class MovieController implements MovieServiceController {
  listMovies(request: ListMoviesRequest): Promise<MediaList> | Observable<MediaList> | MediaList {
    return { items: movies as MediaItem[] };
  }

  streamMovies(request: ListMoviesRequest): Observable<MediaItem> {
    return from(movies);
  }

  searchMovies(
    request: FindMovieRequest,
  ): Promise<MediaItem> | Observable<MediaItem> | MediaItem {
    const defaultItem: MediaItem = {
      id: 0,
      title: '',
      type: '',
      genre: '',
      poster: '',
      released: '',
      imdbRating: 0,
      images: [],
    };
    return (movies as MediaItem[]).find((m) => m.id === request.id) || defaultItem;
  }
}
Some key imports in this snippet above include our dummy data from media-data.json, the decorators and interfaces generated by ts-proto in movie_service.ts when we ran the compile:proto script, and utilities from RxJS for streaming data.
The MovieServiceControllerMethods() decorator internally registers all methods of the MovieController class as gRPC request handlers. The method names map to those defined in the movie package from movie_service.proto. Notice that method names are in camelCase, not TitleCase as they were in the proto file.
For server streaming methods like streamMovies that return large amounts of data, we use an Observable. This lets the client consume the data in chunks without overwhelming the network. When we test, we’ll see how the client handles streaming data compared to sending everything at once.
Every gRPC method must return data matching its return type (assuming no errors). Notice that in searchMovies, we return an empty MediaItem instance as a default when no movie is found.
Setting Up the Client
gRPC is supported by many programming languages, so we can set up a client or server in our preferred language. There are also GUI tools like Progress Telerik Fiddler Everywhere, plus command-line tools for testing gRPC servers.
In this section, we’ll create clients using two approaches: grpcurl from the terminal and a .NET console application.
Using grpcurl
grpcurl is a command-line tool similar to curl, but designed for testing gRPC servers.
First, let’s install grpcurl. On macOS, use homebrew:
brew install grpcurl
Make sure the NestJS gRPC server is running:
npm run start:dev
Calling the gRPC Server
Open your terminal and run the following command:
grpcurl -plaintext -proto ./src/proto/movie_service.proto localhost:4190 movie.MovieService/ListMovies
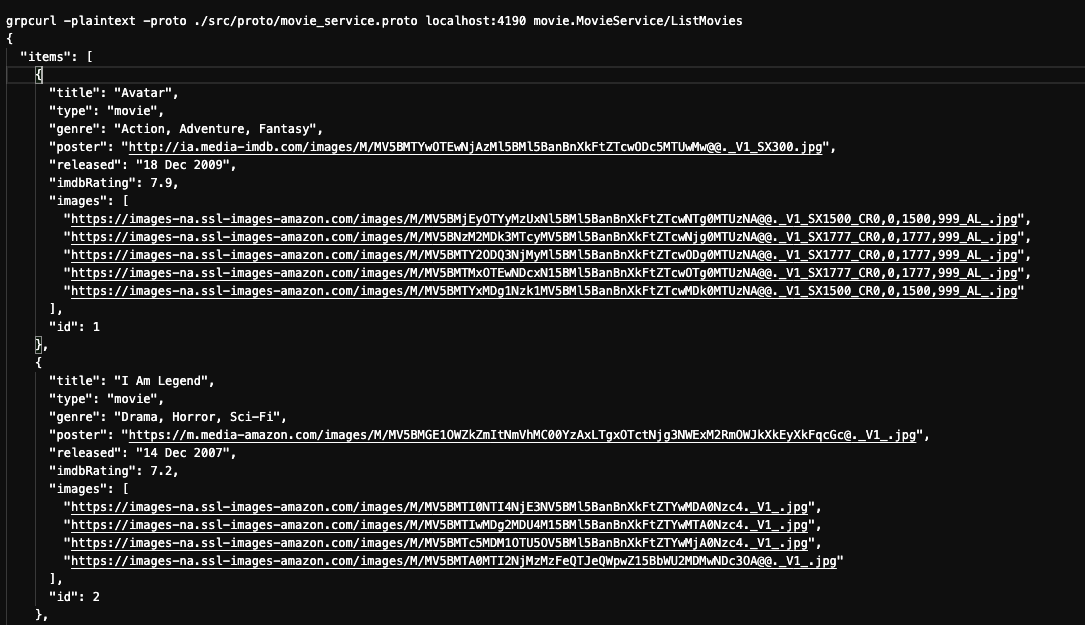
The command above connects to the NestJS gRPC server on localhost:4190 and triggers the ListMovies function by specifying movie.MovieService/ListMovies. The output is displayed in the terminal.
The -plaintext option tells grpcurl not to perform a TLS handshake since the server doesn’t have an SSL certificate. The -proto option specifies the path to the API contract. Finally, we specify which method to call using movie.MovieService/ListMovies.
Now, let’s trigger the SearchMovies function:
grpcurl -plaintext -proto ./src/proto/movie_service.proto -d '{"id": 1}' localhost:4190 movie.MovieService/SearchMovies
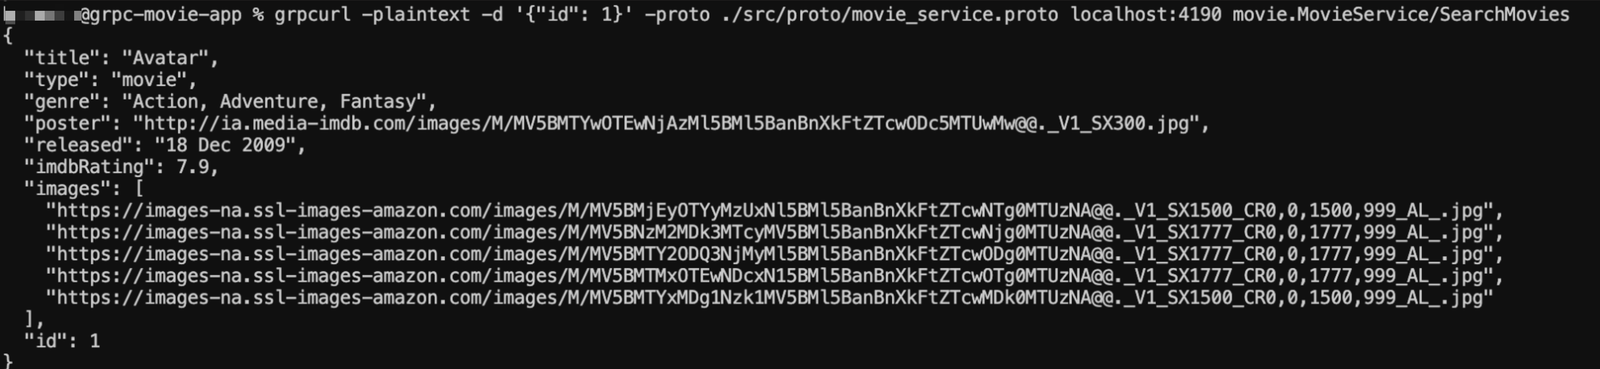
For functions that require parameters, use the -d option to pass the data.
Exposing gRPC API Using Reflection
Notice that calling the server without passing the contract throws an error.

The Reflection protocol allows gRPC servers to expose their API contract to clients, similar to how Swagger documentation works for REST APIs. This is useful when debugging because clients can get a list of services and methods exposed by the server and automatically download the .proto file.
Let’s update our server to enable Reflection:
Adding Reflection to Our NestJS gRPC Server
Open your terminal and run the following command to install the Reflection package:
npm i --save @grpc/reflection
Next, update the main.ts file with the following:
import { NestFactory } from '@nestjs/core';
import { AppModule } from './app.module';
import { MicroserviceOptions, Transport } from '@nestjs/microservices';
import { join } from 'path';
import { ReflectionService } from '@grpc/reflection';

async function bootstrap() {
  const app = await NestFactory.createMicroservice<MicroserviceOptions>(
    AppModule,
    {
      transport: Transport.GRPC,
      options: {
        package: ['movie'],
        protoPath: [join(__dirname, '/proto/movie_service.proto')],
        url: 'localhost:4190',
        onLoadPackageDefinition: (pkg, server) => {
          new ReflectionService(pkg).addToServer(server);
        },
      },
    },
  );
  await app.listen();
}

bootstrap();
We updated our code to include the onLoadPackageDefinition callback, which receives a function. This function is called for each parsed package defined in the package array. After the proto loader parses the .proto file and generates the service definitions for each package, an object is passed that looks like this:
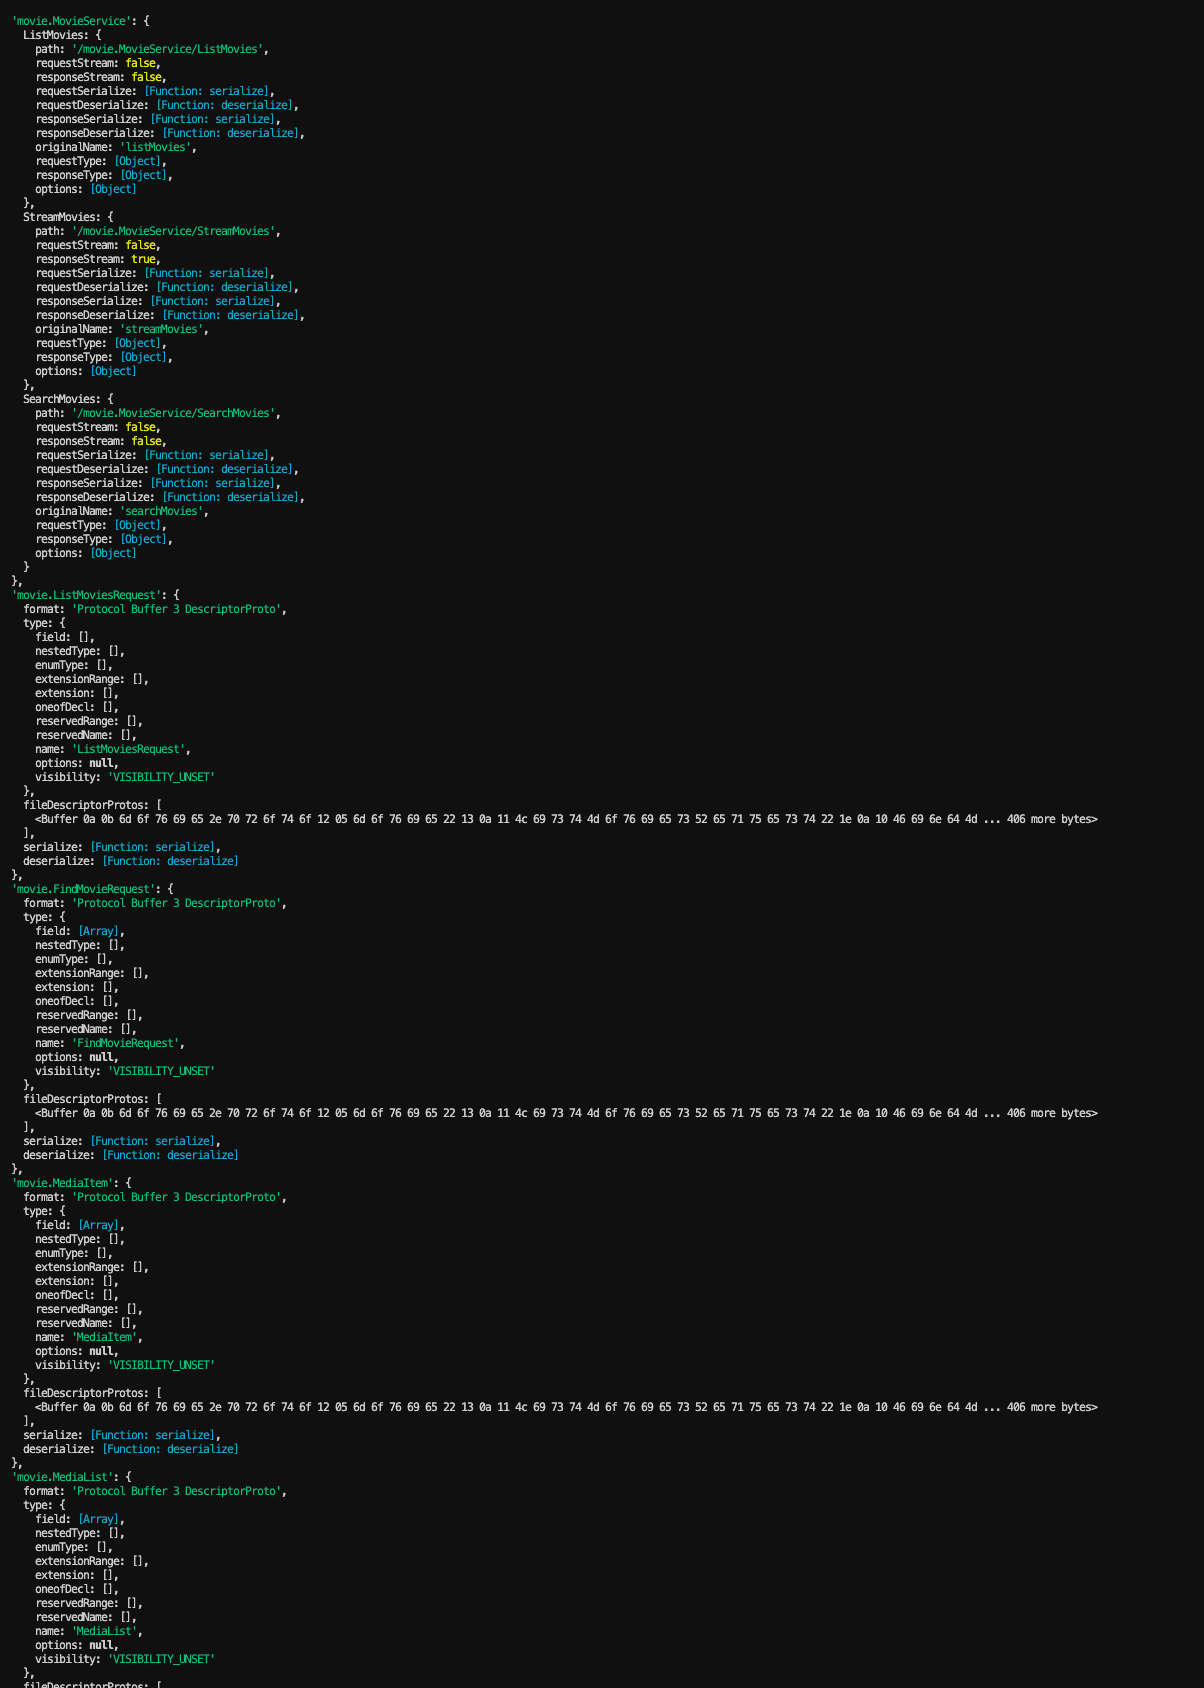
The object is then passed to the ReflectionService and exposed to clients. To see this in action, let’s restart the server and use grpcurl to interact with it:
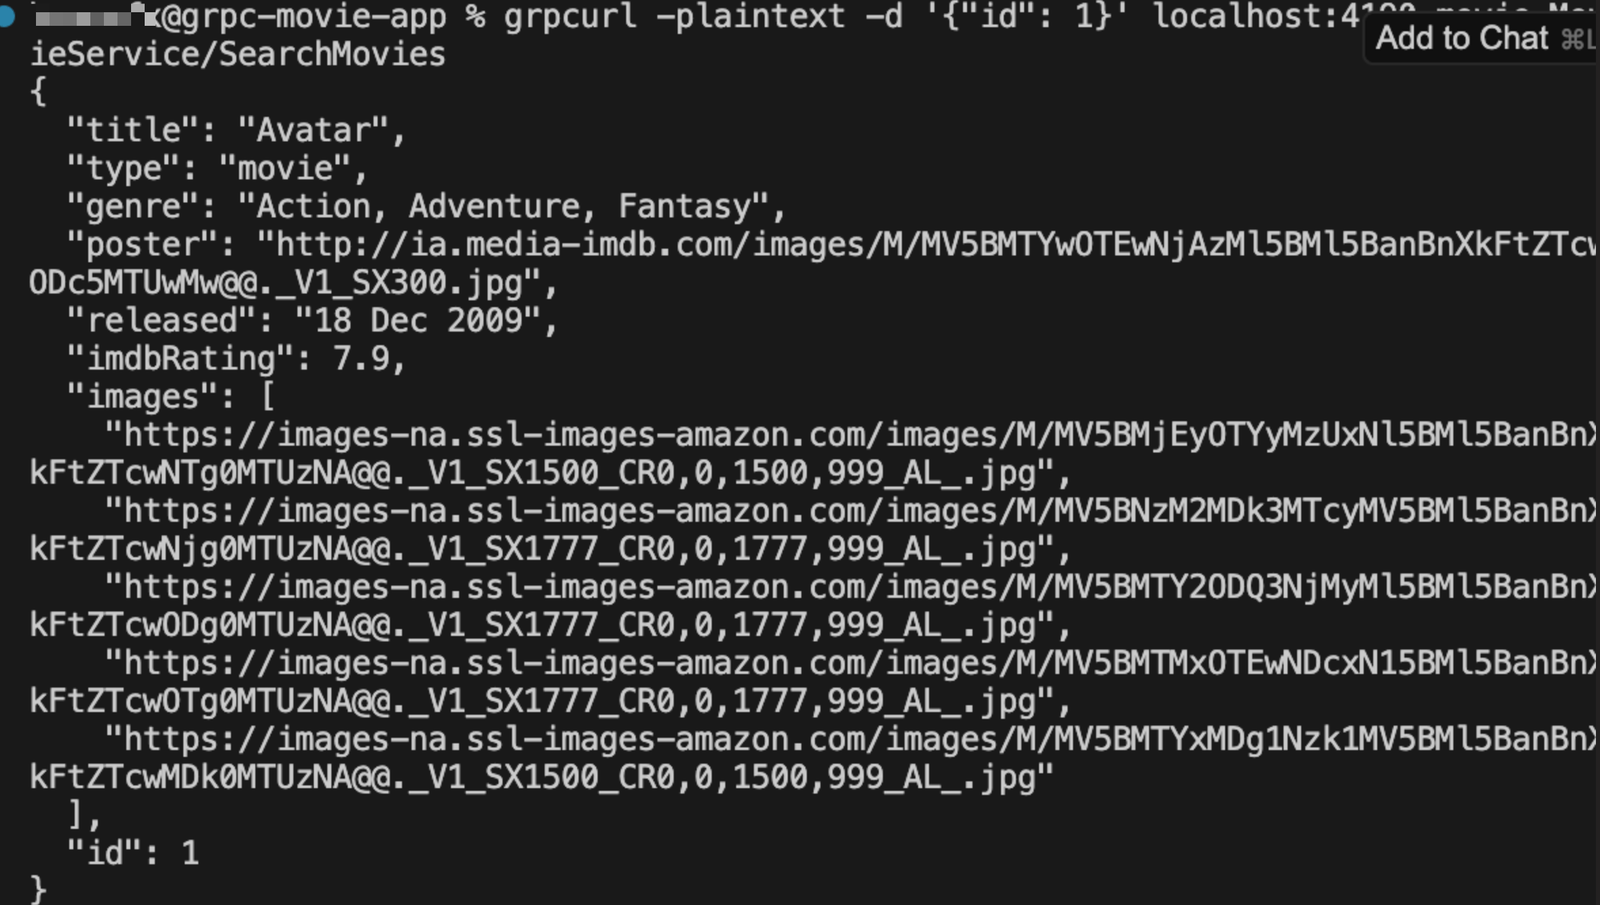
With Reflection enabled, notice that we can now interact with the server without explicitly passing the .proto file.
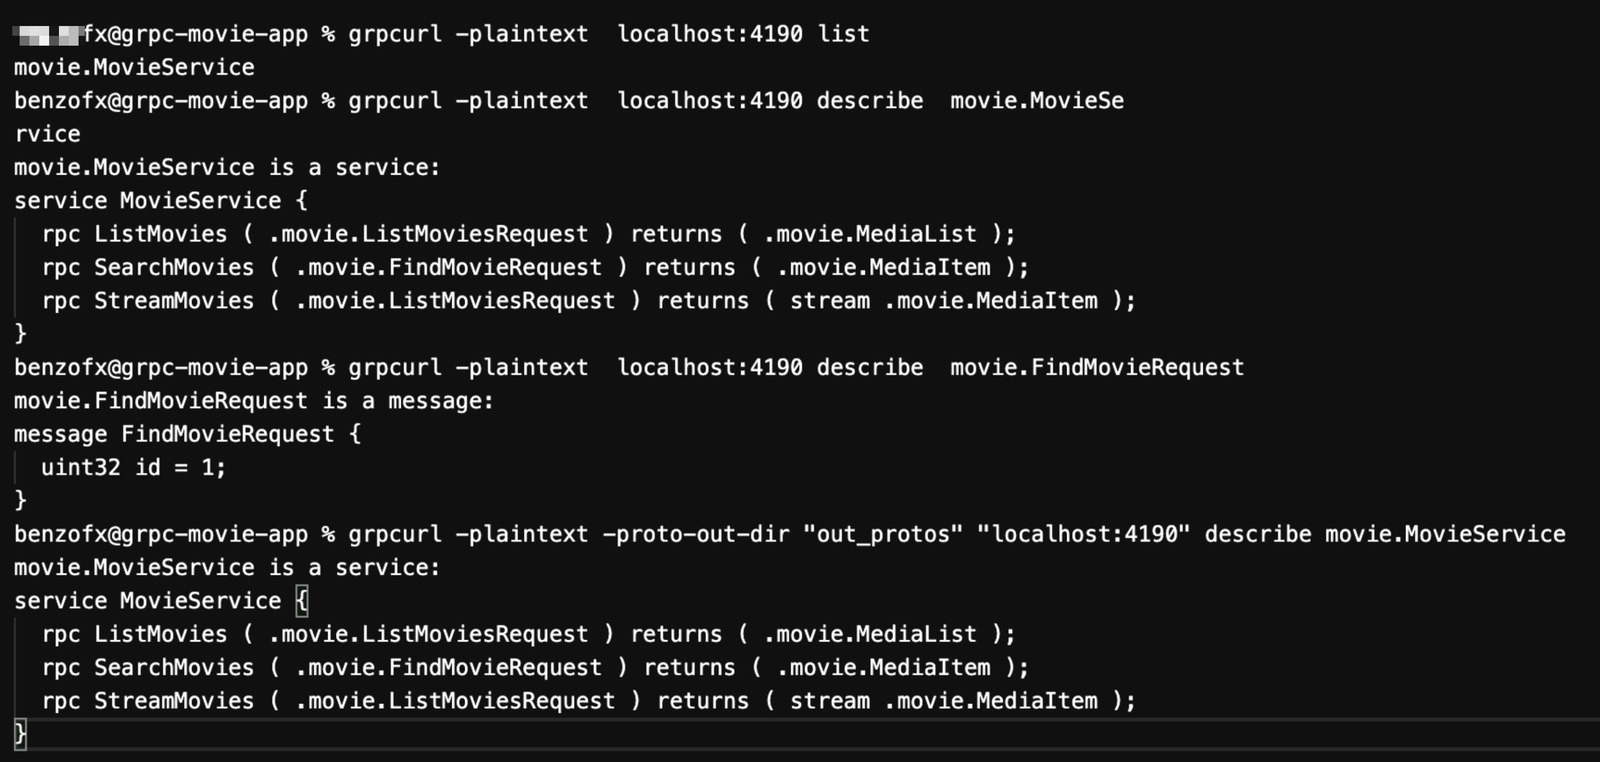
We can use the list command to see the services implemented by the gRPC server. Use the describe command to see the RPC methods exposed by that service. With the -proto-out-dir option, you can download the .proto files from the server. In the following command, we download them to a folder called output_protos that was created automatically for us.

Adding a .NET Client
We will also be creating a small dotnet client to interface with our server. Assuming you have the .NET SDK installed, open your terminal and run the following command to create a basic console application:
dotnet new console -n GrpcMovieClient
cd GrpcMovieClient
mkdir Protos
cp <PATH-TO-PROTO-FILE>/movie_service.proto ./Protos/MovieService.proto
dotnet add GrpcMovieClient.csproj package Grpc.Net.Client
dotnet add GrpcMovieClient.csproj package Google.Protobuf
dotnet add GrpcMovieClient.csproj package Grpc.Tools
The commands above create a console application in a folder called GrpcMovieClient and navigate into it. Then we create a Protos folder and copy movie_service.proto to it as MovieService.proto, following standard C# naming conventions.
Finally, we install three dependencies: Grpc.Net.Client for making gRPC calls, Google.Protobuf for working with protobuf messages, and Grpc.Tools (optional) for generating the client stub. Alternatively, you can use protoc directly to generate the stub.
Next, let’s update the GrpcMovieClient.csproj file to include the proto file:
<Project Sdk="Microsoft.NET.Sdk">
  <PropertyGroup>
    <OutputType>Exe</OutputType>
    <TargetFramework>net10.0</TargetFramework>
    <ImplicitUsings>enable</ImplicitUsings>
    <Nullable>enable</Nullable>
  </PropertyGroup>

  <ItemGroup>
    <PackageReference Include="Google.Protobuf" Version="3.35.1" />
    <PackageReference Include="Grpc.Net.Client" Version="2.83.0" />
    <PackageReference Include="Grpc.Tools" Version="2.83.0">
      <IncludeAssets>runtime; build; native; contentfiles; analyzers; buildtransitive</IncludeAssets>
      <PrivateAssets>all</PrivateAssets>
    </PackageReference>
  </ItemGroup>

  <ItemGroup>
    <Protobuf Include="Protos/MovieService.proto" GrpcServices="Client" />
  </ItemGroup>
</Project>
The <Protobuf> element tells the build system to generate a gRPC client from MovieService.proto. The GrpcServices="Client" attribute specifies that we want client stubs, not server stubs.
Build the project:
dotnet build
This command builds all dependencies. Grpc.Tools automatically generates a Protos folder in the obj/Debug/net10.0 directory containing the generated client stubs from the proto file.
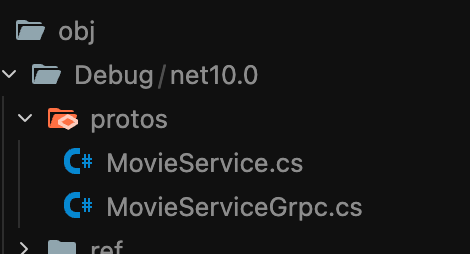
The build generates a MovieService.cs file containing the code needed for the client to call the gRPC server.
Now let’s update the program.cs file with the following:
using Grpc.Core;
using Grpc.Net.Client;
using Movie;

using var channel = GrpcChannel.ForAddress("http://localhost:4190");
var client = new MovieService.MovieServiceClient(channel);

// List all movies
var reply = await client.ListMoviesAsync(new ListMoviesRequest { });
var indentedJson = System.Text.Json.JsonSerializer.Serialize(
  reply,
  new System.Text.Json.JsonSerializerOptions { WriteIndented = true }
);
Console.WriteLine(indentedJson);

// Search for a movie by ID
var searchReply = await client.SearchMoviesAsync(new FindMovieRequest { Id = 1 });
Console.WriteLine(System.Text.Json.JsonSerializer.Serialize(
  searchReply,
  new System.Text.Json.JsonSerializerOptions { WriteIndented = true }
));

// Stream movies
var streamCall = client.StreamMovies(new ListMoviesRequest());
await foreach (MediaItem item in streamCall.ResponseStream.ReadAllAsync())
{
  Console.WriteLine(item.Title);
}
In the code above, we start by importing namespaces, which include the gRPC core library, the client connection setup library and the generated stub.
Next, we create a connection to the server and bind it to MovieService. It’s a best practice to share one connection among multiple clients in gRPC rather than creating a new connection for each client.
We then call each method of the MovieService and print the output. The code shows how calling ListMovies (returns all movies), SearchMovies (finds a specific movie) and StreamMovies (streams movies one at a time).
To run the application:
dotnet run
Using Metadata
Metadata (or headers) in gRPC are key-value pairs that clients include in requests or servers include in responses. Common uses include adding authentication and authorization information, or storing information that would otherwise bloat the protobuf message body.
Let’s see how to add metadata on the server and read it from the client. Update the streamMovies method in your movie.controller.ts file to look like so:
import { Metadata, ServerUnaryCall, status } from '@grpc/grpc-js';

@Controller()
@MovieServiceControllerMethods()
export class MovieController implements MovieServiceController {
  streamMovies(
    request: ListMoviesRequest,
    metadata?: Metadata,
    call?: ServerUnaryCall<any, any>,
  ): Observable<MediaItem> {
    const meta = new Metadata();
    meta.set('token', 'secret-token');
    call?.sendMetadata(meta);
    return from(movies);
  }
  // ... other code
}
Every gRPC method receives three parameters. The second represents metadata sent by the client. Since we want to send metadata back to the client, we imported the Metadata class and created an instance. We added a key-value pair (token: secret-token) using the set() method. The Metadata instance has methods to add, update, and retrieve entries.
Now let’s update the .NET client to read and display the returned metadata. Update the program.cs file to match the following:
var streamCall = client.StreamMovies(new ListMoviesRequest());
var headers = await streamCall.ResponseHeadersAsync;

Console.WriteLine(headers.GetValue("token"));
Run dotnet run to see the output:

Similarly, running the command using grpcurl, we get the header shown below.
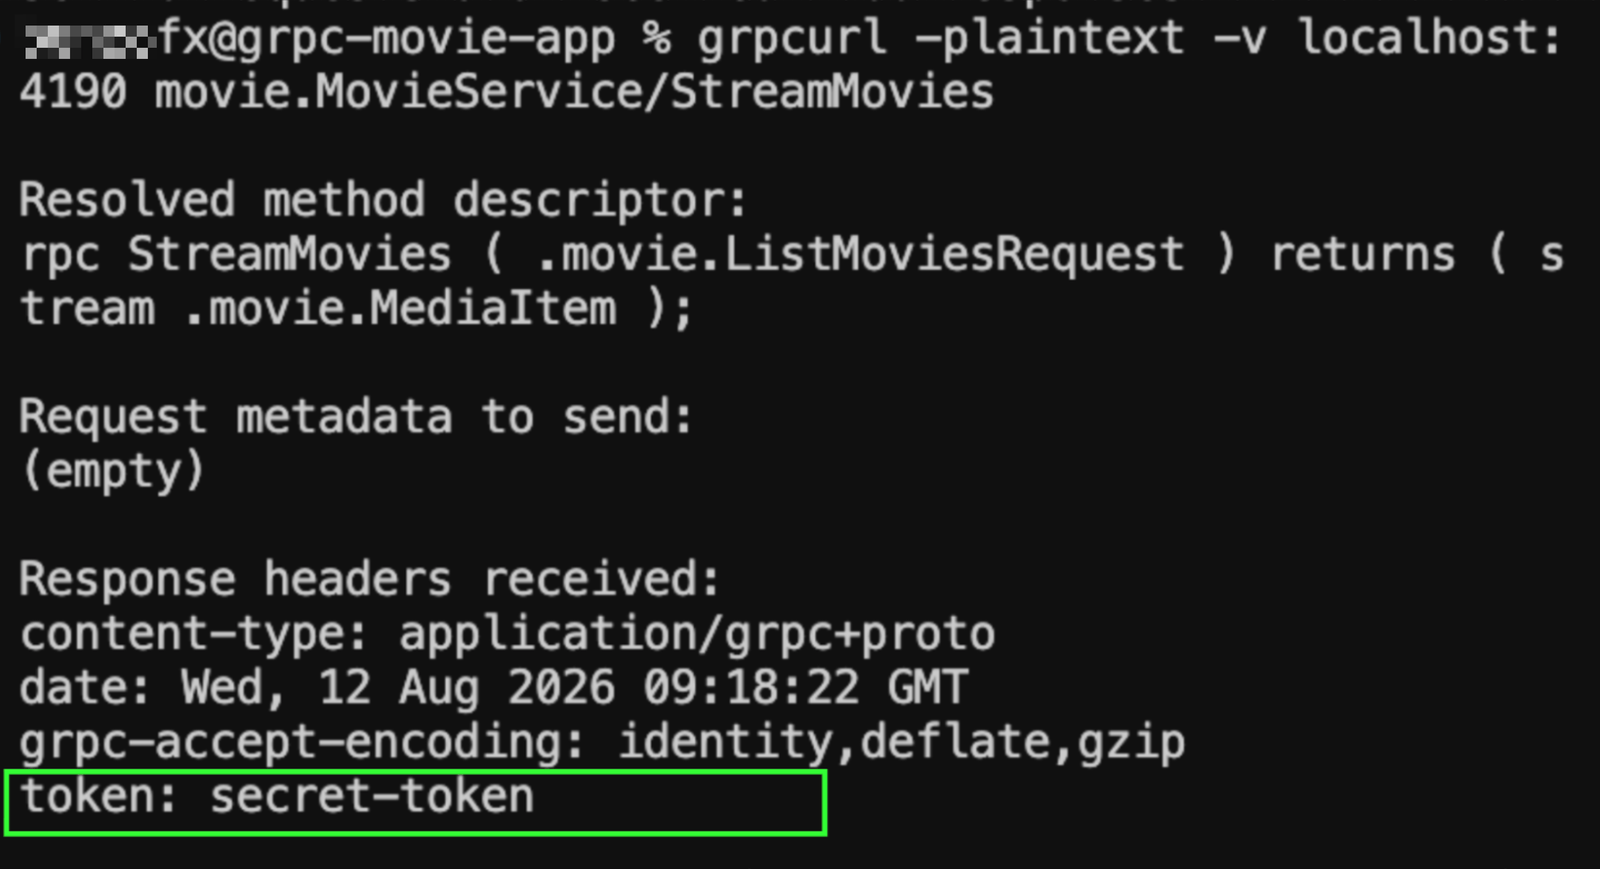
We included the -v (verbose) option to get the full response details. Notice the token header in the response.
A Sneak Peek at the Wire Format
We’ve successfully created a gRPC server and connected clients using grpcurl and the .NET framework. Earlier, we emphasized protocol buffers’ role in encoding and decoding messages. In this section, we will cover the wire format and how messages are encoded before being sent over the network.
For example, when we call SearchMovies with a FindMovieRequest payload, the message looks like this:
message FindMovieRequest {
  uint32 id = 1;
}
A message can have multiple fields. Here’s how it’s encoded and sent over the wire after the client and server establish a connection:
Field order doesn’t matter during encoding or decoding. However, it’s important to use lower field numbers (1–15) whenever possible, as they take up less space on the wire.
Like protobuf itself, the wire format defines wire types, which are type definitions used to encode messages and their fields.
Each message is encoded as a map where the keys are field numbers paired with the wire type, and the values are the assigned values. For example, if we set id=30, in protoscope format (a user-friendly way to view encoded messages), it looks like 1:VARINT 30 or simply 1: 30. Protoscope can infer the type automatically. The wire type tells parsers how much data to expect.
The binary format doesn’t capture field names, so they don’t affect encoding. For example, the field name id isn’t included when the message is encoded. After decoding, the recipient uses the .proto file to infer the field names.
Known Client Limits
Clients have a fixed limit of about 4MB per response. If the data exceeds this limit, you should stream it instead. To see this in action, we’ll update the media-data.json file to include more movies, bumping the file size to 7.3MB.

When we trigger the listMovies function, the server tries to return all the data. Since it exceeds the 4MB limit, we get an error when we run dotnet run:

Using grpcurl, we get a similar error:

However, when we call StreamMovies, the data is sent in chunks so that we can retrieve all of it without errors.
Error Handling
Handling errors is key to building reliable gRPC servers and applications. API Improvement Proposals (AIP)-193 defines how gRPC errors should be propagated. An error should take the following form:
// The Status type defines a logical error model suitable for different
// programming languages and environments.
message Status {
  int32 code = 1;
  string message = 2;
  repeated google.protobuf.Any details = 3;
}
Here’s a sample gRPC error with its key properties:
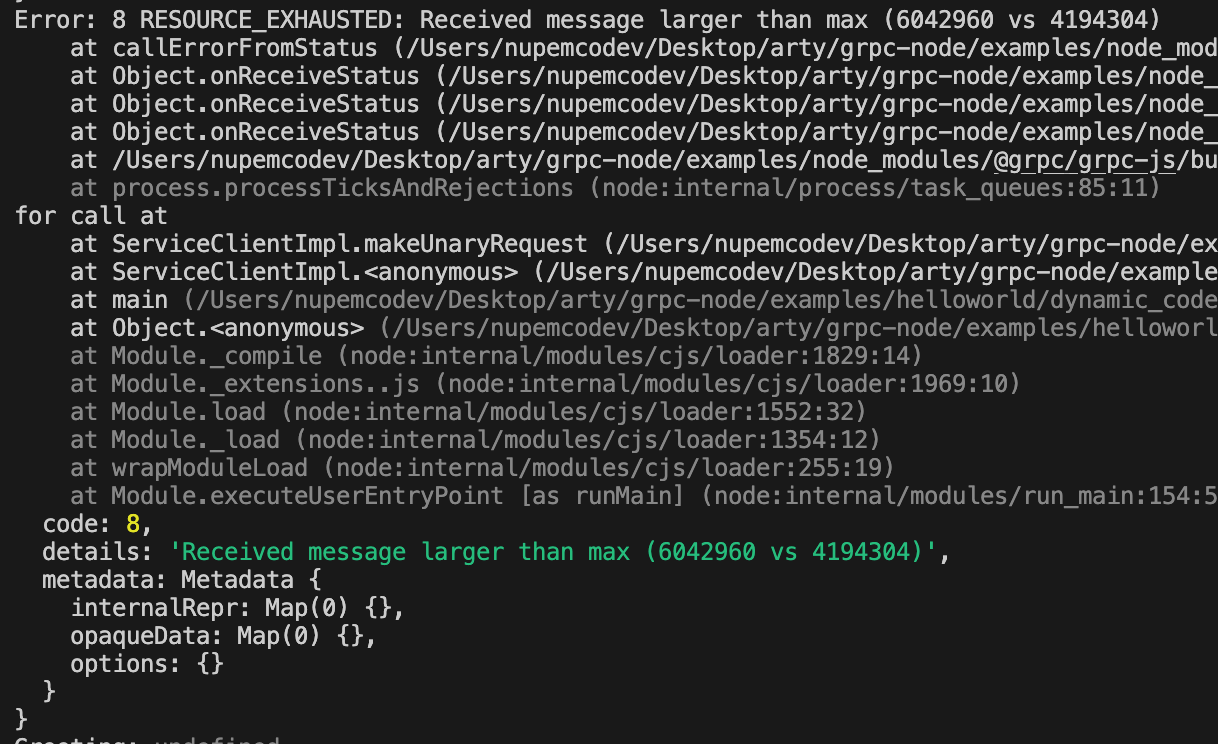
The Status message type defines how gRPC errors should be structured. The code field is an integer enum representing one of gRPC’s standard error codes. For example, code 8 means RESOURCE_EXHAUSTED. The message field provides a developer-friendly explanation of the error. The details field holds additional structured information about the error to communicate to the client.
Standard properties include:
message ErrorInfo {
  string reason = 1;
  string domain = 2;
  map<string, string> metadata = 3;
}
Handling errors is as straightforward as wrapping our code in a try-catch block. Let’s update the ListMovies function to throw an error:
import { Metadata, ServerUnaryCall, status } from '@grpc/grpc-js';
import { RpcException } from '@nestjs/microservices';

@Controller()
@MovieServiceControllerMethods()
export class MovieController implements MovieServiceController {
  // ... other code

  listMovies(
    request: ListMoviesRequest,
    metadata?: Metadata,
  ): Promise<MediaList> | Observable<MediaList> | MediaList {
    try {
      throw new RpcException({
        code: status.NOT_FOUND,
        message: 'Movies not found',
        details: {
          reason: 'MOVIES_NOT_AVAILABLE',
          domain: 'movie-service',
          metadata: {
            someKey: 'somevalue',
          },
        },
      });
    } catch (error) {
      throw error;
    }
  }
}
We imported two key classes: status holds the different gRPC error codes, and RpcException is NestJS’s standard class for throwing RPC errors. We then updated the code to throw an error. To see the output, run grpcurl.
Authentication
So far, our gRPC server and client have communicated over an insecure channel, and the client can call any function. While this works during development, production requires secure authentication. Like regular web servers, gRPC has two levels of authentication: channel level and call level.
Channel-level security uses SSL/TLS credentials to encrypt data in transit. For TLS certificates signed by a Certificate Authority (e.g., Sectigo, DigiCert, Let’s Encrypt), no client changes are needed. For self-signed certificates, you need to create certificates for both client and server, plus a root certificate.
Call Level
Call-level authentication uses headers/metadata to authorize individual function calls. Popular options include plain JWTs and Google OAuth (which only applies to Google services).
Conclusion
This guide covers everything you need to build and connect to gRPC servers so you can build fast, type-safe microservices that scale. gRPC eliminates much of the complexity that comes with REST APIs, and with what we’ve covered in this article, you can confidently implement distributed systems that communicate reliably across languages and platforms.

Christian Nwamba
Chris Nwamba is a Senior Developer Advocate at AWS focusing on AWS Amplify. He is also a teacher with years of experience building products and communities.
Related Posts
Comments
All articles
Topics
Web MobileMobile
Desktop
Design
Productivity
People