Handling Images With .NET MAUI Graphics

Summarize with AI:
Have you ever wondered about new features of .NET MAUI? Today, I’ll be teaching you about .NET MAUI Graphics focused on handling images.
First of all, it’s important that we are clear about what we are talking about when we refer to .NET MAUI Graphics.
.NET MAUI Graphics provides a cross-platform graphics canvas on which you can draw, paint shapes and images, compose operations and transform 2D graphics objects which are contained in the Microsoft.Maui.Graphics namespaces.
It should be noted that this has a similarity with the .NET MAUI Shapes, so let’s clarify the differences between them:
- With Shapes, you can consume all the brushes in all the available controls. Also in a general way the shapes can be consumed in a Page.
- Microsoft.Maui.Graphics should be consumed in a drawing canvas. Here you can also draw high-performance graphics and it provides us with an approach to writing graphics-based controls.
To delve into .NET MAUI Graphics in general, we invite you to enter this article. Meanwhile, in this post, we’ll concentrate on learning how to handle images.
Why Will You Need .NET MAUI Graphics?
One of the benefits of .NET MAUI Graphics is that it has functions that allow you to manipulate images by allowing us to load, save, downsize or resize images. These are represented by the IImage type, which defines the Width and Height properties, both of which are Float type and define the width and height of an image, respectively.
.NET MAUI contains two different IImage interfaces:
- Microsoft.Maui.Graphics.IImage is responsible for the display, manipulation and persistence of images when graphics are displayed in a GraphicsView. This happens through a canvas that is exposed as an ICanvas object. You can learn more about GraphicsView in the article .NET MAUI GraphicsView.
- Microsoft.Maui.IImage abstracts the Image control.
Also, when loading or saving images, you can add an optional argument named ImageFormat, which is an enumeration that defines the format of the image such as PNG, JPEG, GIF, TIFF and BMP.
⚠ But keep in mind that you will only be able to see them if they are compatible with the underlying platform—otherwise even if you add them here, you will not be able to see them as available.
Loading an Image
To load an image, you need to make sure to apply the following steps:
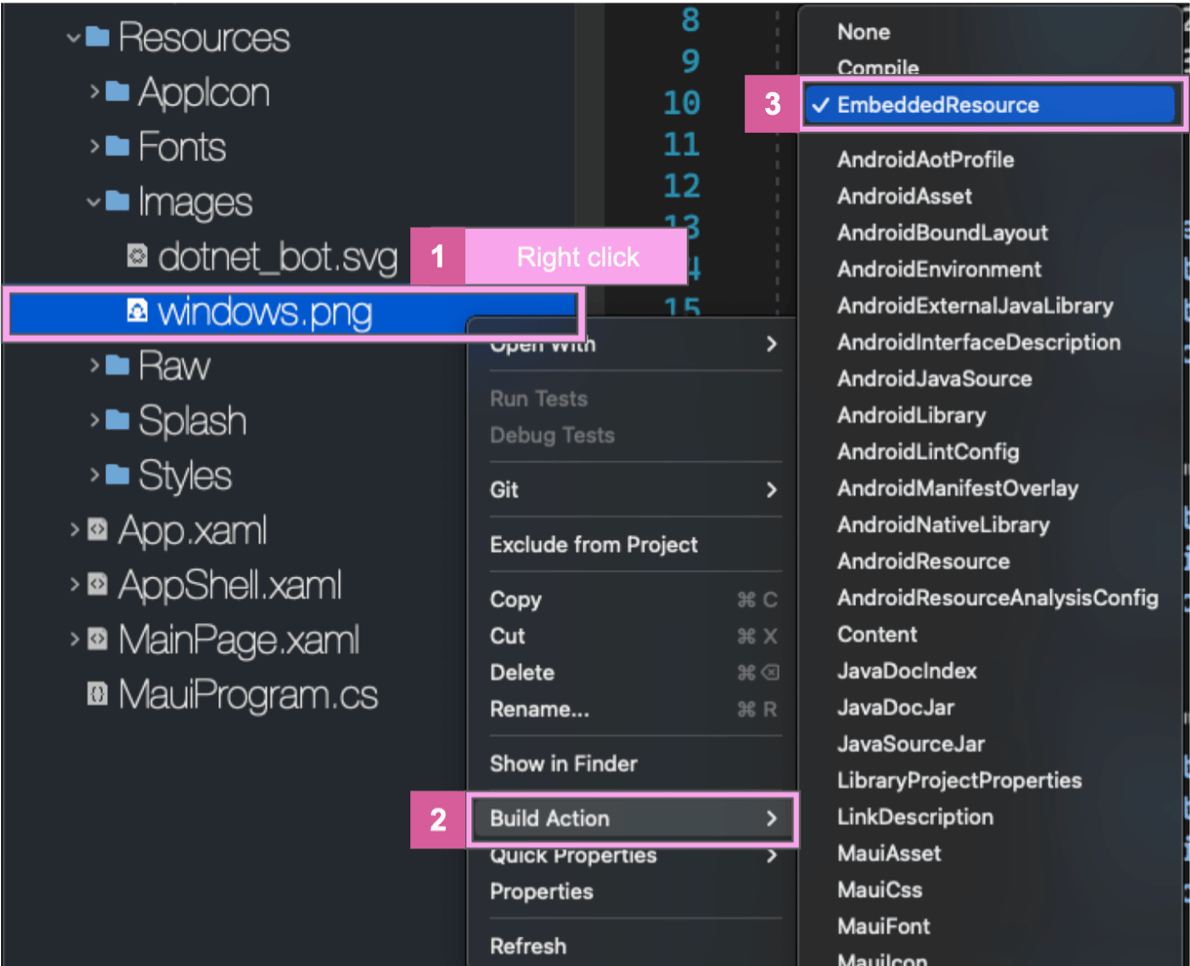
1. Add Your Image
Add your image in the Resources ➡ Images folder. Then, right-click on the image ➡ Build Action ➡ Embedded Resource. (🚫 Not MauiImage.)

2. Create the Drawing Class
Image loading is made possible by the GraphicsService class. This can be loaded from a stream with the LoadFromStream method or from a byte array with the LoadImageFromBytes method.
Let’s look at an example:
➖ First, let’s create a class to host the ICanvas. We’ll name it CanvaDrawSample. It uses the IDrawable interface which implements the Draw method, as it’s shown in the
following:
public class CanvaDrawSample : IDrawable
{
	public void Draw(ICanvas canvas, RectF dirtyRect)
	{
		Microsoft.Maui.Graphics.IImage image;
		Assembly assembly = GetType().GetTypeInfo().Assembly;
		using (Stream stream = assembly.GetManifestResourceStream("MauiGraphicsSample.Resources.Images.windows.png"))
		{
		image = PlatformImage.FromStream(stream);
		}

		if (image != null)
		canvas.DrawImage(image, 10, 15, 90, 90);
	}
}
Some things to remember:
When you use the DrawImage method, keep in mind that it receives the following parameters:
| Name | Description |
|---|---|
| Image | It’s the image that you will pass and it’s a Microsoft.Maui.Graphics.IImage type. |
| x | It’s a float type and refers to the X axis. |
| Y | It’s a float type and refers to the Y axis. |
| Width | It’s float type and is the width of the image. |
| Height | It’s float type and is the height of the image. |
Also, when you use the GetManifestResourceStream method, the string that it receives is the location of the file. That is a composition of the following:

3. Create the XAML
Finally, let’s create the MainPage.xaml where we will display the image. To do it, you just need the following:
➖ Add a reference to your drawable class. Don’t forget to add an x:Key—that is the alias by which you can refer to this class later.
⚠ For this example, we’ll use ContentPage.Resources inside our Page.
<ContentPage.Resources>
  <local:CanvaDrawSample x:Key="MyDrawable" />
</ContentPage.Resources>
➖ Then, add the GraphicsView control and in the drawable property you can use the StaticResource followed by the name you added earlier in the x:key to indicate the drawable class.
<VerticalStackLayout>
	<GraphicsView
	HorizontalOptions="Fill"
	Drawable="{StaticResource MyDrawable}"
	WidthRequest="100"
	HeightRequest="100" />
</VerticalStackLayout>
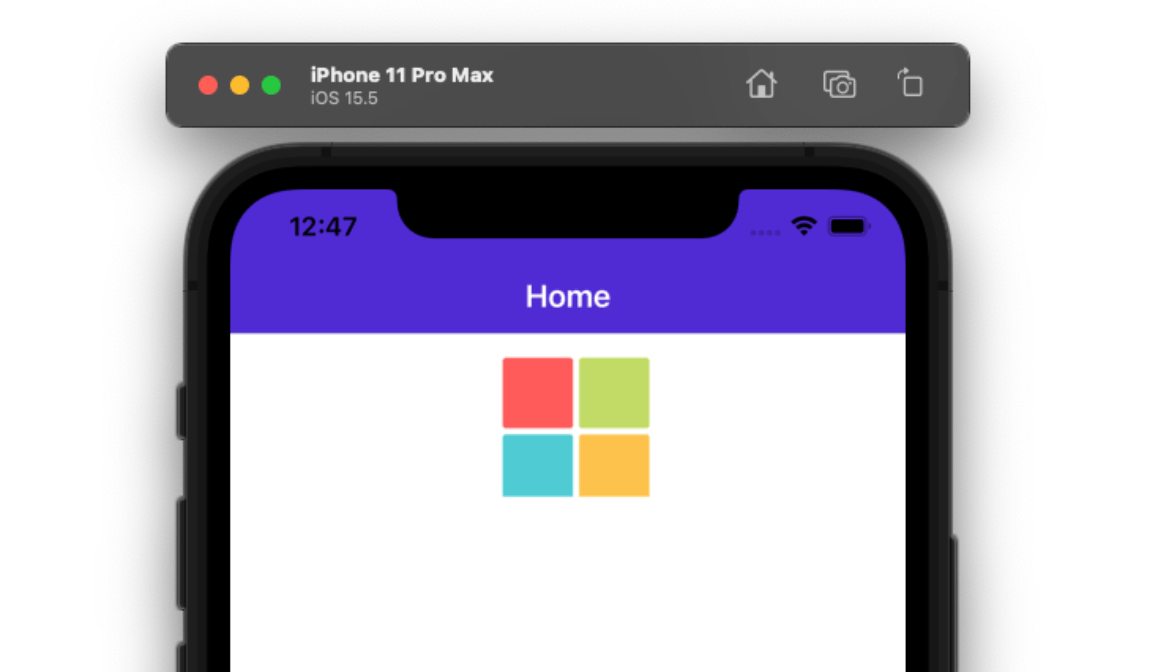
And Finally, Our Result!

Platform limitations
 Windows does not support the PlatformImage.
Resizing an Image
Images can also be resized. For this, we use the IImage.Resize method, which receives the following parameters:
- Width and Height of float type, for the width and height respectively.
- ResizeMode (optional): It’s responsible for controlling how the image will be resized to fit its target dimensions. It is an enumerator that has the following options:
- Fit: Adds the image in a letterbox format to fit your target size.
- Bleed: Crops the image to fit its target size, without losing its aspect ratio.
- Stretch: It’s responsible for stretching the image so that it fills the available space. This can affect the aspect ratio of the image.
- Dispose Original (optional): Bool value, which is False by default. Controls whether the source image should be discarded after performing the shrink operation.
Let’s See a Resizing Example
In this example, the image is resized, the information for the new size is assigned, and it’s indicated that it should be stretched to compensate for the white space. Finally, the original image is deleted.
public void Draw(ICanvas canvas, RectF dirtyRect)
{
	Microsoft.Maui.Graphics.IImage image;
	Assembly assembly = GetType().GetTypeInfo().Assembly;
		using (Stream stream = assembly.GetManifestResourceStream("MauiGraphicsSample.Resources.Images.windows.png"))
		{
		image = PlatformImage.FromStream(stream);
		}

		if (image != null)
		{
		Microsoft.Maui.Graphics.IImage newImage = image.Resize(100, 60, ResizeMode.Stretch, true);
		canvas.DrawImage(newImage, 10, 10, newImage.Width, newImage.Height);
		}
}
Downsizing an Image
To reduce an image you can use the IImage.Downsize method. Which receives the following parameters:
- MaxWidthOrHeight (Required): It’s a float value which represents the maximum width or height of the image and reduces the size of the image maintaining its aspect ratio.
- DisposeOriginal (Optional): Bool value, which is False by default. Controls whether the source image should be discarded after performing the shrink operation.
Let’s See a Downsizing Example
public void Draw(ICanvas canvas, RectF dirtyRect)
{
	Microsoft.Maui.Graphics.IImage image;
	Assembly assembly = GetType().GetTypeInfo().Assembly;
		using (Stream stream = assembly.GetManifestResourceStream("MauiGraphicsSample.Resources.Images.windows.pngg"))
		{
		image = PlatformImage.FromStream(stream);
		}

		if (image != null)
		{
		Microsoft.Maui.Graphics.IImage newImage = image.Downsize(100, true);
		canvas.DrawImage(newImage, 10, 10, newImage.Width, newImage.Height);
		}
}
Saving an Image
You can save the images you want using the IImage.Save and IImage.SaveAsync methods, both of which receive the following parameters:
- Stream (Required): It’s a data type MemoryStream.
- Format (Optional): It’s an ImageFormat type and expects the format type of the image. By default it has .png as a value.
- Quality (Optional): It’s the quality and it’s float type. Its default value is 1.
Let’s See a Saving Example
public void Draw(ICanvas canvas, RectF dirtyRect)
{
	Microsoft.Maui.Graphics.IImage image;

	Assembly assembly = GetType().GetTypeInfo().Assembly;
		using (Stream stream = assembly.GetManifestResourceStream("MauiGraphicsSample.Resources.Images.windows.png"))
		{
		image = PlatformImage.FromStream(stream);
		}

	if (image != null)
	{
		Microsoft.Maui.Graphics.IImage newImage = image.Downsize(150, true);
		using (MemoryStream memStream = new MemoryStream())
		{
		newImage.Save(memStream);
		}
	}
}
Wrap-up
And done! 💥 In this article you have learned how to save, load, downsize and resize an image.
I hope it has been very useful to you. See you next time! 🙋♀️
Reference: https://learn.microsoft.com/en-us/dotnet/maui/user-interface/graphics/images

Leomaris Reyes
Leomaris Reyes is a Software Engineer from the Dominican Republic, with more than 5 years of experience. A Xamarin Certified Mobile Developer, she is also the founder of Stemelle, an entity that works with software developers, training and mentoring with a main goal of including women in Tech. Leomaris really loves learning new things! 💚💕 You can follow her: Twitter, LinkedIn , AskXammy and Medium.

