Getting Started with Appwrite (Part 1/4): The Open-Source Firebase Alternative

Summarize with AI:
This series will explore Appwrite, a self-hosted server backend, plus BaaS platform. We’ll dive in with a React invoicing app, showcasing authentication flow, database storage and serverless functions. In Part 1, we’ll set up our React app and Appwrite project, plus configure storage for our invoices/PDFs.
Appwrite is an open-source alternative to Firebase that is becoming increasingly popular. Initially, Appwrite was just a self-hosted server backend that provided functionality such as authentication, databases, functions and storage. However, with the release of Appwrite Cloud, it became a Backend-as-a-Service (BaaS) platform that simplifies the use of Appwrite functionality.
Why Appwrite and not Firebase? Firebase offers more services out of the box, such as analytics, extensions and ML Kit. It also integrates with Google Cloud, as, after all, it’s one of Google’s services.
The last part might be a reason enough to ditch Firebase, especially since Google sometimes abandons projects or removes features. For example, Google has recently deprecated Cloud Domains and Firebase Dynamic Links. So, stability might be a point in Appwrite’s favor.
What’s more, you can’t self-host Firebase services, and Firebase Cloud Functions cannot make API requests to external services unless you have subscribed for a paid plan. This isn’t the case with Appwrite. Therefore, if you don’t want to use Firebase, Appwrite might be a good alternative. In this series, we will explore Appwrite’s services and how to use them.
The best way to learn things related to coding is by practice. Therefore, this tutorial won’t just briefly cover what Appwrite offers. Instead, we will get our hands dirty and create an invoicing application that will utilize Appwrite’s offerings:
- Authentication – We will build an authentication flow to allow users to sign up and log in.
- Databases – We will store the invoice data in Appwrite’s database.
- Functions & Storage – Upon invoice submission or deletion, a serverless function will be executed to generate an invoice PDF file and upload it to the storage or delete it.
Table of Contents
To demonstrate how to use Appwrite, we will build a web app using Vite, React, React Router and TailwindCSS. This series comprises four parts:
Part 1: Project Setup
In the first part, we will set up a React application and an Appwrite project. We will also configure a database, a collection for invoices and a storage bucket to which we will upload PDF files.
Part 2: Sign up and Login with Appwrite
In the second part, we will create an authentication form that will allow users to create an account and log in if they already have an existing one.
Part 3: CRUD Functionality with Appwrite
The third part will comprise implementing CRUD functionality for invoices.
Part 4: Appwrite CLI, Functions and Storage
In the last part, we will delve into utilizing Appwrite CLI, functions and storage. We will create a function that will be triggered when an invoice is created, updated or deleted. In response to these events, an invoice PDF file will be created or deleted from the Appwrite storage. After that, we will update the invoice page and incorporate a download invoice PDF button.
React Project Setup
You can find the final code for this tutorial in this GitHub repository.
Let’s start by setting up a new project.
First, we need to create a new React project using Vite. You can do so by executing the commands below in your terminal.
$ npm create vite@latest getting-started-with-appwrite -- --template react
$ cd getting-started-with-appwrite
$ npm install react-router-dom react-hot-toast
$ npm run dev
The react-router-dom package provides routing functionality, and react-hot-toast offers easy-to-use toast notifications, which we will use to inform a user when an invoice is created, updated or deleted.
The npm run dev command will start the dev server, but before we proceed with that, let’s configure TailwindCSS.
$ npm install -D tailwindcss postcss autoprefixer
$ npx tailwindcss init -p
The first command installs the required dependencies, and the second one creates a config file, which we need to update next.
tailwind.config.js
/** @type {import('tailwindcss').Config} */
export default {
  content: [
    "./index.html",
    "./src/**/*.{js,ts,jsx,tsx}",
  ],
  theme: {
    extend: {},
  },
  plugins: [],
}
Last but not least, we need to replace the contents of the index.css file and include Tailwind’s directives.
src/index.css
@tailwind base;
@tailwind components;
@tailwind utilities;
Now, it’s time to set up a new Appwrite project.
Appwrite Project Setup
Head to the appwrite.io website and click on the “Sign up” button. After creating a new account, you will be redirected to the “create your first project” screen.
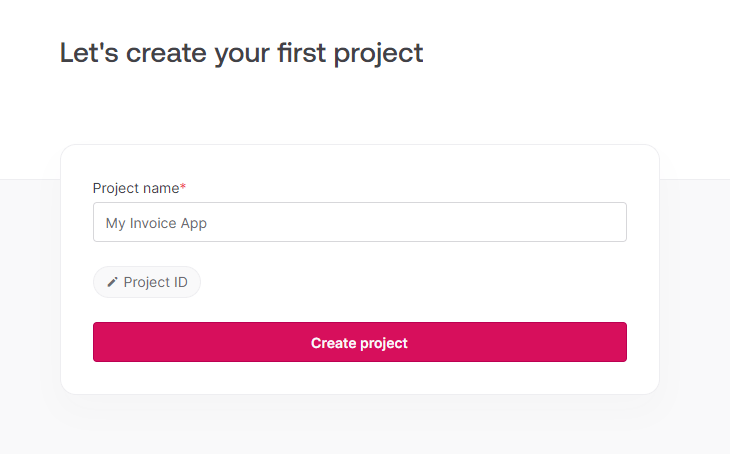
You can provide any project name you want, but for this tutorial, “My Invoice App” is just fine. Appwrite allows configuring the project id, but we don’t need to do it for this project, so just click on the “Create project” button.
Add Web Platform
After the project is created, we will land in the project’s dashboard that will display a getting started guide. We want to create a web app, so let’s add the “Web” platform to the project.
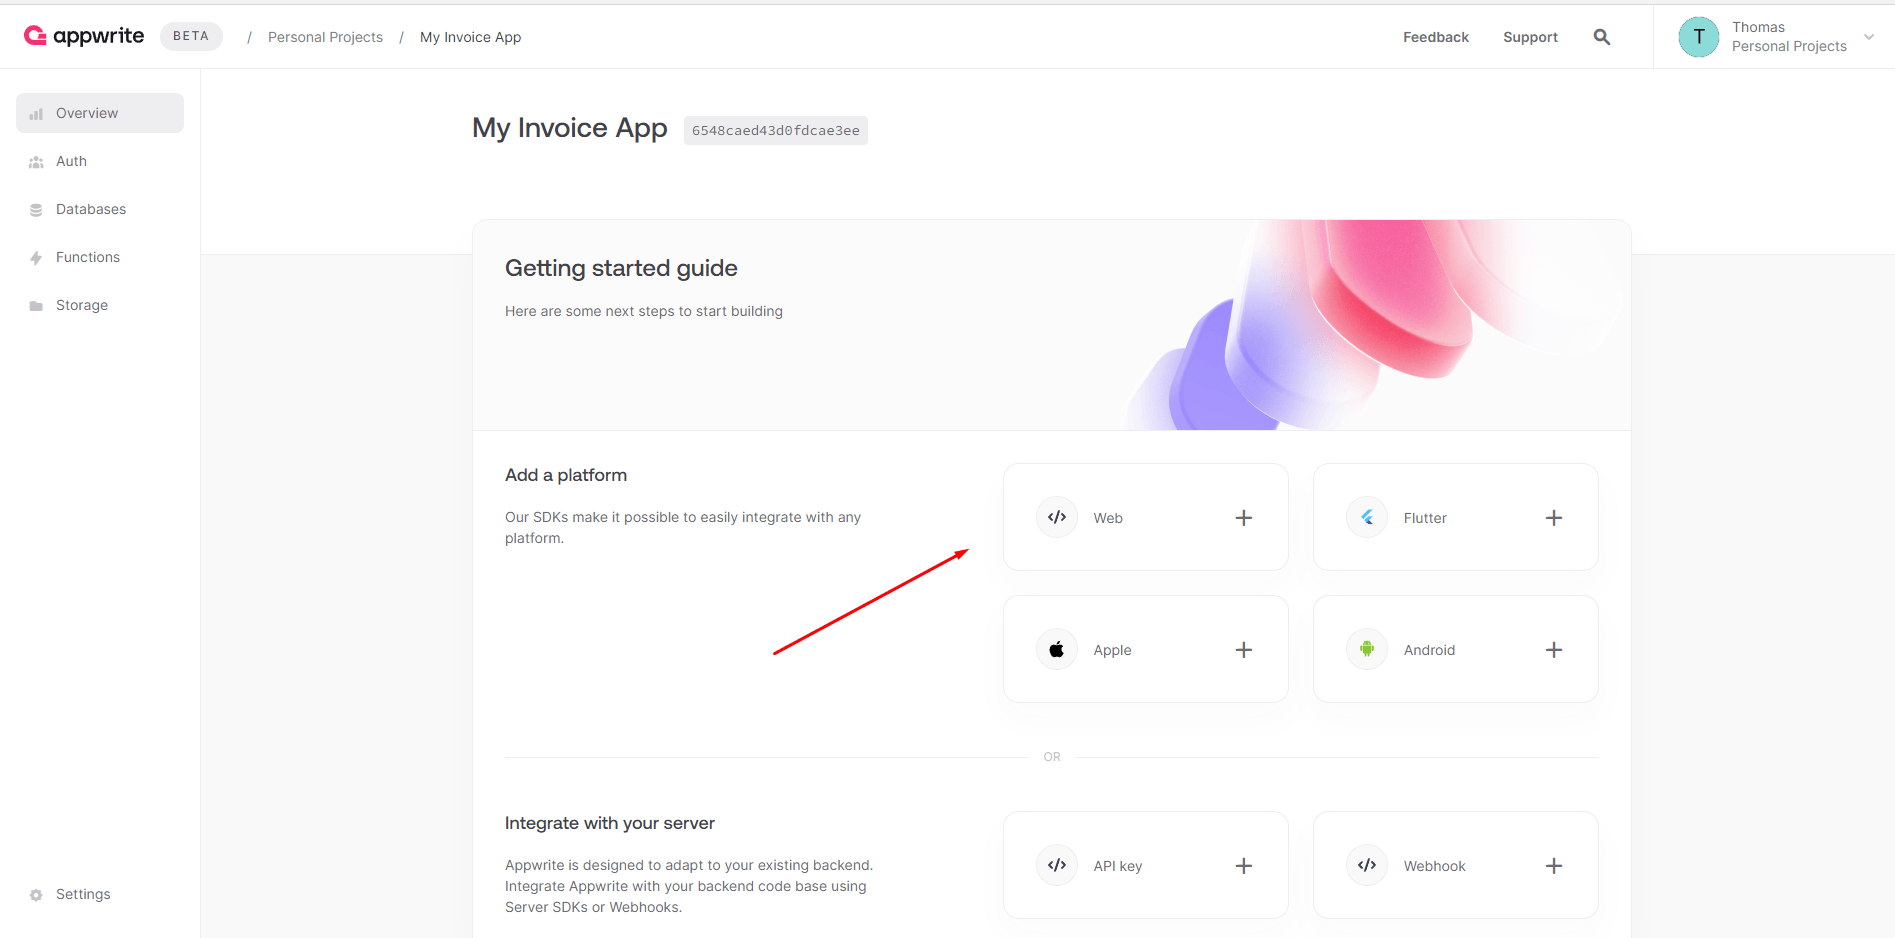
Now, we need to go through a very short web platform setup flow. The image below shows what it looks like.
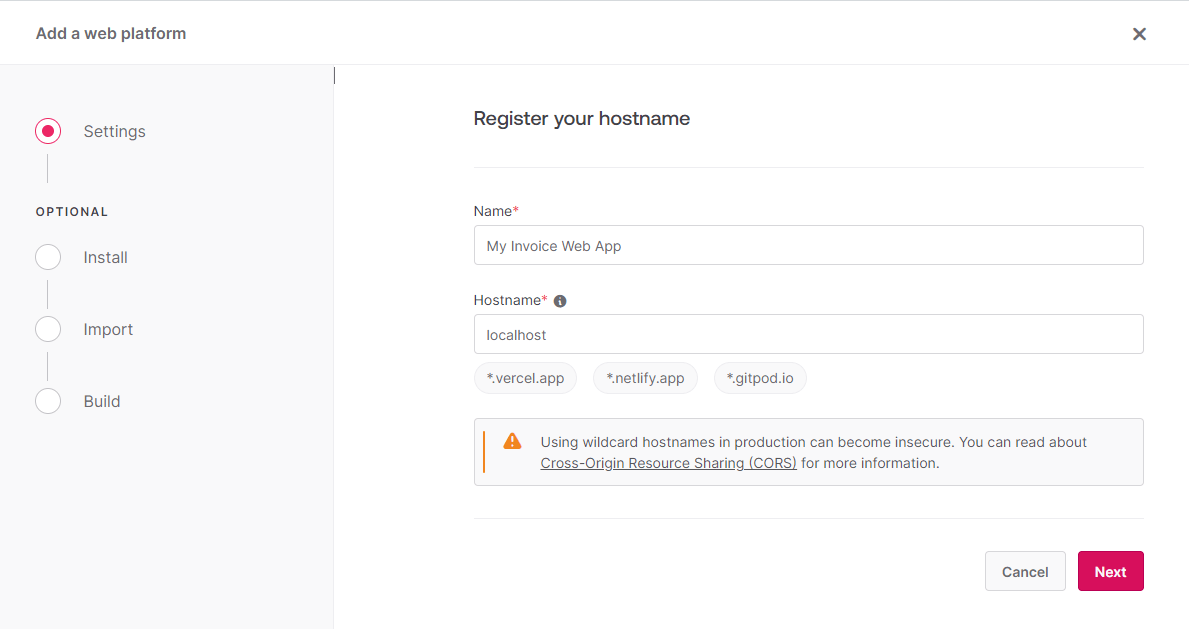
In the settings, we need to enter the name for the web platform and hostname. For this tutorial, we will run the invoicing app locally, so enter localhost for the hostname and “My Invoice Web App” should be fine for the name.
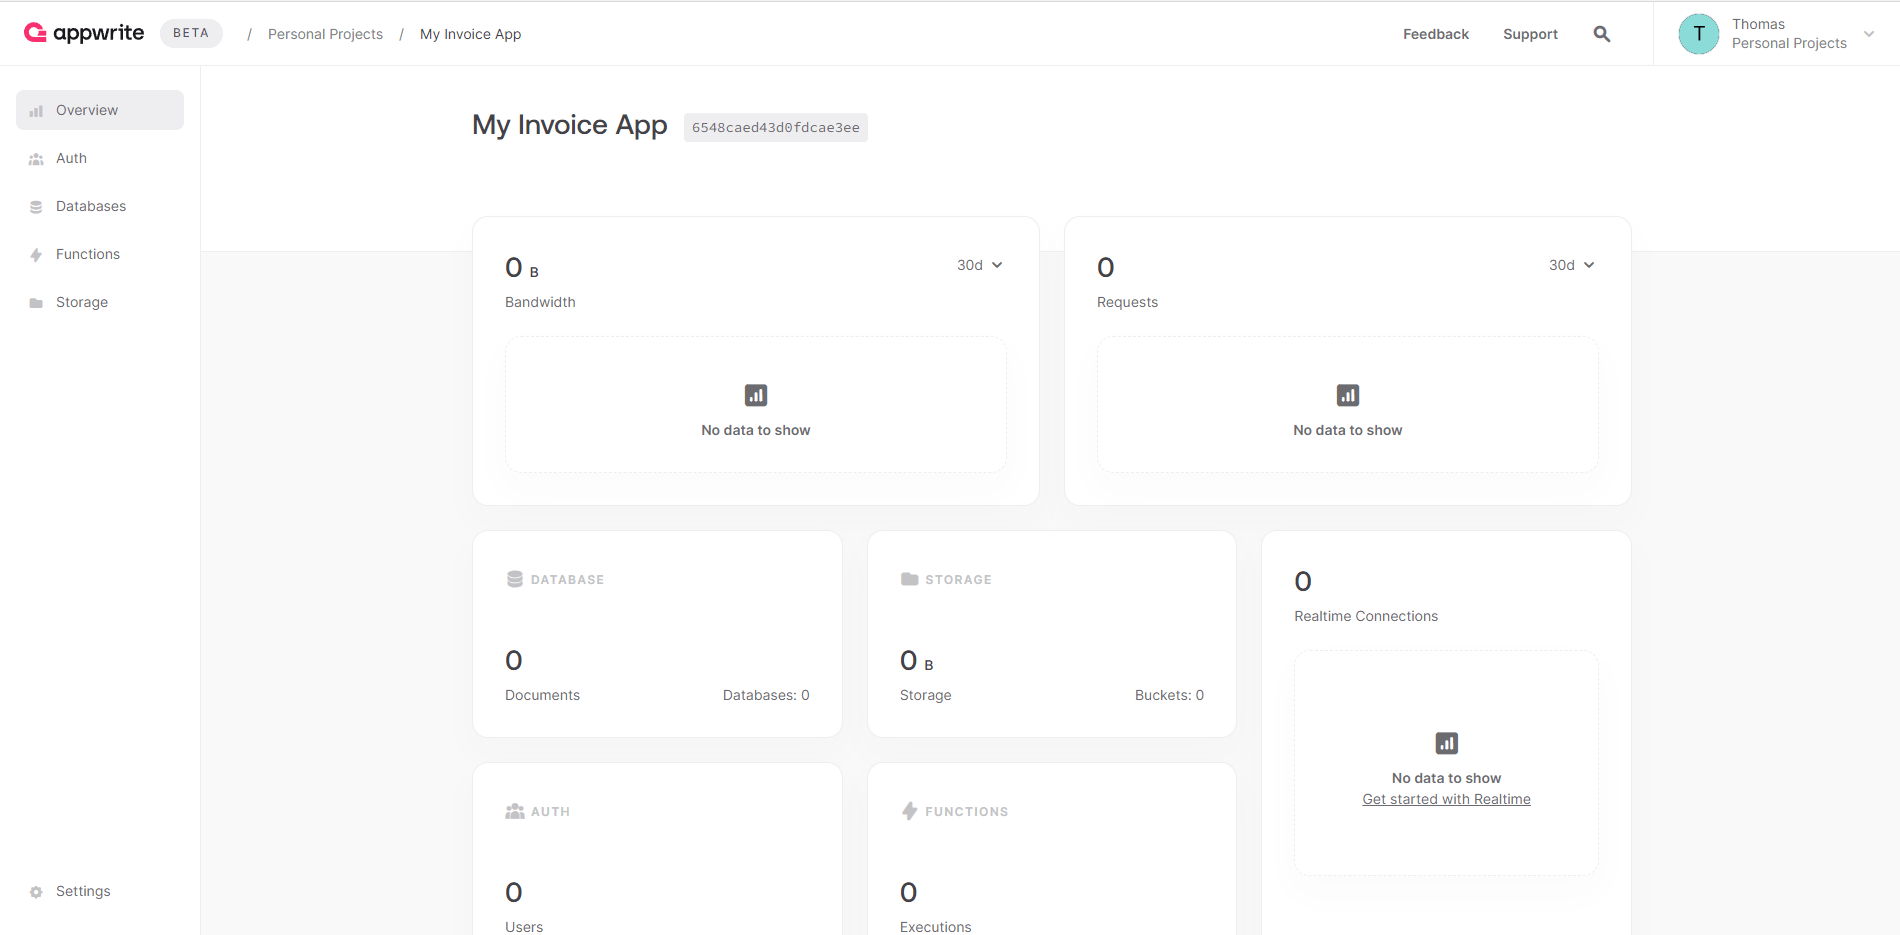
The next steps in the setup flow are optional and cover how to add Appwrite SDK to the project. We will do it shortly, so for now, just press the “Next” button until the end. You should see a screen like the one shown in the image below.
Add Appwrite SDK to the Project
Let’s add the Appwrite SDK to the project we created before. First, we need to install it.
npm install appwrite
After the SDK is installed, we need to configure it. We can do so by initializing a new Client instance and providing the Appwrite API endpoint and the project ID.
src/api/appwrite.api.js
import { Client, Databases, Account, Storage } from "appwrite";

const client = new Client();
client
  .setEndpoint("https://cloud.appwrite.io/v1")
  .setProject(import.meta.env.VITE_APPWRITE_PROJECT_ID);

export const account = new Account(client);
export const databases = new Databases(client);
export const storage = new Storage(client);
The project ID will be provided via an environment variable, so let’s create a new .env file.
.env
VITE_APPWRITE_PROJECT_ID="YOUR_PROJECT_ID"
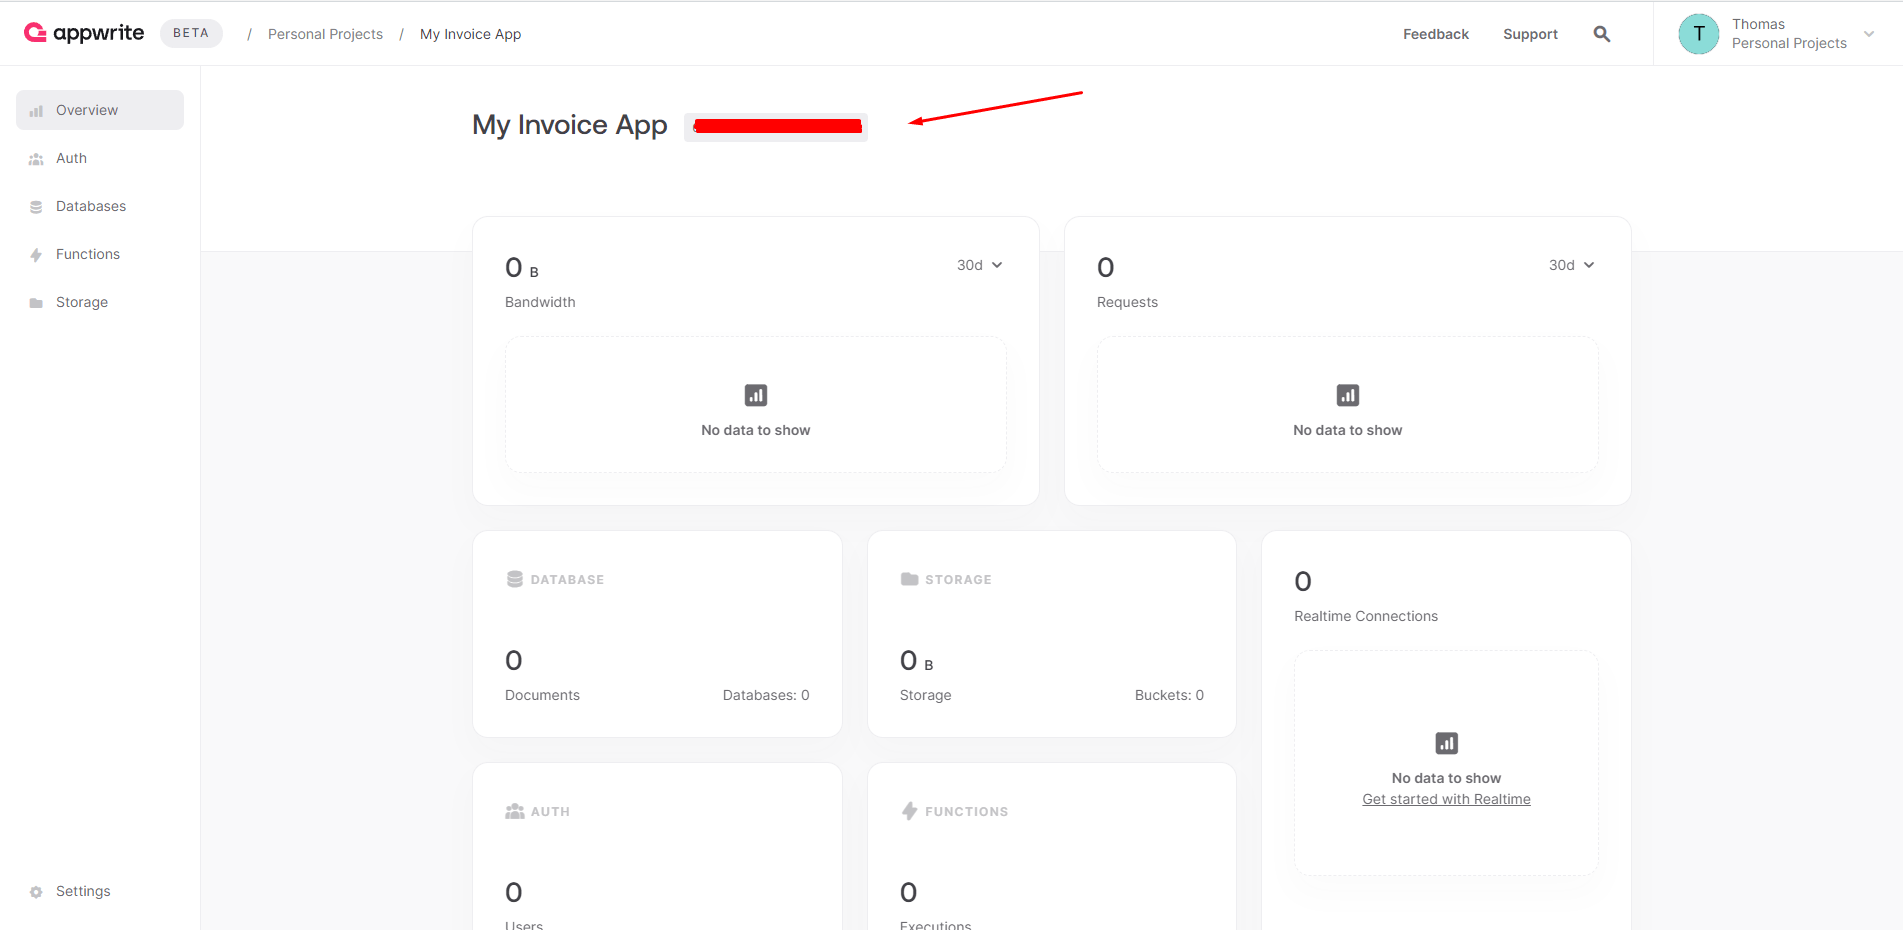
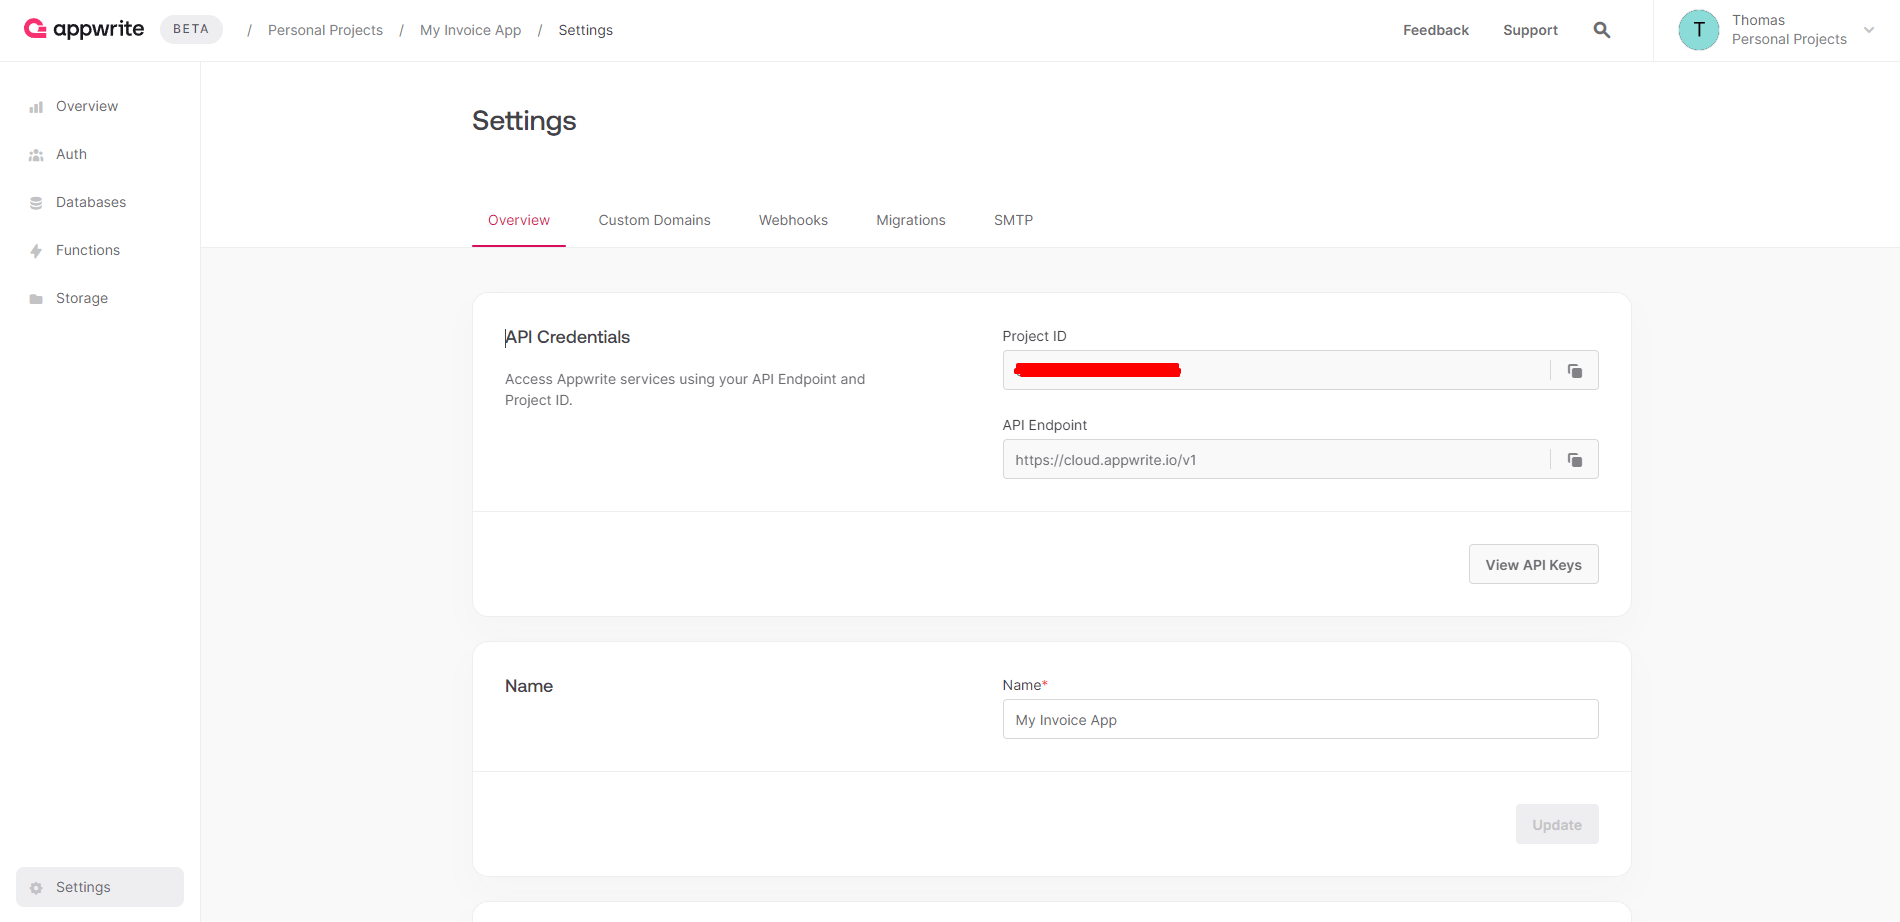
Make sure to replace the YOUR_PROJECT_ID text with the ID of your own project. You can find it next to the name of your project on the overview page, as shown in the image below.
Alternatively, you can find it on the “Settings” page.
Create a New Database in Appwrite
We have to do two more things in the Appwrite console. First, this requires creating a database, as we need one to save invoice details. The second is to set up a storage bucket for the invoice files.
Click on the “Databases” link in the left sidebar and then on the “Create database” button. You should see a popup to create a new database.
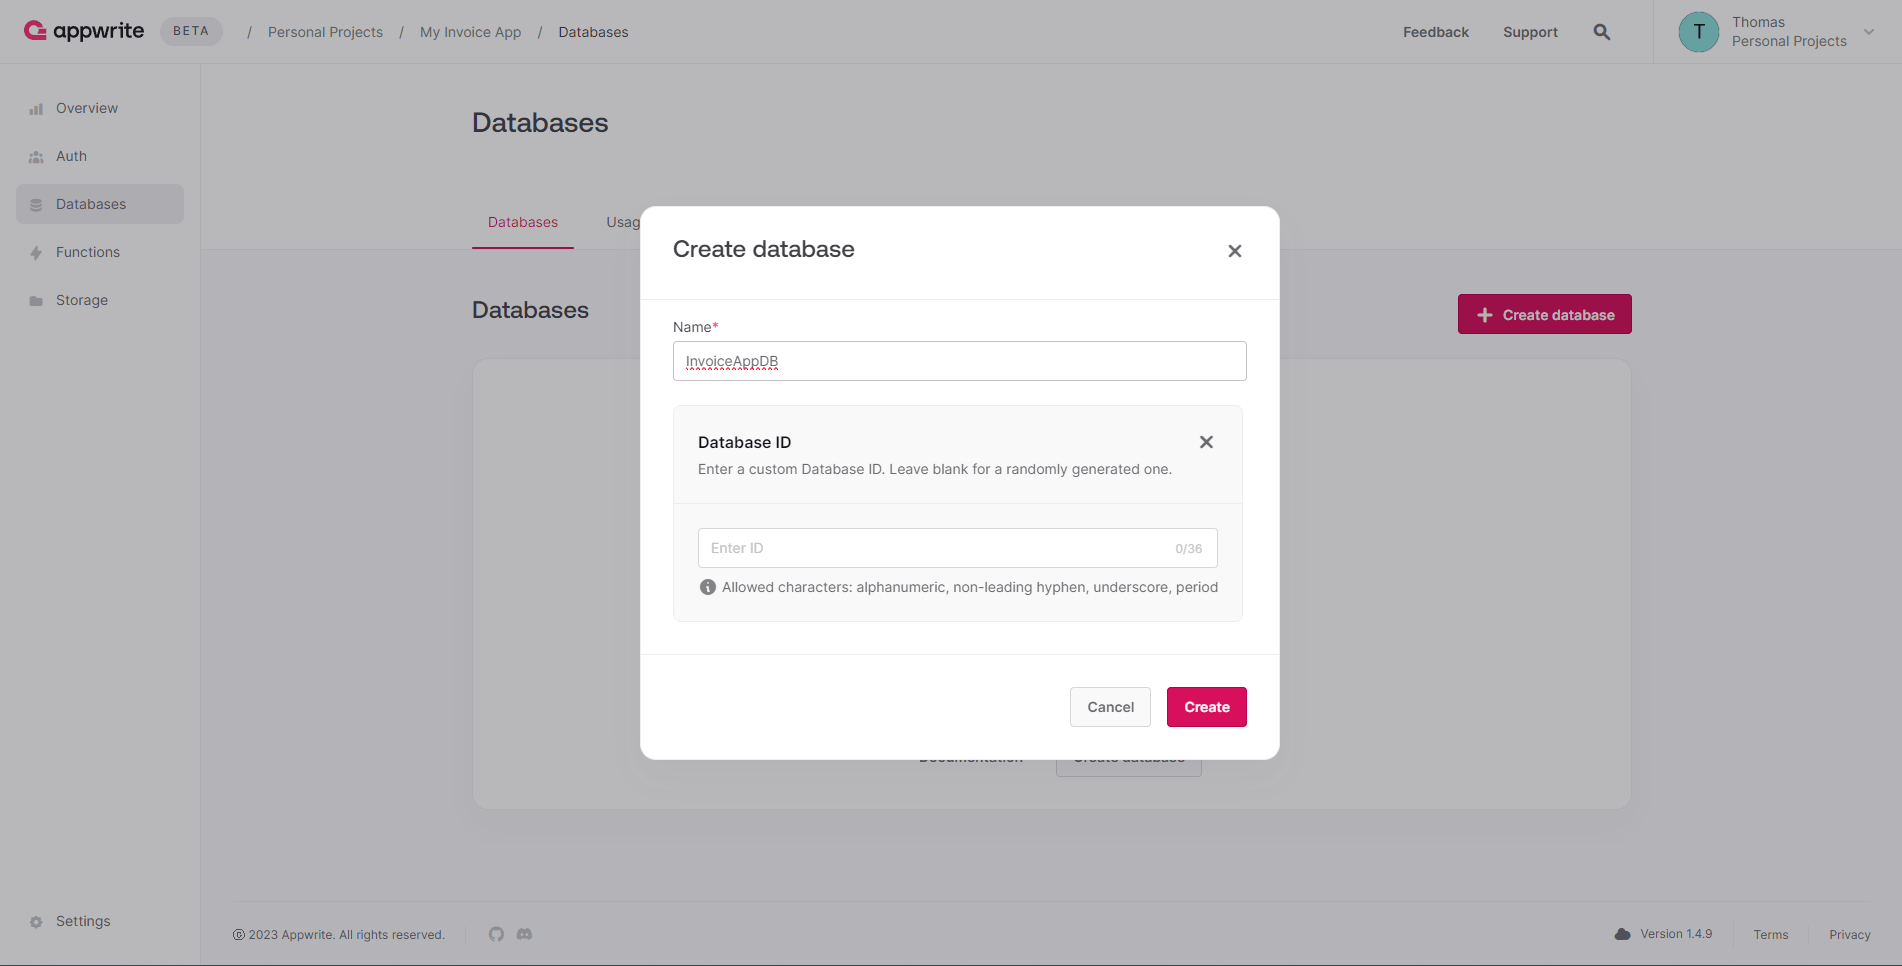
Let’s call it “InvoiceAppDB.” A custom database ID is not necessary, as Appwrite can generate it for us, so just leave it blank.
Create a New Collection
After the database is ready, we can create a new collection for invoices. However, before we proceed, take note of the DATABASE ID that Appwrite generated. It will be necessary for the next part. Now, click on the database, as shown in the image below.
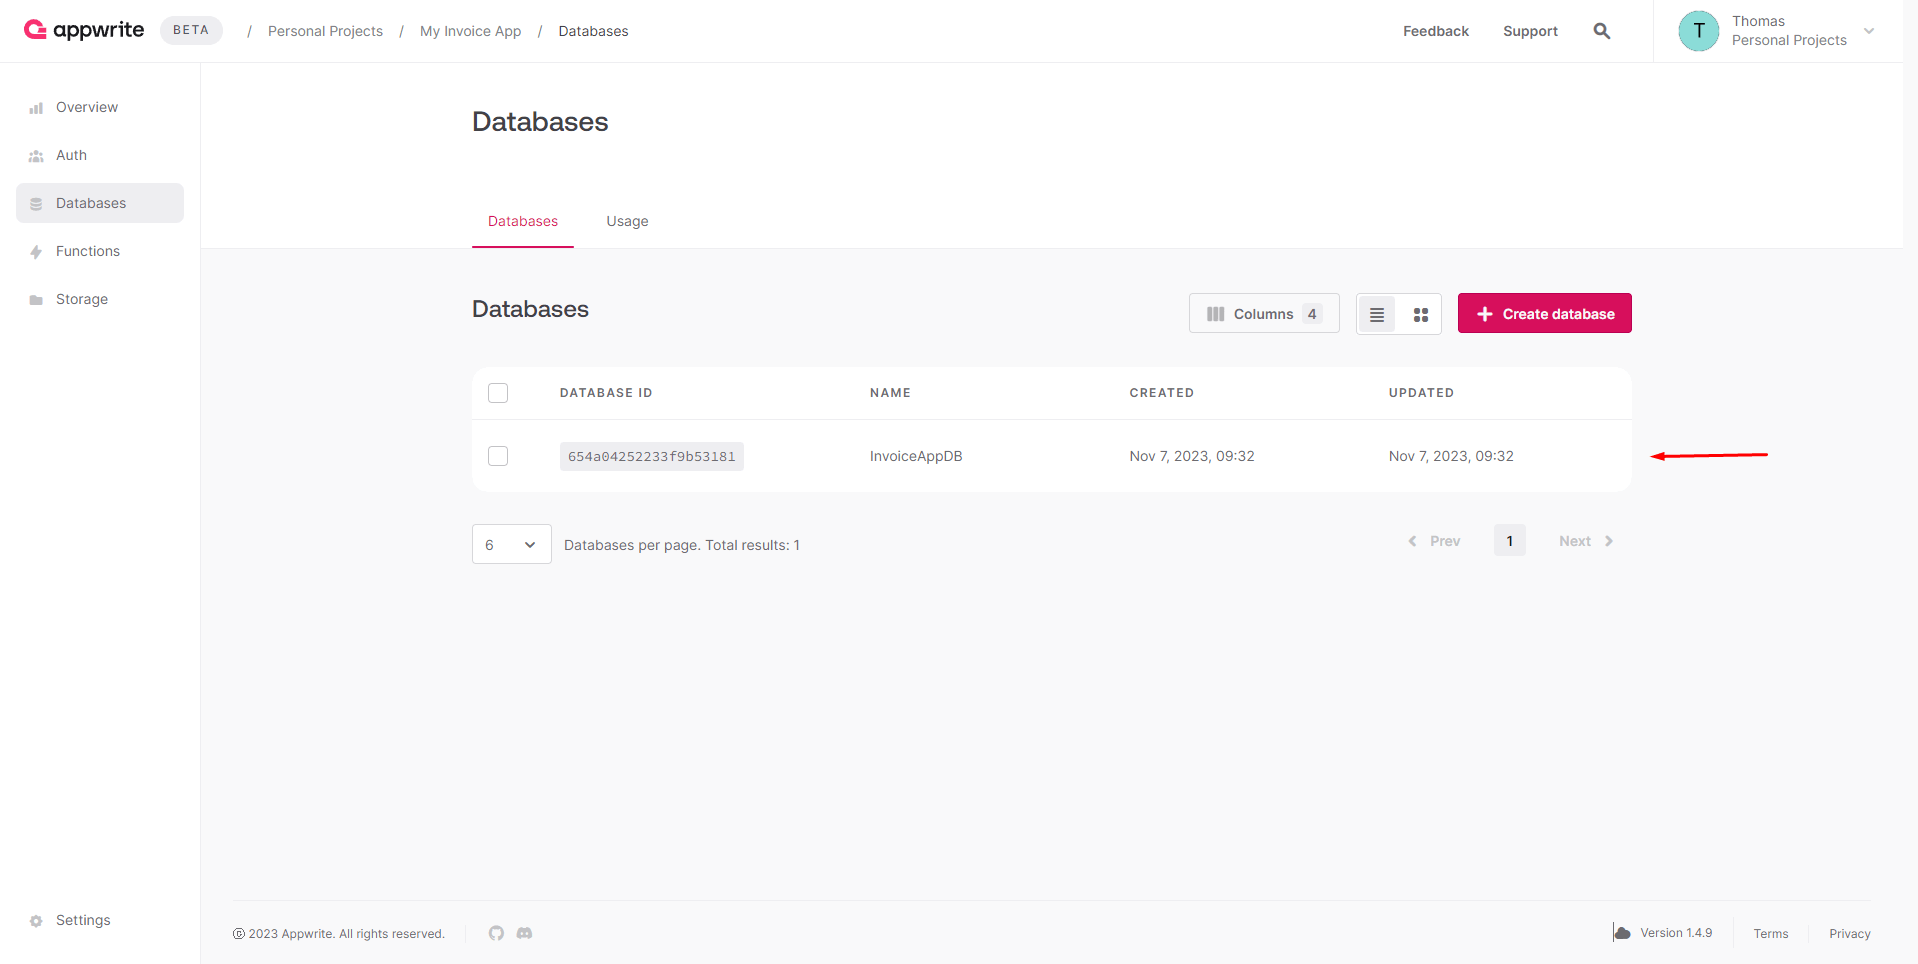
Currently, the database doesn’t have any collections. Let’s set one up.
You can name the collection “invoices.” Again, take a note of the COLLECTION ID of the invoices collection, as we will require it shortly.
Invoice Collection Permissions
Any authenticated user should be able to create an invoice. However, users should not be able to read, update or delete any invoice but their own.
Appwrite provides two levels of permission control—collection level and document level. The collection-level permissions are applied to every document in the collection. Document-level permissions provide fine-grained control and can be applied on specific documents.
In Part 3 of this series, we will cover how to create invoices and apply document-level permissions to allow only the creator of the invoice to read, update and delete it.
Let’s configure collection-level permissions and allow users to create invoices. Click on the invoices collection and head to the Settings tab. We need to do two things. First, find the Permissions section and click on the Add a role button. It should open a dropdown with various permission options. For example, we can add permissions to all guests, all users, teams or only specific users.
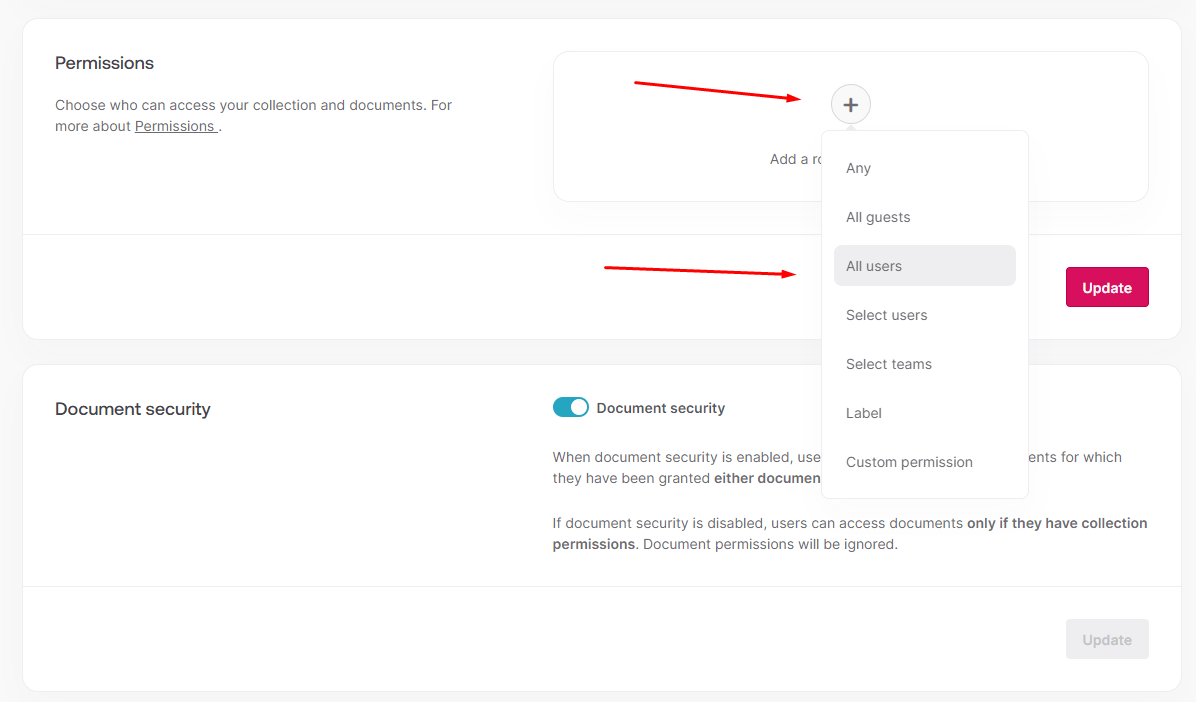
Click on the All users option, as we want every user to be able to create invoices.

Under the Permissions section, you should find a section called Document security. This is the second thing we need to do. Make sure that the Document security toggle is checked. This option needs to be toggled, so we can apply document-level permissions.
Invoice Collection Attributes
After creating a collection and configuring permissions, it’s time to provide attributes the collection will comprise. This is quite different from Firebase’s Firestore database. Firestore accepts data in any shape and format and does not rely on a pre-defined attributes schema.
Appwrite is much stricter and requires these to be configured upfront. To create new attributes, click on the collection we just set up and then on the “Create attribute” button.
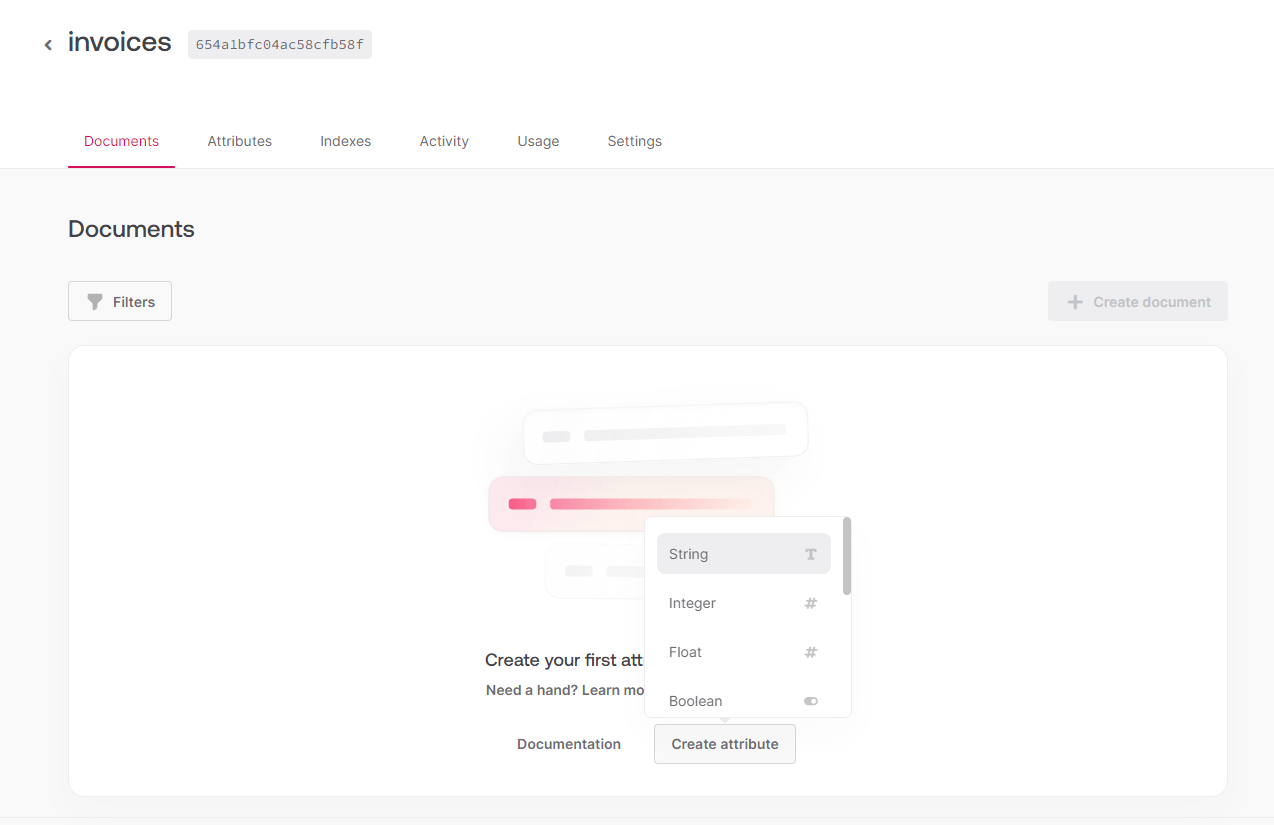
The table below shows the attributes that we need to create. I know, there are a lot of them, but we are building something more complex than a TODO list. Just make sure there are no typos, as Appwrite server will reject any operations that do not satisfy the configured attributes.
| Field Name | Field Type | Size | Required |
|---|---|---|---|
| invoiceId | string | 20 | Yes |
| date | datetime | Yes | |
| dueDate | datetime | Yes | |
| amount | string | 50 | Yes |
| description | string | 1000 | Yes |
| senderName | string | 200 | Yes |
| senderAddress | string | 200 | |
| senderPostcode | string | 10 | |
| senderCity | string | 100 | |
| senderCountry | string | 50 | |
| senderEmail | Yes | ||
| senderPhone | string | 50 | |
| clientName | string | 200 | Yes |
| clientAddress | string | 200 | |
| clientPostcode | string | 10 | |
| clientCity | string | 100 | |
| clientCountry | string | 50 | |
| clientEmail | Yes | ||
| clientPhone | string | 50 | |
| accountName | string | 150 | Yes |
| accountSortCode | string | 10 | Yes |
| accountNumber | string | 50 | Yes |
| accountAddress | string | 150 | Yes |
| accountPostCode | string | 10 | Yes |
| accountCity | string | 100 | Yes |
| accountCountry | string | 50 | Yes |
| accountIban | string | 50 | |
| paymentReceived | boolean | ||
| paymentDate | datetime |
Once we are done with all the attributes, it’s time to prepare a new storage bucket.
Appwrite Storage Setup
Click on the “Storage” link in the sidebar and then on “Create bucket.”
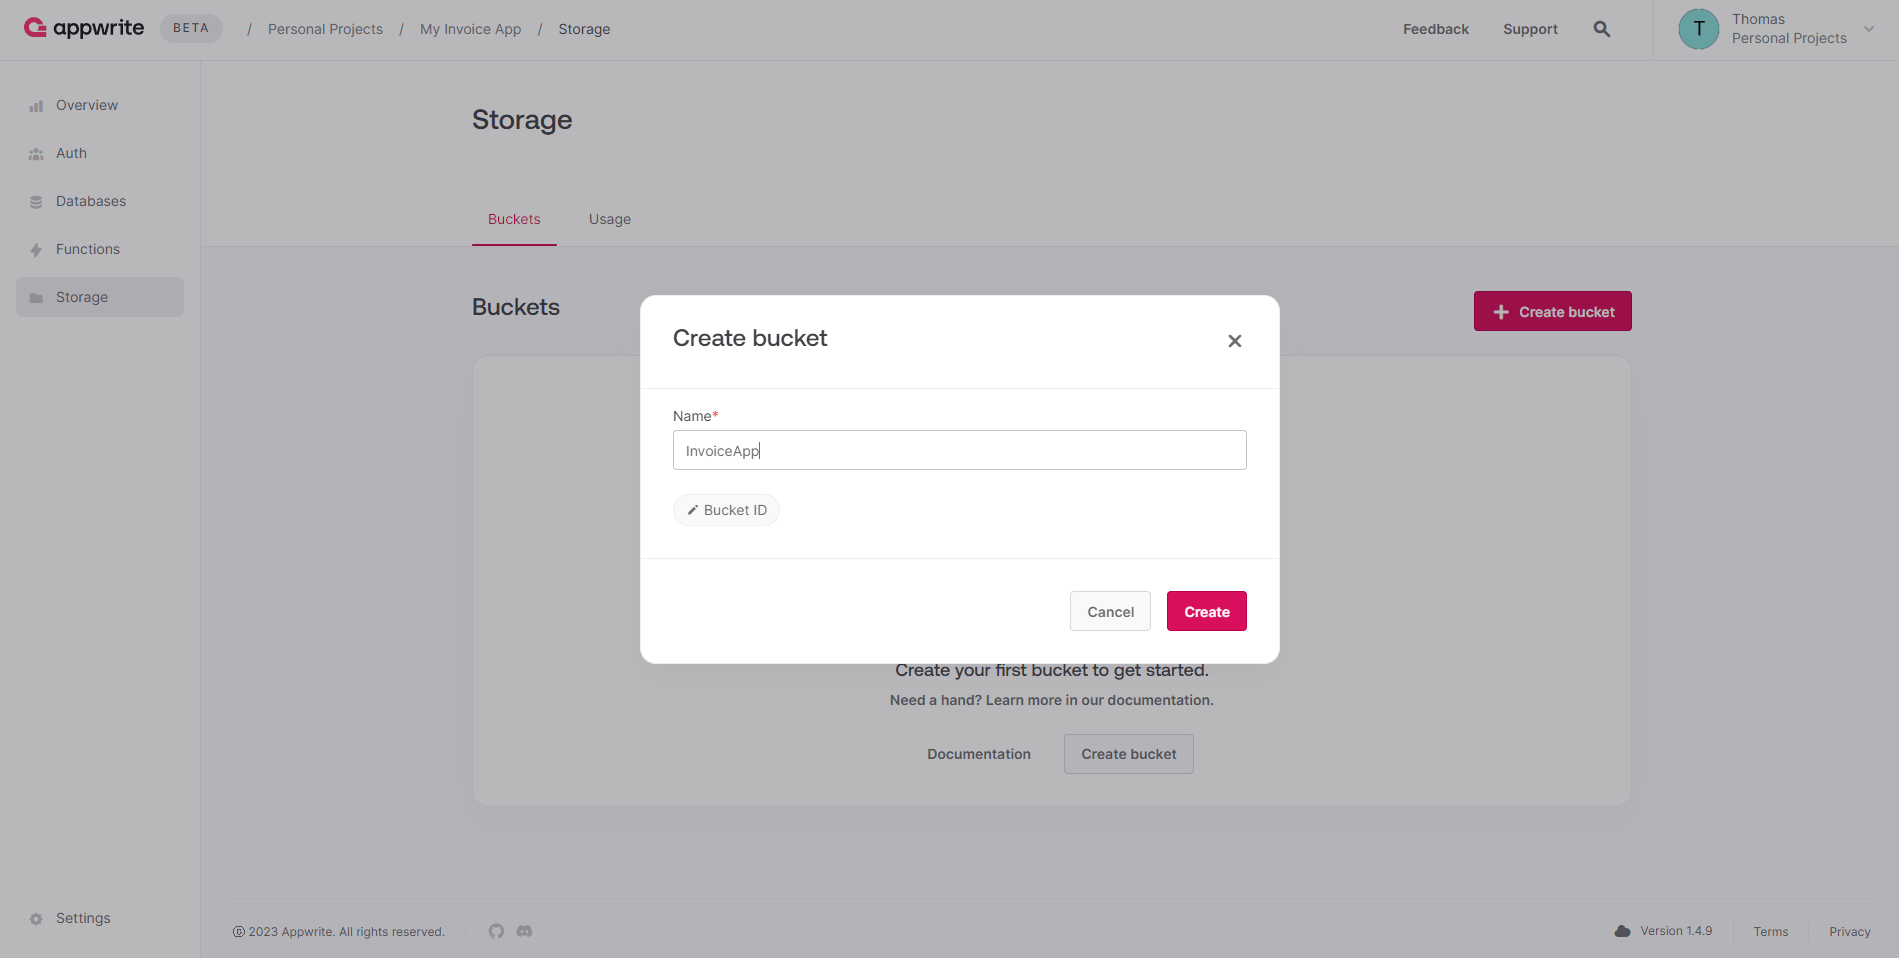
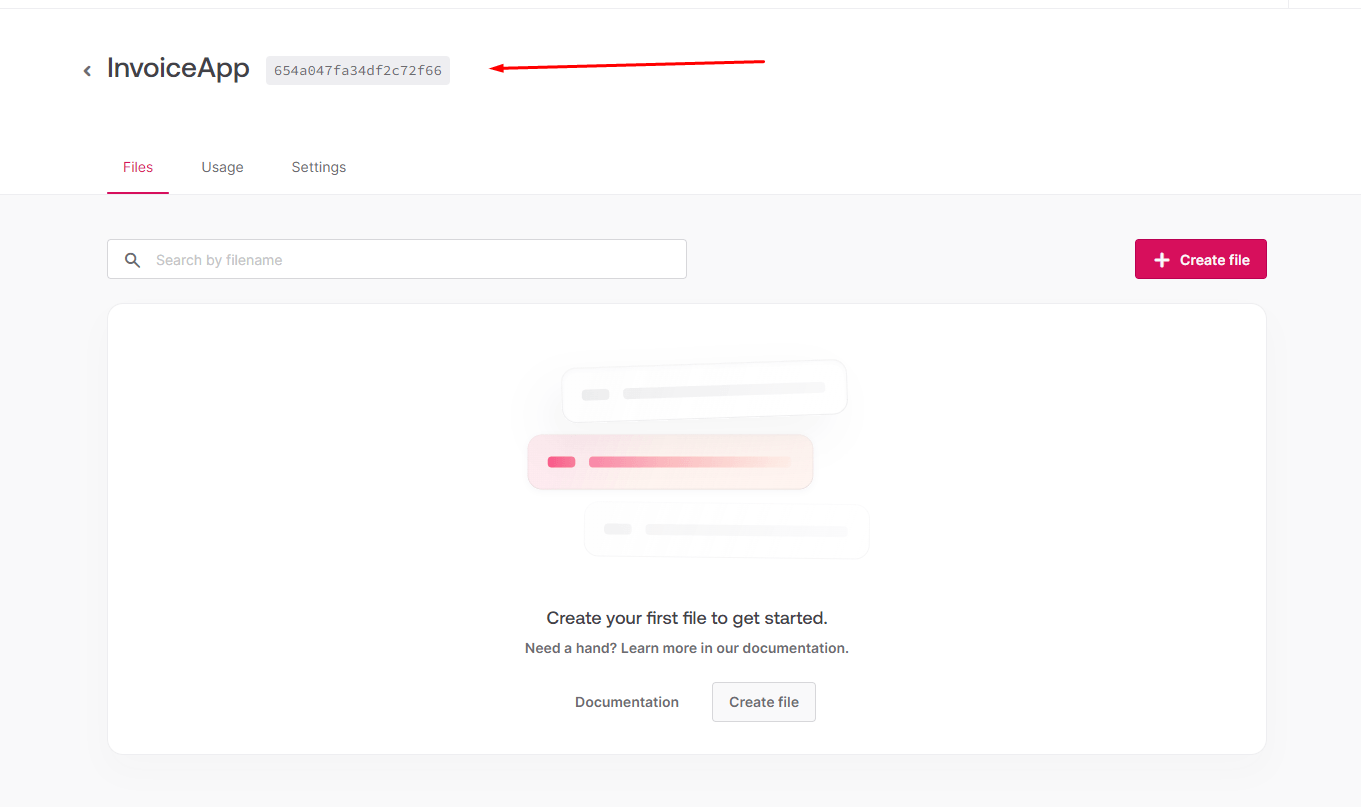
You can enter “InvoiceApp” for the name and click on “Create.” Take note of the Bucket ID, as it will be needed for the last part of this series. The image below shows where you can find it.
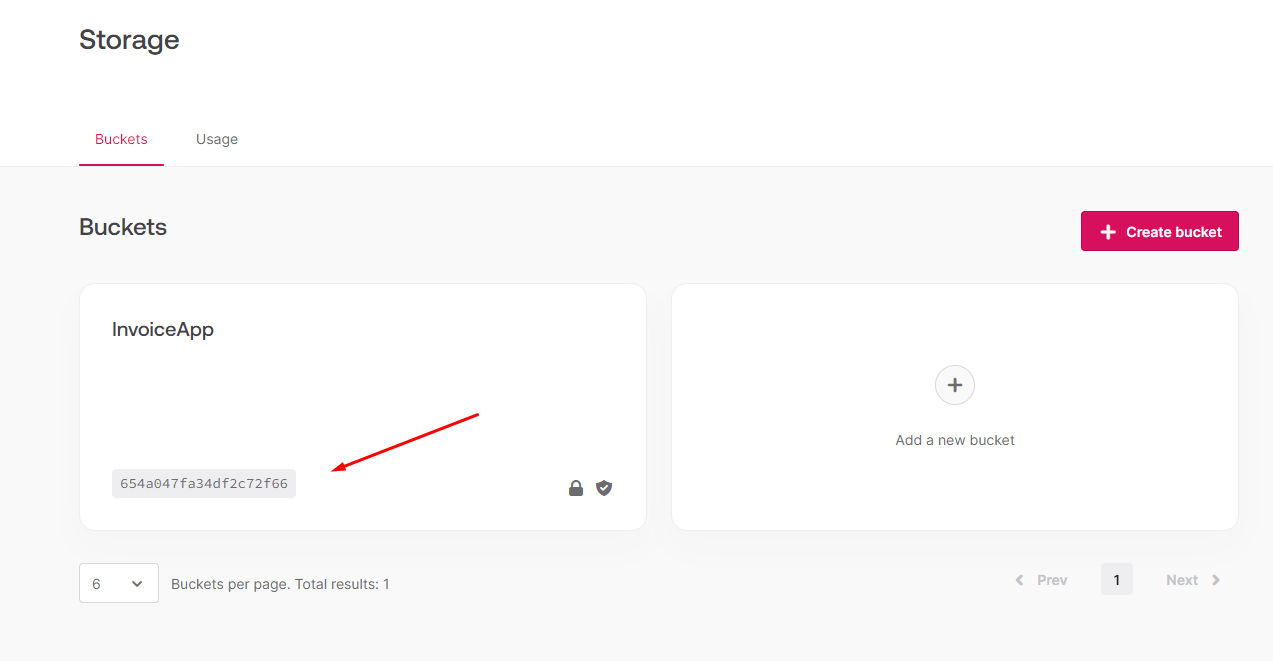
It’s also shown on the bucket’s page next to the bucket’s name.
Next, head to the settings tab and toggle “File security” permissions.
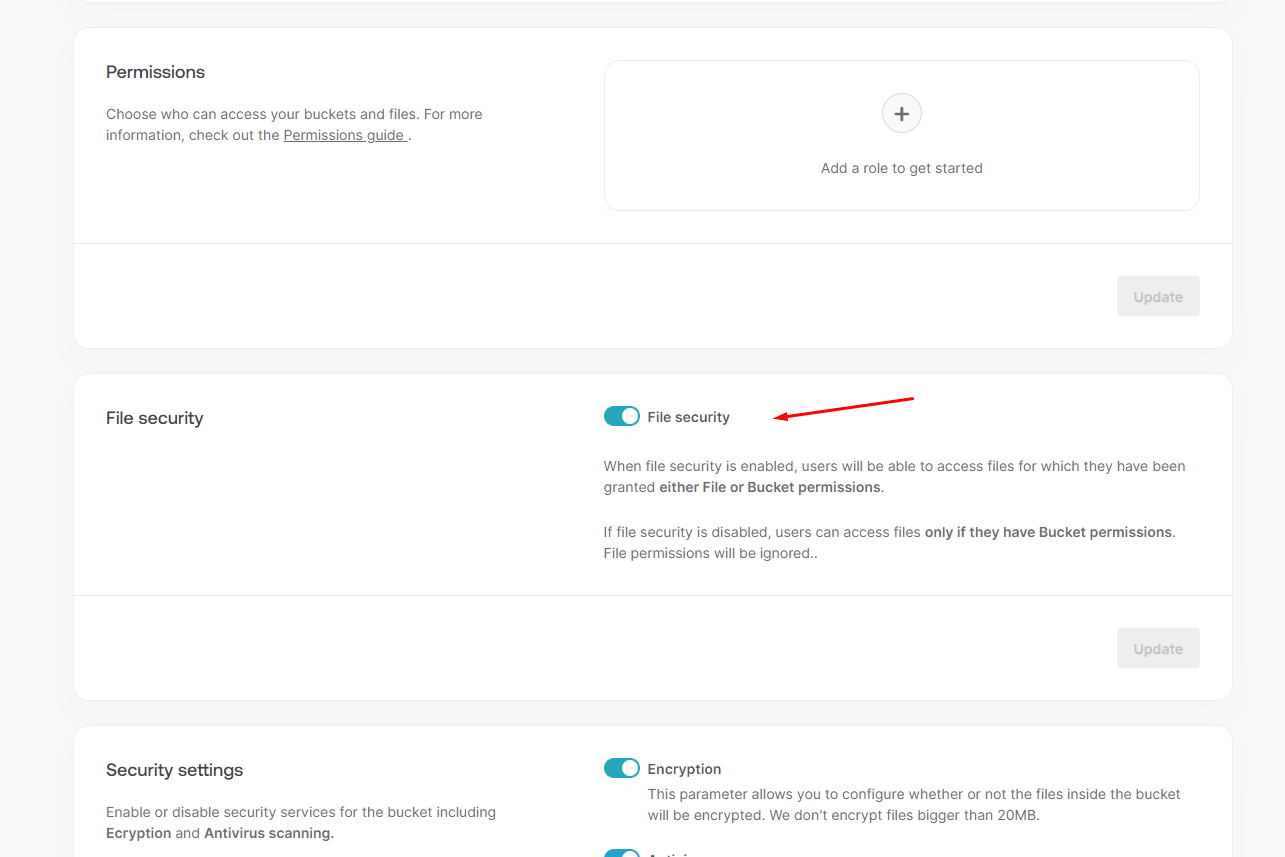
We need to toggle the “File security” option to allow configuring permissions on each uploaded file; otherwise, users will not be able to access their PDFs.
Now that we have project, database, collection and bucket IDs, let’s modify the .env file.
.env
VITE_APPWRITE_PROJECT_ID="YOUR_PROJECT_ID"
VITE_APPWRITE_DATABASE_ID="YOUR_DATABASE_ID"
VITE_APPWRITE_COLLECTION_ID_INVOICES="YOUR_COLLECTION_ID"
VITE_APPWRITE_BUCKET_ID="YOUR_BUCKET_ID"
Make sure to replace the values with your project’s IDs.
That’s enough for the Appwrite setup. Let’s configure routes for the app.
Application Routes
We will need the application to allow users to register, login and view invoices, as well as create and update invoices. Thus, we need to configure five routes. So let’s head to the main.jsx file and do just that.
src/main.jsx
import React, { lazy } from "react";
import ReactDOM from "react-dom/client";
import { createBrowserRouter, RouterProvider } from "react-router-dom";
import App from "./App.jsx";
import "./index.css";
const ViewInvoices = lazy(() => import("./views/invoice/ViewInvoices.jsx"));
const Invoice = lazy(() => import("./views/invoice/Invoice.jsx"));
const Auth = lazy(() => import("./views/auth/Auth.jsx"));

const router = createBrowserRouter([
  {
    path: "/",
    element: <App />,
    children: [
      {
        index: true,
        element: <ViewInvoices />,
      },
      {
        path: "/invoice/create",
        element: <Invoice />,
      },
      {
        path: "/invoice/:id",
        element: <Invoice />,
      },
      {
        path: "/auth/login",
        element: <Auth />,
      },
      {
        path: "/auth/register",
        element: <Auth />,
      },
    ],
  },
]);

ReactDOM.createRoot(document.getElementById("root")).render(
  <React.StrictMode>
    <RouterProvider router={router}>
      <App />
    </RouterProvider>
  </React.StrictMode>
);
The App component is placed at the root of the route config and wraps all the other route components. The reasoning behind it is that when a user visits the app, we will have to figure out whether they are logged in or not. If they are, the user will be redirected to the / page, and if not, to /auth/login instead.
We want to display content once the auth state is determined, and that’s why all routes need a common ancestor. We will implement this in the next part after we have a working sign-up and login functionality.
Let’s create the rest of the route components with some placeholder content.
src/auth/Auth.jsx
const Auth = props => {
  return <div>Auth</div>;
};

export default Auth;
src/invoice/Invoice.jsx
const Invoice = props => {
  return <div>Invoice</div>;
};

export default Invoice;
src/invoice/ViewInvoices.jsx
const ViewInvoices = props => {
  return <div>ViewInvoices</div>;
};

export default ViewInvoices;
Last but not least, we need to update the App component and use the Outlet component provided by React Router. The Outlet component is responsible for rendering child route elements.
src/App.jsx
import { Outlet } from "react-router-dom";
import "./App.css";

function App() {
  return (
    <div>
      <Outlet />
    </div>
  );
}

export default App;
That’s it for the route setup.
Conclusion
We have successfully created and configured a new React app and an Appwrite project with a database, invoices collection and a storage bucket for PDF files. In the next part, we will create an authentication form and integrate it with Appwrite to allow users to create a new account and log in.

Thomas Findlay
Thomas Findlay is a 5-star rated mentor, full-stack developer, consultant, technical writer and the author of “React - The Road To Enterprise” and “Vue - The Road To Enterprise.” He works with many different technologies such as JavaScript, Vue, React, React Native, Node.js, Python, PHP and more. Thomas has worked with developers and teams from beginner to advanced and helped them build and scale their applications and products. Check out his Codementor page, and you can also find him on Twitter.

