Customizing Telerik UI for WinForms RadOpenFileDialog

Summarize with AI:
Need to customize your app’s file windows and dialog boxes? Learn how with the Telerik UI for WinForms RadOpenFileDialog.
Progress Telerik UI for WinForms includes a highly customizable component that replaces the
default OpenFileDialog from .NET. I participated in the development, making a request feature to add custom places to the dialog browser. The feature was implemented in the next release.
This article demonstrates this and another customization that helps a user quickly select the last file modified in the folders while browsing them; the customization alters the file list’s order by the latest date/time change.
I got the idea when shadowing users in a law office because they often added to the follow-up of the application I was developing, the last file they were working on.
Other customizations demonstrated in this article include:
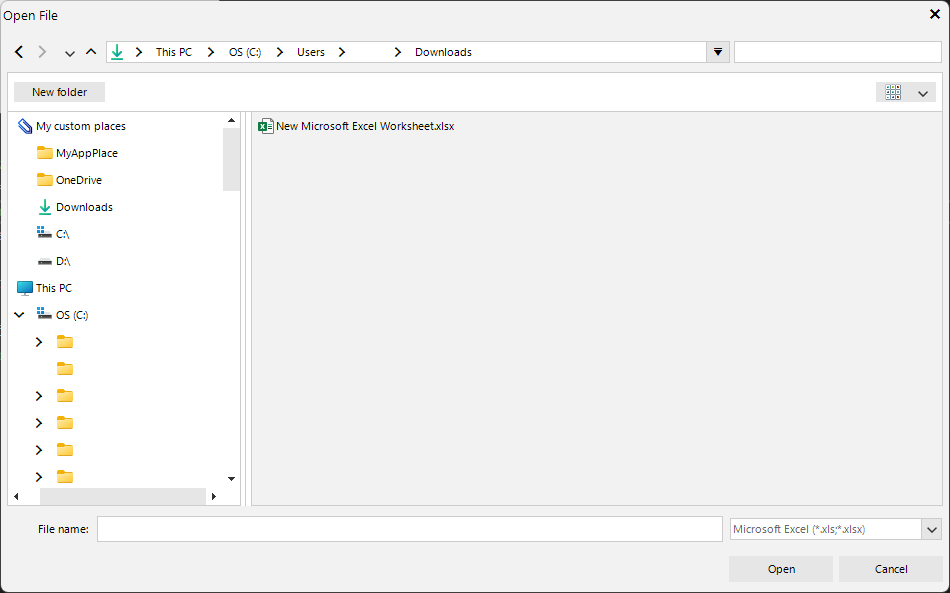
- Set custom places like:
» The folder application path
» The OneDrive path
» The Downloads path
» The drive units on the PC - Change text in a dialog box
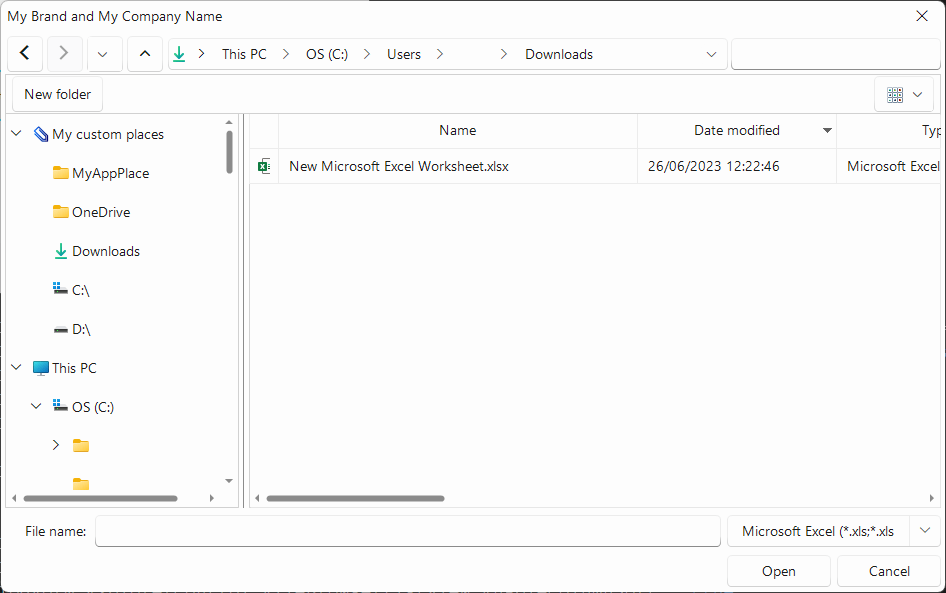
- Set up a specific theme for the Open File dialog box
- Show grid lines
- Restore the last directory by default

Implementing the Customizations
Start by creating a .CS file with a class inherited from RadOpenFileDialog. Add the container component method, which is required for implementation. Your file will look like this:
using System.ComponentModel;
using Telerik.WinControls.UI;

namespace Telerik.Customized;

public class MyRadOpenFileDialog : RadOpenFileDialog
{
    public MyRadOpenFileDialog()
    {

    }

    public MyRadOpenFileDialog(IContainer components)
    {

    }
}
Choose a namespace and a class name that makes sense for your project.
Set Custom Places
The custom places allow you to programmatically add paths at the top of the navigation treeview. You can configure the path from environment variables or the app configuration settings.
Create a list of the places initialized with these elements:
- Folder Application path (hardcoded in this sample)
- The OneDrive environment variable path
- The Downloads path from the OS environment
var places = new List<string>
{
    "C:\\MyAppPlace",
    Environment.GetEnvironmentVariable("OneDrive") ?? "C:\\",
    Environment.GetFolderPath(Environment.SpecialFolder.UserProfile) + "\\Downloads"
};
Add the ready unit drivers:
places.AddRange(DriveInfo.GetDrives()
    .ToList()
    .Where(t => t.IsReady)
    .Select(drv => drv.Name));
Add the custom places on the ExplorerControl method from the OpenFileDialogForm property:
this.OpenFileDialogForm.ExplorerControl.AddCustomPlacesNode("My custom places",
            TelerikWinFormsApp1.Properties.Resources.Clipe16, places);
You can add whatever you need to the label (nodeName). Also, add an image that will represent the node.
At this point, your customization will look like this:

Change Dialog Box Text
You can replace the text in dialog box windows with custom text from Open File. Fix it for the entire application by adding the following text in the class initialization:
this.OpenFileDialogForm.Text = "Open File - Default Text - Brand and My Company Name";
And you can add a new property to customize each dialog you create:
public string DialogText
{
    get => OpenFileDialogForm.Text;
    set => OpenFileDialogForm.Text = value;
}
Set Up a Specific Theme for the File Dialog Box
The file dialog box can use a different theme from the application. For example, if you use a Fluent theme in the application and your target OS is Windows 11, you can apply the Windows 11 theme from Telerik.
this.OpenFileDialogForm.ExplorerControl.MainNavigationTreeView.ElementTree.EnableApplicationThemeName = false;
this.OpenFileDialogForm.ExplorerControl.FileBrowserListView.ElementTree.EnableApplicationThemeName = false;
this.OpenFileDialogForm.ElementTree.ThemeName = "Windows11";
this.OpenFileDialogForm.ExplorerControl.MainNavigationTreeView.ElementTree.ThemeName = "Windows11";
this.OpenFileDialogForm.ExplorerControl.FileBrowserListView.ElementTree.ThemeName = "Windows11";
Before you can use the theme, you have to load it, so before these lines, add this command:
new Telerik.WinControls.Themes.Windows11Theme().DeserializeTheme();
Sort Files by Last Modified
To sort the files, you need to set up the sort descriptor in the load event. Add this line to the class initialization:
this.OpenFileDialogForm.Load += OpenFileDialogForm_Load;

this.OpenFileDialogForm.ExplorerControl.FileBrowserListView.ViewType = ListViewType.DetailsView;

this.OpenFileDialogForm.ExplorerControl.FileBrowserListView.EnableSorting = true;

this.OpenFileDialogForm.ExplorerControl.FileBrowserListView.EnableColumnSort = true;
Then create the OpenFileDialogForm_Load method setting the Sort Descriptors. The FileBrowserListView is a RadGridView that you can customize, as usual.
private void OpenFileDialogForm_Load(object? sender, EventArgs e)
{
    if (this.OpenFileDialogForm.ExplorerControl.FileBrowserListView.SortDescriptors.Count == 0)
    {
        this.OpenFileDialogForm.ExplorerControl.FileBrowserListView.EnableSorting = true;
        var sort = new SortDescriptor(OpenFileDialogForm.ExplorerControl.FileBrowserListView.Columns[2].Name,
            ListSortDirection.Descending);
        this.OpenFileDialogForm.ExplorerControl.FileBrowserListView.SortDescriptors.Add(sort);
    }
    this.OpenFileDialogForm.ExplorerControl.FileBrowserListView.ViewType = ListViewType.DetailsView;

}
Show Grid Lines
To assist people with visual impairments, turn on ShowGridLines. The grid lines can be an option consistent with your RadGridView application design.
this.OpenFileDialogForm.ExplorerControl.FileBrowserListView.ShowGridLines = true;
Restore the Last Directory by Default
You can turn on a default option to remember the last directory while the OpenFileDialogForm class instance is in use (if you create a new instance or restart the application, the last directory will not be stored). Do so by setting this line on initialization:
this.RestoreDirectory = true;
Using the Custom File Dialog
To replace the existing RadOpenFileDialog, replace it with the custom class name in the initialization:
var fileDialog = new MyRadOpenFileDialog();
fileDialog.DialogText = "My Brand and My Company Name";
fileDialog.Filter = "Microsoft Excel (*.xls;*.xlsx)|*.xls;*.xlsx";
DialogResult dr = fileDialog.ShowDialog();
if (dr == System.Windows.Forms.DialogResult.OK)
{
    var file = fileDialog.FileName;
    // Do Something
}
Conclusion
Customizations are a significant way to make applications more efficient. Making it easy to sort lots of files in a directory helps users win time with just one click on the Name column. Customizing a caption could be the difference in your product branding. Being able to use a contrasting theme for a file dialog box can encourage a user to pay attention it.
The result of these customizations might look like this:

If you’d like to review the complete source code used in this article, please check it out below:
using System.Collections.Generic;
using System;
using System.Linq;
using System.ComponentModel;
using System.IO;
using Telerik.WinControls.Data;
using Telerik.WinControls.UI;

namespace Telerik.Customized;

public class MyRadOpenFileDialog : RadOpenFileDialog
{
    public MyRadOpenFileDialog()
    {
        this.OpenFileDialogForm.Load += OpenFileDialogForm_Load;

        var places = new List<string>
        {
            "C:\\MyAppPlace",
            Environment.GetEnvironmentVariable("OneDrive") ?? "C:\\",
            Environment.GetFolderPath(Environment.SpecialFolder.UserProfile) + "\\Downloads"
        };

        places.AddRange(DriveInfo.GetDrives()
            .ToList()
            .Where(t => t.IsReady)
            .Select(drv => drv.Name));

        this.OpenFileDialogForm.ExplorerControl.AddCustomPlacesNode("My custom places",
                TelerikWinFormsApp1.Properties.Resources.Clipe16, places);

        this.OpenFileDialogForm.Text = "Open File - Defatult Text - Brand and My Company Name";

        new Telerik.WinControls.Themes.Windows11Theme().DeserializeTheme();

        this.OpenFileDialogForm.ExplorerControl.MainNavigationTreeView.ElementTree.EnableApplicationThemeName = false;
        this.OpenFileDialogForm.ExplorerControl.FileBrowserListView.ElementTree.EnableApplicationThemeName = false;
        this.OpenFileDialogForm.ElementTree.ThemeName = "Windows11";
        this.OpenFileDialogForm.ExplorerControl.MainNavigationTreeView.ElementTree.ThemeName = "Windows11";
        this.OpenFileDialogForm.ExplorerControl.FileBrowserListView.ElementTree.ThemeName = "Windows11";

        this.OpenFileDialogForm.ExplorerControl.FileBrowserListView.ShowGridLines = true;

        this.OpenFileDialogForm.ExplorerControl.FileBrowserListView.ViewType = ListViewType.DetailsView;
        this.OpenFileDialogForm.ExplorerControl.FileBrowserListView.EnableSorting = true;
        this.OpenFileDialogForm.ExplorerControl.FileBrowserListView.EnableColumnSort = true;

        this.RestoreDirectory = true;

    }

    private void OpenFileDialogForm_Load(object? sender, EventArgs e)
    {
        if (this.OpenFileDialogForm.ExplorerControl.FileBrowserListView.SortDescriptors.Count == 0)
        {
            this.OpenFileDialogForm.ExplorerControl.FileBrowserListView.EnableSorting = true;
            var sort = new SortDescriptor(OpenFileDialogForm.ExplorerControl.FileBrowserListView.Columns[2].Name,
                ListSortDirection.Descending);
            this.OpenFileDialogForm.ExplorerControl.FileBrowserListView.SortDescriptors.Add(sort);
        }
        this.OpenFileDialogForm.ExplorerControl.FileBrowserListView.ViewType = ListViewType.DetailsView;

    }

    public string DialogText
    {
        get => OpenFileDialogForm.Text;
        set => OpenFileDialogForm.Text = value;
    }

    public MyRadOpenFileDialog(IContainer components)
    {

    }
}
Note that to customize
RadSaveFileDialog, you only need to replace the class name andOpenFileDialogFormwithSaveFileDialogForm.
References

Jefferson S. Motta
Jefferson S. Motta is a senior software developer, IT consultant and system analyst from Brazil, developing in the .NET platform since 2011. Creator of www.Advocati.NET, since 1997, a CRM for Brazilian Law Firms. He enjoys being with family and petting his cats in his free time. You can follow him on LinkedIn and GitHub.

