
Creating a Fast Static Site with Astro and Vue

Summarize with AI:
Learn about Astro, a tool for creating fast static websites that are easy to deploy and integrate with your favorite frontend framework. We’ll create a sample app integrated with Vue.
Astro is a well-known and relatively new tool for creating static websites that can be easily deployed to a web server. It provides lightning-fast performance and a modern developer experience. One of its distinct advantages is that it can be integrated with our preferred frontend tools.
In this article, we will learn what Astro is, its benefits, and how we can integrate Astro with our preferred framework—in this case, Vue, as that is the frontend tool we will use.
What is Astro?
Astro is a modern static builder for building frontend web architecture that supports code splitting and server-side rendering. Astro extracts our UI into smaller isolated components on the page and replaces the unused JavaScript with lightweight HTML to increase our website’s load time and interactivity.
Astro is a versatile and fantastic framework with unique features that, when used to improve the efficiency of our application, allows us to optimize our components and send only a small amount of JavaScript code to our frontend.
Benefits of Using Astro
Astro is an all-in-one free, open-source web framework for building fast, content-focused websites. Aside from that, there are other benefits of using Astro:
- We can easily integrate Astro into our favorite component framework or frontend tools because it offers first-class support for tools like React, Preact, Vue, Vite, Svelte, Lit, Solid and Markdown content.
- Astro accelerates the speed of our website because it is lightweight, pre-renders our site on the server and sends it to the client as an HTML page. In addition, it features a built-in bundling system that groups our assets files, such as CSS, images and JavaScript files to cut down on request volume and speed up loading time.
- Astro supports some great built-in features like theming and integrations; these features can be added to our project to improve SEO analytics, performance and accessibility.
- It is scalable as it allows us to easily create a scalable architecture by separating components and pages into separate files.
- Astro is adaptable and can be used to create any application, including complex web and single-page applications.
Creating a New Astro Project
Before we create a new Astro project, we must confirm we have Node installed on our local machine; if we have it installed, we can check the version of Node with the command below:
node --v
After checking the version of Node, we will create a new Astro project with the command below:
# for npm use this command
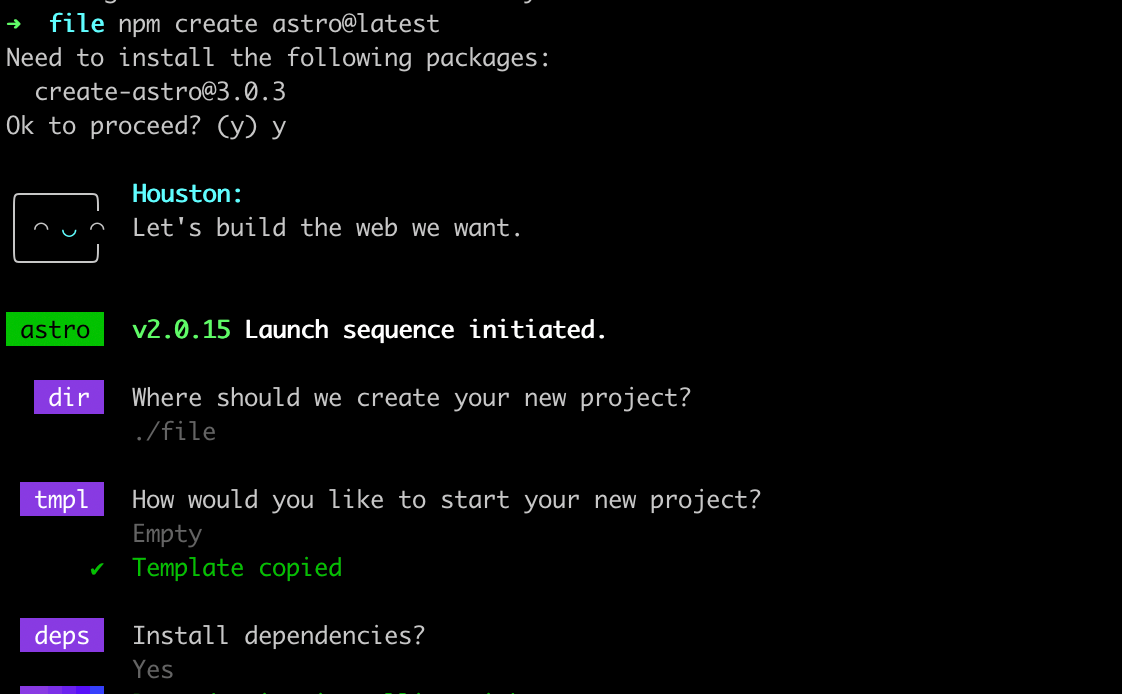
npm create astro@latest
# for yarn use this command
yarn create astro
Note: We can still create Astro on our machine without creating an empty directory; if we don’t have an empty directory, the Wizard will help us create one automatically.
Once we select the preferred package we want to use when installing Astro, we will be prompted with questions to select from. Below is a diagram of the questions we will be :asked
After our project has finished installing, we will run our local development server with the command below:
npm run dev
It will give us browser access to the project at http://localhost:3000.
Integrating Vue into Astro
Astro is quite simple to integrate with any framework of our choice. In this section, we’ll do so with Vue.
To integrate Vue into our Astro app, we are utilizing npm. We’ll use the following command to accomplish that:
npx astro add vue
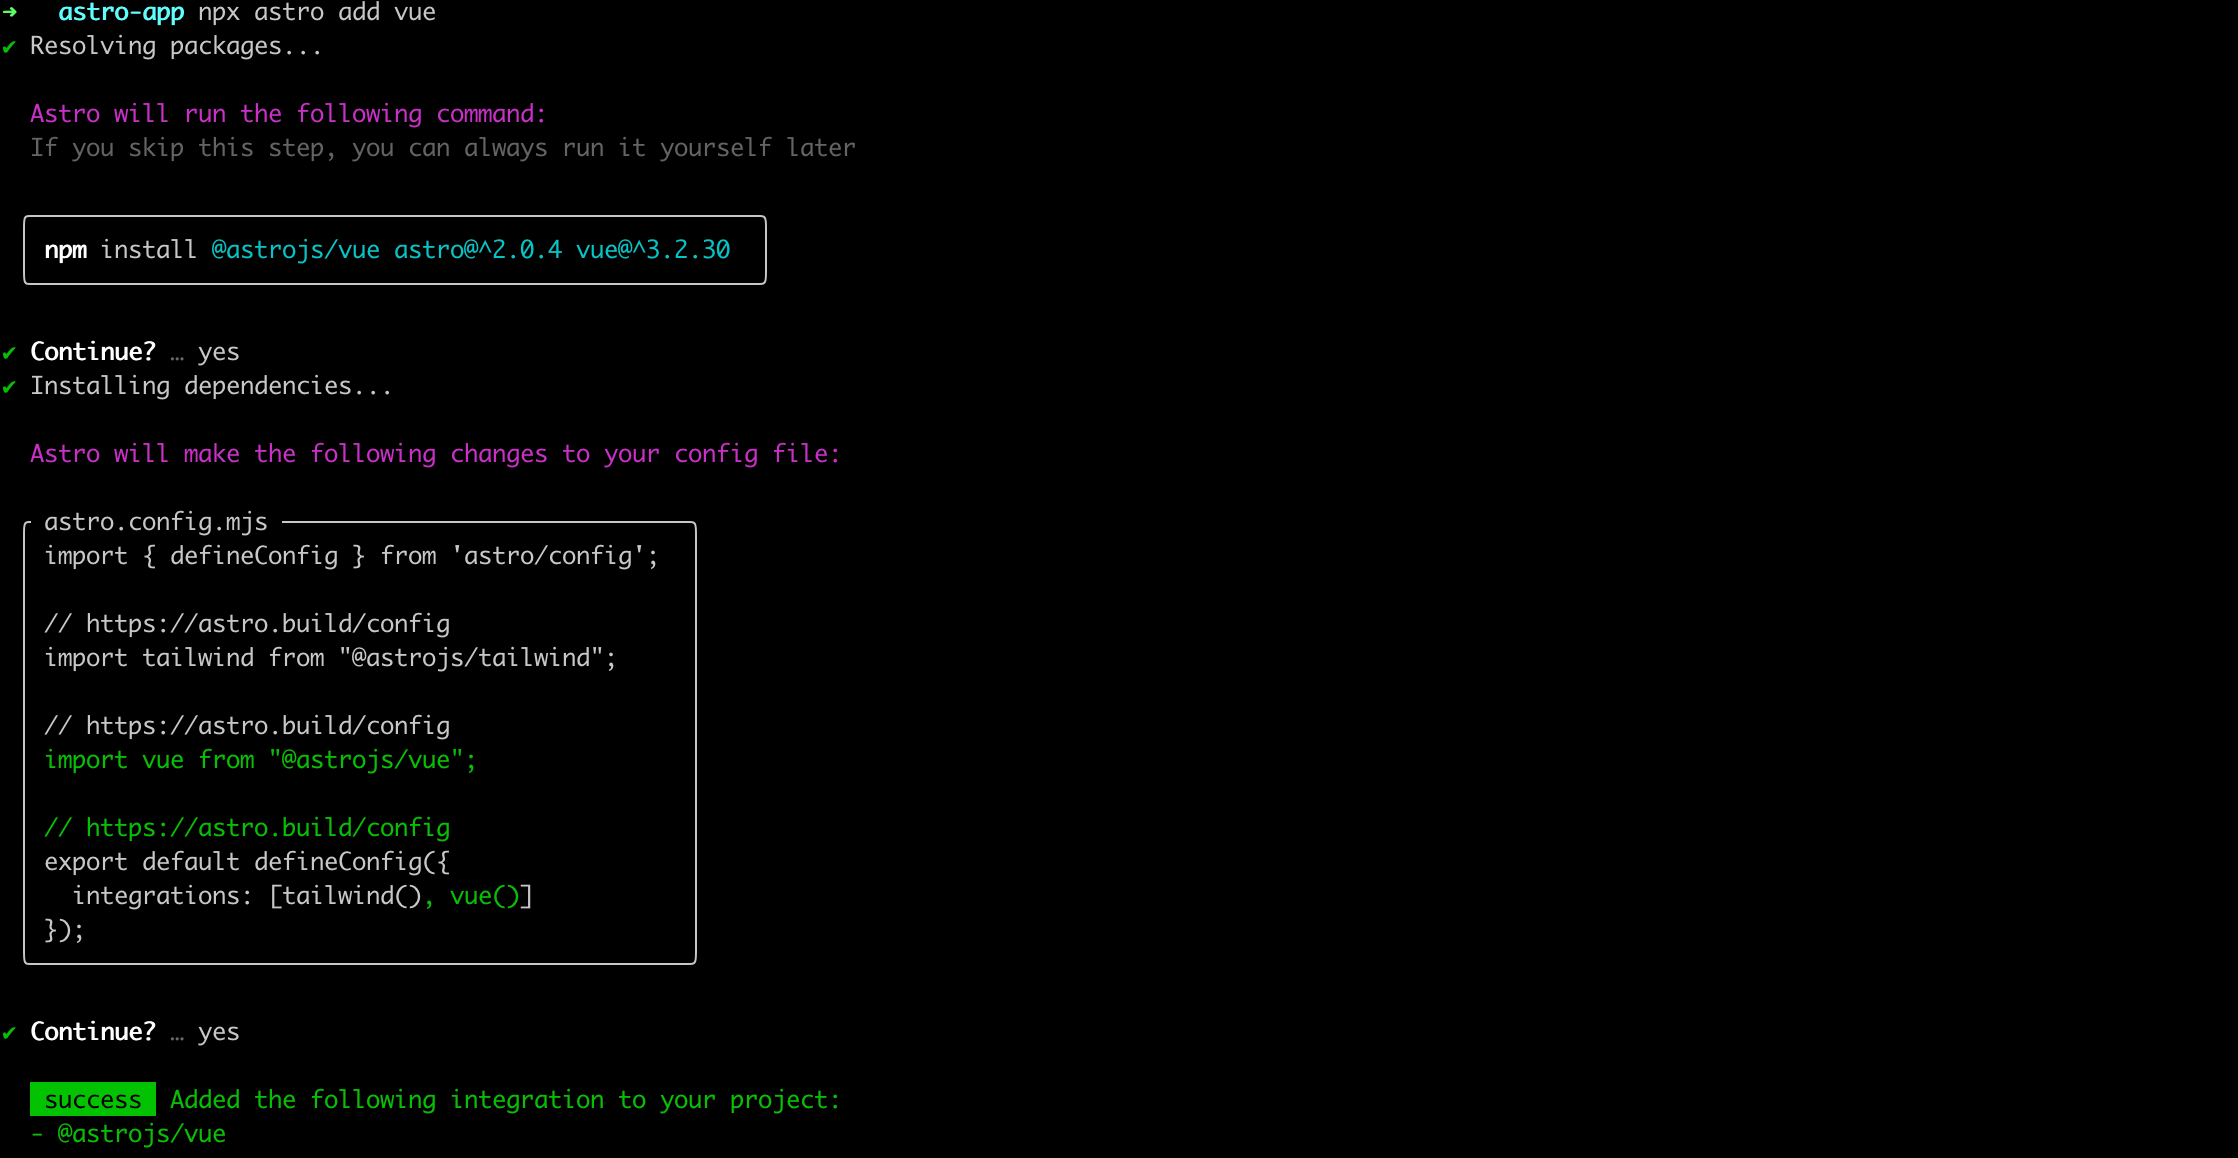
Astro and Vue have been successfully installed and set up. The following stage is to develop a project using Vue and Astro.
Creating Application with Astro and Vue
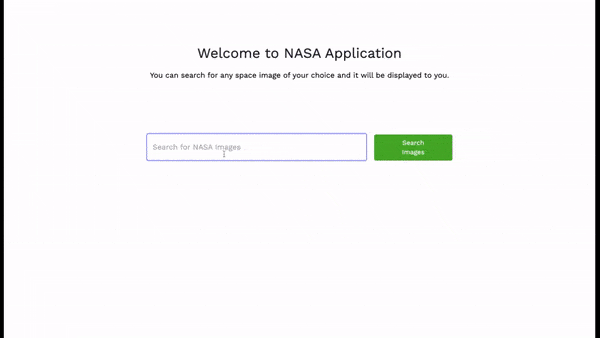
Let’s explore how we can build an application with Astro and Vue. In this section, we are going to use NASA API to build an application that displays space images.
The first step is to design the style of our application where the images fetched will be shown. Next, we will develop a form with a search field and a button; the search box will let us find the specific image we’re looking for:
<template>
<div class="flex flex-col text-center w-full py-24">
        <h1 class="sm:text-3xl text-2xl font-medium title-font mb-4 text-gray-900">Welcome to NASA Application
        </h1>
        <p class="lg:w-2/3 mx-auto leading-relaxed text-base">You can search for any images and it will be displayed to
          you.</p>
      </div>
      <form>
        <div class="container px-5 py-4 mx-auto">
          <div
            class="flex lg:w-2/3 w-full sm:flex-row flex-col mx-auto px-8 sm:space-x-4 sm:space-y-0 space-y-4 sm:px-0 items-end">
            <div class="relative flex-grow w-full">
              <label for="email" class="leading-7 text-sm text-gray-600"></label>
              <input type="email" id="search-bar" placeholder="Search for NASA Images "
                class="w-full bg-gray-100 bg-opacity-50 rounded border border-gray-300 focus:border-indigo-500 focus:bg-transparent focus:ring-2 focus:ring-indigo-200 text-base outline-none text-gray-700 py-3 px-3 leading-8 transition-colors duration-200 ease-in-out"
                v-model="query">
            </div>
            <button class="text-white bg-indigo-500 border-0 py-2 px-12 focus:outline-none rounded text-sm"
              @click.prevent="fetchResults">Search
              Images</button>
          </div>
        </div>
      </form>
</template>
When searching for photos, we require a part that will show the results of our search. This section will include the image, the image’s title, description and keywords:
<template>
      <div class="flex flex-wrap -m-4">
        <div class="lg:w-1/3 sm:w-1/2 p-4" v-for="result in results">
          <div class="flex relative">
            <img alt="gallery" class="absolute inset-0 w-full h-full object-cover object-center"
              :src="result.links[0].href">
            <div class="px-8 py-10 relative z-10 w-full border-4 border-gray-200 bg-white opacity-0 hover:opacity-100">
              <h2 class="tracking-widest text-sm title-font font-medium text-indigo-500 mb-1">{{ result.data[0].title }}
              </h2>
              <h1 class="title-font text-lg font-medium text-gray-900 mb-3" v-for="keyword in result.data[0].keywords">
                <span class="inline-block bg-gray-200 rounded-full px-3 py-1 text-sm font-semibold text-gray-700 mr-2">{{
                  keyword }}</span>
              </h1>
            </div>
          </div>
        </div>
      </div>
</template>
Making Our Fetch Call with NASA API
The first request we will make is to our API, which we will retrieve using Axios. If we don’t have Axios installed in our project, we can use the following command to install Axios:
npm install --save axios
Axios can be quickly set up by simply importing it into our component file in the script tag after installation:
<script lang="ts">
import axios from 'axios'
export default {
  name: "NasaImage",
}
</script>
Before we can fetch data, we need to define the data of our components. We can do this by creating a data() method. We will declare results as an empty array and query as an empty string. The empty array is where we will store the data we fetch from the API:
<script lang="ts">
import axios from 'axios'
export default {
  name: "Counter",
  data() {
    return {
      results: [],
      query: ""
    }
  },
}
</script>
Next, we create a method called fetchResults, which uses Axios to make an HTTP Get request to the NASA API while passing in the current value of the query as a search term. When the request is successful, the response data is parsed and the results data in the component we updated with the items from the API response:
methods: {
    fetchResults: function () {
      axios.get(`https://images-api.nasa.gov/search?q=${this.query}&media_type=image`,)
        .then((response) => {
          return response.data
        })
        .then((parsedJson) => {
          this.results = parsedJson\["collection"\]["items"];
        })
    }
  }
}
Here is what our application should like after making our API call:
Check out the full code example on GitHub and the demo.
Conclusion
Astro is a cutting-edge static site generator that prioritizes producing quick and effective webpages and online applications. It is also a fantastic substitute for creating a static and effective website. Its unique selling point is how simply you can combine Astro with your preferred framework because of how versatile it is. Hopefully, the information in this tutorial will help you integrate Vue into your Astro file.

Ezekiel Lawson
Ezekiel Lawson is a technical writer and software developer. Aside from building web tools and applications, he enjoys educating people and simplifying complicated issues for their easy understanding by sharing resources that will guide developers through technical writing.
Related Posts
Comments
All articles
Topics
Web MobileMobile
Desktop
Design
Productivity
People
