Building a CRM with Xamarin.Forms and Azure, Part 3

Summarize with AI:
In part three of this blog series, we will walk through how to train a custom LUIS AI model to have natural chat conversations using Telerik UI for Xamarin's Conversational UI control.
You can find Part One of our series here, where we built the backend. In Part Two of the series, we built the UI with Telerik UI for Xamarin.
In this final installment of this blog series, we'll discuss how to build a conversational UI using RadChat and a custom trained Azure natural Language Understanding model (aka LUIS). These posts can be read independently, but if you want to catch up read part one and part two.
Powering the Conversation
The Telerik UI for Xamarin RadChat control is intentionally designed to be platform agnostic. Although I'm using Azure for this project, you can use anything you want or currently have.
I wanted to be sure that the app had a dynamic and intelligent service communicating with the user, this is where Azure comes into the picture again. We can train a LUIS model to identify certain contexts to understand what the user is asking for. For example, are they asking about the product details or shipping information?
To get started, follow the Quickstart: create a new app in the LUIS portal tutorial. It's quick and easy to spin up a project and get started training the model with your custom intents.
At this point you might want to think about if you want to use Intents, Entities or both. The ArtGallery CRM support page is better served with using Intents. To help you choose the right approach for you app, Microsoft has a nice comparison table - Entity compared to Intent.
Intents
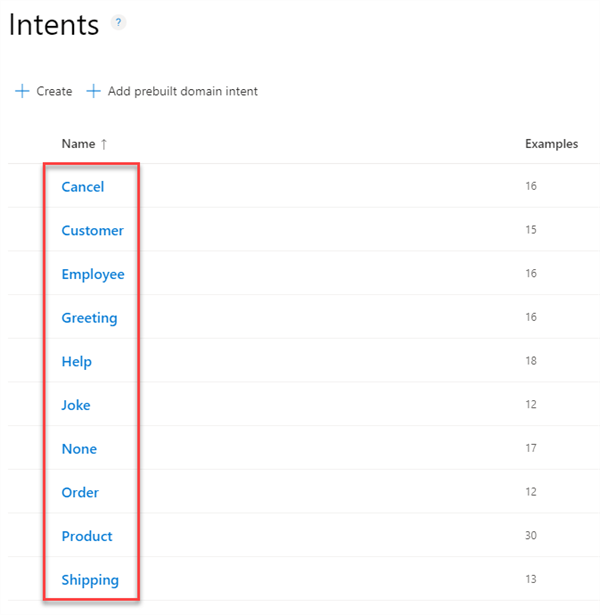
In the CRM app's chat page, the user is interacting with a support bot. So, we mainly to determine if the user is asking for information about a product, employee, order or customer. To achieve this, I've decided on using the following Intents:
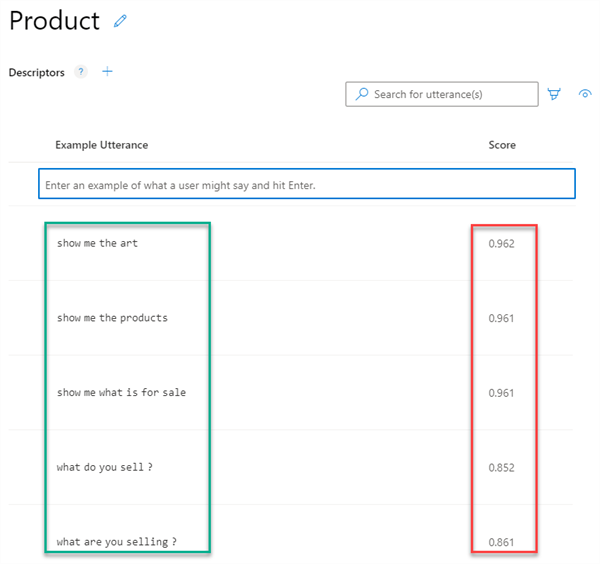
To train the model to detect an intent, you give it a lit of things the user might say. This is called an Utterance. Let's take a look at the utterances for the Product intent.
One the left side, you can see the example utterances I entered. These do not need to be full sentences, just something that you would expect to be in the user's question. On the right side you see the current detection score that utterance has after the last training.
Training
Once you're done entering all the Intents and utterance for those intents, it's time to train the model. you can do this by clicking the "Train" button in the menu bar at the top of the portal:
Testing
After LUIS is trained with the current set of Intents and Utterances, it's time to see how well it performs. Select the Test button:
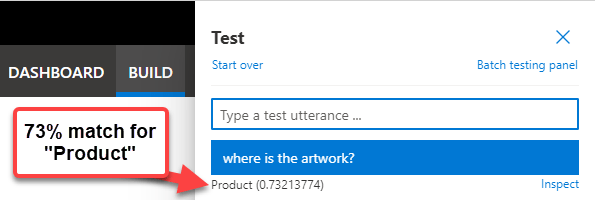
You'll see a fly-out, enter your test question to see a result:
In the above test, I try a search for "where is the artwork?" and the result was a 73% match for a Product intent. If you want to improve the score, add more utterances for the intent and re-train it.
Publishing
When you're satisfied with the scores you get for the Intents, it's time to publish the model. Use the Publish button:
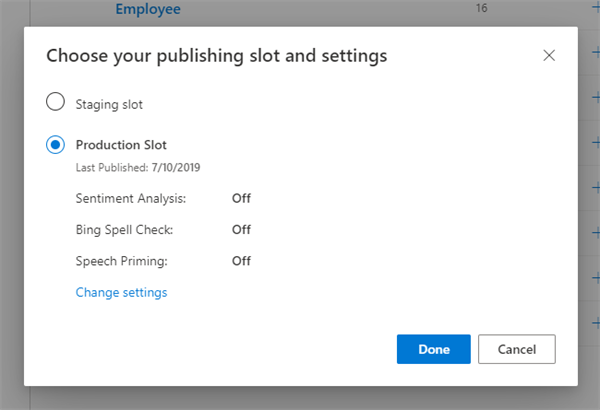
It will open a dialog with settings for what release slot to push the changes to. You can stage the new changes or push it to production:
API Endpoints
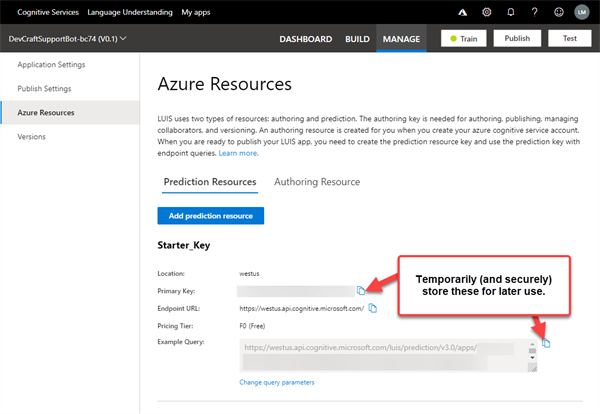
When the publishing is complete, you'll see a button in the notification to navigate to the Manage tab where you can see the REST URLs for your release:
Once you navigate to the Manage tab, the Azure Resources pane will be pre-selected. In the pane, you'll see the API endpoints and other important information.
We'll come back here for these values later or you can temporarily store them in a secure location. Do not share your Primary Key or Example Query (it has the Primary Key in the query parameters).
We're now done with the LUIS portal, and it's time to move on to building the ASP.NET bot application that will be doing the actual communication between the user and LUIS.
Azure Bot Service
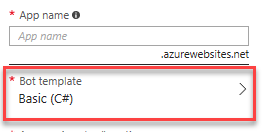
Follow the Azure Bot Quickstart tutorial on how to create a new Bot Service in your Azure portal. When you go through the configuration steps, be sure to choose the C# Bot template so that the bot’s back end will be an ASP.NET application:First Use—Testing with WebChat
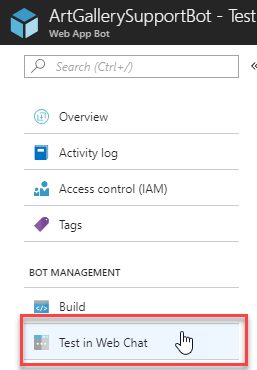
To make sure things are running after you've published the project to Azure, open the bot’s blade and you’ll see a “Test in Web Chat” option:
This will open a blade and initialize the bot. When it’s ready you can test communication. The default bot template uses an “echo” dialog (we’ll go into what this later in the article).
Test this by sending any message, you should see your message, prefixed with a count number. Next, try sending the word “reset”. You will get a dialog prompt to reset the message count.
Explore the Code
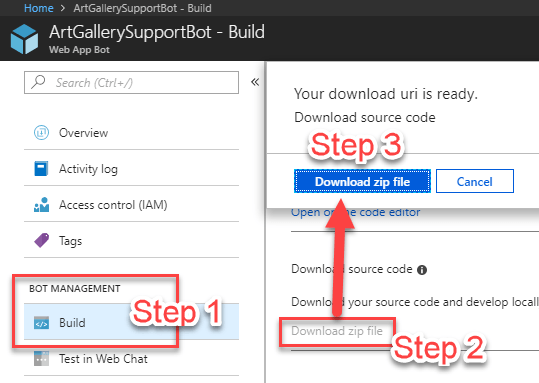
Once you’ve confirmed the bot is responding and working, let’s look at the code by downloading a copy of the ASP.NET application:
- Open the Build blade
- Click “Download zip file” link (this will generate the zip)
- Click the “Download zip file” button (this will download the zip)
At this point, you’ll have a zip file named something like “YourBot-src.” You can now unzip and open the Microsoft.Bot.Sample.SimpleEchoBot.sln in Visual Studio. Do a Rebuild to restore the NuGet packages.
Let’s start reviewing the workflow by opening the MessagesController.cs class in the Controllers folder and look at the `Post` method. The method has an Activity parameter, which is sent to the controller by the client application. We can check what type of activity this is and act on that.
[ResponseType(typeof(void))]
public virtual async Task<HttpResponseMessage> Post([FromBody] Activity activity)
{
    // If the activity type is a Message, invoke the Support dialog
    if (activity != null && activity.GetActivityType() == ActivityTypes.Message)
    {
        await Conversation.SendAsync(activity, () => new Dialogs.EchoDialog());
    }
...
}
In the case of our echo bot, this is ActivityType.Message, in which case the logic determines we respond with an instance of EchoDialog.
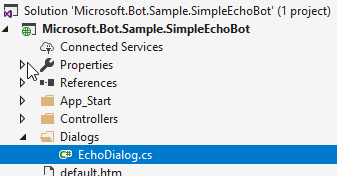
Now, let’s look at the EchoDialog class. This is in the Dialogs folder:
There are a few methods in the class, but we are only currently concerned with the MessageReceivedAsync method:
public async Task MessageReceivedAsync(IDialogContext context, IAwaitable<IMessageActivity> argument)
{
    var message = await argument;

    if (message.Text == "reset")
    {
        // If the user sent "reset", then reply with a prompt dialog
        PromptDialog.Confirm(
            context,
            AfterResetAsync,
            "Are you sure you want to reset the count?",
            "Didn't get that!",
            promptStyle: PromptStyle.Auto);
    }
    else
    {
        // If the user sent anything else, reply back with the same message prefixed with the message count number
        await context.PostAsync($"{this.count++}: You said {message.Text}");
        context.Wait(MessageReceivedAsync);
    }
}
This is the logic that the bot was using when you were just chatting in the Web Chat! Here you can see how all the messages you sent were echoed and why it was prefixed with a message count.
Xamarin.Forms Chat Service
Now that we have a simple echo bot running, it’s time to set up the client side. To do this we’ll need a couple things:
- A bot service class to send and receive messages
- A Xamarin.Forms page with a Telerik UI for Xamarin Conversational UI control
Bot Service Class and the DirectLine API
In addition to the WebChat control that is embeddable, the Bot Service has a way you can directly interact with it using network requests via the DirectLine API.
Although you could manually construct and send HTTP requests, Microsoft has provided a .NET client SDK that makes it very simple and painless to connect to and interact with the Bot service via the Microsoft.Bot.Connector.DirectLine NuGet package.
With this, we could technically just use it directly in the view model (or code behind) of the Xamarin.Forms page, but I wanted to have some separation of concerns. So we'll create a service class that isn't tightly bound to that specific page. Here's the service class:
using System;
using System.Linq;
using System.Threading.Tasks;
using ArtGalleryCRM.Forms.Common;
using Microsoft.Bot.Connector.DirectLine;
using Xamarin.Forms;

namespace ArtGalleryCRM.Forms.Services
{
    public class ArtGallerySupportBotService
    {
        private readonly string _user;
        private Action<Activity> _onReceiveMessage;
        private readonly DirectLineClient _client;
        private Conversation _conversation;
        private string _watermark;

        public ArtGallerySupportBotService(string userDisplayName)
        {
// New up a DirectLineClient with your App Secret
            this._client = new DirectLineClient(ServiceConstants.DirectLineSecret);
            this._user = userDisplayName;
        }

        internal void AttachOnReceiveMessage(Action<Activity> onMessageReceived)
        {
            this._onReceiveMessage = onMessageReceived;
        }

        public async Task StartConversationAsync()

           {
            this._conversation = await _client.Conversations.StartConversationAsync();
        }

// Sends the message to the bot
        public async void SendMessage(string text)
        {
            var userMessage = new Activity
            {
                From = new ChannelAccount(this._user),
                Text = text,
                Type = ActivityTypes.Message
            };

            await this._client.Conversations.PostActivityAsync(this._conversation.ConversationId, userMessage);

            await this.ReadBotMessagesAsync();
        }

// Shows the incoming message to the user
        private async Task ReadBotMessagesAsync()
        {
            var activitySet = await this._client.Conversations.GetActivitiesAsync(this._conversation.ConversationId, _watermark);

            if (activitySet != null)
            {
                this._watermark = activitySet.Watermark;

                var activities = activitySet.Activities.Where(x => x.From.Id == ServiceConstants.BotId);

                Device.BeginInvokeOnMainThread(() =>
                {
                    foreach (Activity activity in activities)
                    {
                        this._onReceiveMessage?.Invoke(activity);
                    }
                });
            }
        }
    }
}
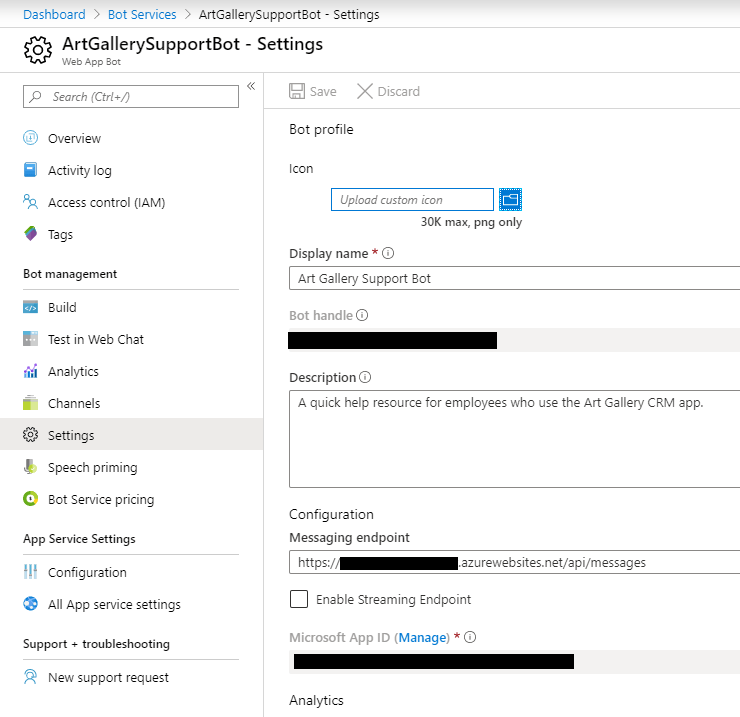
There are really only two responsibilities, send messages to the bot and show incoming bot messages to the user. In the class constructor, we instantiate a DirectLineClient object. Notice that it needs an App ID parameter, you can find this in the Azure portal for bot application's Settings page
Here's a screenshot to guide you. The ID is the "Microsoft App ID" field:
Alright, it's time to connect the User Interface and wire up the RadChat control to the service class.
View Model
To hold the conversation messages, we're going to use an ObservableCollection<TextMessage>. The RadChat control supports MVVM scenarios, you can learn more in the RadChat MVVM Support documentation.public ObservableCollection<TextMessage> ConversationItems { get; set; } = new ObservableCollection<TextMessage>();
public class SupportViewModel : PageViewModelBase
{
    private ArtGallerySupportBotService botService;

    public async Task InitializeAsync()
    {
        this.botService = new ArtGallerySupportBotService("Lance");
        this.botService.AttachOnReceiveMessage(this.OnMessageReceived);
    }

...
}
private void OnMessageReceived(Activity activity)
{
    ConversationItems.Add(new TextMessage
    {
        Author = this.SupportBot, // the author of the message
        Text = activity.Text // the message
    });
}
private void ConversationItems_CollectionChanged(object sender, NotifyCollectionChangedEventArgs e)
{
    if (e.Action == NotifyCollectionChangedAction.Add)
    {
        // Get the message that was just added to the collection
        var chatMessage = (TextMessage)e.NewItems[0];

        // Check the author of the message
        if (chatMessage.Author == this.Me)
        {
            // Debounce timer
            Device.StartTimer(TimeSpan.FromMilliseconds(500), () =>
            {
                Device.BeginInvokeOnMainThread(() =>
                {
                    // Send the user's question to the bot!
                    this.botService.SendMessage(chatMessage.Text);
                });

                return false;
            });
        }
    }
}
The XAML
In the view, all you need to do is bind the ConversationItems property to the RadChat's ItemsSource property. When the user enters a message in the chat area, a new TextMessage is created by the control and inserted into the ItemsSource automatically (triggering CollectionChanged).<conversationalUi:RadChat ItemsSource="{Binding ConversationItems}" Author="{Binding Me}"/>
Typing Indicators
You can show who is currently typing with an ObservableCollection<Author> in the view model. Whomever is in that collection will be shown by the RadChat control as current typing.
<conversationalUi:RadChat ItemsSource="{Binding ConversationItems}" Author="{Binding Me}" >
    <conversationalUi:RadChat.TypingIndicator>
        <conversationalUi:TypingIndicator ItemsSource="{Binding TypingAuthors}"  />
    </conversationalUi:RadChat.TypingIndicator>
</conversationalUi:RadChat>
Visit the Typing Indiciators tutorial for more information. You can also check out this Knowledge Base article in which I explain how to have a real-time chat room experience with the indicators.
Message Styling
RadChat itself gives you easy out-of-the-box functionality and comes ready with styles to use as-is. However, you can also customize the items to meet your branding guidelines or create great looking effects like grouped consecutive messages. Visit the ItemTemplateSelector tutorial for more information.
Connecting the Bot to LUIS
You can run the application at this point and confirm that the bot is echoing your messages. However, now it's finally time to connect the bot server logic to LUIS so that you can return meaningful messages to the user!
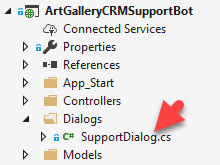
To do this, we need to go back to the bot project and open the EchoDialog class. You could rename this class to better match what it does, for example the CRM demo's dialog is named "SupportDialog."
Going back into the MessageReceived Task we have access to what the Xamarin.Forms user typed into the RadChat control! So, the next logical thing to do is to send that to LUIS for analysis and determine how we're going to respond to the user.
Microsoft has again made it easier to use Azure services by providing .NET SDK for LUIS. Install the Microsoft.Azure.CognitiveServices.Language.LUIS.Runtime NuGet package to the bot project:
Once installed, you can go back to the dialog class and replace the echo logic with a LUISRuntimeClient that sends the user's message to LUIS. The detected Intents will be returned to your bot and you can then make the right chose for how to respond.
Here's an example that only takes the highest scoring intent and thanks the user:
public async Task MessageReceivedAsync(IDialogContext context, IAwaitable<IMessageActivity> argument)
{
    var userMessage = await argument;

    using (var luisClient = new LUISRuntimeClient(new ApiKeyServiceClientCredentials("YOUR LUIS PRIMARY KEY")))
    {
        luisClient.Endpoint = "YOUR LUIS ENDPOINT";

        // Create prediction client
        var prediction = new Prediction(luisClient);

        // Get prediction from LUIS
        var luisResult = await prediction.ResolveAsync(
            appId: "YOUR LUIS APP ID",
            query: userMessage,
            timezoneOffset: null,
            verbose: true,
            staging: false,
            spellCheck: false,
            bingSpellCheckSubscriptionKey: null,
            log: false,
            cancellationToken: CancellationToken.None);

        // You will get a full list of intents. For the purposes of this demo, we'll just use the highest scoring intent.
        var topScoringIntent = luisResult?.TopScoringIntent.Intent;

        // Respond to the user depending on the detected intent

        if(topScoringIntent == "Product")
        {
            // Have the Bot respond with the appropriate message
            await context.PostAsync("I'm happy you asked about products!");
        }
    }
}
The Primary Key, Endpoint and LUIS App ID values are found in the luis.ai portal. (different than the Microsoft App ID for the bot project). Learn more here Quickstart: SDK Query Prediction Endpoint.
The code above uses a very simple check for a "Product" intent and just replies with a statement. If there was no match, there's no reply. The takeaway here is though you are in control over what gets sent back to the user, with LUIS helping you make intelligent decisions, you can provide for the user's needs better than ever.
Conclusion
I hope, though the course of this series, I was able to help show you that with the power of Telerik UI for Xamarin doing the heavy lifting in the UI category, and Azure powering intelligent backend services, you can build a enterprise ready, scalable, application with Xamarin Forms.
The Art Gallery CRM demo has a much more robust solution in place that has many intents and detects user sentiment. For example, if the user is mad or happy, the bot will comment on it in addition to answering their question!
More Resources
Missed part of the series? You can find Part One here, where we built the backend. In Part Two, we built the UI with Telerik UI for Xamarin.
Complete Source Code
Now that you're familiar with the structure of the application, I highly recommend taking a look through the ArtGallery CRM source code on GitHub as you will recognize all the parts we discussed in this series.
Install the App
You can also install app for yourself, available in the:
Further Support
If you have any trouble with the Telerik UI for Xamarin controls, you can open a Support Ticket and get help from the Xamarin team directly (you get complete support with your trial). You can also search and post the UI for Xamarin Forums to discuss with the rest of the community.
If you have any questions about this series, leave a comment below or reach out to me on Twitter @l_anceM.

Lance McCarthy
Lance McCarthy is a Senior Manager Technical Support for DevTools & Sitefinity, responsible for the Americas with additional responsibilities in product security and AI tooling. He's also a multiple-awarded Microsoft MVP (.NET & Windows Dev) who enjoys working with the developer community, sharing knowledge, presenting at events, and loves hackathons.
Lance still provides technical support for DevTools customers, answering cases focusing on security, .NET (desktop, mobile, web components), and CI/CD. Say hi the next time he answers one of your support tickets!

