
Working with ASP.NET Core and Data Grids

Summarize with AI:
ASP.NET Core is here and it's cross-platform, which is kind of awesome. It's also a bit different from MVC 5, which is kind of annoying. I'll be the first to admit that I haven't written any ASP.NET code since version 3, so if you're new to ASP.NET Core, you're in good company! Our team recently assembled a good write-up called ASP.NET Core Changes Every Developer Should Know that I highly recommend.
I wanted to dust off my ASP.NET skills and get up to date with Core. The best way to do that is to just dive in and build something complex enough to stretch me and force me to learn. That's exactly what we're going to do in this article using the UI For ASP.NET Core from Progress and, more importantly, the grid.
Ed. note: This post is the first part of a full week dedicated to ASP.NET Core content. Check back every day this week for a new article.
A Note About Grids
I start with the grid because it is the most complex editing interface that any of us are likely to build. If you can build and deploy an app with a full-featured, editable grid, you can do anything in programming. Of that I am sure. The reason for this is that Grid's are basically apps within themselves. They also force you to learn a bit about AJAX, CRUD, the Entity Framework, Foreign Key Relations and a whole host of other concepts.
I've got a pretty large collection of DVD's thanks to Walmart's $5 DVD bin. Yes, I'm the guy digging through the DVD bin at Walmart. Don't judge me. This relatively large collection is kind of a pain because I have no idea what I own and I have, on occasion, rented movies from Amazon that I already own. So, I wanted to create an app that would allow me to enter in all of my DVDs and then search through them to see what I have and view the data a variety of different ways. That's the app we're going to build in this article, so let's get to it!
File / New Project
To get started, you'll need Visual Studio 2015 update 3 and .NET Core 1.0.- VS 2015 Tooling Preview 2. Just refer to the top of this article if you get confused on what is required.
The UI for ASP.NET Core components can be installed from NuGet, but thanks to the somewhat confusing way that Microsoft has chosen to mix dll's in NuGet and JavaScript/CSS in Bower/NPM, I would highly recommend using the installer, which can be found in your account. If you don't yet own UI For ASP.NET Core, you can download a fully functional trial. There is an article that shows you how to set up a new project with all of the necessary UI For ASP.NET MVC Core dependencies, but the whole reason I got into software was so that I didn't have to manually do anything anymore.

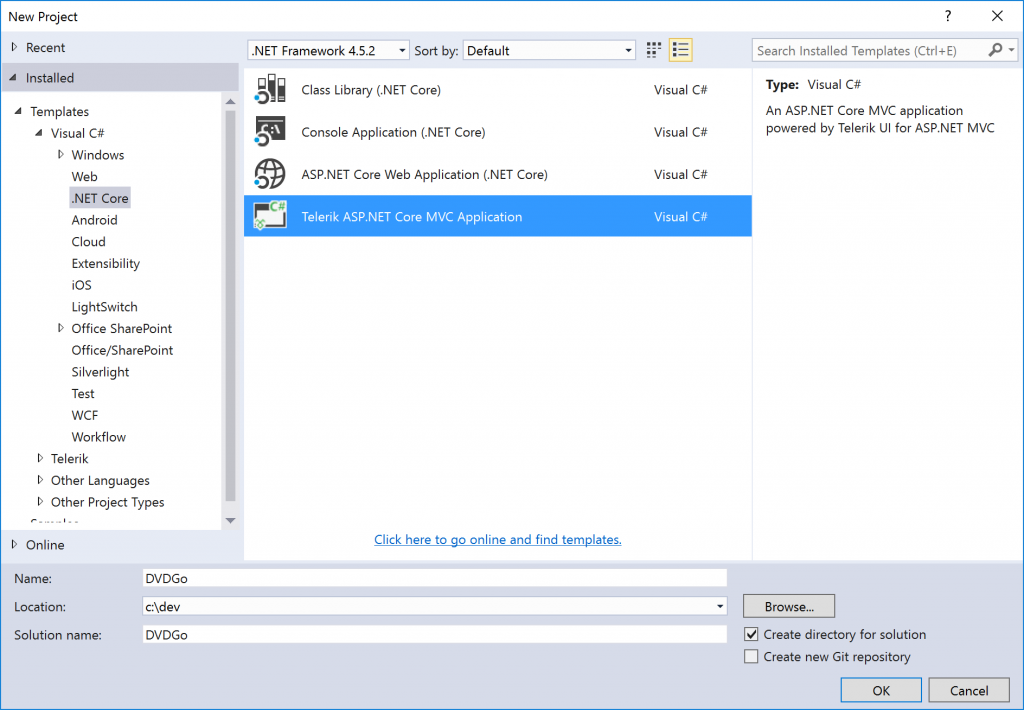
After running the installer, we can File / New Project and get something that already has all of the necessary JavaScript and dll references for our Grid component. To do that, select `Templates / Visual C# / .NET Core" and then select the `Telerik ASP.NET Core MVC Application" template. I've named my project DVDGo. You know what they say about naming things.
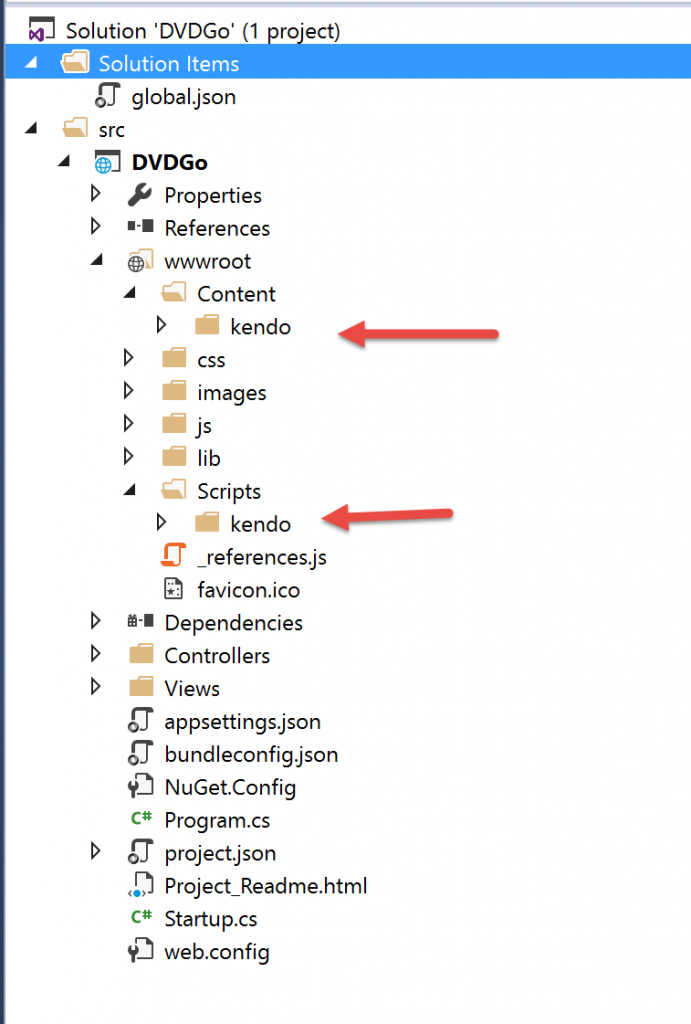
.NET Core project structures are different than the last time I did any ASP.NET development. Now, all of the JavaScript and CSS files are contained in a wwwroot folder. If you look in the wwwroot/Content folder, you'll find all of the Kendo UI CSS. Kendo UI is the JavaScript and CSS library that powers the UI For ASP.NET Core controls. That's why you'll see a lot of "kendo" in this tutorial. The Kendo UI JavaScript is found in wwwroot/Scripts. There is some additional CSS and JavaScript in the js and css folders. This includes jQuery (a requirement for the UI For ASP.NET Core controls) and Bootstrap for nice, pretty layouts.
Run the project and you'll get a skeleton MVC solution with some Buttons for the top menu control and a PanelBar.
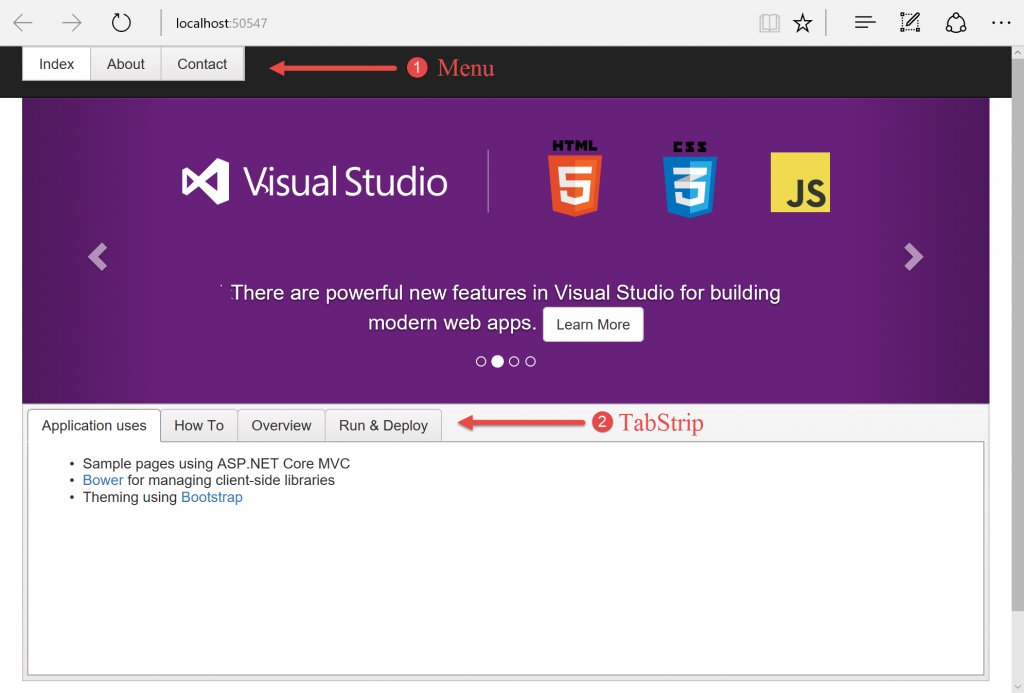
We're not going to be using either the Menu or the TabStrip components in this tutorial, but we will be using a Grid. We will also be using a lovely Bootstrap NavBar at the top of this app, so let's start with that portion of the UI. Open the Views/Shared/_Layout.cshtml file and replace everything between <body> and <environment name="Development"> with the following markup.
<div class="container">
<div class="navbar navbar-inverse">
<div class="container-fluid">
<div class="container-fluid">
<div class="navbar-header">
<button type="button" class="navbar-toggle collapsed" data-toggle="collapse" data-target="#navbar" aria-expanded="false" aria-controls="navbar">
<span class="sr-only">Toggle navigation</span>
<span class="icon-bar"></span>
<span class="icon-bar"></span>
<span class="icon-bar"></span>
</button>
<a class="navbar-brand" href="#">DVDGo</a>
</div>
<div id="navbar" class="navbar-collapse collapse">
<ul class="nav navbar-nav">
<li class="active"><a href="#">Home</a></li>
<li><a href="#">Dashboard</a></li>
</ul>
</div><!--/.nav-collapse -->
</div>
</div>
</div>
<div>
@RenderBody()
<hr />
<footer>
<p>© 2016 - DVDGo</p>
</footer>
</div>
</div>
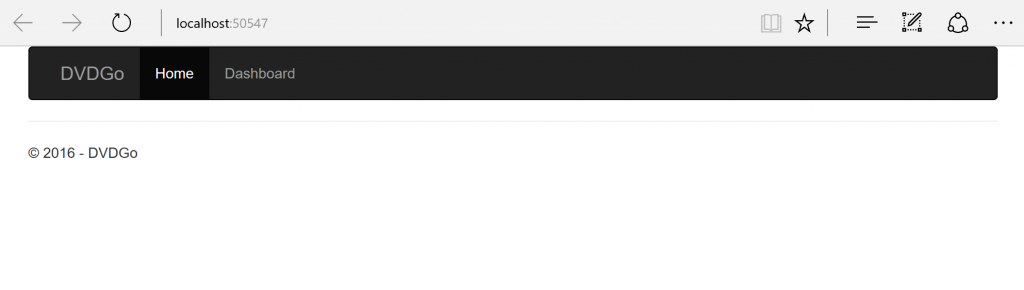
Go ahead and remove all of the markup from the Views/Home/Index.cshtml file. Also remove all of the content from the wwwroot/css/site.css. If you run this now you should get blank page with a top navbar.
Now it's time to get our database wired up. You can grab the SQL Scripts for creating this simple database from the GitHub project. Run them in order. The structure of the database is really simple. It's just one main table and two lookup tables.
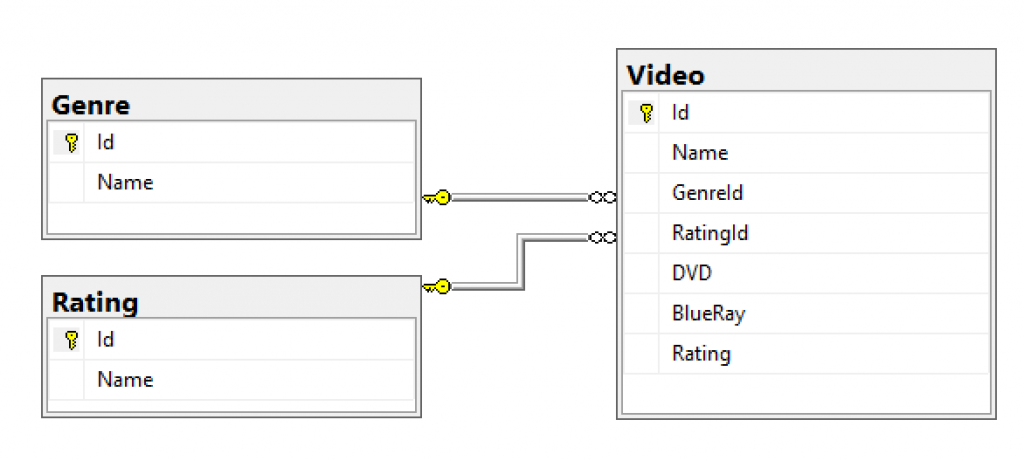
Once the database is defined and populated with my collection of videos (you're welcome), we're ready to connect to that database from our ASP.NET Core project using the Entity Framework.
Introducing Entity Framework Core
Things have changed quite a bit in this department as well. Gone are the days when you could simply right-click and add a data context to your application. Now we need to install the relative packages from NuGet. For this, we will need Microsoft.EntityFrameworkCore and Microsoft.EntityFrameworkCore.SqlServer.
Once that package is added to your project, go ahead and create a folder called Models and inside create three classes for Video, Genre and Rating.
Video.cs
public class Video {
    public int Id { get; set; }
    public string Name { get; set; }
    public int GenreId { get; set; }
    public int RatingId { get; set; }
    public bool DVD { get; set; }
    public bool BlueRay { get; set; }
}
Genre.cs
public class Genre {
    public int Id { get; set; }
    public string Name { get; set; }
}
Rating.cs
public class Rating {
    public int Id { get; set; }
    public string Name { get; set; }
}
These are very simple model files that we will use to "model" our database structure within the code. Let's create the Data Context that is going to be using them. Create a folder called Data and inside that create a class file called DVDGoContext.cs.
DVDGoContext.cs
using Microsoft.EntityFrameworkCore;
using DVDGo.Models;

namespace DVDGo.Data
{
    public class DVDGoContext : DbContext {
        public DVDGoContext(DbContextOptions<DVDGoContext> options)
            : base(options) { }

        public DbSet<Video> Videos { get; set; }
        public DbSet<Rating> Ratings { get; set; }
        public DbSet<Genre> Genres { get; set; }

        protected override void OnModelCreating(ModelBuilder modelBuilder) {
            modelBuilder.Entity<Video>().ToTable("Video");
            modelBuilder.Entity<Rating>().ToTable("Rating");
            modelBuilder.Entity<Genre>().ToTable("Genre");
        }
    }
}
You just created an EF Data Context from scratch! Not too bad, right? I was impressed at how little code it took. Now we need to initialize our context in the Startup.cs file. Do that inside of the ConfigureServices method.
Startup.cs
public void ConfigureServices(IServiceCollection services) {
    ...
    var connection = Configuration.GetConnectionString("DefaultConnection");
    services.AddDbContext<Data.DVDGoContext>(options => options.UseSqlServer(connection));
    ...
}
If you were paying attention and not just copy/pasting, you may have noticed that the initialization for the EF Context references a value in a settings file. In previous versions of ASP.NET MVC, you might have been used to putting your connection strings in the Web.config file. That has been replaced with an appsettings.json file. Add the connection string for the database there. You can add it anywhere as long as it's a top level element.
appsettings.json
"ConnectionStrings": {
    "DefaultConnection": "Data Source=localhost\\SQLEXPRESS;Initial Catalog=DVDGo;Persist Security Info=True;User ID=DVDGoUser;Password=password"
}
Now it's time to add in our UI for ASP.NET Core Grid. Open the Views/Home/Index.cshtml file and delete all the contents. Replace them with the markup required to create a simple Grid.
Home.cshtml
<div>
    @(Html.Kendo().Grid<DVDGo.Models.Video>()
        .Name("Videos")
        .DataSource(datasource => datasource
             .Ajax()
             .ServerOperation(false)
             .Read(read => read.Action("List", "Video"))
        )
    )
</div>
You can see from the above code that the Grid is going to make an AJAX call for data to the List method on the Video Controller. That object doesn't exist, so let's create it now.
Right-click the solution and select Add / New Item. Then selector MVC Controller Class from the templates.
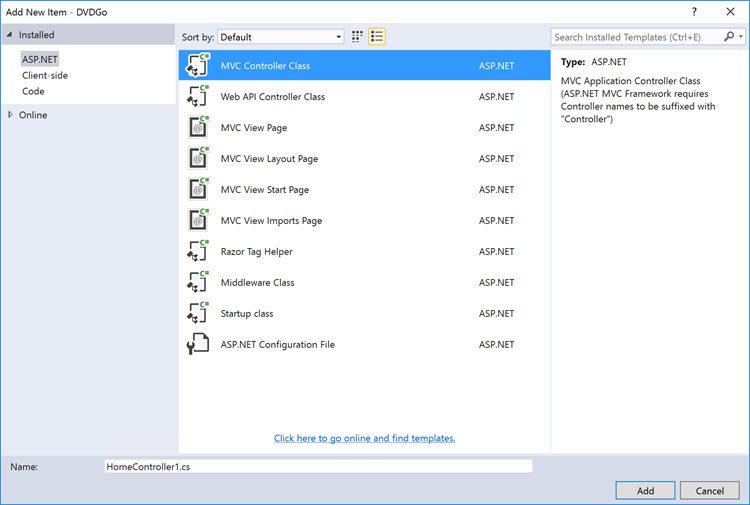
Add the List method to the newly created controller which will query the Video table and return the results as JSON.
using DVDGo.Data;
using Kendo.Mvc.Extensions;
using Kendo.Mvc.UI;
using Microsoft.AspNetCore.Mvc;

namespace DVDGo.Controllers {

    public class VideoController : Controller
    {
        private readonly DVDGoContext _context;

        public VideoController(DVDGoContext context) {
            _context = context;
        }

        public IActionResult List([DataSourceRequest] DataSourceRequest request) {
            return Json(_context.Videos.ToDataSourceResult(request));
        }
    }
}
The brief bit of code above communicates with the UI For ASP.NET Core Grid to use the DataSourceRequest, which handles the request coming in from the Grid, and export with the DataSourceResponse. Those two objects handle all of the communication between the controller and the Grid.
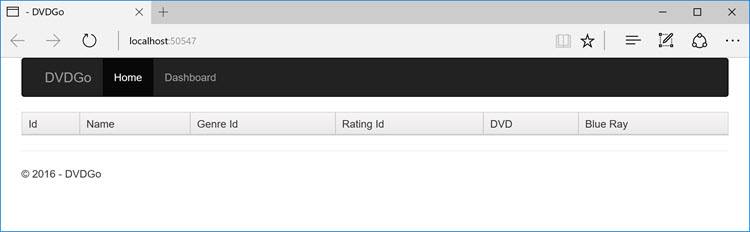
If you were to run the application (finally!), you would see an empty Grid.
The reason for this is that the way that the JSON.NET library serializes classes in .NET has changed. The default is to make every field camel case. So if we have a field called "Name", it becomes "name" in the JSON response. If we have "BlueRay", it becomes "blueRay". The problem with this is that the Grid is strongly typed to the Models.Video class and is expecting "Name" and "BlueRay". We can fix this either by defining the Model on the grid, or by changing the way JSON.NET serializes fields. I chose the latter for this example.
Startup.cs
public void ConfigureServices(IServiceCollection services)
{
    ...

    services.AddMvc().AddJsonOptions(options => {
        options.SerializerSettings.ContractResolver = new DefaultContractResolver();
    });

    ...
}
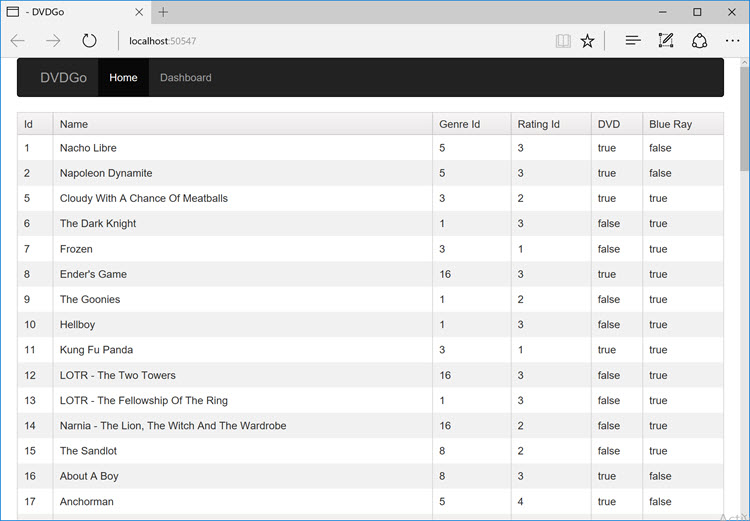
Now, if you visit the page, you will see the Grid with all of the videos from the database. Nice!
Next, we need to handle the foreign key fields GenreId and RatingId. To do that, we need to send over the data from those tables so that the grid can match up the GenreId with a Genre Name, and likewise with the RatingId.
Add the following to the HomeController.
HomeController.cs
using DVDGo.Data;
using Microsoft.AspNetCore.Mvc;
using System.Linq;

namespace DVDGo.Controllers {

    public class HomeController : Controller {
        private readonly DVDGoContext _context;

        public HomeController(DVDGoContext context) {
            _context = context;
        }

        public IActionResult Index() {

            var genres = _context.Genres.ToList();

            ViewData["genres"] = genres;
            ViewData["defaultGenre"] = genres.First();

            var ratings = _context.Ratings.ToList();

            ViewData["ratings"] = ratings;
            ViewData["defaultRating"] = ratings.First();

            return View();
        }

        public IActionResult Error() {
            return View();
        }
    }
}
We also need to make sure the grid knows that these are foreign key columns by defining each of the columns used by the Grid. Replace the context of the Views\Home\Index.cshtml file.
Index.cshtml
<div>
    @(Html.Kendo().Grid<DVDGo.Models.Video>()
            .Name("Videos")
            .Columns(columns => {
                columns.Bound(p => p.Name);
                columns.ForeignKey(p => p.GenreId, (System.Collections.IEnumerable)ViewData["genres"], "Id", "Name").Title("Genre");
                columns.ForeignKey(p => p.RatingId, (System.Collections.IEnumerable)ViewData["ratings"], "Id", "Name").Title("Rating");
                columns.Bound(p => p.DVD);
                columns.Bound(p => p.BlueRay);
            }
        )
        .DataSource(datasource => datasource
            .Ajax()
            .ServerOperation(false)
            .Read(read => read.Action("List", "Video"))
        )
    )
</div>
Now the Grid will display the Genre and Rating text instead of just the ID.
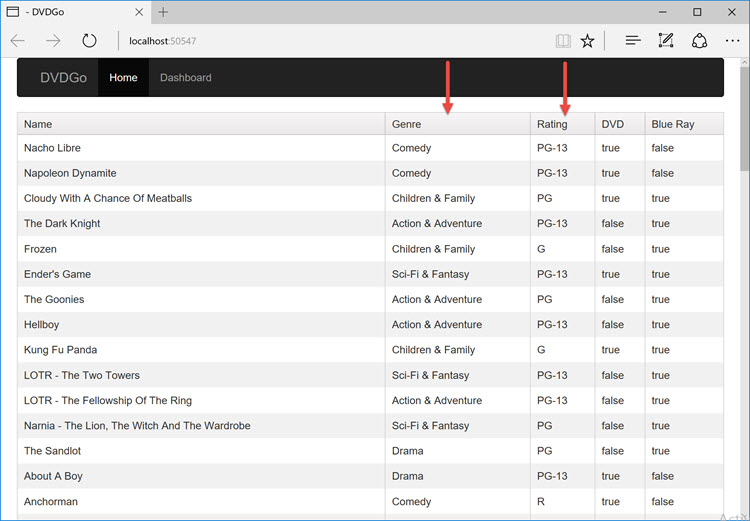
Now let's handle those "DVD" and "BlueRay" fields. Those display "True" or "False", which is fine, but it would be better if they were checkmarks. That way it would be easier to visually know their status just by glancing at them, which is what we really want here.
To do that, first include the Font Awesome icon font (CDN) in the Views\Shared\_Layout.cshtml file at the bottom of all the CSS includes inside of the <environment name="Development"> tag at the top.
_Layout.cshtml
<environment names="Development">
    <link rel="stylesheet" href="~/lib/bootstrap/dist/css/bootstrap.css" />
    <link rel="stylesheet" href="~/css/site.css" />
    <link rel="stylesheet" href="https://opensource.keycdn.com/fontawesome/4.6.3/font-awesome.min.css">
</environment>
We can use the FontAwesome checkmark by specifying a template for our Grid rows where we want the checkmark to appear and then assigning those templates as the ClientTemplate for those columns.
Index.cshtml
@{
    var dvdTemplate = "# if (data.DVD) { # <i class='fa fa-check' aria-hidden='true'></i> # } #";
    var blueRayTemplate = "# if (data.BlueRay) { # <i class='fa fa-check' aria-hidden='true'></i> # } #";
}

<div>
    @(Html.Kendo().Grid<DVDGo.Models.Video>()
            .Name("Videos")
            .Columns(columns => {
                columns.Bound(p => p.Name);
                columns.ForeignKey(p => p.GenreId, (System.Collections.IEnumerable)ViewData["genres"], "Id", "Name").Title("Genre");
                columns.ForeignKey(p => p.RatingId, (System.Collections.IEnumerable)ViewData["ratings"], "Id", "Name").Title("Rating");
                columns.Bound(p => p.DVD).ClientTemplate(dvdTemplate).HtmlAttributes(new { style = "text-align: center" });
                columns.Bound(p => p.BlueRay).Title("BlueRay").ClientTemplate(blueRayTemplate).HtmlAttributes(new { style = "text-align: center" });
            }
        )
        .DataSource(datasource => datasource
            .Ajax()
            .ServerOperation(false)
            .Read(read => read.Action("List", "Video"))
        )
    )
</div>
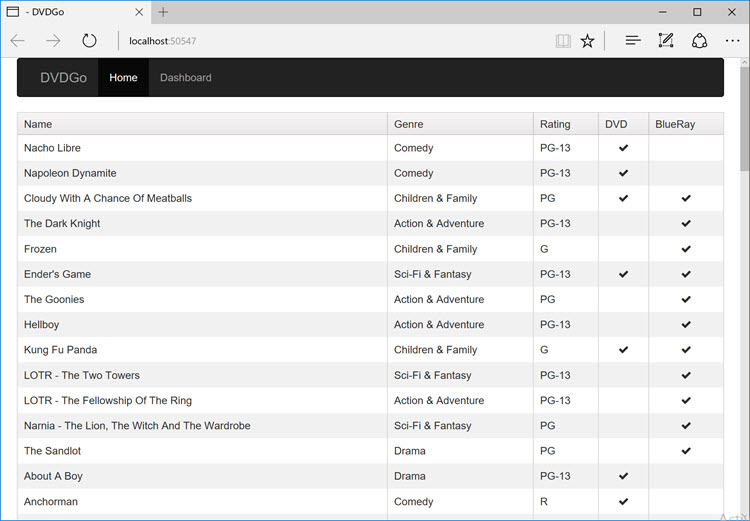
Now there are checkmarks for the "DVD"And "BlueRay" columns.
Editing
We can't conclude this tutorial without exploring the ability to edit the data in this Grid. That means full create, update and delete capabilities. This is usually the hardest part of configuring any data grid in ASP.NET. I think you'll find in this case, it's a lot easier than you might have expected.
For the create portion, we're going to add a Toolbar button. For the edit, we're going to add a command column. These two things will work together when a new item is created or updated, allowing the user to update or cancel out of the edit operation.
We need to let the grid know what editing mode our grid is going to be in and specify which methods on the Video controller to call for create, update and delete.
Finally, we need to specify the "Model" for the DataSource. This model tells the Grid which field constitutes the unique ID for a row, as well as specifying default values for the Genre, Rating and DVD columns.
Index.cshtml
@{
    var dvdTemplate = "# if (data.DVD) { # <i class='fa fa-check' aria-hidden='true'></i> # } #";
    var blueRayTemplate = "# if (data.BlueRay) { # <i class='fa fa-check' aria-hidden='true'></i> # } #";
}

<div>
    @(Html.Kendo().Grid<DVDGo.Models.Video>()
            .Name("Videos")
            .Columns(columns => {
                columns.Bound(p => p.Name);
                columns.ForeignKey(p => p.GenreId, (System.Collections.IEnumerable)ViewData["genres"], "Id", "Name").Title("Genre");
                columns.ForeignKey(p => p.RatingId, (System.Collections.IEnumerable)ViewData["ratings"], "Id", "Name").Title("Rating");
                columns.Bound(p => p.DVD).ClientTemplate(dvdTemplate).HtmlAttributes(new { style = "text-align: center" });
                columns.Bound(p => p.BlueRay).Title("BlueRay").ClientTemplate(blueRayTemplate).HtmlAttributes(new { style = "text-align: center" });
                columns.Command(command => { command.Edit(); command.Destroy(); }).Width(185);

            }
        )
        .ToolBar(toolbar => toolbar.Create())
        .DataSource(datasource => datasource
            .Ajax()
            .ServerOperation(false)
            .Read(read => read.Action("List", "Video"))
            .Create(create => create.Action("Create", "Video"))
        )
    )
</div>
We also need to add the methods to the VideoController that will perform the actual database actions.
VideoController.cs
using Microsoft.AspNetCore.Mvc;
using DVDGo.Data;
using Kendo.Mvc.Extensions;
using Kendo.Mvc.UI;

namespace DVDGo.Controllers
{
    public class VideoController : Controller
    {
        private readonly DVDGoContext _context;

        public VideoController(DVDGoContext context) {
            _context = context;
        }

        public IActionResult List([DataSourceRequest] DataSourceRequest request) {
            return Json(_context.Videos.ToDataSourceResult(request));
        }

        [HttpPost]
        public ActionResult Update([DataSourceRequest] DataSourceRequest request, Models.Video product) {
            if (product != null && ModelState.IsValid) {
                _context.Videos.Update(product);
                _context.SaveChanges();
            }
            return Json(new[] { product }.ToDataSourceResult(request, ModelState));
        }

        [HttpPost]
        public ActionResult Destroy([DataSourceRequest] DataSourceRequest request, Models.Video video) {
            _context.Remove(video);
            _context.SaveChanges();

            return Json(new[] { video }.ToDataSourceResult(request, ModelState));
        }

        [HttpPost]
        public ActionResult Create([DataSourceRequest] DataSourceRequest request, Models.Video video) {
            if (video != null && ModelState.IsValid) {
                _context.Add(video);
                _context.SaveChanges();
            }

            return Json(new[] { video }.ToDataSourceResult(request, ModelState));
        }


    }
}
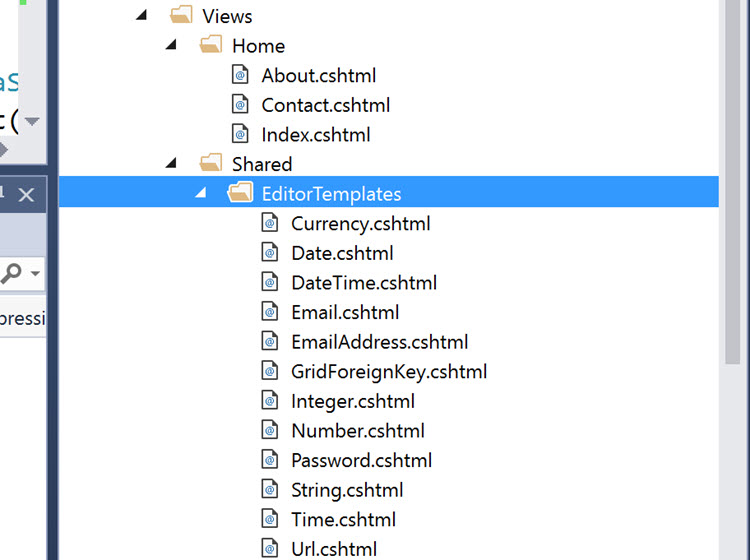
Lastly, you need to copy in the editor templates for the grid. To do this, find the installation directory of your Telerik UI For ASP.NET Core. Mine was in C:\Program Files (x86)\Telerik\UI for ASP.NET Core R3 2016\wrappers\aspnetcore\EditorTemplates\razor. Create a new folder in your project under Views/Shared called EditorTemplates. Copy in all of the files from the above location to that folder.
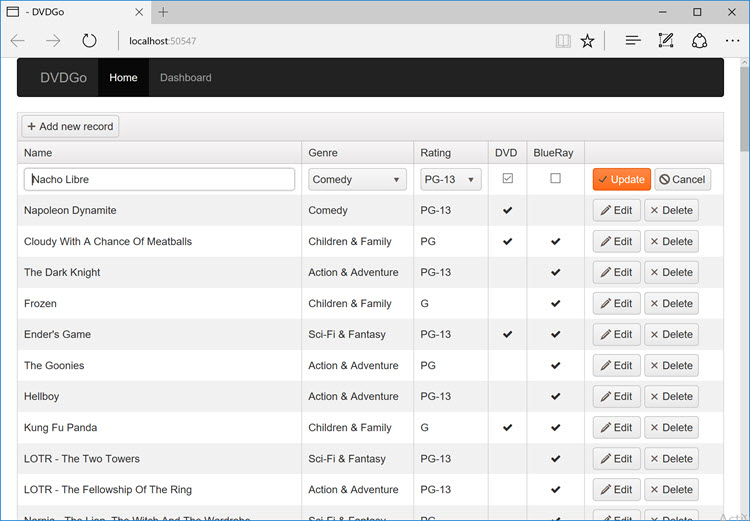
At this point we have a fully configured and editable Grid with two foreign key columns. Notice that when you do a create or update, the Genre and Ratings columns display as UI For ASP.NET Core DropDownLists. No extra work is required to do this. The DVD and BlueRay columns display as checkboxes automatically since the grid knows they are Boolean fields.
Now that we have done most of the hard work, let's have some fun with the grid by enabling some UI features that are pretty much single lines of code.
Paging
We can add paging to the Grid by setting the Pageable() method and the page size.
Index.cshtml
@{
    var dvdTemplate = "# if (data.DVD) { # <i class='fa fa-check' aria-hidden='true'></i> # } #";
    var blueRayTemplate = "# if (data.BlueRay) { # <i class='fa fa-check' aria-hidden='true'></i> # } #";
}

<div>
    @(Html.Kendo().Grid<DVDGo.Models.Video>()
        .Name("Videos")
        .Columns(columns => {
            columns.Bound(p => p.Name);
            columns.ForeignKey(p => p.GenreId, (System.Collections.IEnumerable)ViewData["genres"], "Id", "Name").Title("Genre");
            columns.ForeignKey(p => p.RatingId, (System.Collections.IEnumerable)ViewData["ratings"], "Id", "Name").Title("Rating");
            columns.Bound(p => p.DVD).ClientTemplate(dvdTemplate).HtmlAttributes(new { style = "text-align: center" });
            columns.Bound(p => p.BlueRay).Title("BlueRay").ClientTemplate(blueRayTemplate).HtmlAttributes(new { style = "text-align: center" });
            columns.Command(command => { command.Edit(); command.Destroy(); }).Width(185);
        })
        .ToolBar(toolbar => toolbar.Create())
        .Pageable()
        .Editable(editable => editable.Mode(GridEditMode.InLine))
        .DataSource(datasource => datasource
            .Ajax()
            .ServerOperation(false)
            .PageSize(10)
            .Model(model => {
                model.Id(p => p.Id);
                model.Field(p => p.GenreId).DefaultValue(1);
                model.Field(p => p.RatingId).DefaultValue(1);
                model.Field(p => p.DVD).DefaultValue(true);
            })
            .Read(read => read.Action("List", "Video"))
            .Create(create => create.Action("Create", "Video"))
            .Update(update => update.Action("Update", "Video"))
            .Destroy(destroy => destroy.Action("Destroy", "Video"))
        )
    )
</div>
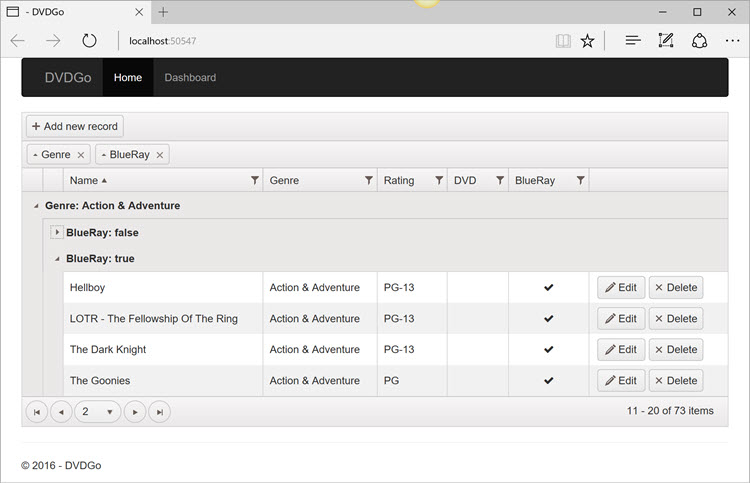
Now the grid is pageable. Note that all of the paging is being done client-side. We know that because we have set the ServerOperation(false). If we were to remove that line, paging would happen on the server. No other configuration is required on our part.
Madness! How does that work!?
That's the magic of the UI For ASP.NET Core widgets. They take care of all of the communication between the controller methods and the grid. That means that we can do much more. We can make this Grid sortable, groupable and filterable all by simply toggling those items on. We can even specify that we want the items displayed in alphabetical order by default simply by specifying the default sort on the DataSource. Remember, all of this data manipulation is happening on the server.
Index.cshtml
@{
    var dvdTemplate = "# if (data.DVD) { # <i class='fa fa-check' aria-hidden='true'></i> # } #";
    var blueRayTemplate = "# if (data.BlueRay) { # <i class='fa fa-check' aria-hidden='true'></i> # } #";
}

<div>
    @(Html.Kendo().Grid<DVDGo.Models.Video>()
        .Name("Videos")
        .Columns(columns => {
            columns.Bound(p => p.Name);
            columns.ForeignKey(p => p.GenreId, (System.Collections.IEnumerable)ViewData["genres"], "Id", "Name").Title("Genre");
            columns.ForeignKey(p => p.RatingId, (System.Collections.IEnumerable)ViewData["ratings"], "Id", "Name").Title("Rating");
            columns.Bound(p => p.DVD).ClientTemplate(dvdTemplate).HtmlAttributes(new { style = "text-align: center" });
            columns.Bound(p => p.BlueRay).Title("BlueRay").ClientTemplate(blueRayTemplate).HtmlAttributes(new { style = "text-align: center" });
            columns.Command(command => { command.Edit(); command.Destroy(); }).Width(185);
        })
        .ToolBar(toolbar => toolbar.Create())
        .Pageable()
        .Sortable()
        .Filterable()
        .Groupable()
        .Editable(editable => editable.Mode(GridEditMode.InLine))
        .DataSource(datasource => datasource
            .Ajax()
            .PageSize(10)
            .Model(model => {
                model.Id(p => p.Id);
                model.Field(p => p.GenreId).DefaultValue(1);
                model.Field(p => p.RatingId).DefaultValue(1);
                model.Field(p => p.DVD).DefaultValue(true);
            })
            .Read(read => read.Action("List", "Video"))
            .Create(create => create.Action("Create", "Video"))
            .Update(update => update.Action("Update", "Video"))
            .Destroy(destroy => destroy.Action("Destroy", "Video"))
            .Sort(sort => sort.Add("Name").Ascending())
        )
    )
</div>
Grab The Code!
You can get all of the code from this article from GitHub. I plan to add a dashboard section to this project as well to demonstrate how we can use UI For ASP.NET Core for rich charting and data visualization.
Hopefully you've seen that while ASP.NET Core is different, it's not terribly hard to learn. It's really a matter of front end files (JS, CSS, etc.) being in a different folder location. It also means that our project could theoretically run on any operating system, not just Windows Server. That's pretty powerful stuff.
Grab your copy of UI For ASP.NET Core and build rich, cross-platform data driven experiences with the newest web framework from Microsoft, and a set of UI tools that make the complex trivial.
Watchthe Webinar
Lastly, make sure you watch the recording of webinar on . We're really working hard to make the transition from traditional ASP.NET to ASP.NET Core as simple as possible. We're developers, just like you, and we know it can be daunting and frustrating when your favorite web development platform changes so drastically. The good news is that we've spent a lot of time looking at it and learning it so that you don't have to!
So to sum up what you need to do next...
You'll be an ASP.NET Core expert in no time!
Related resources:

Burke Holland
Burke Holland is a web developer living in Nashville, TN and was the Director of Developer Relations at Progress. He enjoys working with and meeting developers who are building mobile apps with jQuery / HTML5 and loves to hack on social API's. Burke worked for Progress as a Developer Advocate focusing on Kendo UI.