Add Pagination to Your Site With React

Summarize with AI:
In this post, we will look at how to add pagination (split data into separate pages) to an app using react-paginate.
The process of splitting data into separate pages is known as pagination. Instead of retrieving a large amount of data from the server and showing it to the user all at once, dividing the data across pages allows developers to limit the amount of data that a user loads over time, prompting them to request more if needed.
In this post, we will look at how to split data into chunks. We will create a paginated image gallery using the official Unsplash JSON API and react-paginate.
Prerequisites
To follow this tutorial, You will need to have:
- A basic understanding of React.js
- Node installed on your PC
- A text editor
Project Setup
In this tutorial, we will be using React as the JavaScript framework, Axios to fetch data from API, and react-paginate to add pagination to our site. Let’s start by installing the necessary dependencies.
Run this command to create a new React application in a folder named image-gallery:
npx create-react-app image-gallery
cd image-gallery
Run this command to install the dependency:
npm install axios
The command above installs Axios, which is the dependency we will be using to fetch data from an API.
To clean things up, let’s delete files we won’t need from our app. Delete the following files: App.css, App.test.js, logo.svg, reportWebVitals.js, setupTest.js.
Replace everything in your index.js file with this:
import React from "react";
import ReactDOM from "react-dom";
import "./index.css";
import App from "./App";
ReactDOM.render(
  <React.StrictMode>
    <App />
  </React.StrictMode>,
  document.getElementById("root")
);
Replace the code in your App.js file with the following:
import axios from "axios";
import { useEffect, useState } from "react";
import config from "./config";

function App() {
  const [images, setImages] = useState([]);
  const [isLoading, setIsLoading] = useState(false);
  useEffect(() => {
   setIsLoading(true);
    axios
      .get(
        `https://api.unsplash.com/photos/?client_id=${config.Image_Gallery_Client_ID}`
      )
      .then((res) => {
        setImages((prevState) => [...res.data]);
        setIsLoading(false);
        console.log(res.data);
        return res.data;
      })
      .catch((err) => {
        console.log(err);
        setIsLoading(false);
      });
  }, []);
  return (<div>Welcome</div>)
}
export default App;
In the code above, we’re importing Axios and using it in the useEffect hook to fetch our data once the page loads. We
also created some state variables with the useState hook that stores our data.
When calling our API endpoint, we read the value of our client_id from a config file that we have yet to create. We need to get an access key from Unsplash and then store the key in a config file.
Unsplash API Setup
Head over to this Unsplash site and follow these steps:
- Log in or register as a developer if you don’t have an account already.
- Click the New Application link.
- You should be navigated to the API Guidelines page. Check the buttons and click the Accept terms button.
- Fill in the required details and click the Create application button.
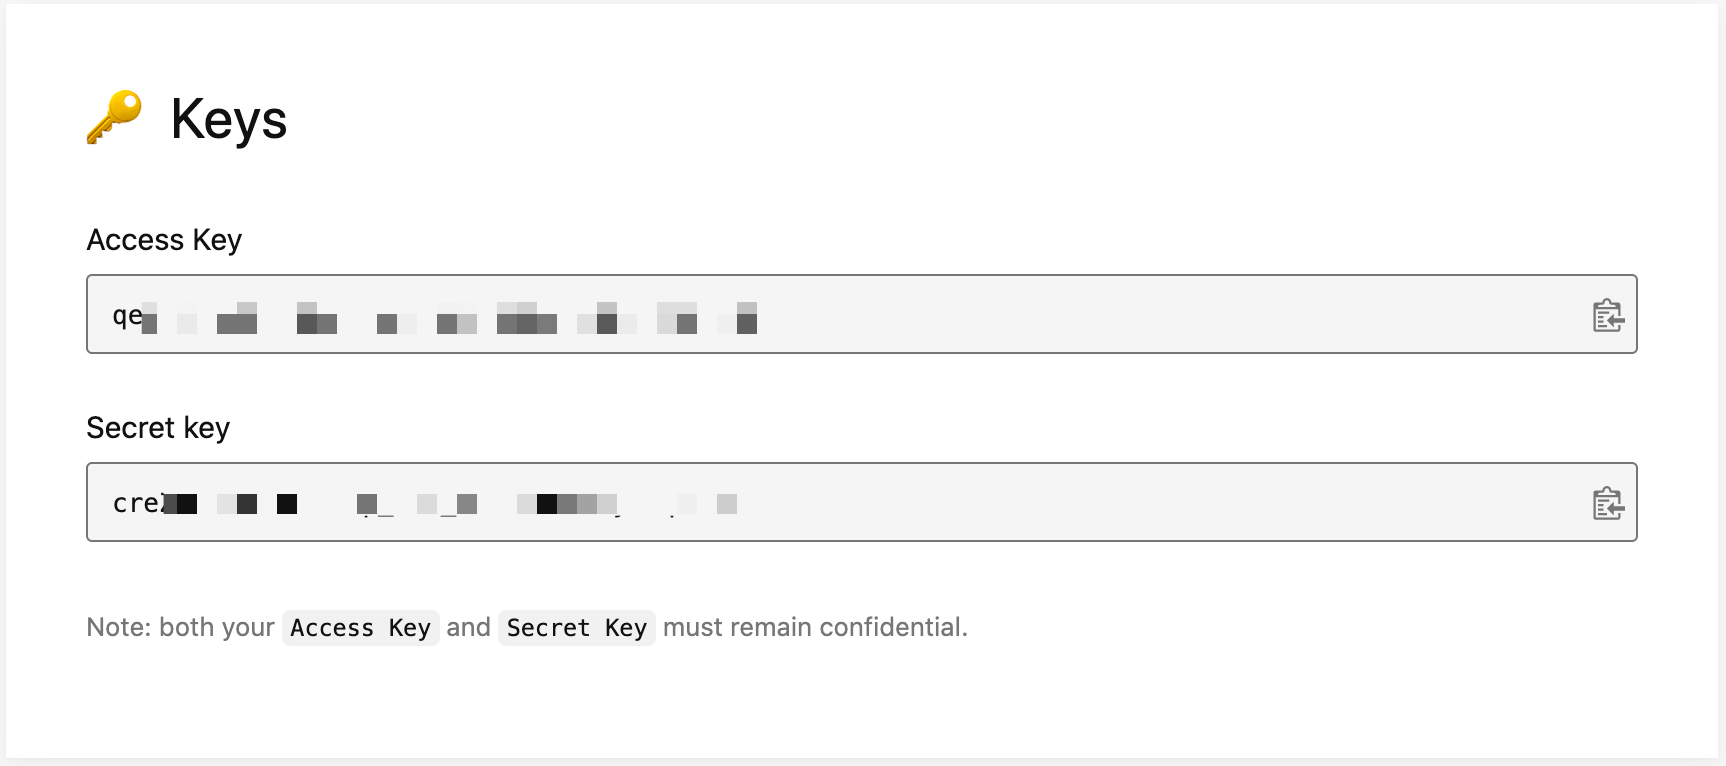
- You should be navigated to your applications page. Scroll down to the Keys section of the page and copy your access key.

Inside the src directory of your project, create a config.js file and add the following to it with your access key:
Image_Gallery_Client_ID="Your_Access_Key"
We’ve already imported the config file in the App.js file, so add the config.js file to your .gitignore file.
We can go ahead and test our progress so far project. Run this command in your terminal to start your server.
npm start
Open your developer tools. In the console, you should see the data retrieved from the API.

Let’s use the data in the project. Replace the following with what is in the return statement in your App.js file:
<>
  <h2>My Image Gallery</h2>
  <div className="App">
    {images?.map((image, i) => {
      return (
        <div className="img-wrapper" key={i}>
          <img src={image?.urls?.thumb} alt={image.alt_description} />
        </div>
      );
    })}
  </div>
</>
In the code above, we are looping through the data, and for each iteration, we’re returning an image. If you run your server, you should see something like this:

Now, to style the page, add the following to your index.css file:
h2 {
  font-size: 2.5rem;
  font-weight: 600;
  text-align: center;
  text-transform: uppercase;
  margin: 3rem 0;
}
.App {
  max-width: 1000px;
  width: 100%;
  margin: 0 auto;
  display: grid;
  grid-template-columns: repeat(auto-fit, minmax(200px, 1fr));
  grid-gap: 1rem;
  margin-bottom: 2.5rem;
}
.img-wrapper {
  width: 100%;
}
.img-wrapper img {
  width: 100%;
  height: 300px;
  object-fit: cover;
}
.pagination {
  display: flex;
  justify-content: center;
  align-items: center;
  margin-top: 2rem;
  margin-bottom: 3rem;
}
button {
  background: #fafafa;
  border: 1px solid #eaeaea;
  padding: 0.7rem 1.2rem;
  border-radius: 3px;
  cursor: pointer;
}
button:hover {
  background: #eaeaea;
}
p {
  font-size: 1rem;
  margin: 0 1rem;
}
You should see something similar to the image below.

Pagination With Unsplash
Looking at our app now, we’re only getting 10 images, which is what we get from the Unsplash API by default. What if we want to load more images? Unsplash API has a pagination system that we can use. Open your App.js file and this to
it:
const [page, setPage] = useState(1);
This creates a state that stores the page we’re currently on. Now add page to the dependency array in the useEffect hook.
Replace the axios.get request in your useEffect hook with the following:
axios.get(
  `https://api.unsplash.com/photos/?client_id=${config.Image_Gallery_Client_ID}&page=${page}`
)
In the code above, we added a query string called page, and its value is the value of the page state. The page query tells Unsplash which page we need it to return.
By default, this request will return a list of images paginated into pages of 10 items.
To make the pagination work, add the following to line 38 of your App.js file:
<div className="pagination">
  {isLoading ? (
    <p>Loading...</p>
  ) : (
    <>
     <button
        disabled={page === 1}
        onClick={() => setPage((prevState) => prevState - 1)}
      >
        Prev
      </button>
      <p>{page}</p>
     <button onClick={() => setPage((prevState) => prevState + 1)}>
        Next
      </button>
    </>
  )}
</div>
In the code above, we have two buttons: one that subtracts one from the page to get the previous page and one that adds one to the current page to get the next page. This is why we added page to the dependency array in the useEffect hook to fetch the data again whenever the page updates.
Now, if you run the server, you should have something like this:

This works quite nicely if we stop here. But we can move a step forward. Consider a situation where we receive a large amount of data at once and need to add pagination to make the site look better.
Let’s update the API call with this to increase the number of images to display per page:
axios.get(
  `https://api.unsplash.com/photos/?client_id=${config.Image_Gallery_Client_ID}&per_page=30`
)
We added the per_page query parameter to our API request and set it to fetch 30 images per page. Remove page from the dependency array in the useEffect hook.
React Paginate Component
Let’s install react-paginate, the React component we will use to achieve pagination.
npm install react-paginate --save
Next, let’s add these state variables to our App.js file:
const [currentImages, setCurrentImages] = useState(null);
const [pageCount, setPageCount] = useState(0);
const [imagesOffset, setImagesOffset] = useState(0);
Let’s add another useEffect hook to structure the number of images we request per page:
useEffect(() => {
  const endOffset = imagesOffset + 8;
  setCurrentImages(images.slice(imagesOffset, endOffset));
  setPageCount(Math.ceil(images.length / 8));
}, [images, imagesOffset]);
The code above splits the data into a specific number per page.
const handlePageClick = (event) => {
  const newOffset = (event.selected * 8) % images.length;
  setImagesOffset(newOffset);
};
When the user clicks on any page from the pagination, the function will be triggered.
In the return statement in your App.js file, we’re currently iterating over the images state variable, change it to currentImages. In the useEffect hook where we are making the API request, remove
all the calls to setIsLoading() and delete the useState hook we defined for it.
At the top of your App.js file, import react-paginate.
...
import ReactPaginate from "react-paginate";
Now to use react-paginate, remove the following pagination code:
<div className="pagination">
  //...
</div>
Replace the previous pagination with the following:
<div className="pagination">
  <ReactPaginate
    breakLabel="..."
    nextLabel="next >"
    onPageChange={handlePageClick}
    pageRangeDisplayed={5}
    pageCount={pageCount}
    previousLabel="< previous"
    renderOnZeroPageCount={null}
    breakClassName={"page-item"}
    breakLinkClassName={"page-link"}
    containerClassName={"pagination"}
    pageClassName={"page-item"}
    pageLinkClassName={"page-link"}
    previousClassName={"page-item"}
    previousLinkClassName={"page-link"}
    nextClassName={"page-item"}
    nextLinkClassName={"page-link"}
    activeClassName={"active"}
  />
</div>
Finally, add the following to your index.css file to style the pagination component.
.pagination > li {
  list-style: none;
  border: 0.3px solid;
}
.pagination > li > a,
.pagination > li > span {
  float: left;
  padding: 8px 20px;
  line-height: 1.5;
  border: 1px solid #ddd;
  margin-left: -1px;
}

.pagination > li.active > a {
  color: #fff;
  background-color: #218838;
  border-color: #1e7e34;
}
.pagination > li > a:hover {
  background-color: #218838;
  color: white;
  cursor: pointer;
}
.pagination > li:first-child > a,
.pagination > li:first-child > span {
  margin-left: 0;
}
You should get the same result shown in the image below if you refresh your browser.

Conclusion
This post covered different methods for structuring the amount of data a user sees at once, whether the data was paginated from the backend or sent as a large data format.


