Arc Gauge Scale
The scale of the arc gauge renders the values, pointers and labels. You can customize it by adding an instance of the <ArcGaugeScale> to the <ArcGaugeScales> collection, child tag of the <TelerikArcGauge>. The <ArcGaugeScale> exposes the following parameters:
Min and Max
-
The
Max(double) parameter controls the maximum value that the component can reach. -
The
Min(double) parameter controls the lowest value of the component.
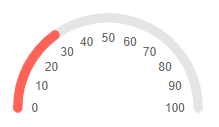
Change the lowest and the highest values for the scale. The result from the code snippet below.

@* Use the Min and Max parameters to change the lowest and highest values for the scale *@

<TelerikArcGauge>
    <ArcGaugeScales>
        <ArcGaugeScale Min="10" Max="100">
            <ArcGaugeScaleLabels Visible="true" />
        </ArcGaugeScale>
    </ArcGaugeScales>

    <ArcGaugePointers>

        <ArcGaugePointer Value="30">
        </ArcGaugePointer>

    </ArcGaugePointers>
</TelerikArcGauge>
MinorUnit and MajorUnit
-
The
MajorUnit(double) parameter controls the interval between the major unit divisions of the component. The values provided to theArcGaugePointerwill render as aMajorUnittick. The labels will be rendered next to theMajorUnitticks. -
The
MinorUnit(double) parameter controls the interval between the minor unit divisions of the component. In order to use theMinorUnitticks you must enable them explicitly.
Change the rendering frequency of the major unit divisions. The result from the code snippet below.
@* Update the rendering of the major ticks *@

<TelerikArcGauge>
    <ArcGaugeScales>
        <ArcGaugeScale Min="0" Max="100" MajorUnit="10">
            <ArcGaugeScaleLabels Visible="true" />
        </ArcGaugeScale>
    </ArcGaugeScales>

    <ArcGaugePointers>

        <ArcGaugePointer Value="30">
        </ArcGaugePointer>

    </ArcGaugePointers>
</TelerikArcGauge>
StartAngle and EndAngle
-
The
StartAngle(double) parameter controls the starting angle of the scale. -
The
EndAngle(double) parameter controls the ending angle of the component.
By default the StartAngle is set to 0 and the EndAngle to 180. These values represent the angles on the coordinate system.
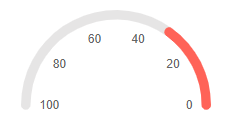
Change the StartAngle and the EndAngle of the scale. The result from the code snippet below.
@* Use the StartAngle and EndAngle parameters to curve the scale differently. *@

<TelerikArcGauge>
    <ArcGaugeScales>
        <ArcGaugeScale Min="0" Max="100" StartAngle="-45" EndAngle="180">
            <ArcGaugeScaleLabels Visible="true" />
        </ArcGaugeScale>
    </ArcGaugeScales>

    <ArcGaugePointers>

        <ArcGaugePointer Value="30">
        </ArcGaugePointer>

    </ArcGaugePointers>
</TelerikArcGauge>
Reverse
If you set the Reverse (bool) parameter to true the values of the scale will increase from the right side to the left side of the scale. By default they will raise from the left to right.
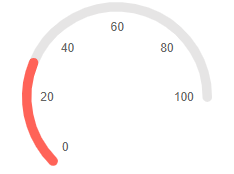
Reverse the scale of the component. The result from the code snippet below.
@* Set the Reverse parameter to true *@

<TelerikArcGauge>
    <ArcGaugeScales>
        <ArcGaugeScale Min="0" Max="100" Reverse="true">
            <ArcGaugeScaleLabels Visible="true" />
        </ArcGaugeScale>
    </ArcGaugeScales>

    <ArcGaugePointers>

        <ArcGaugePointer Value="30">
        </ArcGaugePointer>

    </ArcGaugePointers>
</TelerikArcGauge>
Additional Customization
To further customize the elements of the Arc Gauge you can use nested tags. When configuring nested properties and child elements in your Arc Gauge, the inner tags will contain their parent tag name and add specifics to its end. In general the structure of such nested tags will be <ArcGauge*Category**Specifics*> where the Category can be one of the following:
- Scale
- GaugeArea
Example: Enable the MinorUnit ticks
You can enable the MinorUnit ticks on the scale by using the <ArcGaugeScaleMinorTicks> nested tag and its Visible parameter.
Add the MinorUnit ticks to the scale. The result from the code snippet below.
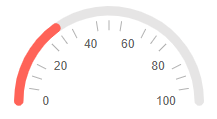
@* Add the MinorUnit ticks. *@

<TelerikArcGauge>
    <ArcGaugeScales>
        <ArcGaugeScale Min="0" Max="100" MajorUnit="20" MinorUnit="5">
            <ArcGaugeScaleMinorTicks Visible="true" />
            <ArcGaugeScaleLabels Visible="true" />
        </ArcGaugeScale>
    </ArcGaugeScales>

    <ArcGaugePointers>

        <ArcGaugePointer Value="30">
        </ArcGaugePointer>

    </ArcGaugePointers>
</TelerikArcGauge>