Adding Groups to Tables
Table, Crosstab, and List items are template variations of the same Table data item and use row and column groups to organize data hierarchically. Unlike Report groups, table groups expand both horizontally (column groups) and vertically (row groups) to create flexible data layouts.
Use the Group Explorer to add and manage groups in table items. You can create parent, child, adjacent, or details groups, and configure filtering, sorting, and aggregation settings for each group.
The instructions in this article apply to all three template variations: Table, Crosstab, and List items.
Add a Row/Column Group Using the Report Designer
Add a Parent or Child Group
To add a parent or child row/column group:
- Select the Table, Crosstab, or List item on the design surface.
- In the Group Explorer, right-click an existing group.
- Click Add Group, and then click Parent Group or Child Group depending on where you want to add the group. The Table Group dialog box opens.
- In the Group by section, click the New button.
- Enter an expression for the grouping criteria (for example,
= Fields.Category). - (Optional) Select Add Header to add a group header row or column.
- (Optional) Select Repeat On Every Page to repeat the header on each page.
- (Optional) Select Add Footer to add a group footer row or column.
- (Optional) Select Repeat On Every Page to repeat the footer on each page.
The Repeat On Every Page functionality for group headers and footers was introduced in version
20.0.26.211. - Click OK.
The group is added to the Group Explorer hierarchy, and the corresponding rows or columns are added to the data item on the design surface.
When using Repeat On Every Page, you can display different content for repeated instances of the header or footer. Use the
ReportItem.IsRepeatedproperty in expressions to conditionally modify the displayed content, for example, appending "(continued)" text. For more details, see Display Continued Text for Repeated Table Group Headers.
Add an Adjacent Group
To add an adjacent row/column group:
- Select the Table, Crosstab, or List item on the design surface.
- In the Group Explorer, right-click an existing group.
- Click Add Group, and then click Adjacent Above or Adjacent Below to specify where to add the group. The Table Group dialog box opens.
- In the Group by section, click the New button.
- Enter an expression for the grouping criteria (for example,
= Fields.Category). - (Optional) Select Add Header to add a group header row or column.
- (Optional) Select Repeat On Every Page to repeat the header on each page.
- (Optional) Select Add Footer to add a group footer row or column.
- (Optional) Select Repeat On Every Page to repeat the footer on each page.
The Repeat On Every Page functionality for group headers and footers was introduced in version
20.0.26.211. - Click OK.
The group is added to the Group Explorer at the specified position, and the corresponding rows or columns are added to the data item on the design surface.
When using Repeat On Every Page, you can display different content for repeated instances of the header or footer. Use the
ReportItem.IsRepeatedproperty in expressions to conditionally modify the displayed content, for example, appending "(continued)" text. For more details, see Display Continued Text for Repeated Table Group Headers.
Repeatable headers and footers are not compatible with the
PageBreakproperty. If any group in the table has aPageBreakvalue other thanNone, repeatable headers and footers will not be processed and rendered, even ifPrintOnEveryPageis enabled.
Add a Details Group Using the Report Designer
A details group displays individual data records without grouping. For row groups, this creates a row for each record; for column groups, this creates a column for each record.
To add a details group:
- Select the Table, Crosstab, or List item on the design surface.
- In the Group Explorer, right-click the innermost child group.
- Click Add Group, and then click Child Group. The Table Group dialog box opens.
- Select Show detail data.
- Click OK.
The details group is added to the Group Explorer and displays the details group icon. A new row (for row groups) or column (for column groups) is added to the table to display the detail data.
Edit an Existing Group
To edit an existing group's properties, including grouping expressions, sorting, filtering, and other settings:
-
Select the Table, Crosstab, or List item on the design surface.
-
In the Group Explorer, right-click the group, and then click Group Properties.
-
Configure the group properties:
- GroupKeepTogether—Specify the keep together options to control whether group content stays together across page breaks.
- PageBreak—Specify where page breaks occur relative to the group.
- PrintOnEveryPage—Controls whether the corresponding header or footer row/column repeats on every page. This property is respected only on static groups. See Edit the Repeat On Every Page Behavior for details.
- Visible—Control the visibility of the group.
- Filters—Click the ellipsis to configure filters. Click New to add a filter, then specify the Expression, Operator, and Value.
- Groupings—Click the ellipsis to add or modify grouping expressions. Click New to add additional expressions. All expressions are combined using a logical AND.
- Sortings—Click the ellipsis to configure sort order. Click New to add a sort expression, then choose ASC (ascending) or DESC (descending) from the Direction drop-down list.
- BookmarkId—Set a bookmark identifier for this group.
- DocumentMapText—Specify the text to display in the document map for this group.
- TocText—Specify the text to display in the table of contents for this group.
- Name—Enter the name of the group.
-
Click OK.
Edit the Repeat On Every Page Behavior
When you enable Repeat On Every Page for a header and/or footer while creating a dynamic group in the Table Group Dialog, the designer sets the PrintOnEveryPage property to True on the corresponding static group. Static groups have no grouping expressions—they represent fixed structural rows or columns that serve as group headers and footers.
To change the repeat behavior after group creation:
-
Select the Table, Crosstab, or List item on the design surface.
-
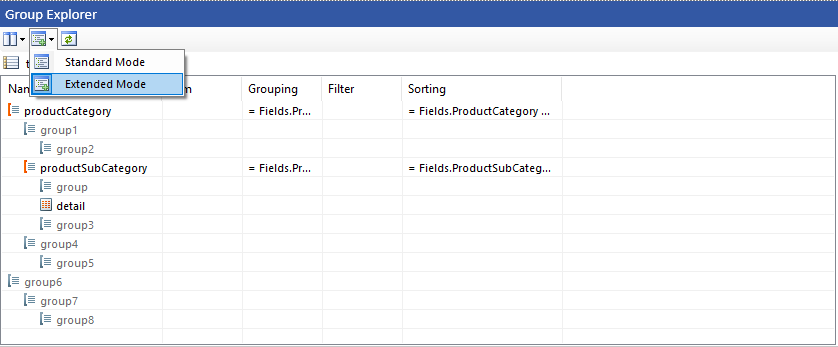
In the Group Explorer, switch to Extended Mode. Static groups are hidden in the default Standard Mode.
-
Locate the leaf static group that represents the header or footer you want to modify. Static groups appear with a distinct icon and gray text.
Each dynamic group owns its header as the first child static group and its footer as the last child static group. However, when groups are nested, outer dynamic groups produce a chain of static groups rather than a single one: there is a non-leaf static group at the outer level wrapping a leaf at the inner level.
PrintOnEveryPageis only respected on the leaf at the end of that chain.To find the correct leaf: start from the dynamic group whose header or footer you want to change → select its first child (header) or last child (footer) static group → keep following the child chain until you reach one with no children. That is the leaf to edit.
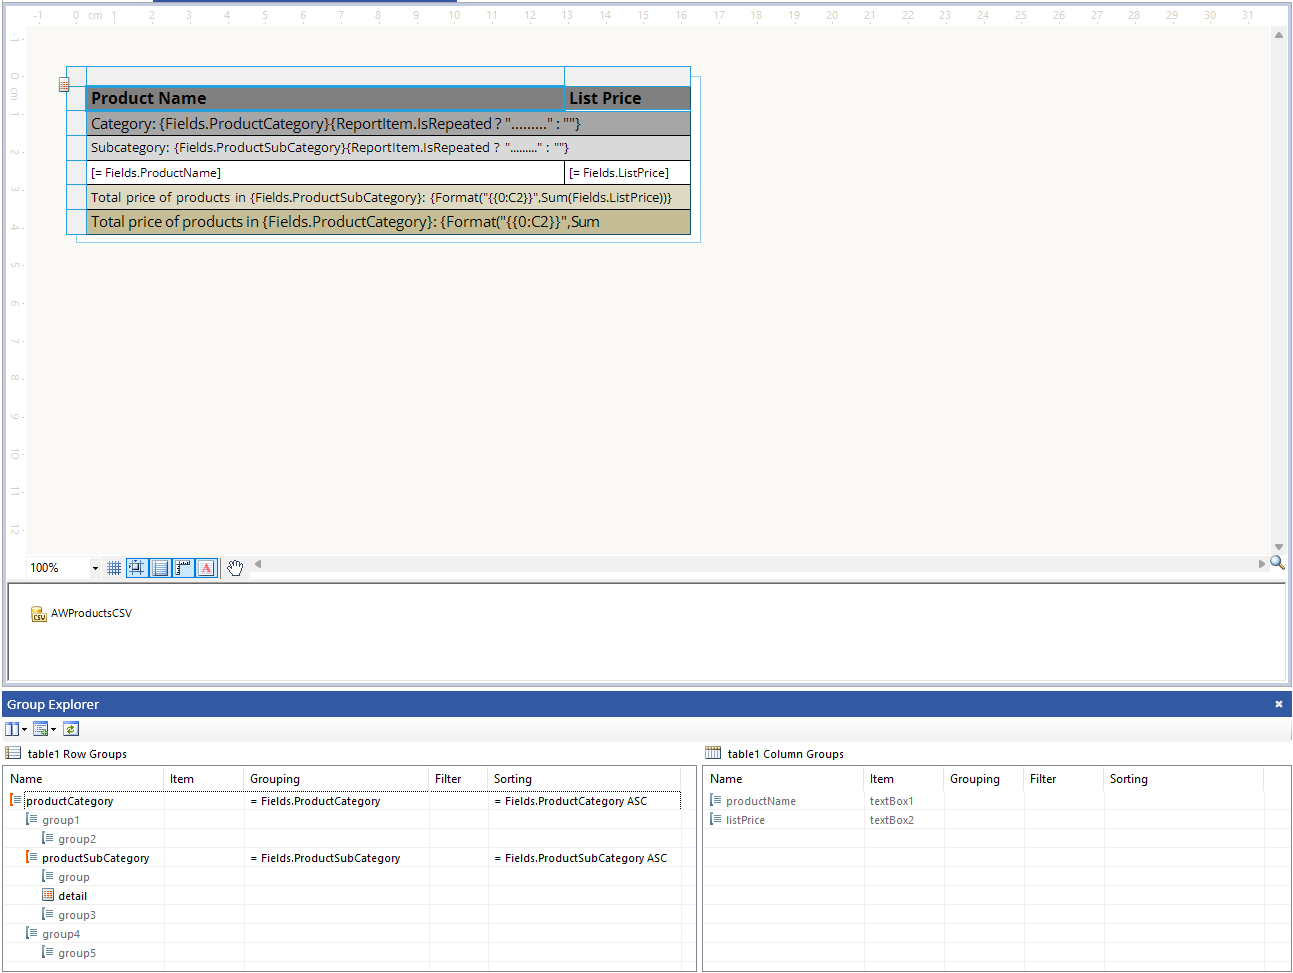
For example, the sample report
RepeatableTableGroupHeadersFootersDemo.trdxhas a productCategory group containing a nested productSubCategory group. The resulting row group hierarchy in Extended Mode is:productCategory (dynamic) ├── group1 (static, non-leaf) ← Category header chain start │ └── group2 (static, leaf) ✔ ← set PrintOnEveryPage here for Category header ├── productSubCategory (dynamic) │ ├── group (static, leaf) ✔ ← set PrintOnEveryPage here for Subcategory header │ ├── detail │ └── group3 (static, leaf) ✔ ← set PrintOnEveryPage here for Subcategory footer └── group4 (static, non-leaf) ← Category footer chain start └── group5 (static, leaf) ✔ ← set PrintOnEveryPage here for Category footerThe outer productCategory header and footer each have a two-level static chain (
group1→group2andgroup4→group5), while the inner productSubCategory header and footer are direct leaf children.The screenshot below shows this hierarchy in the Group Explorer alongside the corresponding table rows on the design surface:
-
Double-click the leaf static group to open the Group Properties editor.
-
Set
PrintOnEveryPagetoTrueto repeat the header/footer on every page, orFalseto disable repeating. -
Click OK.
To control the content displayed in repeated headers or footers, use the
ReportItem.IsRepeatedproperty in expressions. For example, you can append "(continued)" text to repeated headers. See Display Continued Text for Repeated Table Group Headers.
Delete a Group Using the Report Designer
To delete a group:
-
Select the Table, Crosstab, or List item on the design surface.
-
In the Group Explorer, right-click the group, and then click Delete Group.
-
In the Delete Group dialog box, select one of the following options:
- Delete group and related rows and columns—Choose this option to delete the group definition and all related rows and columns that display group data. For the details group, if the same row or column belongs to both detail and group data, only the detail data rows and columns are deleted.
- Delete group only—Choose this option to keep the structure of the data item and delete only the group definition.
-
Click OK.
Add a Group Programmatically
Telerik.Reporting.TableGroup group1 = new Telerik.Reporting.TableGroup();
group1.Name = "ProductID1";
group1.Groupings.Add(new Telerik.Reporting.Grouping("=Fields.ProductID"));

// If you need to filter the members of the group, apply filtering
group1.Filters.Add(new Telerik.Reporting.Filter("=Fields.ProductID", Telerik.Reporting.FilterOperator.Equal, "=10"));

// If you need to order the members of the group, apply sorting
group1.Sortings.Add(new Telerik.Reporting.Sorting("=Fields.ProductID", Telerik.Reporting.SortDirection.Asc));

Telerik.Reporting.TextBox textBox1 = new Telerik.Reporting.TextBox();
table1.Items.Add(textBox1);
group1.ReportItem = textBox1;

table1.RowGroups.Add(group1);