Working with Nodes on the Server
Using the server-side API, you can programmatically add, remove, disable, or select RadTreeView nodes.
Adding Nodes
To add a node programmatically, create an instance of RadTreeNode, assign Text, Value and other properties, then add the object to a Nodes collection. You can add it to the RadTreeView Nodes collection or the Nodes collection of another Node.
RadTreeNode newNode = new RadTreeNode();
newNode.Text = "New Node";
newNode.Value = "1234";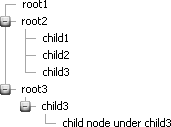
RadTreeView1.Nodes.Add(newNode);By adding nodes to the RadTreeView Nodes collection or to the Nodes collection of another node you can define the entire tree structure. The example below demonstrates adding a node with no children, adding a node with three children and adding a node with two levels of children.
- All RadTreeNodes have a property called ParentNode containing an instance to the parent RadTreeNode (if any) or null if the parent is the RadTreeView itself(i.e. this node is a root).
- All RadTreeNodes have an attribute called TreeView containing an instance to the parent RadTreeView .>
using Telerik.Web.UI;
namespace RadTreeView
{
    public partial class _Default : System.Web.UI.Page
    {
        protected void Page_Load(object sender, EventArgs e)
        {
            if (!Page.IsPostBack)
            {
                RadTreeNode root1 = new RadTreeNode("root1");
                RadTreeView1.Nodes.Add(root1);
                RadTreeNode root2 = new RadTreeNode("root2");
                root2.Nodes.Add(new RadTreeNode("child1"));
                root2.Nodes.Add(new RadTreeNode("child2"));
                root2.Nodes.Add(new RadTreeNode("child3"));
                RadTreeView1.Nodes.Add(root2);
                RadTreeNode root3 = new RadTreeNode("root3");
                RadTreeNode child3 = new RadTreeNode("child3");
                child3.Nodes.Add(new RadTreeNode("child node under child3"));
                root3.Nodes.Add(child3);
                RadTreeView1.Nodes.Add(root3);
            }
        }
    }
}You can add multiple nodes at once by using the AddRange method of the RadTreeNodeCollection. The following code creates a new root node and adds all current nodes as a child of that node:
RadTreeNode node = new RadTreeNode("New ROOT");
node.Nodes.AddRange(RadTreeView1.Nodes.Cast<RadTreeNode>());
RadTreeView1.Nodes.Add(node);Removing Nodes
You can remove nodes by:
-
Calling the node's Remove() method.
-
Calling the Nodes collection Remove() method and passing a reference to the node.
-
Calling the Nodes collection RemoveAt() method and passing the index of the node to be removed. Be careful with this last method as the indexing is relative to each Nodes collection. Notice in the code example how the RemoveAt() method is called not from the RadTreeView nodes collection, but through the parent of the node being removed.
-
Calling Nodes.Clear() to remove all nodes at one time.
protected void btnDelete_Click(object sender, EventArgs e)
{
    if (RadTreeView1.SelectedNode != null)
    {
        RadTreeView1.SelectedNode.Remove();
        // or ...
        //RadTreeView1.Nodes.Remove(RadTreeView1.SelectedNode);
        // or ...

        //RadTreeView1.SelectedNode.ParentNode.Nodes.RemoveAt(RadTreeView1.SelectedNode.Index);
    }
}Selecting Nodes
Setting the RadTreeNode Selected property typically highlights the node, depending on the styling of the RadTreeView Skin. The typical scenario for selecting a node programmatically is first locating the node, then setting its Selected property. The example below uses a LinkButton to trigger finding a node with "Biography" in the text, then selects the node.

protected void LinkButton1_Click(object sender, EventArgs e)
{
    RadTreeNode node = RadTreeView2.FindNodeByText("Biography");
    if (node != null)
    {
        node.Selected = true;
    }
}Disabling/Enabling Nodes
Setting the RadTreeNode Enabled property to false makes the node inactive and un-clickable. The appearance of the node is typically in a grey or other faint color, depending on the styling of the RadTreeView Skin. The example below locates the "Books" node and disables all its child nodes.

protected void LinkButton1_Click(object sender, EventArgs e)
{
    RadTreeNode node = RadTreeView2.FindNodeByText("Books");
    foreach (RadTreeNode childNode in node.Nodes)
    {
        childNode.Enabled = false;
    }
}