First Steps with RadToolTip
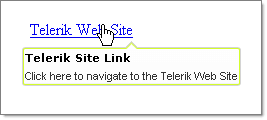
The following tutorial demonstrates how RadToolTip is used to provide a custom tooltip for a single element.

-
In a new AJAX-Enabled Web Application, add a HyperLink control from the Standard tab to the default web page.
-
Set the Text property to "Telerik Web Site" and the NavigateUrl to "https://www.telerik.com".
-
Drop a RadToolTip control from the ToolBox to the default web page.
-
Set the RadToolTip TargetControlID property to the ID property of the HyperLink.
-
Set the Position property to be BottomCenter.
-
Set the Title property to "Telerik Site Link".
-
Set the Text property to "Click here to navigate to the Telerik Web Site".
-
Set the Skin property to Telerik.
-
Press F5 to run the application. Run the mouse over the HyperLink to view the tooltip.
Example 1 - Creating RadTooltip in the aspx page
<telerik:RadScriptManager ID="RadScriptManager1" runat="server" />
<asp:HyperLink ID="HyperLink1" runat="server" Text="Telerik Web Site" NavigateUrl="https://www.telerik.com"></asp:HyperLink>
<telerik:RadToolTip ID="RadToolTip1" runat="server" TargetControlID="HyperLink1" Position="BottomCenter"
    Skin="Telerik" Title="Telerik Site Link" Width="200px" Height="60px">
    <contenttemplate>
        Click here to navigate to the Telerik Web Site
    </contenttemplate>
</telerik:RadToolTip>
Example 2 - Dynamic creation
    protected void Page_Load(object sender, EventArgs e)
    {
        Button button = new Button();
        button.ID = "Button1";
        button.Text = "Click me";
        button.ToolTip = "This is a tooltip";

        RadToolTip tooltip = new RadToolTip();
        tooltip.TargetControlID = "Button1";
        tooltip.Text = "This is a tooltip";
        tooltip.BackColor = Color.Yellow;
        tooltip.ForeColor = Color.Red;

        this.Form.Controls.Add(button);
        this.Form.Controls.Add(tooltip);
    }