RadTimeView Templates
The appearance of every aspect of the RadTimeView control that is embedded in RadDateTimePicker controls can be altered using a template. The way data is rendered is completely determined by your implementation of the control's templates, which describe how to present time items. The RadTimeView control supports four types of templates:
-
The TimeTemplate controls the appearance of the items in the time view that the user can select.
-
The AlternatingTimeTemplate controls the appearance of every other item in the time view. If an AlternatingTimeTemplate is not supplied, the time view uses the TimeTemplate (if supplied) for every item in the time view.
-
The HeaderTemplate controls the appearance of the header section.
-
The FooterTemplate controls the appearance of the footer section.
Creating templates at design time
To create templates for the time view control embedded in a RadDateTimePicker control, right click on the control and choose Edit Template from the RadDateTimePicker Smart Tag. Select the type of template you want to create, and use the template design surface to create the template. You can drag any controls or HTML elements from the tool box onto the template design surface.
Inside a TimeTemplate or AlternatingTimeTemplate, you can use a DataBinder.Eval statement such as "<%# DataBinder.Eval(Container, "DataItem.Time", "{0:t}")%>" to bind an element to the value the item represents:
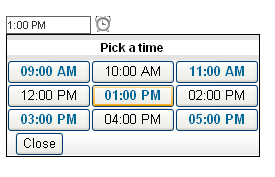
The following example illustrates how to add templates at design time to the embedded RadTimeView control:
<telerik:RadDateTimePicker RenderMode="Lightweight" ID="RadDateTimePicker1" runat="server">
    <TimeView
        StartTime="09:00:00"
        EndTime="17:00:10"
        BorderWidth="1px"
        BorderColor="Black" >
        <HeaderTemplate>
            <div style="text-align: center; font-size: 9pt;">
                <b>Pick a time</b>
            </div>
        </HeaderTemplate>
        <TimeTemplate>
            <button style="color: #006699;font-weight:bold;"
             onclick="javascript: return false;">
             <%# DataBinder.Eval(Container, "DataItem.Time","{0:hh:mm tt}") %>
            </button>
        </TimeTemplate>
        <AlternatingTimeTemplate>
            <button onclick="javascript: return false;">
             <%# DataBinder.Eval(Container, "DataItem.Time","{0:hh:mm tt}") %>
            </button>
        </AlternatingTimeTemplate>
        <FooterTemplate>
            <button onclick="javascript: ClosePopup(); return false;">Close</button>
        </FooterTemplate>
    </TimeView>
</telerik:RadDateTimePicker>
Creating Templates at runtime
The RadTimeView template properties are of type ITemplate. To create a template at runtime, define a class that implements the ITemplate interface and assign an instance of that class to the appropriate RadTimeView property. The ITemplate interface has only one method, called InstantiateIn. In the InstantiateIn method, create any controls that you want to add to the template, and add them to the Controls collection of the container object that is passed as an argument.
If a control you are adding to the container's Controls collection should be bound to a data source column, then you should register your own handler for the OnDataBinding event. When the event occurs, retrieve the text from the data source and refresh the user interface of the control. When defined for a server control, the DataBinding event handler is expected to resolve all data binding expressions in the server control and in any of its children.
The following example demonstrates how to create a template dynamically:
protected void Page_Load(object sender, EventArgs e)
{
    RadDateTimePicker1.TimeView.TimeTemplate = new CustomTimeTemplate();
}
sealed class CustomTimeTemplate : ITemplate
{
    LiteralControl literalControl;
    void ITemplate.InstantiateIn(Control owner)
    {
        literalControl = new LiteralControl();
        literalControl.DataBinding += new EventHandler(literalControl_DataBinding);
        owner.Controls.Add(literalControl);
    }
    void literalControl_DataBinding(object sender, EventArgs e)
    {
        LiteralControl literalControl = (LiteralControl)sender;
        DataListItem list = (DataListItem)literalControl.NamingContainer;
        DateTime time = (DateTime)((DataRowView)list.DataItem)["Time"];
        literalControl.Text = time.ToString("t");
    }
}