Getting Started with the Telerik WebForms DataForm
This tutorial will walk you through the creation of a sample application that contains RadDataForm and will show you how to:
-
Use RadDataForm in your project
-
Bind RadDataForm through NeedDataSource event
-
Bind DataForm to a declarative DataSource control
For the purpose of exemplifying this, you will need to create an empty Web.UI Application project and open it in Visual Studio.
RadDataForm is a control suitable for visualizing one record at a time. If you want to display and access multiple items on a single page, you can check the RadListView component.
Adding RadDataForm to the Project
-
Create a new ASP.NET project
-
Add references to the assemblies Telerik.Web.UI, Telerik.Web.UI.Skins and Telerik.Web.Design
-
Add the RadDataForm as demonstrated below:
<telerik:RadDataForm runat="server" id="RadDataForm1">
</telerik:RadDataForm>
Binding RadDataForm through NeedDataSource event
Firstly, for the purpose of this tutorial, we will create a new data table with a single row
public DataTable GetDataTable()
{
    DataTable table = new DataTable();
    table.Columns.Add("FirstName");
    table.Columns.Add("LastName");
    table.Columns.Add("Occupation");
    table.Columns.Add("Salary", typeof(Int32));
    table.Columns.Add("IsMarried", typeof(bool));
    table.Columns.Add("StartingDate", typeof(DateTime));
    table.Rows.Add("Sarah", "Blake", "Product Manager", 3500, true, "01/02/2014 00:00:00");
    return table;
}Once data table is defined, you may use it to bind it to the RadDataForm through the NeedDataSource event:
<telerik:RadDataForm runat="server" id="RadDataForm1" OnNeedDataSource="RadDataForm1_NeedDataSource">
</telerik:RadDataForm>After applying the DataSource you can add the required templates in the DataForm markup:
<telerik:RadDataForm runat="server" id="RadDataForm1" OnNeedDataSource="RadDataForm1_NeedDataSource" Skin="Glow">
    <LayoutTemplate>
        <div >
            <div id="itemPlaceholder" runat="server"></div>
        </div>
    </LayoutTemplate>
    <ItemTemplate>
        <fieldset class="rdfFieldset rdfBorders">
            <div class="rdfRow">
                <asp:Label runat="server" ID="Lbl1" Text="First Name:"></asp:Label>
                <asp:Label Text='<%# Eval("FirstName") %>' runat="server" ID="lbl2" />
            </div>
            <div class="rdfRow">
                <asp:Label runat="server" ID="lbl3" Text="Lat Name:"></asp:Label>
                <asp:Label Text='<%# Eval("LastName") %>' runat="server" ID="lbl4" />
            </div>
            <div class="rdfRow">
                <asp:Label runat="server" ID="lbl5" Text="Occupation:"></asp:Label>
                <asp:Label Text='<%# Eval("Occupation") %>' runat="server" ID="lbl6" />
            </div>
            <div class="rdfRow">
                <asp:Label runat="server" ID="lbl7" Text="Salary:"></asp:Label>
                <asp:Label Text='<%# Eval("Salary") %>' runat="server" ID="lbl8" />
            </div>
            <div class="rdfRow">
                <asp:Label runat="server" ID="lbl9" Text="IsMarried:"></asp:Label>
                <asp:Label Text='<%# Eval("IsMarried") %>' runat="server" ID="lbl10" />
            </div>
            <div class="rdfRow">
                <asp:Label runat="server" ID="lbl11" Text="Starting Date:"></asp:Label>
                <asp:Label Text='<%# Eval("StartingDate") %>' runat="server" ID="lbl12" />
            </div>
        </fieldset>
    </ItemTemplate>
</telerik:RadDataForm>
Binding RadDataForm to a DataSource control
In order to populate the DataForm control, follow the steps below:
- Add and configure a DataSource control to your application:
<asp:SqlDataSource ID="SqlDataSource1" runat="server" ConnectionString="<%$ ConnectionStrings:TelerikConnectionString35 %>"
SelectCommand="SELECT [EmployeeID], [LastName], [FirstName], [HireDate], [Country], [HomePhone] FROM [Employees_Northwind]"></asp:SqlDataSource>-
Set the DataSourceID of the DataForm control to point to the already configured data source control
-
In order to visualize the retrieved data you should set the DataForm templates (ItemTemplate, LayotTemplate)
-
As the DataForm will be bound to more than one item in this case, you can enable paging by adding a RadDataPager or custom buttons with corresponding paging functionality in the LayoutTemplate:
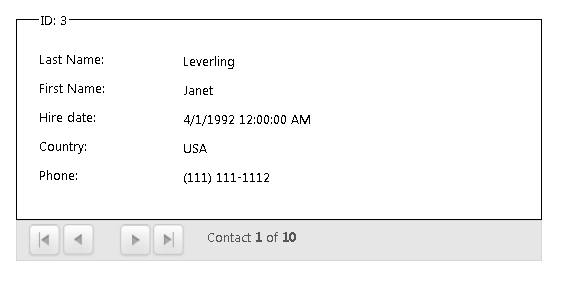
The provided steps will lead to a markup similar to this:
<telerik:RadDataForm runat="server" InsertItemPosition="FirstItem" id="RadDataForm1" DataSourceId="SqlDataSource1"
    DataKeyNames="EmployeeID" DataSourceCount="0" ResolvedRenderMode="Classic">

    <LayoutTemplate>
        <div class="RadDataForm RadDataForm_<%# Container.Skin %> rdfLeftAligned rdfNoFieldHint">
            <div id="Div1" runat="server">
            </div>
            <telerik:RadDataPager ID="RadDataPager1" runat="server" PagedControlID="RadDataForm1">
                <Fields>
                    <telerik:RadDataPagerButtonField FieldType="FirstPrev" />
                    <telerik:RadDataPagerButtonField FieldType="NextLast" />
                    <telerik:RadDataPagerTemplatePageField>
                        <PagerTemplate>
                            <div>
                                <label>
                                    Contact <strong>
                                        <%#Container.Owner.StartRowIndex+1%></strong> of <strong>
                                            <%# Container.Owner.TotalRowCount%></strong></label>
                            </div>
                        </PagerTemplate>
                    </telerik:RadDataPagerTemplatePageField>
                </Fields>
            </telerik:RadDataPager>
        </div>
    </LayoutTemplate>
    <ItemTemplate>
        <fieldset class="rdfFieldset rdfBorders">
            <legend class="rdfLegend">ID:
                <%#Eval("EmployeeID")%></legend>
            <div class="rdfRow">
                <asp:Label runat="server" ID="LastNameLabel" CssClass="rdfLabel rdfBlock" Text="Last Name:"></asp:Label>
                <asp:Label CssClass="rdfFieldValue" Text='<%# Eval("LastName") %>' runat="server"
                    ID="LastNameLabel1" />
            </div>
            <div class="rdfRow">
                <asp:Label runat="server" ID="FirstNameLabel" CssClass="rdfLabel rdfBlock" Text="First Name:"></asp:Label>
                <asp:Label CssClass="rdfFieldValue" Text='<%# Eval("FirstName") %>' runat="server"
                    ID="FirstNameLabel1" />
            </div>
            <div class="rdfRow">
                <asp:Label runat="server" ID="HireDateLabel" CssClass="rdfLabel rdfBlock" Text="Hire date:"></asp:Label>
                <asp:Label CssClass="rdfFieldValue" Text='<%# Eval("HireDate") %>' runat="server"
                    ID="HireDateLabel1" />
            </div>
            <div class="rdfRow">
                <asp:Label runat="server" ID="UnitPriceLabel2" CssClass="rdfLabel rdfBlock" Text="Country:"></asp:Label>
                <asp:Label CssClass="rdfFieldValue" Text='<%# Eval("Country") %>' runat="server"
                    ID="UnitPriceLabel1" />
            </div>
            <div class="rdfRow">
                <asp:Label runat="server" ID="HomePhoneLabel" CssClass="rdfLabel rdfBlock" Text="Phone:"></asp:Label>
                <asp:Label CssClass="rdfFieldValue" Text='<%# Eval("HomePhone") %>' runat="server"
                    ID="HomePhoneLabel1" />
            </div>
        </fieldset>
      </ItemTemplate>
</telerik:RadDataForm>

<asp:SqlDataSource ID="SqlDataSource1" runat="server" ConnectionString="<%$ ConnectionStrings:TelerikConnectionString35 %>"
    SelectCommand="SELECT [EmployeeID], [LastName], [FirstName], [HireDate], [Country], [HomePhone] FROM [Employees_Northwind]"></asp:SqlDataSource>
On running the application, you will see the following:
