What Is Single Project in .NET MAUI?

Summarize with AI:
The .NET MAUI single project makes resource management across platforms a breeze—upload in one place, and it takes care of the rest!
Howdy! 🙋♀️ I hope you are doing well! On this occasion, we will learn about a very important topic to start with .NET MAUI—the single project handle! I invite you to go for your favorite snack and take your time to read this article!
Before beginning, I would like to leave some super important points to keep in mind about MAUI:
Did you read the post “Time to Evolve: .NET Multi-Platform App UI (MAUI)”? If you haven’t, I recommend you take a look! It talks about .NET MAUI and how it all started!
.NET MAUI is a super tool which is the evolution of Xamarin—that’s why the Microsoft team is working hard to integrate the learning obtained from Xamarin into .NET MAUI, in this way working together with the community, to make a better product from both a user and developer experience! 🌟
Where can I find the .NET MAUI previews? Here is the link where you can see all the previews so far. I recommend that you keep up to date with them so you can find out everything that happens!
Let’s get started!
What Is Single Project?
The .NET Multi-platform App UI (.NET MAUI) single project takes care of collecting all the development experiences from the different target platforms, such as Android, iOS, macOS and Windows, and abstracting them into a single shared project.
With the goal of providing a simplified and consistent cross-platform development experience across all target platforms, this project is enabled through multi-targeting and the use of SDK-style projects in .NET 6.
To highlight some of the most important points of this type of project:
A simplified debug target selection to run your .NET MAUI applications.
Shared resource files within a single project. In the current Xamarin Forms projects, each resource must be added with the specifications required by each platform. In single project, you will only add it to one project! This saves a lot of time on image generation for example.
Access to API and platform-specific tools when needed. It’s important to know that, although we will have a single project with shared resources, if it’s necessary, we also have the option to access the platform directly.
A single cross-platform application entry point.
Let’s Talk About Resource Management in the Single Project
As we talked about above, in Xamarin projects we need to generate different types of resources to meet the expectations of each platform. The best example of this is the images. The good news is that in the .NET MAUI single project, you no longer have to add platform-specific resources—just add a single resource and it takes care of the rest!
How Do I Achieve This and What Type of Resources Are Included?
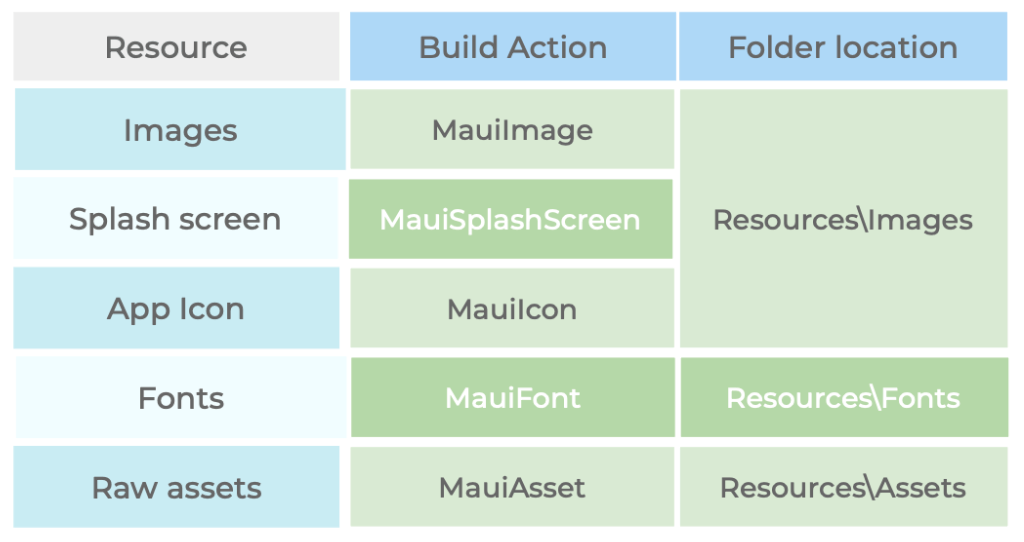
When I talk about resources, in addition to images, it mean fonts, app icons, splash screens and raw assets. These resources should be located in the “Resources” folder, and should have their build action set correctly.
Here are the build actions for each type of resource file followed by the specific resource location:

What Happens When I Add a Resource in the Resources Folder of the Specific Platform and Have It in the Single Project?
The resources contained in the specific platform are not generated. The Single Project will proceed to work with the others.
Let’s take the example of an image. If I add an image in the Platforms\Android\Resources\drawable-hdpi folder and I also have the image in the Resources folder of the single project, it will behave as follows:
The project will automatically generate all the images that are NOT hdpi, taking as a base image the one contained in the Resource folder of the single project.
The image corresponding to hdpi will be taken from the Android-specific resource location in this case.
Let’s Get To Know Each Type of Resource
As usual, to add a resource to your project, you can add it by dragging it to the Resources + Folder corresponding to the type of resources (Image, Fonts, Splash Screen, etc.) of your single project—and don’t forget to set the corresponding BuildAction.
Such resources are generated at build time. In the case of resources contained in the Resources/Images folder, they are resized to the corresponding resolutions for each platform and then the target device adds these resized images to its app bundle. In the case of Fonts, it creates a corresponding entry per font in your project file.
Each resource creates a corresponding entry in its project file:
 , Raw assets - " title="Entries required by platform">
Now Let’s Explore the Single Project Specific Structure
A .NET MAUI app project contains a folder and files per platform to which it can target. These folders contain specific resources according to what is required by each one, and that starts the application on each platform. Let’s explore this folder structure a bit:

Wrap-up
Finally, I hope you liked the article and that you understood the concept, structure and resource management of a single project! See you later!
Thanks for reading! 💚💕
References: https://docs.microsoft.com/en-ca/dotnet/maui/fundamentals/single-project
Use a component library in sync with .NET MAUI’s release cadence. Try Telerik UI for .NET MAUI for free.

Leomaris Reyes
Leomaris Reyes is a Software Engineer from the Dominican Republic, with more than 5 years of experience. A Xamarin Certified Mobile Developer, she is also the founder of Stemelle, an entity that works with software developers, training and mentoring with a main goal of including women in Tech. Leomaris really loves learning new things! 💚💕 You can follow her: Twitter, LinkedIn , AskXammy and Medium.
